If you want to build a nice wooden frame for your favorite pet, we recommend you to pay attention to the instructions and plans described in the article. Work with attention and invest in the best materials you can afford, otherwise the dog bed won’t be durable. Cedar, pine or redwood are excellent choices, as they have a nice finish and are highly resistant to moisture and sunlight.
There are several things that you have to pay attention to when building the dog bed frame, so make sure you pay attention to the following instructions and tips. First of all, we recommend you to adjust the dog bed plans to the size of your pet and to gather all the tools from the very beginning. Use the right tools for the job, as the final look of the dog bed will be influence by all these aspects.
Dog Bed Frame Plans
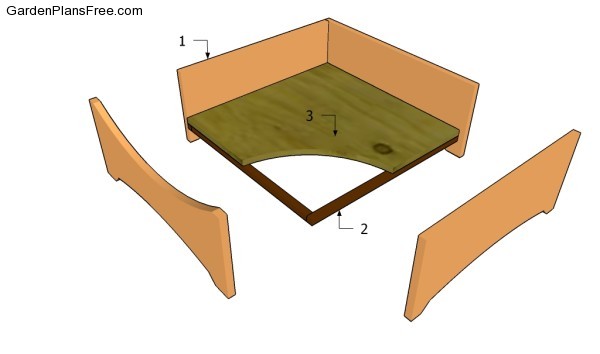
Building a dog bed frame
Materials
- A – 2 pieces of 1×10 lumber – 24″, 2 pieces – 22 1/2″ FRAME
- B – 2 pieces of 1×1 lumber – 22 1/2″, 2 pieces – 21″ CLEATS
- C – 1 piece of 3/4″ plywood – 22 1/2″x22 1/2″ FLOOR
- 1 piece of 1×10 lumber – 8 ft
- 1 piece of 1×1 lumber – 8 ft
- 1 piece of 3/4″ plywood – 2’x2′
- 50 pieces of 1 1/4″ screws
- glue, stain / paint
Tools
- Hammer, Tape measure, Carpentry square
- Miter saw, Drill machinery, Screwdriver, Sander, Router
- Safety Gloves, Safety Glasses, Respiratory Mask
Time
- One day
Building a dog bed frame
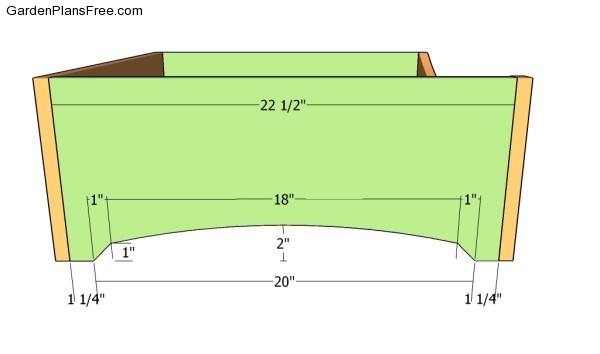
Building the side walls
The first step of the project is to build the side components of the bed frame. In order to get the job done in a professional manner, we recommend you to cut the 1×10 at the right size, by using the information described in the image. Use a good jigsaw to make the curved cuts and smooth the edges with fine-grit sandpaper.
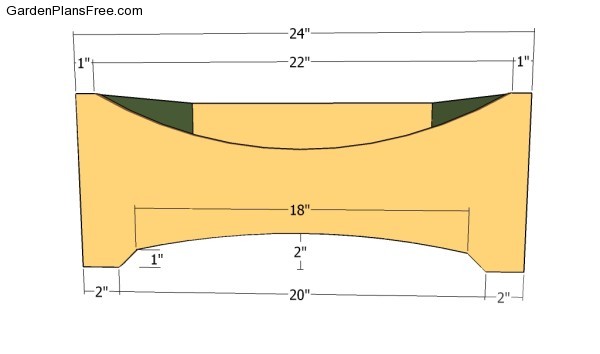
Building the front wall
The next step is to build the front face of the dog bed. In order to ease the access of your bed to the bed frame, we recommend you to make a curved notch through the top of the slat.
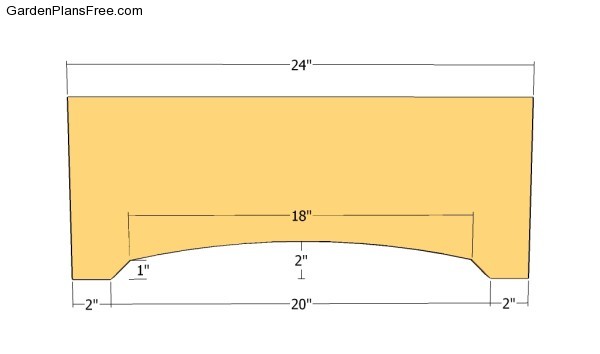
Building the back wall
Continue the construction by making the back wall of the dog bed frame. Use the information from the plans to cut the component at the right size and shape. Afterwards, you need to assemble the frame of the bed with galvanized screws. Drill pilot holes through the side components, align everything with attention (make sure the edges are flush) and insert the screws with attention. Add waterproof glue to the joints, if you want to enhance the rigidity of the structure.
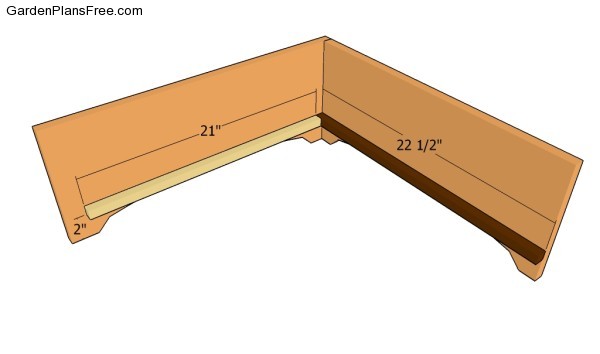
Attaching the cleats
Attaching the 1×1 cleats to the interior sides of the dog bed frame is easy, but you need to make sure they are perfectly horizontal. Drill pilot holes through the cleats and secure them to the side walls with finishing nails and waterproof glue.
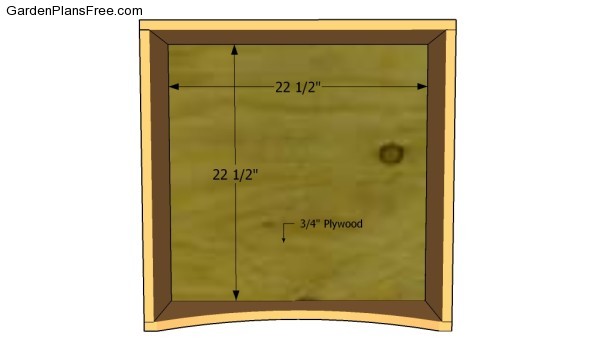
Attaching the floor
Cut a piece of 3/4″ plywood and fit it inside the frame, as show in the image. Make sure the plywood sheet slides easily into place, in case you need to move the bed frame to another location or to replace it. Don’t lock the floor to the cleats with finishing nails, as this will make moving it from position almost impossible.
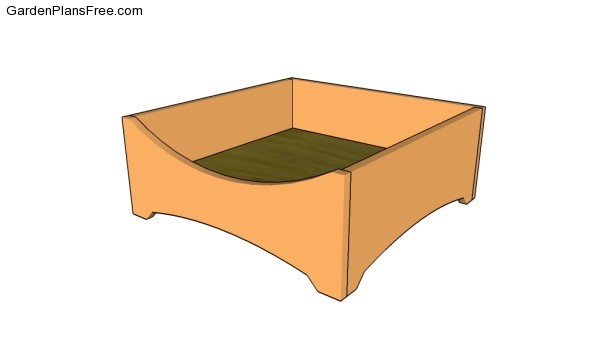
Dog bed frame plans
Last but not least, you should take care of the finishing touches. Check if the components are secured into place properly and if the frame is rigid. Make sure there are no protruding screws or sharp edges that could injure you. Check out my free plans for a dog bowl.
PRO TIP: Fill the holes with a good wood filler and smooth the surface with 120-grit sandpaper. Apply several coats of paint or stain over the components, in order to protect them from decay.
This diy project was about dog bed plans free. If you have enjoyed the free project, we recommend you to share it with your friends, by using the social media widgets. LIKE us on Facebook if you want to be the first that gets our latest projects.
