If you want to learn more about how to build a dog bowl stand, we recommend you to pay attention to the instructions described in the article. Plan everything from the very beginning and select the right dog bowl stand plans for your needs. This stand is made for two bowls. Make sure you invest in high-quality materials (cedar, pine or redwood), as the additional investment will pay off on the long run.
There are many plans that you could choose from, so make sure you take a look over several alternatives before starting the actual assembly of the dog bowl stand. Drill pocket holes through the components before inserting the screws, in order to prevent the wood from splitting. Add waterproof glue to the joints, as to create a rigid structure. Smooth the edges with sandpaper to prevent your dog from getting injured.
Dog Bowl Stand Plans

Building a dog bowl stand
Materials
- 1 – 4 pieces of 2×2 lumber – 6″ LEGS
- 2 – 2 pieces of 1×4 lumber – 7″, 2 pieces – 14″ SUPPORTS
- 3 – 1 pieces of 1×12 lumber – 18 1/2″ TOP
- 1 piece of 1×12 lumber – 2 ft
- 1 piece of 1×4 lumber – 4 ft
- 1 piece of 2×2 lumber – 2 ft
- 1 1/4″ screws
Tools
- Hammer, Tape measure, Carpentry square
- Miter saw, Drill machinery, Screwdriver, Sander, Router
- Safety Gloves, Safety Glasses, Respiratory Mask
Time
- One day
Building a dog bowl stand

Building the sides of the stand
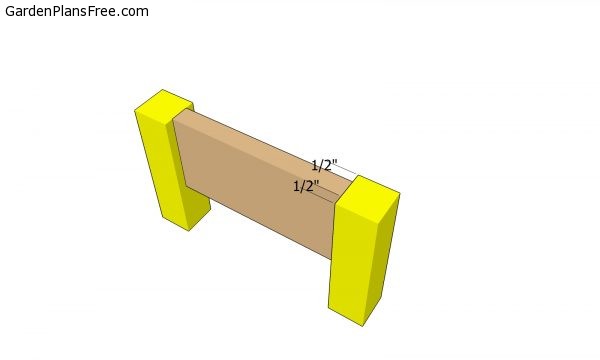
Frame
The first step of the woodworking project is to build the frame of the stand. In order to get the job done in a professional manner, we recommend you to build the legs out of 2×2 lumber and the rest of the components out of 1×4 slats. Cut the components at the right size, drill pilot holes at both ends of the slats and secure them to the legs with 1 1/4″ galvanized screws. Add glue to the joints in order to make the rigid.

Attaching the side components
Continue the project by attaching the rest of the components, as shown in the plans. Drill pocket holes at both ends of the slats and align them properly, before inserting the 1 1/4″ screws. Check if the corners are right-angled before inserting the screws.

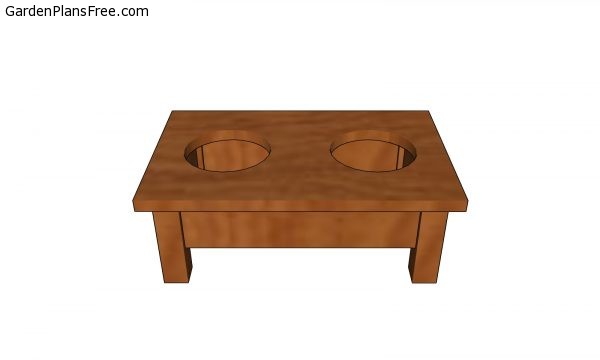
Build the support stand
Building the top of the bowl stand is a straight-forward process, if you use the right techniques and tools. Mark the cut lines on the piece of lumber and cut out the pieces by using a nice jigsaw. Smooth the edges with a piece of sandpaper and remove the residues with a vacuum cleaner.

Attaching the support
Attach the frame of the stand to the top and secure it with galvanized screws. Drill pocket holes through the supports and insert the screws into the wooden top. Make sure you center the frame to the top before inserting the 1 1/4″ galvanized screws.

Dog bowl stand plans
Last but not least, you should take care of the finishing touches. Check if the components are secured into place properly and if the structure is rigid. Make sure there are no protruding screws or sharp edges that could injure you. See plans for a large dog house with porch.
Dog bowl stand – free DIY Plans
PRO TIP: Fill the holes with a good wood filler and smooth the surface with 120-grit sandpaper. Apply several coats of paint or stain over the components, in order to protect them from decay.

This diy project was about dog bowl stand plans free. If you have enjoyed the free project, we recommend you to share it with your friends, by using the social media widgets. LIKE us on Facebook if you want to be the first that gets our latest projects.
3 comments
Need ideas to spend my spare time during these hard times. Thanks
You’re welcome. Let me know how it comes out.
Love this! I’m making my second one.