In this article, we will explore the different methods of seeding, sodding, and establishing grass to help you create a lush, healthy lawn. Planting your lawn is a crucial step in achieving long-term success, and choosing the right method can make all the difference. In the South, there are two primary ways to establish a lawn: seeding or sodding, along with a couple of in-between techniques like sprigging or plugging. Each method comes with its own advantages and challenges, and the best choice for you will depend on several factors, including your grass type, budget, and how quickly you want to see results.
Seeding is the most cost-effective option, but it requires patience and consistent care, as the grass will take time to germinate and establish strong roots. On the other hand, sodding provides an instant lawn, giving your yard immediate coverage and reducing the risk of erosion, but it comes at a higher cost. If you are looking for a middle-ground approach, sprigging or plugging may be a great alternative, particularly for warm-season grasses like hybrid bermudagrass or zoysia. These methods allow you to save on costs while still gradually filling in your lawn over time.
In this chapter, we will walk you through when and how to seed or sod, ensuring that you use the correct techniques for optimal results. We will also cover the essential steps for caring for new grass, including watering, fertilizing, and protecting the young turf from weeds and foot traffic. Whether you’re starting from scratch or renovating an existing lawn, these tips will help you establish a strong, healthy foundation for a beautiful outdoor space.
Choosing Between Seed and Sod
Many warm-season grasses can be started from seed or vegetative material, but not all. For instance, common bermudagrass and certain zoysia varieties produce viable seed, whereas St. Augustinegrass is almost always established vegetatively (via sod or plugs) because seed is not commercially available. Centipedegrass and bahiagrass can be seeded or sodded. Hybrid bermudagrasses (like Tifway) and many elite zoysias come as sod, sprigs, or plugs only.
So first, know your grass: if you’re planting St. Augustine or a hybrid grass, you’ll be using sod or plugging by necessity. If seed is an option, then consider these factors:
- Cost: Seeding is much cheaper upfront. Quality grass seed for 1,000 sq.ft. might cost $10–$20, whereas sod for that area could cost several hundred dollars. If budget is a concern and your grass type is available as seed (e.g. common bermuda, centipede, some zoysia), seeding may be attractive.
- Speed and Initial Results: Sodding gives you an instant lawn. The area will be green and fully covered within a day of installation. This is great for erosion control (hillsides, etc.) and instant curb appeal. Seeding, on the other hand, requires patience – the lawn will look sparse at first and may take 2–3 months to fill in, even under ideal conditions. If you need quick cover, sod is the way to go.
- Labor and Maintenance: Sodding is labor-intensive for a day or two (cutting, hauling, and laying sod is a workout), but then it’s largely a matter of watering until it roots. Seeding is relatively easy to do physically, but it demands diligent daily watering and care for several weeks to keep the seedbed moist. You’ll also need to guard against erosion (heavy rain can wash seed away) and weed invasion during establishment. So, sod is “easy but heavy,” while seed is “light but fussy.”
- Grass Quality and Uniformity: Sod is usually grown from top-quality cultivars under expert care, so it tends to be relatively weed-free and uniform. When you lay sod, you essentially transplant a mature turf. Seed can also produce a fine lawn, but you must buy high-purity, high-germination seed and be patient. Make sure any seed mix is appropriate for the South and avoid mixes containing cool-season grasses like rye unless used for temporary cover.
In summary, choose sod if you need an instant lawn or are planting a grass that has no seed available (like St. Augustine). Choose seed if cost is a major factor, your grass can be seeded, and you’re prepared to water and wait for it to fill in. You can also choose a middle route: sprigging or plugging, which involves planting small pieces of sod or stolons throughout the area. This is commonly done for grasses like hybrid bermuda or zoysia to save money on sod – you might plant plugs on 6–12 inch centers and let them grow together. The downside is it can take a number of months for the plugs to fill the lawn, and weeds will need control in the meantime.
Now, let’s go through best practices for each method in the Southern climate.
Seeding a Southern Lawn
When to Seed
Timing is critical for success. Warm-season grass seeds should be sown when soil temperatures are warm enough for germination and there is a long growing season ahead. In general, the ideal window for seeding warm-season grasses is late spring into early summer. Planting too early, when the soil is still cool, can lead to poor germination and disease, while planting too late in summer may expose young grass to excessive heat and drought stress. Aim for at least 90-100 days of good growing weather after germination so the grass can establish before fall.
Seeding Rate and Seed Quality
Purchase high-quality seed of an adapted variety. The seed bag will specify the seeding rate – follow it carefully. As a reference:
- Common bermudagrass is often sown around 1 lb per 1,000 sq.ft.
- Zoysiagrass needs 2–3 lbs per 1,000 sq.ft.
- Centipedegrass requires only 0.25–0.5 lb per 1,000 sq.ft.
More seed is not necessarily better; overcrowding can lead to weak seedlings. Also, inspect the seed label for purity and weed content. Look for at least 90% purity and 85% germination rates for best results.
Site Preparation for Seeding
Before seeding your lawn, it’s essential to do a final grading and raking to create a smooth, level seedbed. This step helps ensure good seed-to-soil contact, proper drainage, and even grass coverage. Use a landscape rake or similar tool to break up any remaining clumps, remove rocks or debris, and smooth out high or low spots. The goal is to create a surface that’s level and slightly firm—not compacted, but not too fluffy either. A lightly packed surface helps retain moisture and gives seeds a better chance to anchor and sprout.
Avoid deep tilling right before seeding. While it might seem like it helps aerate the soil, it can actually create a loose, unstable layer that settles unevenly over time. This may lead to an uneven lawn and poor root establishment. Instead, keep the top few inches loose and worked just enough for seeds to lodge and grow. If needed, lightly roll the soil with a lawn roller (half-filled with water) after raking to firm up the surface before broadcasting seed. Then, after seeding, you can roll again to press the seed into the soil for better contact. This careful prep work pays off by giving your new lawn the best foundation to thrive.
Seeding Technique
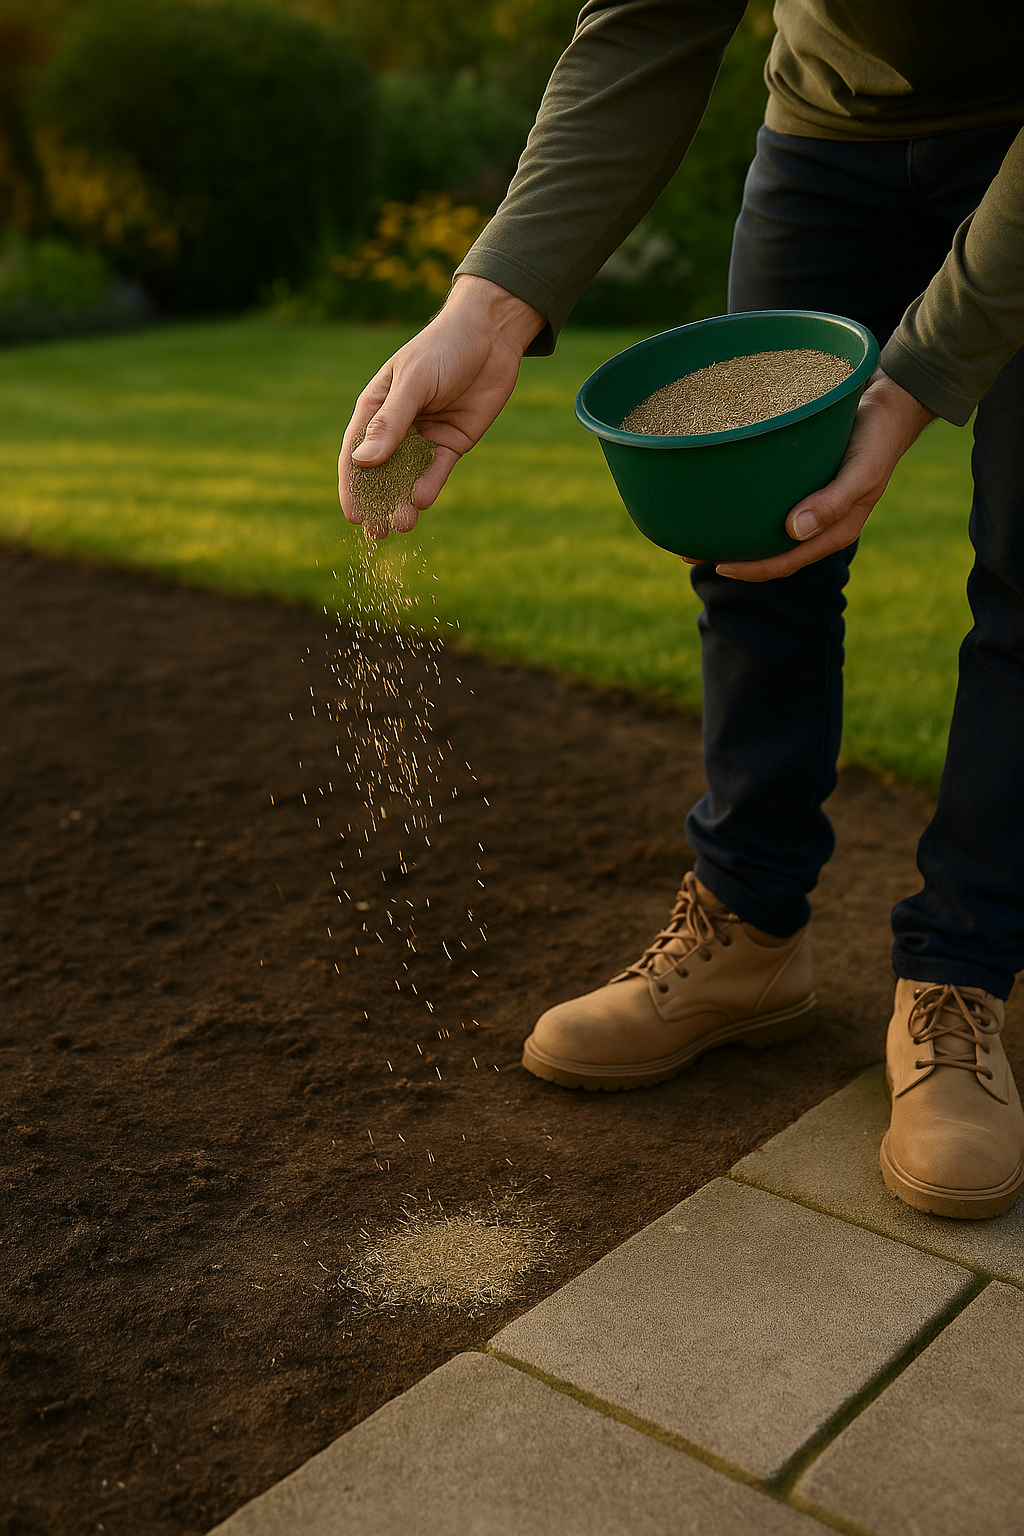
For best results when seeding your lawn, use a lawn spreader to ensure uniform coverage. Uneven seeding can lead to patchy growth and wasted seed, so taking the time to do this right pays off. A great trick is to divide your seed into two equal portions. Spread the first half in one direction—such as north to south—then take the second half and spread it in a perpendicular direction, like east to west. This crisscross method helps you avoid missed spots and overlapping, creating a more consistent and dense lawn from the start.
After the seed is down, lightly rake the surface to gently mix the seed into the soil. The goal here is to cover the seeds with a thin layer of soil, ideally no deeper than 1/8 to 1/4 inch. Seeds buried too deeply may struggle to germinate, while those left exposed are at risk of drying out or being eaten by birds.
For extra seed-to-soil contact, you can follow up with a lawn roller (again, half-filled with water) or simply walk over the area with flat shoes to press the seed in. Once done, begin your watering routine to keep the surface consistently moist during germination. With this methodical approach, you’ll be well on your way to growing a lush, healthy lawn.
Mulching and Protecting the Seed
After seeding and lightly raking the area, it’s smart to protect your investment with a light layer of mulch. This step helps retain moisture, reduce soil erosion, regulate temperature, and protect the seeds from birds and wind. Use clean straw (not hay, which contains weed seeds) or a specialized seeding mulch like pelletized paper or coconut fiber designed specifically for lawns. Spread it thinly—just enough to cover the surface without smothering the seed. You should still be able to see about 50% of the soil through the mulch. That visibility ensures sunlight reaches the seeds and oxygen circulates properly, both of which are critical for germination.
If you’re using straw, aim for about one bale per 1,000 square feet. Shake it out loosely by hand or with a straw blower if available. For specialized mulches, follow the product instructions closely. Once mulched, begin your watering regimen right away. The mulch will hold in moisture, giving your seeds the steady hydration they need to sprout successfully. As the grass begins to grow, the mulch will naturally break down or can be gently raked away once the lawn is well established.
Watering New Seed
Frequent, light watering is crucial. The seedbed should never dry out during the germination phase. Water at least 2–3 times per day initially, keeping the surface constantly moist. After germination, gradually reduce watering frequency while increasing depth to encourage deep root growth.
Caring for Seedlings
Once you’ve seeded and mulched your lawn, it’s time to step back—literally. Keep all foot traffic off the area for at least 6 to 8 weeks. This gives the grass a chance to sprout and establish strong roots without being compacted or disturbed. Even light walking can damage delicate seedlings or create ruts in soft, moist soil.
When the grass reaches about 1.5 times its intended mowing height—typically around 3 to 4 inches for most common varieties—it’s time for the first mow. Use a sharp mower blade to make clean cuts, which reduce stress on the young grass and help prevent disease. Never remove more than one-third of the grass blade at once. This gentle approach supports healthy root development and keeps your lawn looking even.
Hold off on fertilizing or using herbicides until your lawn is well-established. A good rule of thumb is to wait until after you’ve mowed it at least three times. Fertilizing too early can burn the tender roots, and herbicides may damage or kill young grass. Once your lawn is more mature, you can begin feeding it with a balanced fertilizer and addressing any weed issues with spot treatments. With some patience and care in these early weeks, you’ll set the stage for a thick, vibrant lawn that lasts.
Sodding a Southern Lawn
When to Sod
Sod offers an instant lawn, but timing is key to long-term success. While you can technically lay sod any time the ground isn’t frozen, the most favorable windows are mid-to-late spring and early fall. These seasons offer moderate temperatures and more consistent rainfall, which help the sod establish roots without excessive stress.
Try to avoid installing sod during the peak of summer unless absolutely necessary. Hot, dry weather increases water demands dramatically and makes the sod more vulnerable to transplant shock. In extreme heat, sod can dry out quickly or fail to root properly, leading to brown patches and wasted effort.
If summer installation is your only option, be prepared for an intense watering schedule—up to several times a day at first—and consider installing early in the morning or late in the day to reduce stress from sun exposure. No matter when you lay sod, proper soil prep, watering, and aftercare are essential for a lush, healthy lawn.
Laying the Sod
Before laying your first roll of sod, start by lightly moistening the soil. You don’t want it soggy—just damp enough to help the sod root into the soil below. This pre-watering step gives the roots better contact with the soil and helps lock in early moisture. Lay the first row of sod along a straight edge, like a driveway, sidewalk, or patio. This gives you a solid reference line to keep everything aligned. From there, work row by row, placing the pieces snugly against each other without overlapping.
Be sure to stagger the seams like a brick pattern—this prevents long, visible lines that can be prone to drying out or shifting. After placing each piece, press it down firmly with your hands or walk over it carefully to remove any air pockets beneath. For larger areas, a sod roller (filled about one-third with water) helps ensure full contact between the sod and soil, boosting root establishment. Avoid stretching or pulling the sod pieces to make them fit—cut them cleanly with a sharp knife or edging tool when needed. Proper installation from the start makes the difference between a patchy lawn and one that thrives.
Watering and Rooting
Water immediately after installation, ensuring both the sod and the underlying soil are soaked. For the first two weeks, water daily to keep the sod moist. After two to three weeks, check for root growth by lifting a corner of a sod piece – if it resists, the sod has started to establish.
Post-Sod Care
Once your sod is laid, treat it gently—avoid any heavy foot traffic until it’s fully rooted, which typically takes about 2 to 3 weeks under optimal conditions. Walking, mowing, or placing heavy objects on it too early can disrupt the rooting process and lead to uneven or damaged areas. Plan to do the first mow around three weeks after installation, but only if the grass has grown tall enough to need it. Tug gently on a few corners of sod pieces; if there’s resistance, that’s a good sign roots have started to anchor.
When mowing for the first time, raise the mower blades high—about 3 to 4 inches, depending on your grass type. Never remove more than one-third of the blade length at a time. A high cut reduces stress on the new grass, encourages deeper root growth, and protects it from drying out or burning, especially in warm weather.
After the first mow, continue with regular watering and allow the grass to thicken. Wait to fertilize or use herbicides until at least four to six weeks after installation, once the sod is well-established. With patience and proper care, your new lawn will settle in and thrive.

Post-Planting Care Summary
Whether you seeded or laid sod, the first 2 to 3 months are absolutely critical for establishing a healthy, resilient lawn. This is when your grass is most vulnerable and needs extra care to ensure deep root development and even growth.
Watering: Consistent moisture is key. For seed, keep the soil evenly moist—never soggy—until germination, which can take 7 to 21 days depending on the grass type. After sprouting, gradually reduce watering frequency while increasing the depth of watering to encourage deeper roots. For sod, water immediately after installation and then daily for the first couple of weeks to help it root into the native soil. Avoid letting the edges curl or dry out.
Foot Traffic: Limit walking, playing, or mowing on new lawns during this period. Young roots are delicate, and pressure can lead to soil compaction and stunted growth. If pets or kids frequent the yard, try to block off the area temporarily or guide them elsewhere until the lawn is stronger.
Weed Control: Don’t apply herbicides (pre-emergent or post-emergent) until your grass has been mowed at least three times—this typically means the lawn is established. Using weed killers too early can damage or kill young grass shoots. Instead, focus on good watering and mowing practices, which will help your grass outcompete most weeds naturally.
Mowing: Begin mowing once the grass reaches about one-third taller than your ideal height—typically when it’s around 3 to 4 inches tall. Always use sharp mower blades and never cut off more than one-third of the grass blade in a single session. This protects the roots, reduces stress, and helps prevent diseases.
Fertilizing: Hold off on fertilizing seeded lawns until they’ve been mowed a few times. For sod, you can apply a light starter fertilizer about 4–6 weeks after installation, assuming you didn’t already apply it during soil prep.
With steady care and patience during this establishment window, your lawn will reward you with a lush, dense carpet of green that can thrive for years to come.
By following these guidelines, your new lawn will establish quickly and stay healthy. Up next, we’ll cover long-term maintenance strategies to keep your Southern lawn thriving year-round.
1. Understanding Southern Lawns
2. Preparing the Soil for a Healthy Lawn
3. Seeding, Sodding, and Establishing Grass
4. Irrigation and Drought Management
5. Lawn Maintenance Strategies
6. Reviving and Salvaging a Lawn