This garden project is about free wood shed plans. The article shows how to build a small firewood shed including easy to follow diagrams and a list with the materials required. If you are looking for ideas, we strongly recommend you to take a look over the rest of the articles featured on GardenPlansFree.com Always check out the local building codes before starting the actual construction of the project.
If you want to store firewood in a professional manner and to keep them protected from bad weather, you should consider building a basic wood shed. After choosing the best design for your needs, we recommend you to buy quality lumber, such as pressure-treated, as the components will be exposed to harsh weather conditions. Cut the components at the right size with a circular saw and lock them together with screws.
Building a wood shed
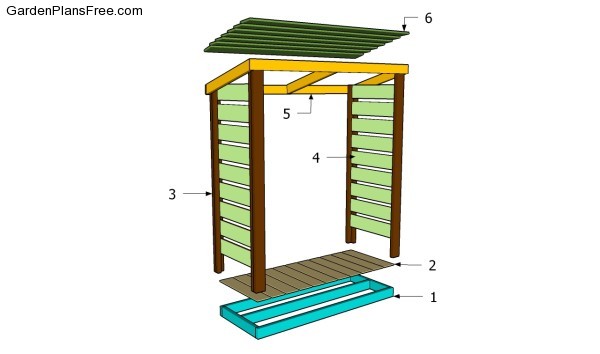
Building a wood shed
Materials
- 1 – 2 pieces of 2×4 lumber – 71″, 3 pieces – 27 1/2″ FRAME
- 2 – 11 pices of 1×6 lumber – 27 1/2″ FLOOR
- 3 – 2 pieces of 2×4 lumber – 81″, 2 pieces – 73 1/2″, 2 pieces of 2×2 lumber – 81″, 2 pieces – 73 1/2″ LEGS
- 4 – 9 pieces of 1×6 lumber – 27″ SLATS
- 5 – 3 pieces of 2×4 lumber – 31 1/2″, 2 pieces of 1×4 lumber – 77″ RAFTERS
- 6 – 7 pieces of 1×6 lumber – 79″ ROOFING
Tools
- Hammer, Tape measure, Carpentry square
- Miter saw, Drill machinery, Screwdriver, Sander, Router
- Safety Gloves, Safety Glasses, Respiratory Mask
Time
- One day
Wood Shed Plans Free
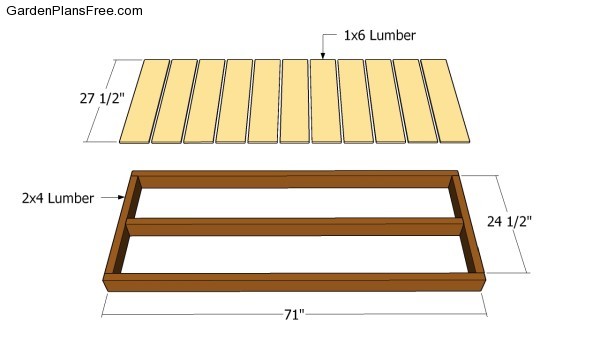
Building the floor of the shed
The first step of the woodworking project is to build the frame of the floor. As you can see in the image, you need to assemble the frame by using 2×4 lumber. Check if the corners are square before drilling pilot holes and inserting 3 1/2″ galvanized screws.
After building the frame you have to continue the woodworking project by attaching the 1×6 slats into place. Drill pilot holes at both ends of the slats and insert 2 1/2″ screws into the frame. Place a wood block between the slats, in order to get even gaps and a consistent result.
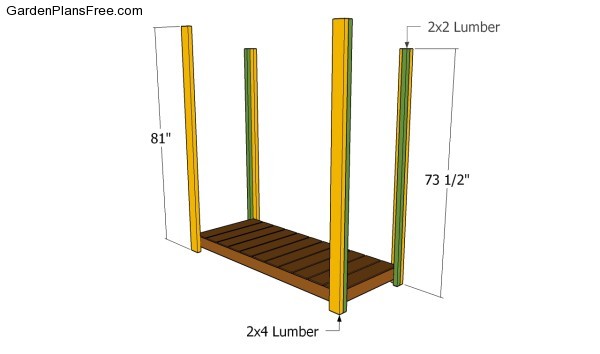
Attaching the legs
Afterwards, attach the wooden legs to the frame, as shown in the free plans. In order to get the job done in a professional manner, we recommend you to build the corner legs from one 2×4 slat and one 2×2 post. Align the components at both ends and lock them together with wood glue and galvanized screws. Leave about 2″ between the ground and the floor of the wood shed.
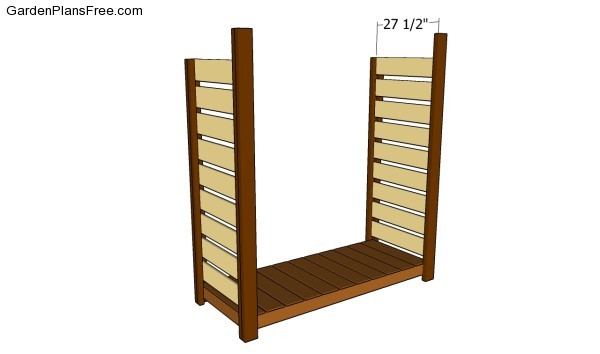
Building the side walls
Continue the woodworking project by attaching the 1×6 slats to both sides of the shed, as shown in the image. Leave about 1″ between the slats before attaching them to the posts with 1 1/4″ nails or screws. The side walls will protect the firewood from bad weather.
Installing the rafters
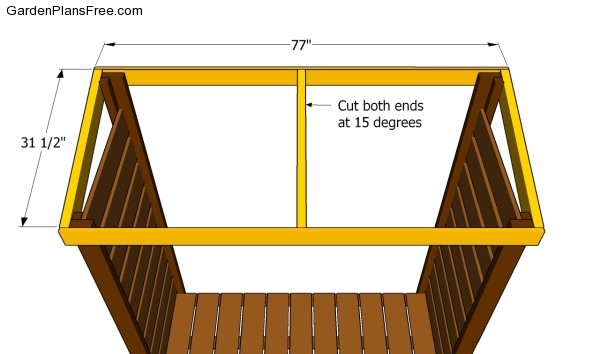
Taking into account we want to show you how to build a basic shelter for firewood, the roof structure is equally simple. Therefore, build the rafters from 2×4 lumber, making sure you cut their both ends at 45 degrees. Attach 1×4 slats to both ends of the rafters and lock the structure to the legs with screws. Place a spirit level on top of the front and back beams to check if they are horizontal.
Attaching the roofing slats
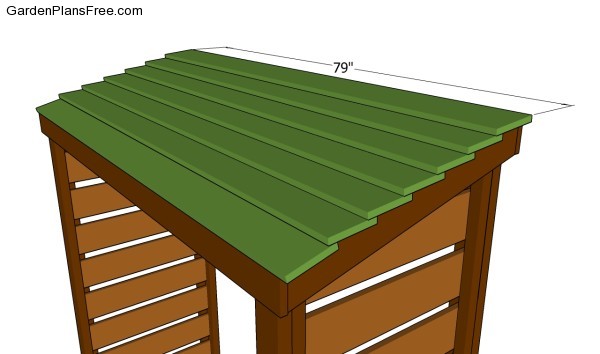
One of the last steps of the garden project is to cover the roof structure with 1×6 slats. As compared to using plywood and asphalt shingles, the 1×6 cedar slats will protect the whole structure from water damage while enhancing the look of the construction. Start the installation of the weather-resistant slats from the bottom and use galvanized nails to get the job done.
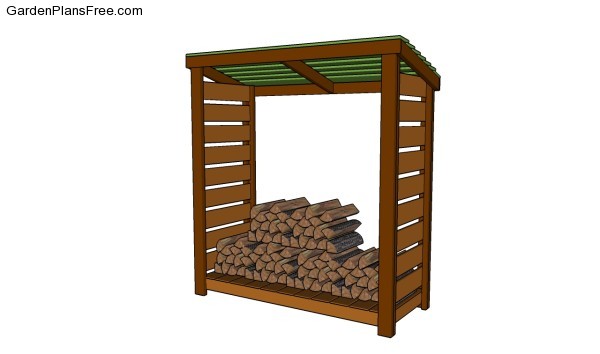
Wood shed plans free
Lastly, we recommend you to get the final touches done. It is essential to make sure all the components are tightly locked together, before filling the holes with putty. Smooth the wooden surface with 120-grit sandpaper and clean the debris with a cloth.
PRO TIP: Applying a few coats of paint will not only enhance the look of the shed, but it will also protect the wooden components from water damage.
This diy project was about wood shed plans free. If you have enjoyed the free project, we recommend you to share it with your friends, by using the social media widgets.
