If you want to learn more about how to build a wooden kayak rack, you have to take a close look over the free plans in the article. I have designed this kayak rack so you can store three kayaks and save a lot of space by attaching the structure to the wall. You can easily adjust the size of the rack, so you can fit the kayaks safely. Moreover, you can even add more supports to the rack, so you store even more kayaks. This is a sturdy but yet simple rack, so you can be safe with the budget.
If you want to get the job done in a professional manner, we recommend you to plan everything with attention, as to prevent costly mistakes and to build a professional garden bench. Invest in high quality materials, such as cedar, pine or redwood, as the bench will be exposed to all kinds of weather. Apply a few coats of paint over the components, to enhance their appearance and to protect them from bad weather.
Wooden Kayak Rack – Free DIY Plans
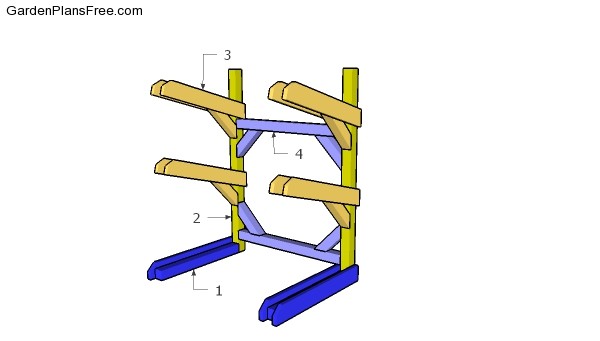
Building a kayak rack
Materials
- 1 – 2 pieces of 4×4 lumber – 38″ long, 4 pieces of 2×6 lumber – 43 1/2″ long BASE
- 2 – 2 pieces of 4×4 lumber – 72″ long POST
- 3 – 8 pieces of 2×6 lumber – 40″ long, 4 pieces of 4×4 lumber – 27″ long SUPPORTS
- 4 – 2 pieces of 4×4 lumber – 48 1/2″ long, 4 pieces – 16″ long BACK SUPPORTS
- 6 pieces of 4×4 lumber – 8′
- 6 pieces of 2×6 lumber – 8′
- 100 pieces of 2 1/2″ screws
- 12 pieces of 7″ carriage bolts
- wood glue, stain/paint
Tools
- Hammer, Tape measure, Carpentry square
- Miter saw, Drill machinery, Screwdriver, Sander, Router
- Safety Gloves, Safety Glasses, Respiratory Mask
Time
- One day
Made from this plan
STEP 1:
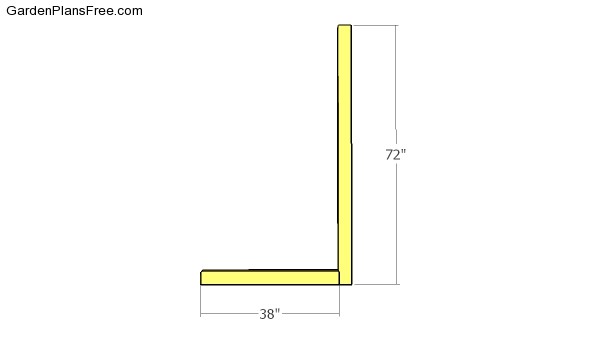
Building the post
The first step is to build the frames for the kayak rack. Cut the components from 4×4 lumber. Drill pocket holes at one end of the horizontal support. Align the edges and check if the corners are square. Insert 2 1/2″ screws to assemble the supports.
STEP 2:
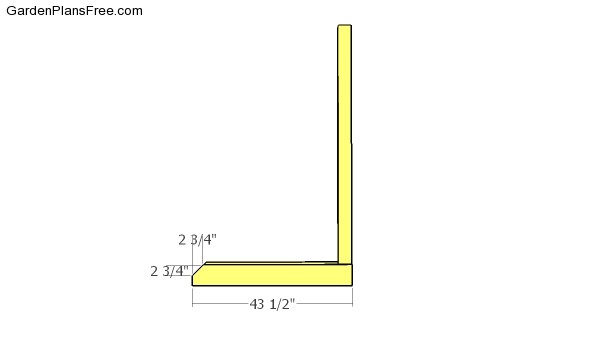
Base beams
Use 2×6 lumber for the base. Attach them to the frames. Drill pilot holes and insert 7″ carriage bolts (2 bolts per frame.
STEP 3:
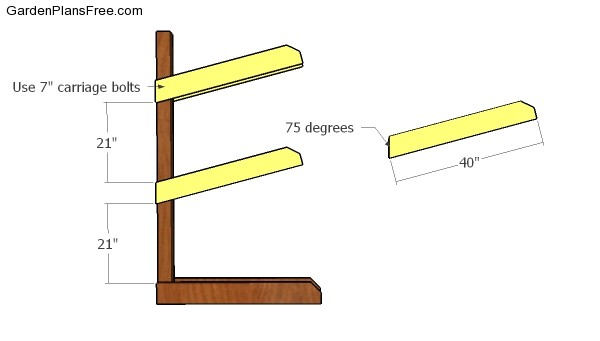
Fitting the supports
Attach the supports to the vertical posts. Clamp them into place, drill pilot holes and insert 7″ bolts to lock them into place tightly.
STEP 4:
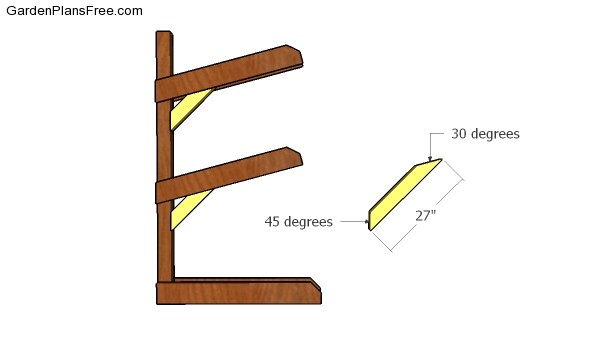
Fitting the diagonal braces
Use 4×4 lumber for the braces. Use a miter saw to make the angle cuts. Fit the braces to the frame of the kayak rack. Drill pilot holes and secure it into place with 2 1/2″ screws.
STEP 5:
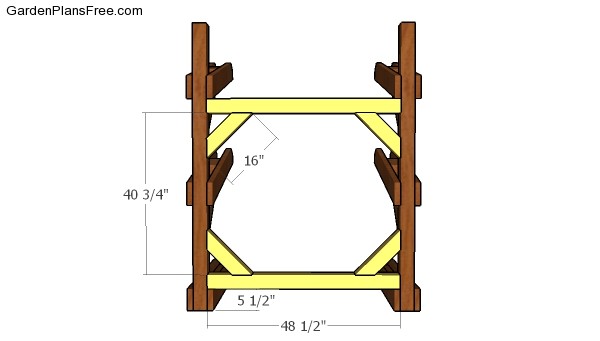
Use 4×4 lumber for the horizontal supports. Drill pocket holes at both ends of the supports and secure them to the frame with 2 1/2″ screws. Make 45 degree cuts to both ends of the diagonal braces. Drill pilot holes and insert 2 1/2″ screws to lock it into place tightly.
STEP 6:
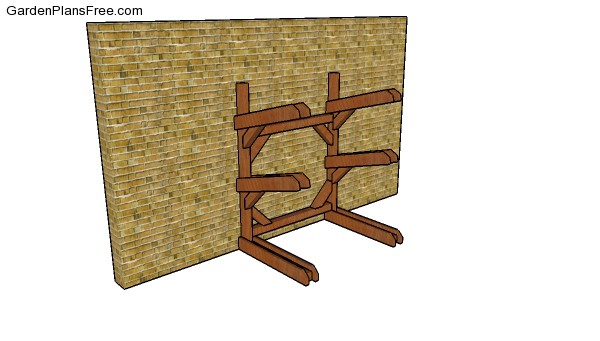
Kayak rack plans
I recommend you to check if the components are locked into place properly and structure is rigid enough for your garden. Make sure there are no protruding screws or sharp edges. Fill the holes with wood putty and then smooth the surface with sandpaper. Apply a few coats of paint or stain to protect the components from decay. Use 7″ bolts to lock the vertical posts to the wall.
STEP 7:
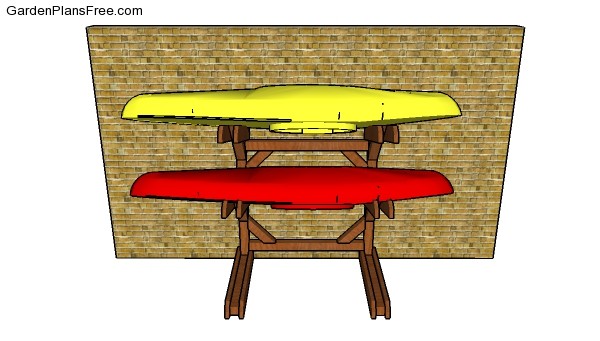
How to build a kayak rack
PRO TIP: Apply several coats of paint or stain over the components, in order to protect them from decay. Check out the rest of the project to learn more about building garden projects.
This diy project was about wooden kayak rack plans. If you have enjoyed the free project, we recommend you to share it with your friends, by using the social media widgets.


14 comments
Please email me the free kayak rack DIY plans
thanks!
You can save the plans by yourself. Please read the FAQs: http://gardenplansfree.com/faqs/
do you think this plan would work for 2 canoes?
Yes, i think it can, but it depends on how much heavier are compared to a kayak.
Are you kidding? That rack could hold two small CARS if it were secured to the wall well enough! It is one beefy sucker!
Thanks for posting the simple and very clear plans.
You’re welcome 🙂
Thanks for sharing!
Robert
My pleasure, Robert. Looking forward to seeing your project.
I’m so excited to start this project. I have almost everything, but discovered that your supply list is short one 4×4 board. The cut list accounts for 489 inches of lumber, but the supply list only provides for 480 inches.
Thanks for the feedback. I added another piece of 4×4 to the materials list.
Finally finished my kayak rack over the weekend. Would love to be able to upload a couple pictures.
Hi. You can upload them here: https://gardenplansfree.com/contact/ Thanks
I am not comfortable with all of the links. “START” “OPEN” “Download Now”
I just want to buy them without having to downlaod a program. Please advise
You have a GET PDF Plans button at the end of the article.