After building the base of the shed, you should continue the project and fit the roofing components. As you will see in this article, any person with basic woodworking skills can get the job done in a few days, as this project doesn’t require complex steps. Use pressure treated lumber and align all the components at both ends, before driving the galvanized screws. In this manner, you will get a rigid structure and a sturdy garden shed.
You should study the building codes before starting the construction of the roof. There are certain cases in which you need to choose a certain slope for your roof, so make sure you are aware of the legal requirements, before starting the actual construction. In addition, it would also be a good idea to consult a qualified engineer, if you plan to build a large garden shed, as it need a sturdy structure.
TABLE OF CONTENTS:
PART 1: Garden shed plans
PART 2: Garden shed roof plans
Building a Shed Roof

Building a garden shed
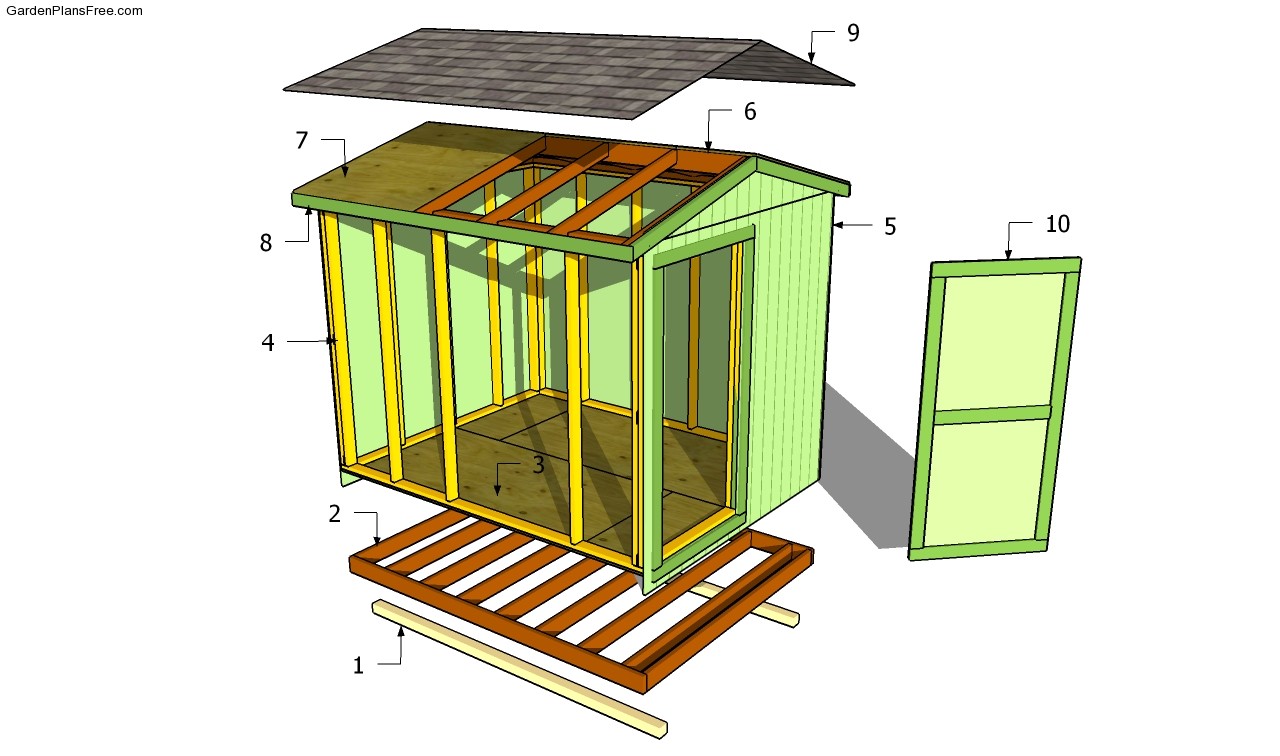
Materials
- 6 – 12 pieces of 2×4 lumber – 57 1/4″ long – cut at 15º at both ends RAFTERS
- 6 – 2 pieces of 2×4 lumber – 10″ long, 1 piece of 2×6 lumber – 120″ long RIDGE BOARS
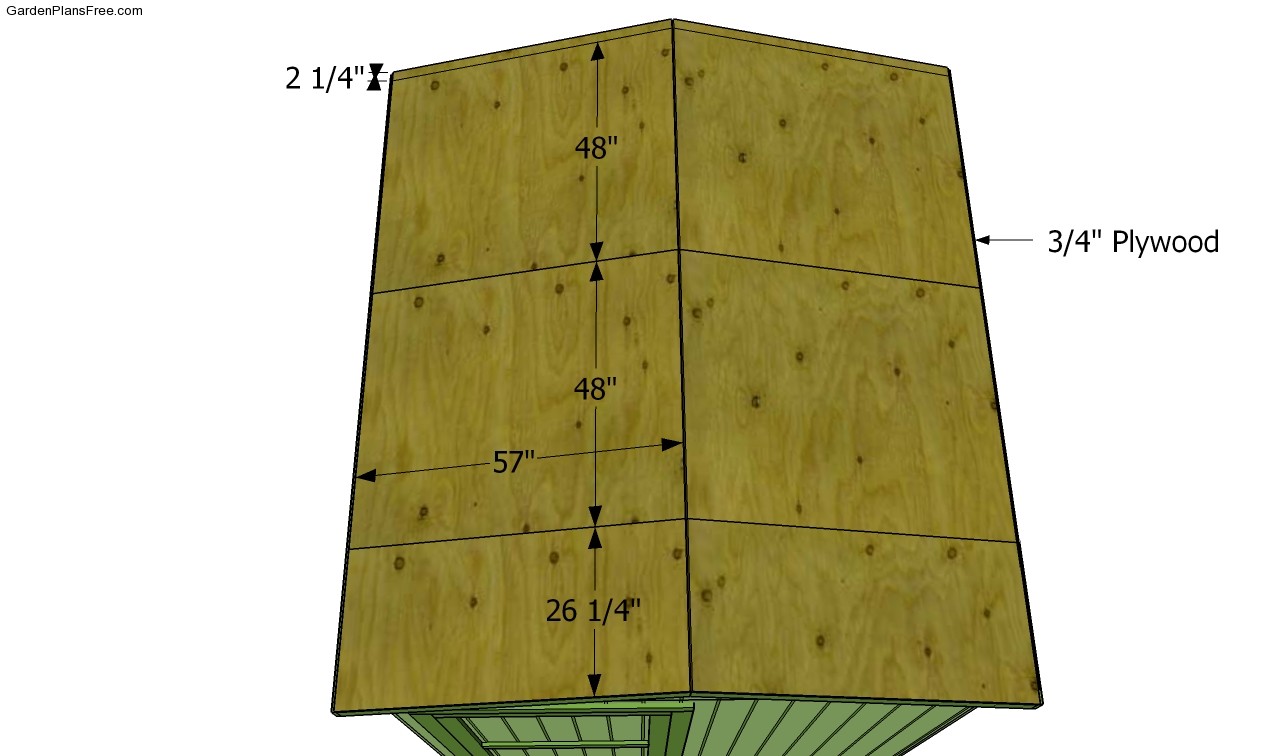
- 7 – 6 pieces of 4×8′ 3/4″ tongue and groove plywood ROOFING
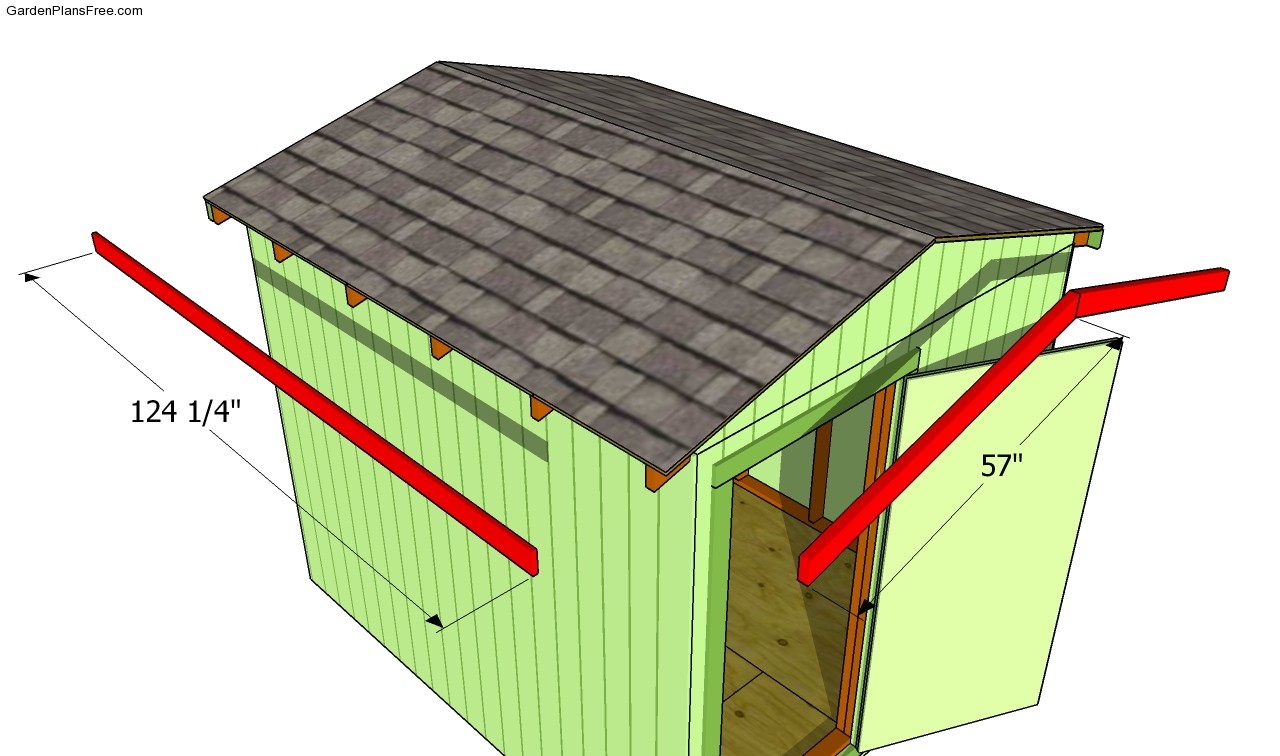
- 8 – 2 pieces of 1×4 lumber – 124 1/4″ long, 4 pieces of 1×4 lumber – 58″ long TRIMS
- 9 – 100 sq ft of roofing felt, 100 sq ft of asphalt shingles SHINGLES
- 10 – 2 pieces of 1×3 – 75″, 2 pieces of 1×3 – 39 1/4″, 1 piece of 1×3 – 32 1/4” DOOR
- 10 – 1 piece of 3/4” grooved plywood – 39 1/4″ x 75″ DOOR
Tools
- Hammer, Tape measure, Carpentry Square
- Miter saw, Drill machinery, Screwdriver, Sander
- Safety Gloves, Safety Glasses, Respiratory Mask
Time
- One Weekend
Garden Shed Plans

Fitting the rafters
The first step of the project is to build the rafters and fit them into place, as in the plans. In order to get the job done as a professional, you need to secure the ridge boars on two supports, place at both ends. Afterwards, install the rafters, making sure you align them at both ends. Drill pilot holes trough the rafters before securing them to the top plates and to the ridge board with 3 1/2” wood screws.

Building the rafters
As you can see in the image, you need to cut the both ends of the rafters at about 15º, in order to drain the water properly. Nevertheless, you can choose a steeper slope for your garden shed, but you also need to adjust the size of the rest of the roof components, as to fit together easily.
PRO TIP: Cut out notches in the rafters, as to fit into place properly. Use a carpentry square to mark the cut lines and a circular saw to make the actual cuts.

Installing the roofing sheets
Continue the process by installing the roofing sheets into place. As you can easily notice in the plans, you have to use 3/4” tongue and groove plywood, as they connect together easily and are rigid enough to support a lot of weight. Place the sheets into place and secure them with 1 1/4” screws, every 4” along the rafters.

Fitting the trims
Fitting trims to the end of the rafters, as well as to the front and back faces of the garden shed is not compulsory, but it will most certainly add value to your project. Cut the trims at the right size, place them to the siding and drive 1 1/4” finishing nails into the framing.

Installing the shingles
In order to waterproof the shed, you have to cover the roofing sheets with felt. Make sure the strips of roofing felt overlap at least 2-3″ and staple them to the plywood sheets every 8″. Continue the project by installing the asphalt shingles. Place the starting course at the bottom of the roof, before fitting the rest of the shingles.
PRO TIP: Always read the manufacturer’s instructions, before installing the shingles. They provide essential information about the installation of the shingles.

Garden shed plans free
After installing the roof and the asphalt shingles, there are still a few finishing touches you have to take care of. First of all, you could fill the holes and gaps with wood filler and smooth the surface with medium-grit sandpaper.
PRO TIP: Apply a few coats of paint to the wooden components, in order to enhance the look of the shed and to protect it from decay.
This diy project was about garden shed plans free. If you have enjoyed the free project, we recommend you to LIKE and SHARE it with your friends, by using the social media widgets.
<<<< PREVIOUS | NEXT >>>>
