If you want to learn more about how to build a nesting boxes for the 8×8 gable coop you have to take a close look over the free plans in the article. This is PART 2 of the easy chicken coop project, where I show you how to build the nesting boxes. This is a great addition to your coop, because that will allow you to harvest the eggs in a few seconds. Make sure you don’t skip this step because it really makes a huge difference.
If you want to get the job done in a professional manner, we recommend you to plan everything with attention, as to prevent costly mistakes and to build a professional garden project. Invest in high quality materials, such as cedar, pine or redwood, as the bench will be exposed to all kinds of weather. Apply a few coats of paint over the components, to enhance their appearance and to protect them from bad weather.
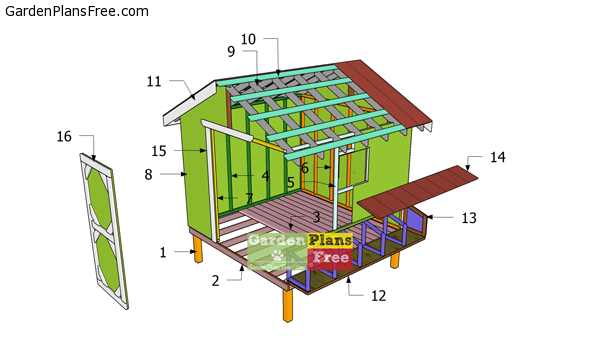
Nesting Boxes for 8×8 Coop – Free DIY Plans
Building-a-chicken-coop
Materials
- 8 – 6 pieces of 1/2″ plywood – 16″x17″ long, 1 piece – 13″x96″ long PANELS
- 12 – 2 pieces of 2×2 lumber – 96″ long, 6 pieces – 13″ long FLOOR FRAME
- 12– 1 piece of 1/2″ plywood – 16″x96″ long FLOOR
- 13 – 1 piece of 2×2 lumber – 17″ long 1 piece – 13″ long, 1 piece – 13 1/2″ long, 1 piece – 13 7/8″ long 6xFRAMES
- 14 – 1 piece of 1/2″ plywood – 16 1/2″x96″ long, 1 piece of 1×2 lumber – 72″ long ROOF
- 8 pieces of 2×2 lumber – 8′
- 1 pieces of 1×2 lumber – 8′
- 1 piece of 1/2″ plywood – 4’x8′
- 1 piece of metal roofing – 3’x8′
- 1 5/8″ screws
- 2 1/2″ screws
- 3 1/2″ screws
- wood glue, stain/paint
Tools
- Hammer, Tape measure, Carpentry square
- Miter saw, Drill machinery, Screwdriver, Sander, Router
- Safety Gloves, Safety Glasses, Respiratory Mask
Time
- One day
Nesting Boxes for 8×8 Coop – Free DIY Plans
Fitting-the-side-window—chicken-coop
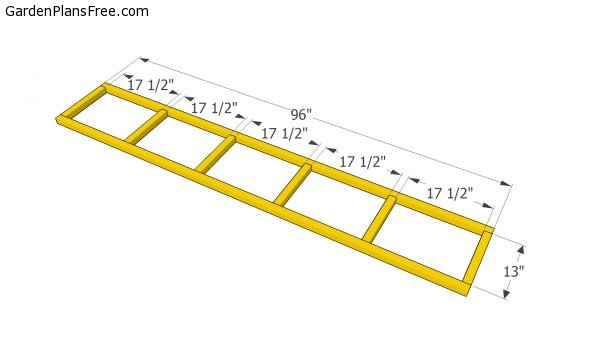
Use 2×2 lumber for the nest box floor frame. Cut the components at the dimensions shown in the diagram and lay them on a level surface. Align the edges flush and make sure the corners are square. Drill pilot holes and insert 2 1/2″ screws into the 13″ joists.
nest-box-floor-frame
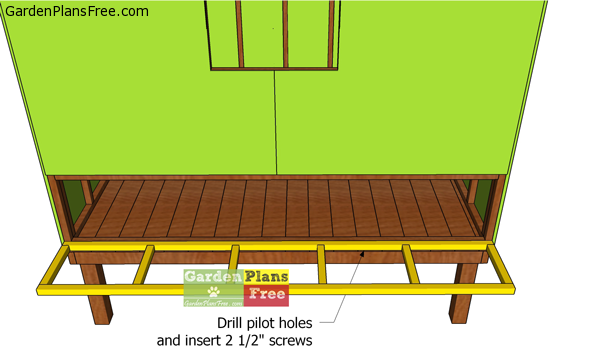
Secure the floor frame to the coop with 3 1/2″ screws. Use a spirit level to check if the floor frame is perfectly level.

Nest-box-floor
Fit the 1/2″ plywood panel to the floor of the frame. Align the edges flush and insert 1 5/8″ screws to secure the panel into place tightly.
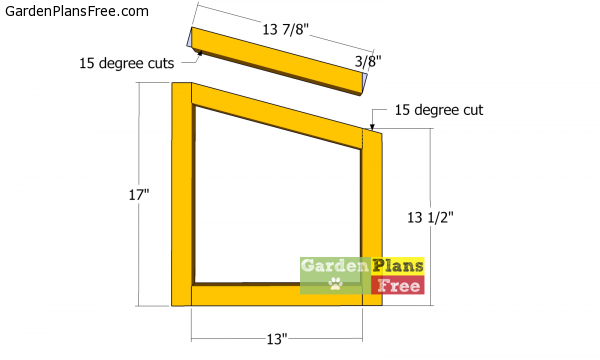
Frames-for-nesting-box
Use 2×2 lumber for the partition frames. Cut the components as shown in the diagram. Lay the slats to a level surface and drill pilot holes, so you can assembled the frames tightly with 3 1/2″ screws.
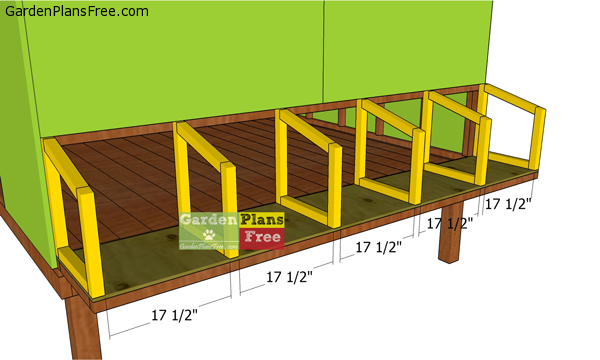
Fitting-the-nest-box-frames
Fit the frames to the floor of the nesting boxes. Plumb the frames with a spirit level. Drill pilot holes through the bottom components and insert 3 1/2″ screws into the floor frame.
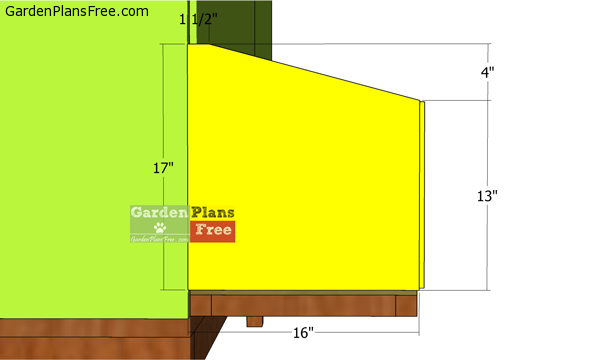
Side-nest-box-panels
Use 1/2″ plywood for the exterior wall panels. Cut the panels as shown in the diagram and lock them to the frames with 1 5/8″ screws. Fit the panels to the partitions, as well.
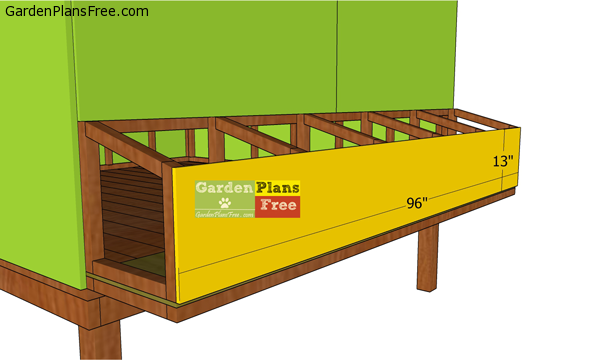
Nest-box-panel
Attach the panel to the front of the nest box.
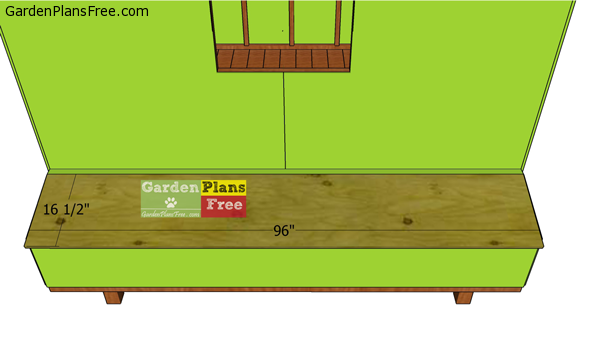
Lid-for-nest-box
Fit the 1×2 slat to the top of the partitions. Use 1/2″ plywood for the roof of the nest box.
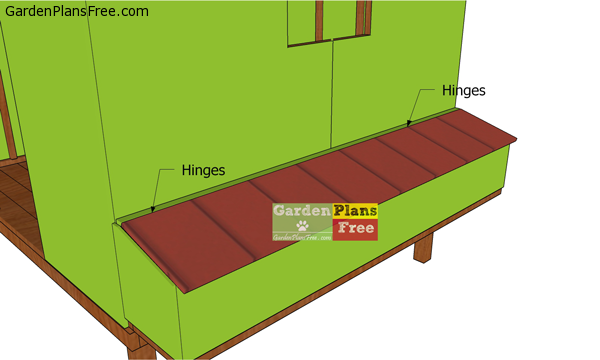
Fitting-the-nest-box-lid
Attach metal roofing to the plywood and secure it into place with appropriate screws. In addition, secure the lid to the back top slat with hinges. Use a latch to secure the lid into place tightly.
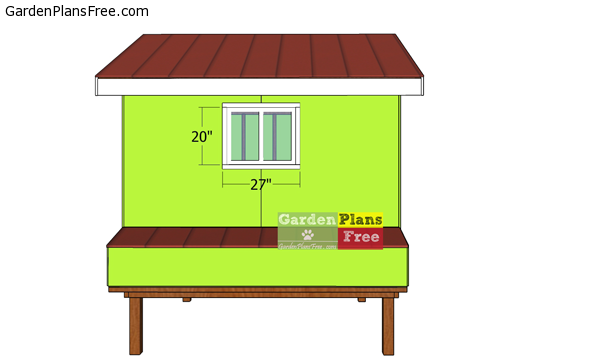
Fitting-the-side-window—chicken-coop
Last but not least, you need to attach the side window and then the 1×2 trims. Take care of the finishing touches by filling the holes with wood putty and smoothing the surface with 120-220 grit sandpaper. Apply a few coats of paint / stain over the exterior of the chicken coop.
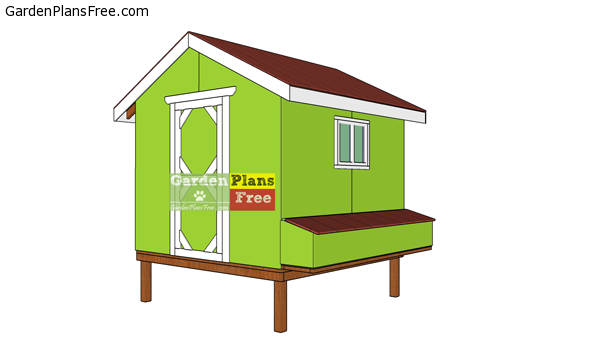
How-to-build-a-chicken-coop
This is compact backyard chicken coop that can shelter up to 16 chickens. This is really easy to make and it features a dynamic design that will most certainly make for a cozy home for the cute chickens. You can customize this coop to suit your needs. You really need to take a look over my 6×6 chicken coop plans. That will show you everything you need to know about making a compact size coop.
After installing the nesting box to the chicken coop, you need to take care of the finishing touches. Check out PART 1 of the project to learn how to build the chicken coop.

1 comment
So where do you put the drip edge and do you bend the metal over the top?