Step by step diy woodworking project about garden playhouse plans. Building a playhouse is a great weekend project that will put a big smile on your kids faces, especially that it doesn’t require a significant investment. In addition, you could build a small playhouse by your yourself in just a weekend, if you know the basic woodworking skills. Adjust the size of the playhouse according to your needs, before starting the actual constructions.
Use quality materials for your project, if you want to build a durable playhouse, such as pressure treated lumber and 3/4″ plywood. Always pre-drill the components before inserting the wood screws, to prevent the wood from splitting. Align the components at both ends and use a spirit level to check if the walls are plumb. Make sure you insert the screws properly, otherwise your kids might injure. Smooth the sharp edges with a belt sander.
RELATED PLANS:
Building a garden playhouse

Building a playhouse
Materials
- 1 – 2 pieces of 2×6 lumber – 96″ long, 7 pieces of 2×6 lumber – 45″ long JOISTS
- 2 – 1 pieces of 3/4″ plywood – 48×96 long FLOORING
- 3 – 25 pieces of 2×2 – 45″, 4 pieces – 94 1/2″, 4 pieces – 43 1/2” FRAME
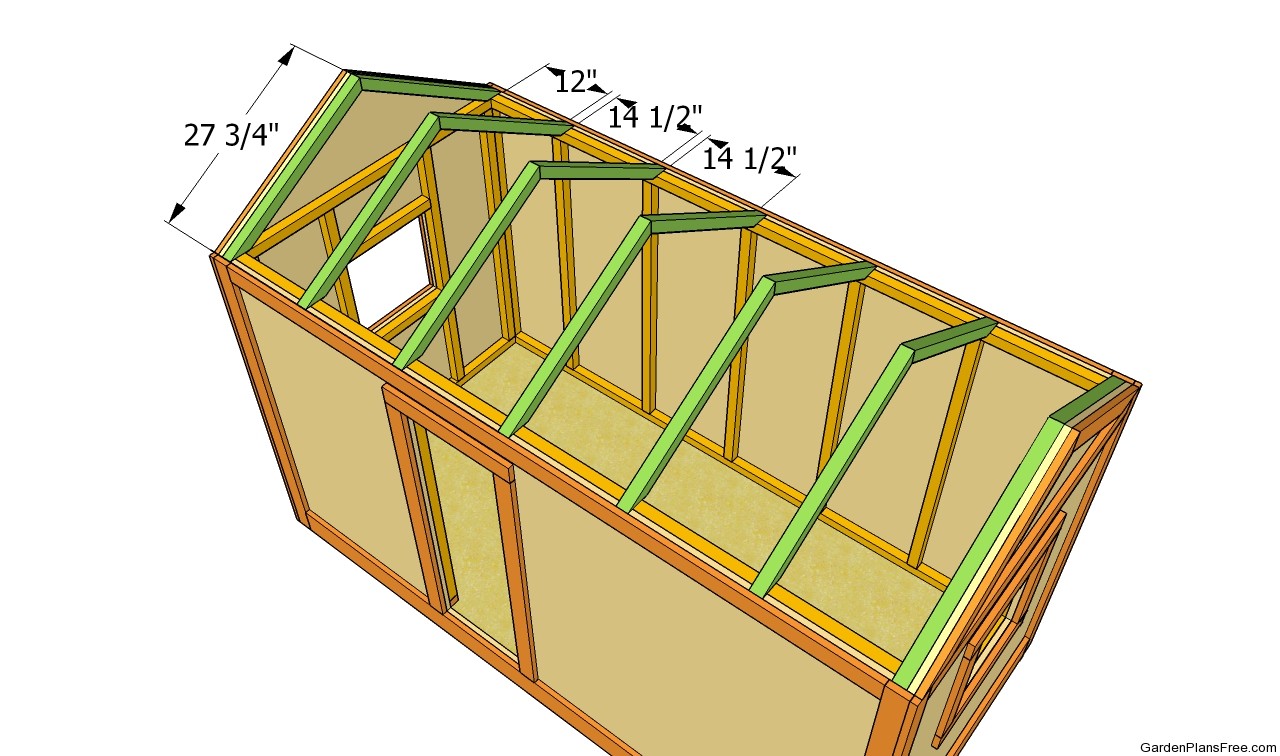
- 4 – 14 piece of 2×2 lumber – 27 3/4″ long RAFTERS
- 5 – 120 sq ft of 3/4″ tongue and groove plywood SIDING
- 6 – 2 pieces of 4×8′ plywood, 50 sq ft of tar paper, 50 sq ft of asphalt shingles ROOFING
- 7 – 8 pieces of 1×3 – 52 1/4″, 2 pieces – 91″, 4 pieces – 27 3/4″, 4 pieces – 16″, 21 pieces – 21″ TRIMS
- 7 – 2 pieces of 1×6 – 91″, 2 pieces – 44 1/2″, 2 pieces of 1×4 – 44 1/2″, 2 pieces – 41 1/2” TRIMS
- 6 pieces of 2×6 lumber – 8 ft
- 7 pieces of 3/4″ plywood – 4’x8′
- 24 pieces of 2×2 lumber – 8 ft
- 16 pieces of 1×3 lumber – 8 ft
- 50 sq ft of tar paper, 50 sq ft of asphalt shingles
- 200 pieces of 1 1/4″ screws
- 100 pieces of 1 5/8″ screws
- 200 pieces of 2 1/2″ screws
- 20 pieces of 3 1/2″ screws
- wood glue, stain/paint
Tools
- Hammer, Tape measure, Carpentry Square
- Miter saw, Drill machinery, Screwdriver, Sander
- Safety Gloves, Safety Glasses, Respiratory Mask
Time
- One Day
Garden Playhouse Plans

Building the floor of the playhouse
The first step of the project is to build the frame of the floor. As you can see in the image, you need to drill pilot holes trough the perimeter joists and to insert 3 1/2” galvanized screws into the joists. Attach a 4×8′ piece of plywood over the frame and drive 1 1/4″ screws into the joists.
PRO TIP: Check if the corners are right-angled, using an L-square. In addition, the plywood sheet should be flush with the frame.

Side walls plans
Continue the woodworking project by building the side walls. Use 2×2 lumber to build the frames, as in the plans. Drill pilot holes trough the plates of the walls to prevent the wood from splitting and insert 2 1/2″ screws. As you can easily notice in the image, you could also frame a small window, using two pieces of 2×2 lumber. Make sure the corners are square.
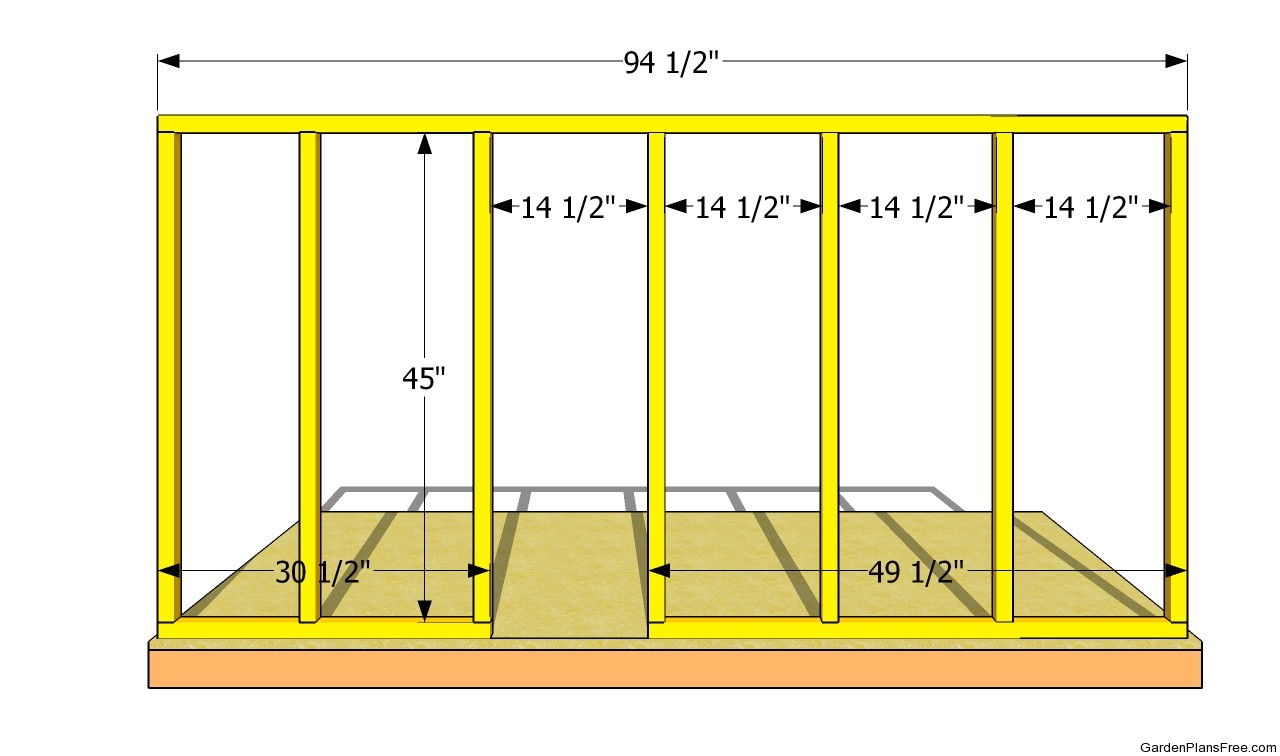
Front and back walls plans
The front and the back walls of the playhouse should be assembled in the same manner described above. Leave enough space for a door opening, by cutting a small piece of the bottom plate. In addition, place the studs equally spaced to enhance the rigidity of the structure.
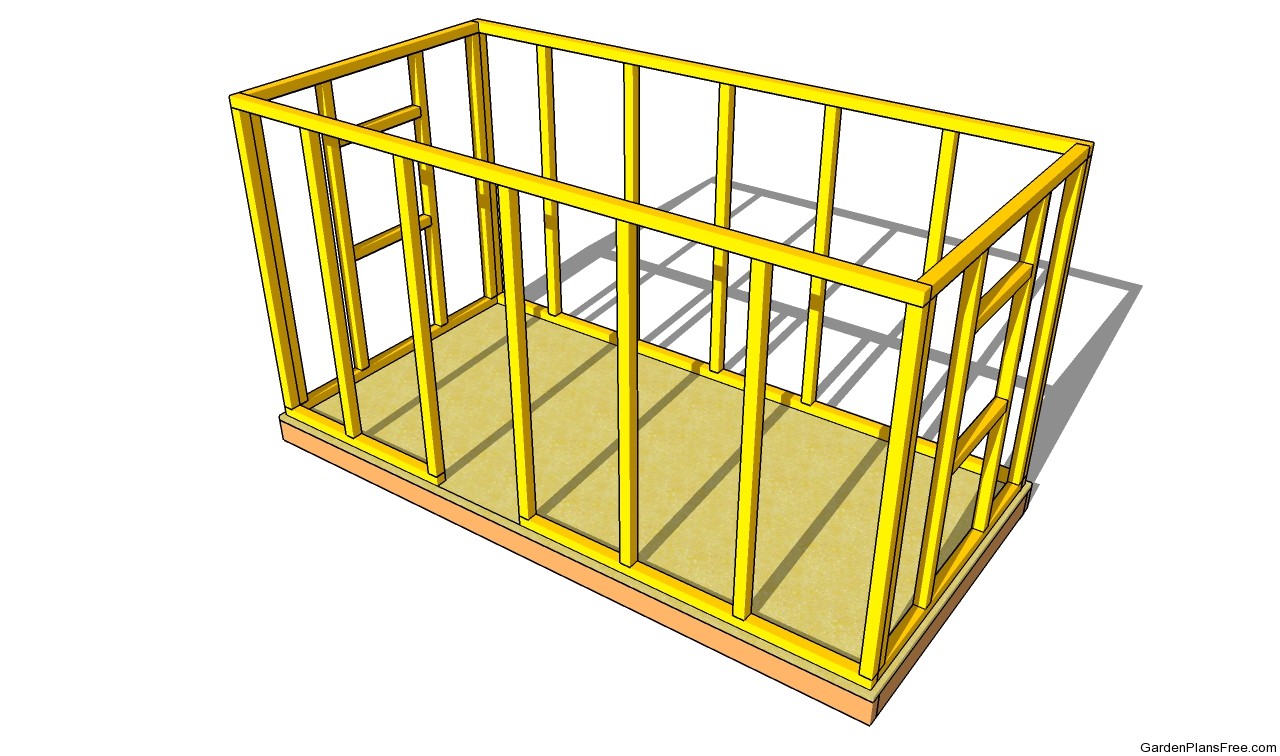
Installing the playhouse frame
Assemble the wall frames together and secure them to the flooring with 3 1/2” wood crews. Use a spirit level to plumb the walls before locking them together. In addition, secure the adjacent walls together, by inserting wood screws into the components.
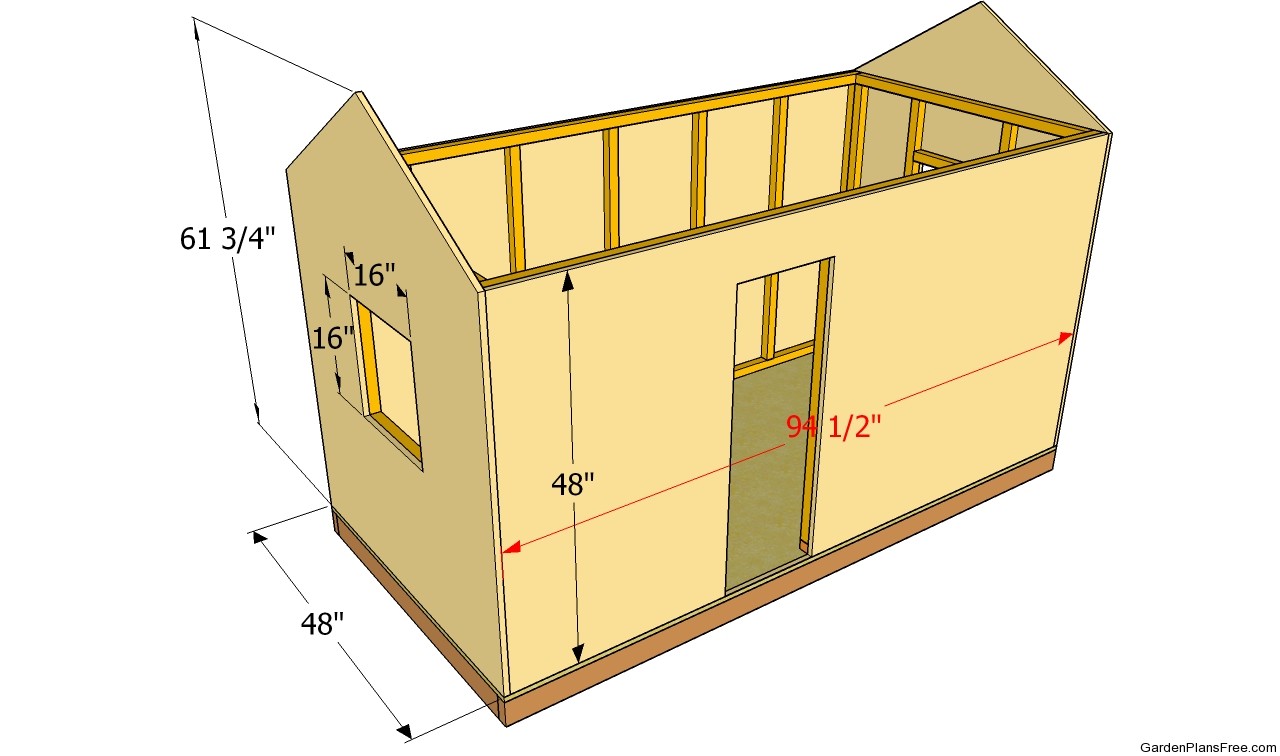
Installing the siding
Continue the woodworking project by attaching the exterior walls (3/4″ plywood). Secure the plywood sheets to the frame with 1 1/4″ screws. Use a good circular saw to adjust the size of the sheets at the proper size. In addition, drill a starting holes and cut the openings with a jigsaw.
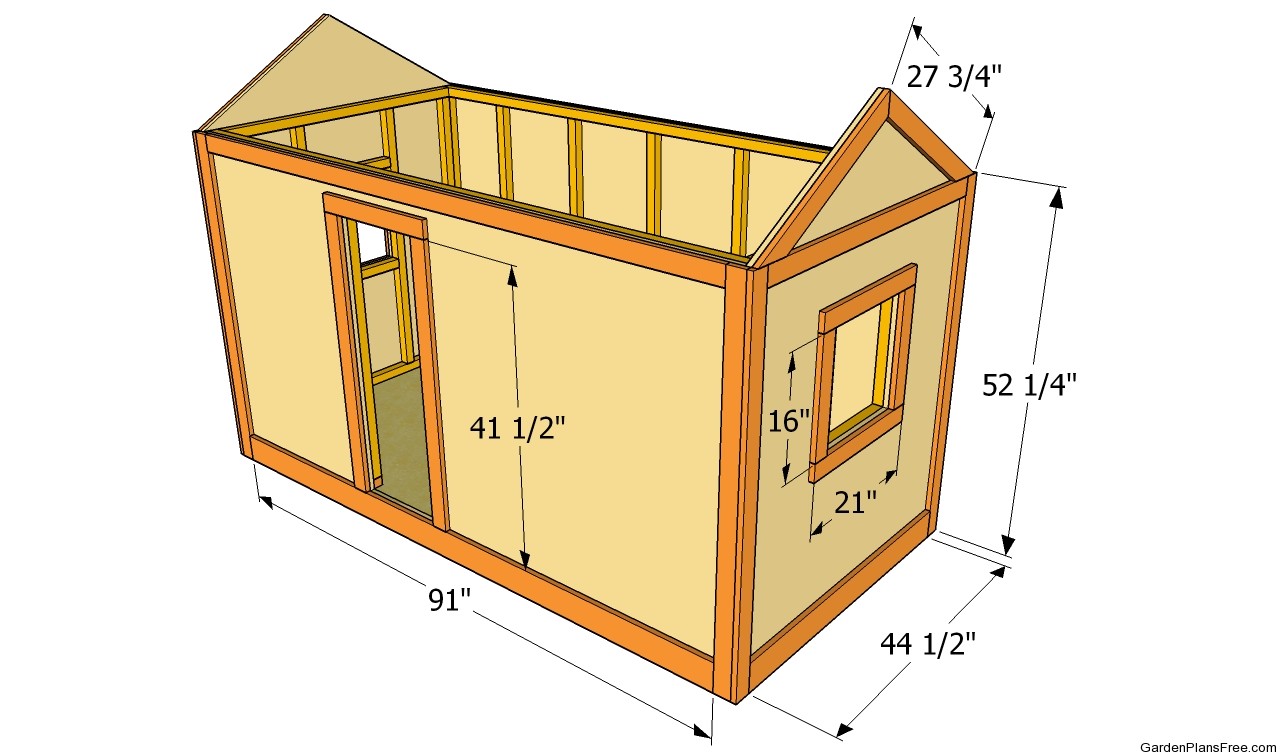
Fitting the trims
Attaching the trims to the playhouse is a straight forward job, especially if you use 1×3 lumber. Attach 1×6 trims to the bottom of the playhouse, as to cover the rim joists. Use 1×3 lumber to build the rest of the trims, including the ones placed around the door and windows.
PRO TIP: Place the trims to the exterior siding and lock them into place with 1 1/4” nails. Plumb the trims with a spirit level.
Installing the rafters
Build the wooden rafters from 2×2 lumber, cutting one end at 30º and the other one at 60º. Place the rafters over the top plates and secure them together with 2 1/2″ wood screws. Pre-drill the lumber before inserting the screws, to prevent the wood from splitting. Place the rafters equally spaced, in order to support the weight of the roof properly.
Installing the roofing sheets
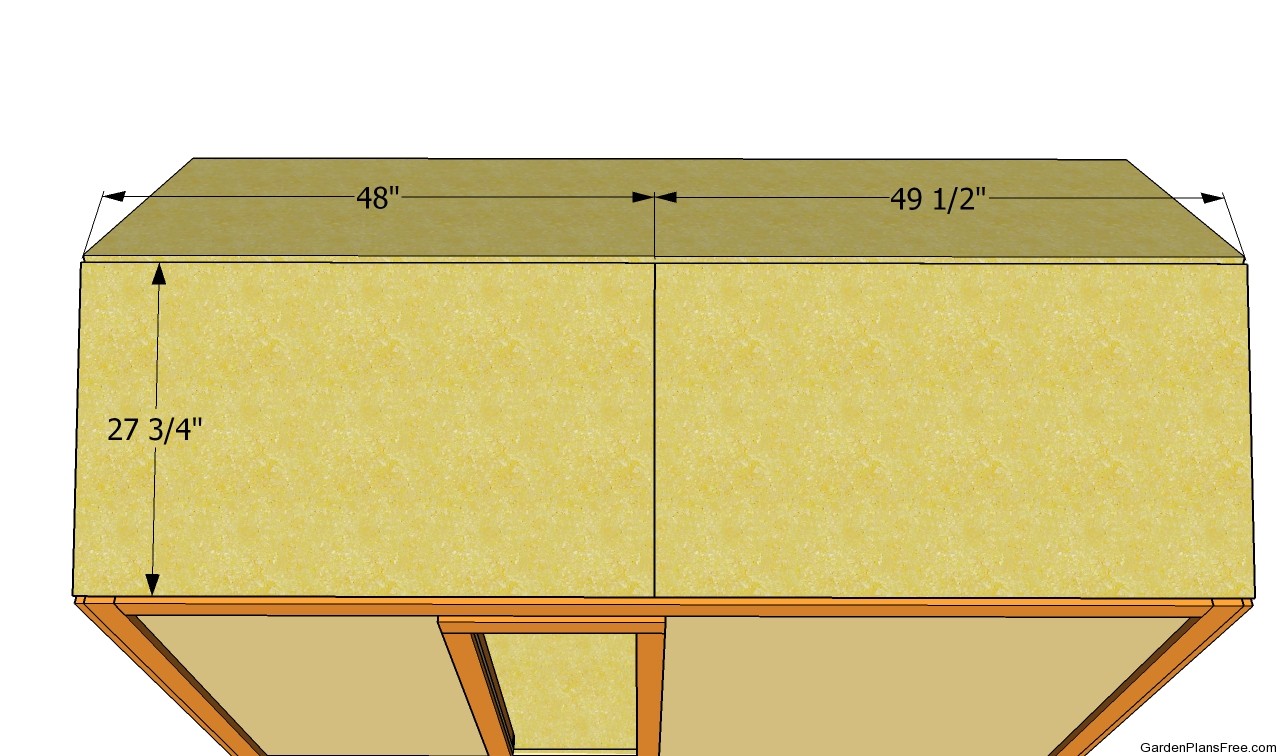
Attach 3/4″ plywood sheets to the rafters and secure them into place with 1 1/4″ galvanized screws, every 6″. In addition, we recommend you to use tongue and groove boards, as they will connect together easily. Align the sheets at both ends, before driving the screws into the rafters.
Installing the shingles
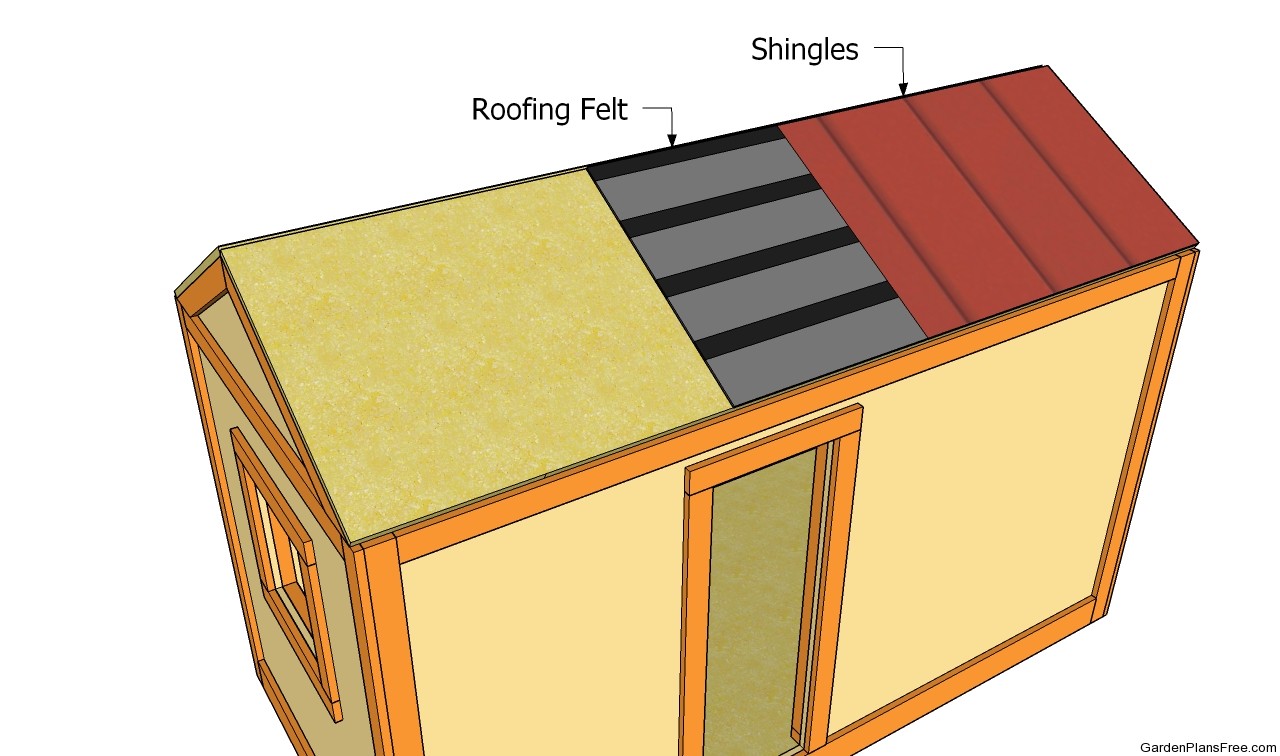
One of the last steps of the projects is to cover the roof with tar paper, making sure the strips overlap at least 2″. Use staples to secure the roofing felt to the plywood sheets. Install asphalt shingles to the roof, starting with the bottom, and secure them with a nail gun and proper nails.
Garden playhouse plans
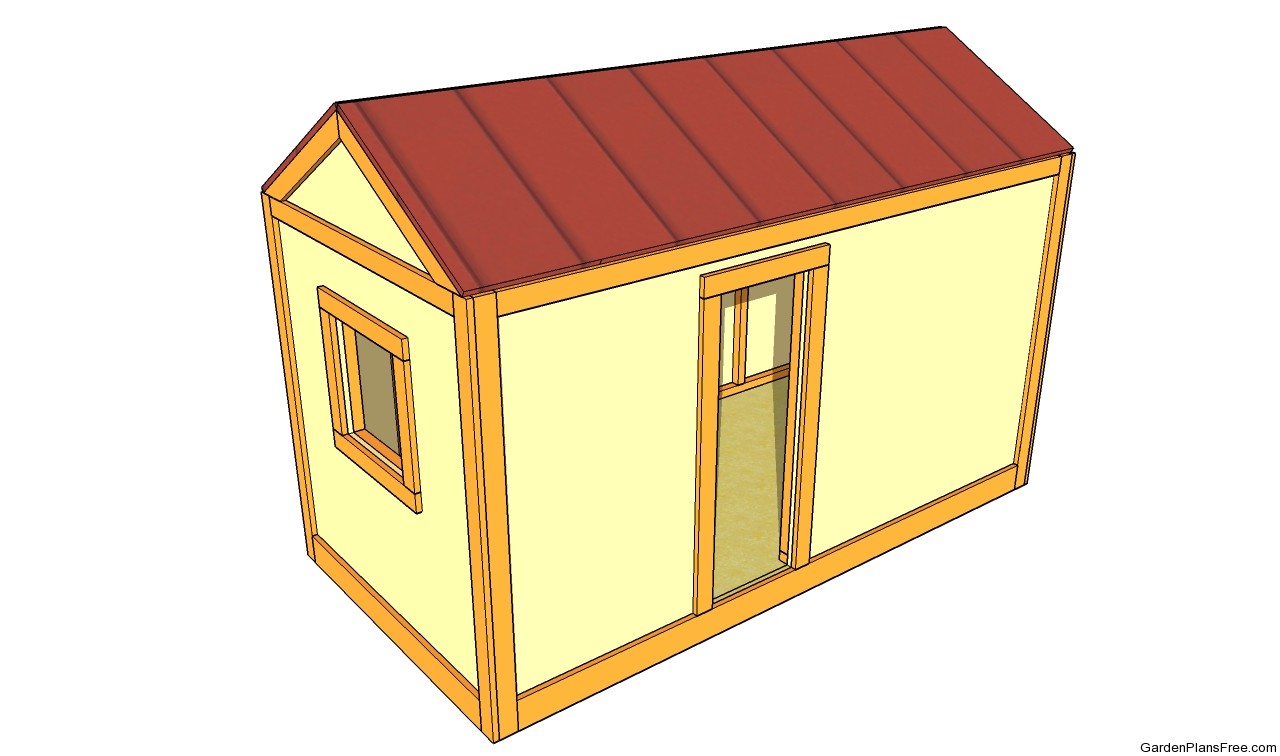
Last but not least, there are several aspects you should take into account. Therefore, you should fill the holes with wood filler and smooth the wooden surface after it dries out. In addition, check all the screws are inserted properly and there are no sharp corners, otherwise the kids could easily injure.
PRO TIP: Apply several coats of paint over the components, in order to protect them from decay. Involving your kids is a great way to enhance the creativity of your kids.
This diy project was about simple birdhouse plans. If you have enjoyed the free project, we recommend you to LIKE and SHARE it with your friends, by using the social media widgets.

