If you want to learn more about how to build a backyard fort, we recommend you to pay attention to the instructions described in the article. Work with attention and ask a friend to give you hand, as you need someone to hold the components into place, while you insert the screws. Invest in high-quality materials, such as pine, redwood or cedar, as these materials have a nice finish and are highly durable.
Choose the right backyard fort plans for your needs and plan everything with great attention. There are many designs and plans to choose from when building a fort, so make sure you take a look over several alternatives before starting the actual construction project. Make sure the corners are right-angled and plumb the posts and the rails with a spirit level, before inserting the screws.
Backyard Fort Plans
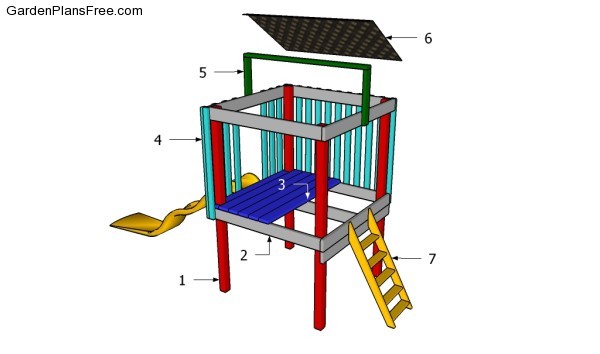
Building a backyard fort
Materials
- 1 – 4 pieces of 4×4 lumber – 94 1/2″ LEGS
- 2 – 5 pieces of 2×6 lumber – 63″, 5 pieces – 60″ JOISTS
- 3 – 11 pieces of 2×6 lumber – 63″ DECKING
- 4 – 27 pieces of 1×2 lumber – 54″ RAILS
- 5 – 2 pieces of 2×4 lumber – 24″, 1 piece – 66″ ROOF
- 6 – 1 piece of fabric – 66″x78″ ROOF
- 7 – 2 pieces of 2×6 lumber – 52 1/4″, 5 pieces of 2×4 lumber – 17″ LADDER
- 4 pieces of 4×4 lumber – 8 ft
- 12 pieces of 2×6 lumber – 12 ft
- 1 piece of 2×4 lumber – 10 ft
- 14 pieces of 1×2 lumber – 10 ft
- 1 piece of fabric – 66″x78″
- 4×4 post anchors
- 100 pieces of 2 ½” screws
- 100 pieces of 1 5/8” screws
- Construction glue
- paint
- slide
Tools
- Hammer, Tape measure, Carpentry square
- Miter saw, Drill machinery, Screwdriver, Sander, Router
- Safety Gloves, Safety Glasses, Respiratory Mask
Time
- One day
Building a Backyard Fort
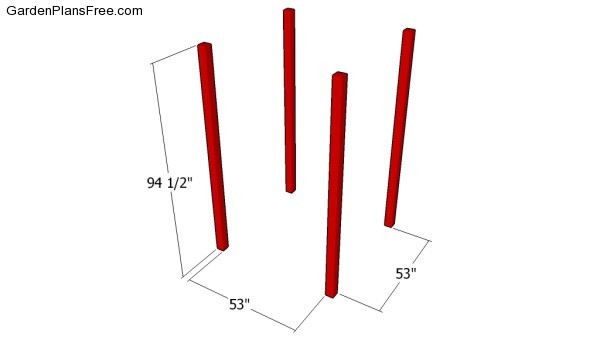
Fitting the wooden posts
The first step of the woodworking project is to set the wooden posts into place. As you can easily notice in the image, we recommend you to layout the fort in a professional manner, making sure the posts are plumb and the diagonals equally-spaced. See here more about how to set the post into concrete as a professional. Secure the posts to the ground, so the fort won’t move from position or flip over.
Use a spirit level to make sure the top of the posts are level one with another. Use a circular saw to make the cuts, if necessary.
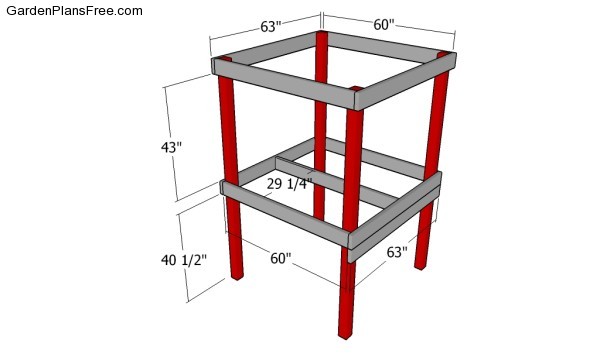
Attaching the joists
The next step of the project is to attach the 2×6 joists to the legs. Clamp the joists to the wooden posts, check if they are perfectly horizontal and secure them into place with galvanized screws. Drill pilot holes through the components before inserting the 2 1/2″ screws, in order to prevent the wood from splitting. Make sure you leave no gaps between the components, if you want to get a professional result.
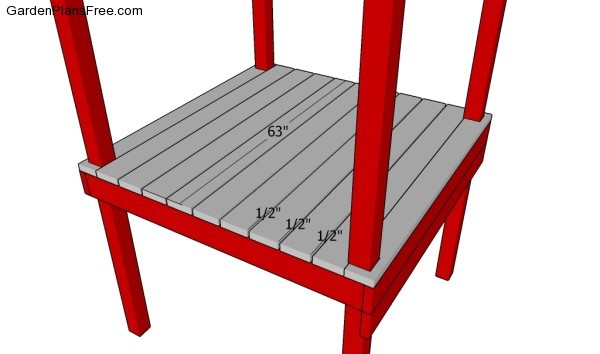
Attaching the floor slats
Attaching the 2×6 decking boards to the joists is a straight-forward process, especially if you place them equally-spaced. Place a nail between the wooden boards before inserting the galvanized screws, to make sure the water will drain properly. Smooth the cut edges with a piece of sandpaper. Cut notches at both ends of the slats before setting them into place, as to fit around the wooden posts.
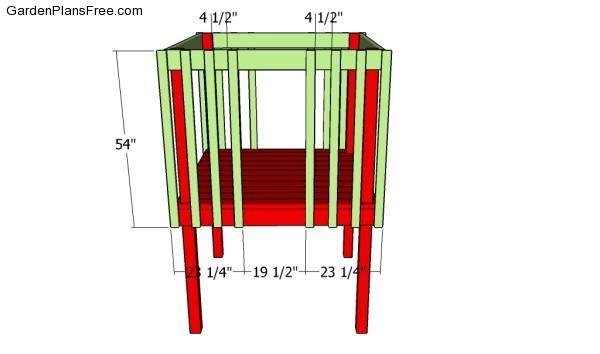
Fitting the slats to the slide side
After building the frame of the backyard fort, we recommend you to attach the 1×2 rails to the exterior of the joists. Cut the components at the right size and secure them into place with 1 5/8″ galvanized screws. Use a spirit level to make sure the rails are plumb and place a piece of wood between them to make sure they are equally-spaced.
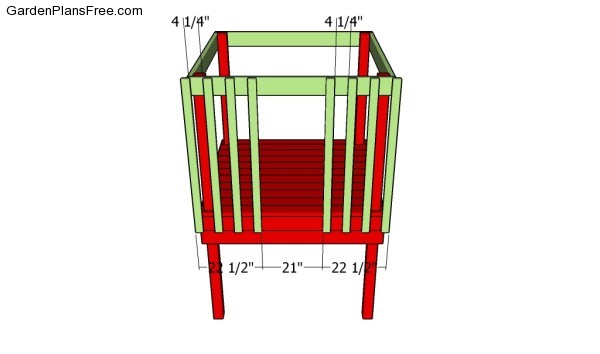
Fitting the slats to the ladder face
Continue the project by attaching the rails to the opposite side of the backyard fort. Use the same instructions described above to get the job done in a professional manner.
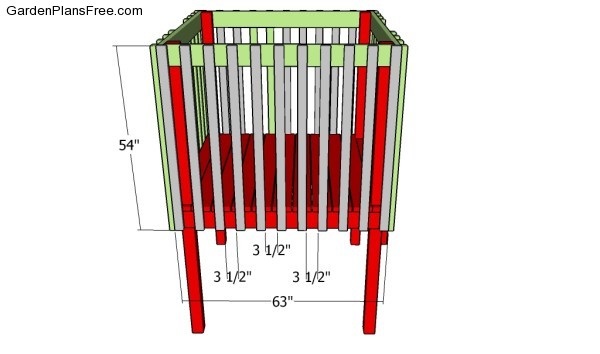
Attaching the side slats
Fitting the balusters to both sides of the fort is a straight-forward process, as it doesn’t require complex techniques. Make sure the balusters are plumb and equally-spaced. Therefore, fit a piece of 1×4 slat between the balusters, in order to make sure the gaps are consistent. Drill pilot holes and insert 1 1/4″ screws into the joists.
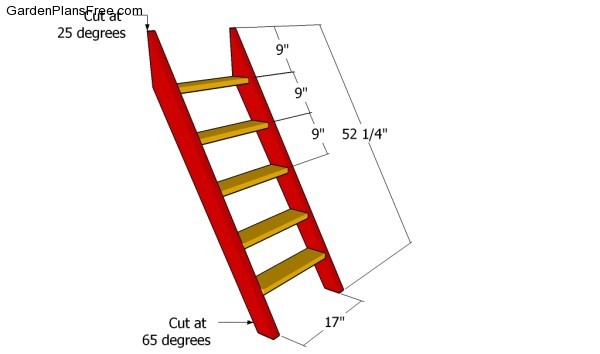
Building the ladder
Building the ladder is a complex task, but anyone with basic skills can get the job done. Build the side components from 2×6 lumber, making sure you cut both ends at the right angles. Cut the steps out of 1×4 lumber and secure them to the supports with 2 1/2″ screws. Make sure the whole structure is locked together in a professional manner and the joints are rigid. Add waterproof glue to joints and make sure the steps are perfectly horizontal.
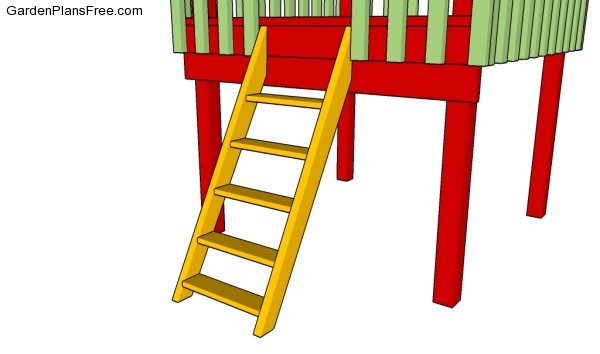
Fitting the ladder into place
Attach the ladder to the wooden structure and insert long galvanized screws into the joists to lock them properly. Leave no gaps between the ladder and the fort.
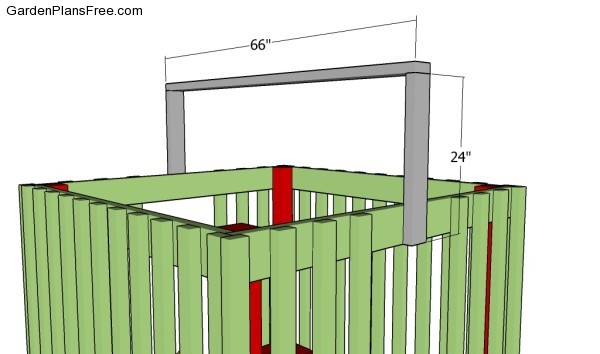
Building the roof support
One of the last steps of the project is to attach the roof structure. Build the components out of 1×2 lumber and lock them together with galvanized screws. Plumb the supports with a spirit level and make sure the top components is horizontal.
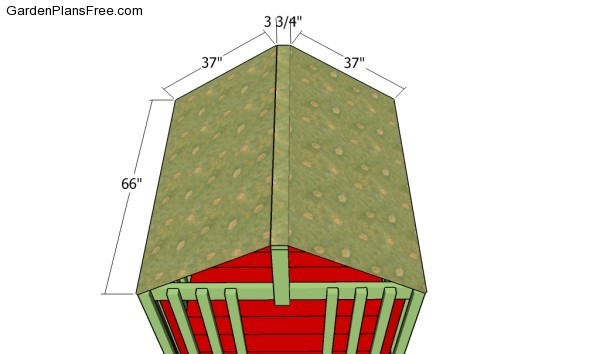
Attaching the roof
In order to protect the fort from sunrays and rain, cover the structure with fabric or textile. Choose a waterproof material and fit it into place in a professional manner.

Backyard fort plans
Last but not least, you should take care of the finishing touches. Check if the components are secured into place properly and if the structure is rigid. Make sure there are no protruding screws or sharp edges that could injure you.
PRO TIP: Fill the holes with a good wood filler and smooth the surface with 120-grit sandpaper. Apply several coats of paint or stain over the components, in order to protect them from decay.
This diy project was about backyard fort plans free. If you have enjoyed the free project, we recommend you to share it with your friends, by using the social media widgets. LIKE us on Facebook if you want to be the first that gets our latest projects.

