If you want to learn more about how to build a flower box, we recommend you to pay attention to the instructions described in the article. Work with attention and select the right flower box plans for your needs and budget. Invest in high-quality materials, such as pine, redwood or cedar, as the components should be weather-resistant and have a nice appearance.
Plan every aspect of the construction from the very beginning, in order to keep the costs under control and to save time. Take accurate measurements and adjust the size of the wooden components with a proper and sharp saw, in order to get the job done as a professional. Check if the corners are right-angled after fitting each component, as they might move from position easily.
RELATED PLANS:
Flower Box Plans
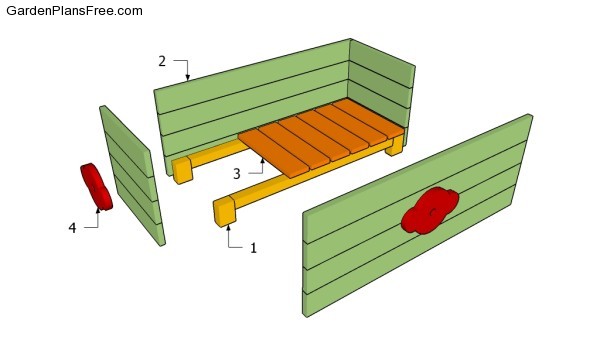
Building a flower box
Materials
- 1 – 4 pieces of 2×4 lumber – 2 1/2”, 2 pieces of 2×2 lumber – 29 3/4″ SUPPORTS
- 2 – 8 pieces of 1×4 lumber – 14 1/2”, 8 pieces – 36″ FRAME
- 3 – 8 pieces of 1×4 lumber – 14 1/2″ SLATS
- 4 – 1×4 and 1×6 lumber ORNAMENTS
Tools
- Hammer, Tape measure, Carpentry square
- Miter saw, Drill machinery, Screwdriver, Sander, Router
- Safety Gloves, Safety Glasses, Respiratory Mask
Time
- One day
Building a flower box
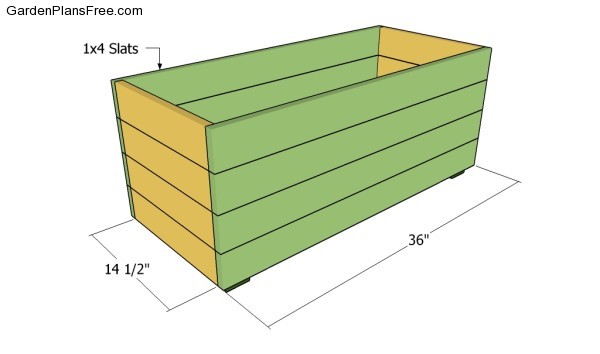
Building the frame of the flower box
The first step of the woodworking project is to build the frame of the flower box. As you can see in the image, we recommend you to cut the slats at the right size and to lock them together tightly with galvanized screws.
PRO TIP: Drill pocket holes at both ends and insert the screws after checking if the corners are right-angled.After building the four rectangles, you need to lock them together with galvanized screws. Drill pocket holes, add glue and insert the 1 1/4″ screws to create a rigid flower box.
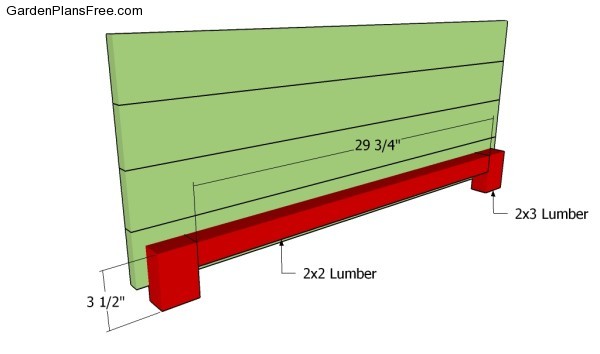
Building the supports
Continue the project by building the supports and attach them to the both sides of the interior faces. Cut the wooden components at the right size, drill pocket holes at both ends of the horizontal components and insert galvanized screws. Add waterproof glue to the joints, in order to get the job done in a professional manner. Lock the supports to the flower box, as shown in the woodworking plans.
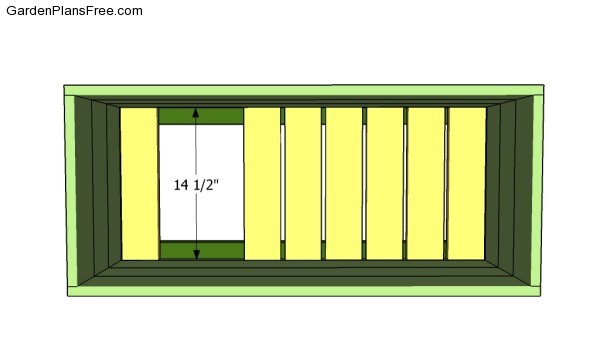
Fitting the bottom of the flower box
Fitting the 1×4 slats to the cleats is a straight-forward process, provided you take accurate measurements and place the slats equally-spaced. Drill pilot holes at both ends of the slats before inserting the screws into the cleats, to prevent the wood from splitting.
Building the ornaments
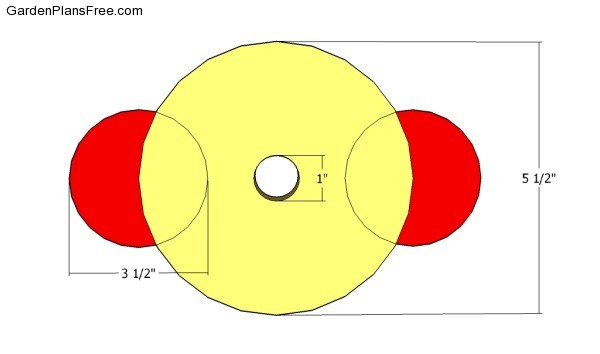
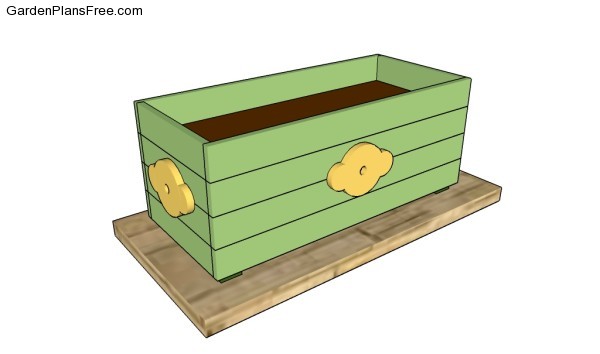
If you want to enhance the look of the planter bow, you could attach ornaments on the exterior faces. Mark the cut lines on the slats and make the curved cuts with a jigsaw. Smooth the cut edges with sandpaper and secure them into place with glue and finishing nails, after making sure they are centered.
Flower box plans
Last but not least, you should take care of the finishing touches. Therefore, we recommend you to check if the components are locked into place properly and structure is rigid enough to support the soil. Make sure there are no protruding screws or sharp edges.
PRO TIP: Fill the holes with a good wood filler and smooth the surface with medium-grit sandpaper. Apply several coats of paint or stain over the components, in order to protect them from decay. Check out the rest of the project to learn more about building garden projects.
This diy project was about flower box plans free. If you have enjoyed the free project, we recommend you to share it with your friends, by using the social media widgets.
