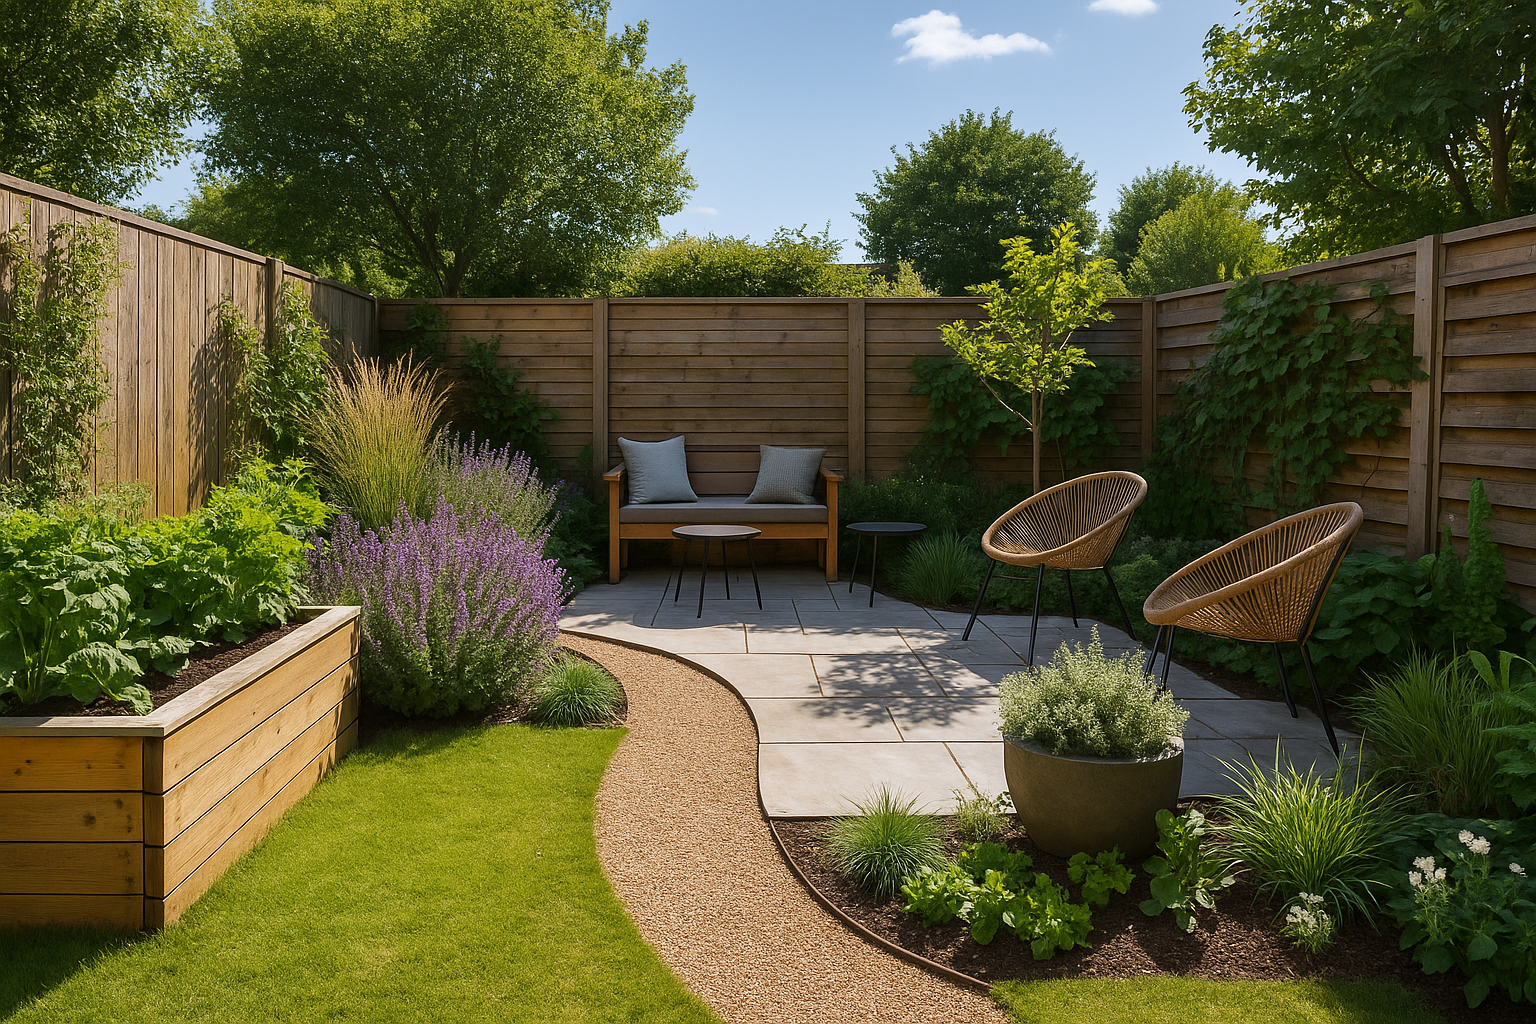
A small backyard bursting with color and function: a petite lawn provides a patch of green, while lush flower borders and vertical trellises create layers of interest. A cozy dining nook sits under a curtained pergola, offering an inviting spot to relax amidst the greenery. Even the tiniest yard can be transformed into a beautiful, multi-purpose garden with the right design approach. If you’re working with a limited outdoor space – whether an urban patio, a narrow side yard, or a small suburban backyard – don’t be discouraged. With some creativity and smart planning, you can maximize every inch and create your own personal oasis.
This article offers clear, practical, and encouraging ideas to help you design an inspiring small garden space. We’ll focus on solutions that make the most of what you have, regardless of your budget or skill level. Instead of detailed construction plans or product links, you’ll find design inspiration, layout strategies, and space-saving tricks that empower you to take action with confidence.
We’ll explore fundamental design principles (such as smart use of scale, function, and flow) to set the stage for a successful small garden. Then we’ll dive into creative layout ideas for dividing your space into useful zones – from cozy entertaining nooks to productive little veggie patches. You’ll discover low-maintenance landscaping tips to keep your yard beautiful without constant upkeep, and learn about material options for fences, paths, raised beds, and seating that fit compact spaces. We’ll also cover vertical gardening techniques and clever structures that let you grow more in less area. For those on a tight budget or schedule, we have advice on budget considerations and time-saving approaches. Plus, no garden is complete without year-round appeal – so we’ll discuss seasonal flexibility using container plantings, and ways to enhance your space with lighting and decor for extra charm. By the end, you should feel inspired and empowered to turn even a modest patch of yard into a vibrant, functional outdoor retreat!
Design Principles for Small Gardens (Scale, Function, Flow)
Good design is just as important in a small garden as in a large landscape. In fact, with limited space, following a few key principles will help the area feel cohesive, comfortable, and even more spacious than it really is. Here are some core design principles to guide you in a small garden:
- Scale and Proportion: Always consider the size of garden elements in relation to each other and to your house. Oversized trees or massive furniture can overwhelm a small yard, while very tiny ornaments might get lost. Aim for a balanced scale – for example, choose appropriately scaled plants and features so they feel in proportion with the space. A basic rule is that a large structure (like your house or fence) needs some substantial elements (a medium-size tree or cluster of shrubs) to tie it in, but those elements should not dwarf the space. In other words, avoid planting a giant tree in a courtyard or using doll-sized pots under a tall wall – everything should feel just right for the scale of your garden.
- Clear Functionality: Before you start designing, think about how you most want to use your small garden. Will it be for entertaining friends, growing vegetables, relaxing with a book, or a bit of everything? Define the primary functions and let them guide your layout. In a tight space, it often works best to focus on one or two main purposes rather than trying to do it all. That said, you can certainly incorporate multiple uses by letting one feature serve double-duty. For example, a simple storage bench can provide seating for guests and hide your gardening tools, or a planter box along a deck railing might also act as a privacy screen. Designing with clear functions in mind ensures every square foot is working hard for you.
- Flow and Circulation: Even a small garden benefits from a sense of flow – how you move through and around the space. Plan for a clear path or at least an open route, so you’re not stepping over plants or furniture to get from one spot to another. This might be as straightforward as a little stepping-stone pathway or just intentional open space between features. Aligning a path or arranging pavers on a diagonal can create an illusion of greater length in a small yard by drawing the eye along the longer dimension. Also consider vertical flow: for instance, an arbor or pergola at the entry to your garden can create a pleasant transition and make the space feel like an outdoor “room” you’re entering. Good flow makes a small garden inviting and easy to navigate, without awkward dead-ends or obstacles.
- Focal Points: Every garden, no matter the size, benefits from a focal point – a feature that immediately draws the eye and gives the space a sense of purpose or harmony. In a small garden, it’s especially important to avoid too many focal points (which leads to visual clutter). Instead, pick one or two standout elements. It could be a petite water fountain, a beautiful dwarf tree or large planter, a piece of artwork, or even a cozy seating arrangement. By giving the viewer something to focus on, you create a feeling of depth and intention. For example, placing a bright ceramic urn at the far end of a narrow yard will catch the eye and subtly encourage people to explore the whole space, making it feel larger. Keep surrounding elements simpler so they support, rather than compete with, your focal point.
- Simplicity and Unity: In design, less is often more – and that’s certainly true for small gardens. Aim to keep the design simple and unified for a calming, spacious effect. This can mean sticking to a consistent color palette for flowers or outdoor decor, or using one type of paving material throughout instead of a patchwork of different materials. Repetition is your friend: using the same plant or material in a few places can tie the whole look together. For instance, you might repeat a certain ornamental grass along the border and also in a container, or echo the wood tone of your deck in a matching wooden trellis. A cohesive design prevents a small yard from feeling cluttered or chaotic. Try not to overcrowd the space with too many different plant species or decorations – select a handful of favorites and let them shine. You’ll find that a tidy, unified small garden actually feels more expansive.
- Privacy and Comfort: Just because your yard is small doesn’t mean you want to be on display to the whole neighborhood. Thoughtfully addressing privacy will make the space much more comfortable and usable. However, solid high walls on all sides can make a tiny yard feel boxed in, so consider partial screens or softer barriers. A great strategy is to break up sight lines without completely enclosing the space. For example, instead of a solid fence panel, you might use a lattice trellis or a row of tall potted plants that block the view where it matters most (say, near a seating area) but still let light and breeze through. Sheer outdoor curtains or a decorative panel can also create a private little nook in one corner. By using these kinds of permeable screens, you get a sense of enclosure and retreat, but your garden won’t feel claustrophobic. The goal is to make your small sanctuary feel intimate and cozy, a place where you can comfortably unwind.
Creative Layout Ideas and Zones (Entertaining, Growing Food, Relaxing)
A narrow side yard transformed into a cozy outdoor dining space using a warm wood deck, built-in planters, and slatted fencing for privacy. Overhead string lights add charm and allow the area to be enjoyed after dark. Small yards often have to pack a lot of uses into one area. A clever approach is to divide your space into zones or distinct functional areas, much like rooms in a house, even if there are no walls between them. By delineating zones for different purposes – for example, one area for lounging and another for gardening – you create a sense of order and make the space more usable. The great news is you don’t need actual walls or big dividers to separate these zones; subtle cues can do the job. Simply rearranging furniture or using a rug or stepping stones can visually define an “outdoor living room” versus a “garden” area. In fact, just shifting the layout and decor can signal a change in function and make a small yard feel like it has multiple destinations.
One trick designers use is to change ground materials or levels to distinguish zones. For instance, you might have a tiny patio of pavers or decking for dining, next to a patch of synthetic turf or groundcover that acts as a mini lawn for play or visual relief. Even a single step up or down can psychologically separate spaces – like a raised deck for seating overlooking a lower gravel garden area. You can also use planters, trellises, or furniture placement to create gentle boundaries. The key is to maintain a sense of cohesion (so it still feels like one yard) while giving each activity its own comfortable spot.
Consider incorporating one or more of these zones in your small garden layout:
- Cozy Entertaining Area: Even a small yard can host friends and family in style. Carve out a corner or section as an outdoor living/dining space. This could be as simple as a café-style bistro table with two chairs, or as elaborate as a built-in bench and a grill station – scale it to your space and needs. Ideally, place your entertaining zone nearest the house for convenience (and so you can extend your indoor hosting space outward through a patio door). Make it inviting with some outdoor cushions and maybe a compact fire pit or chiminea if safe to use. If your space is a narrow side yard like in the photo above, a long dining table against the fence can work, or a drop-leaf table that expands when you have guests. Use vertical space to your advantage here: string lights or hanging lanterns overhead will define the gathering spot and set a welcoming mood. An outdoor rug can also anchor the seating area and subtly separate it from the rest of the yard. The goal is to create a little “room” where people naturally gravitate to sit and chat.
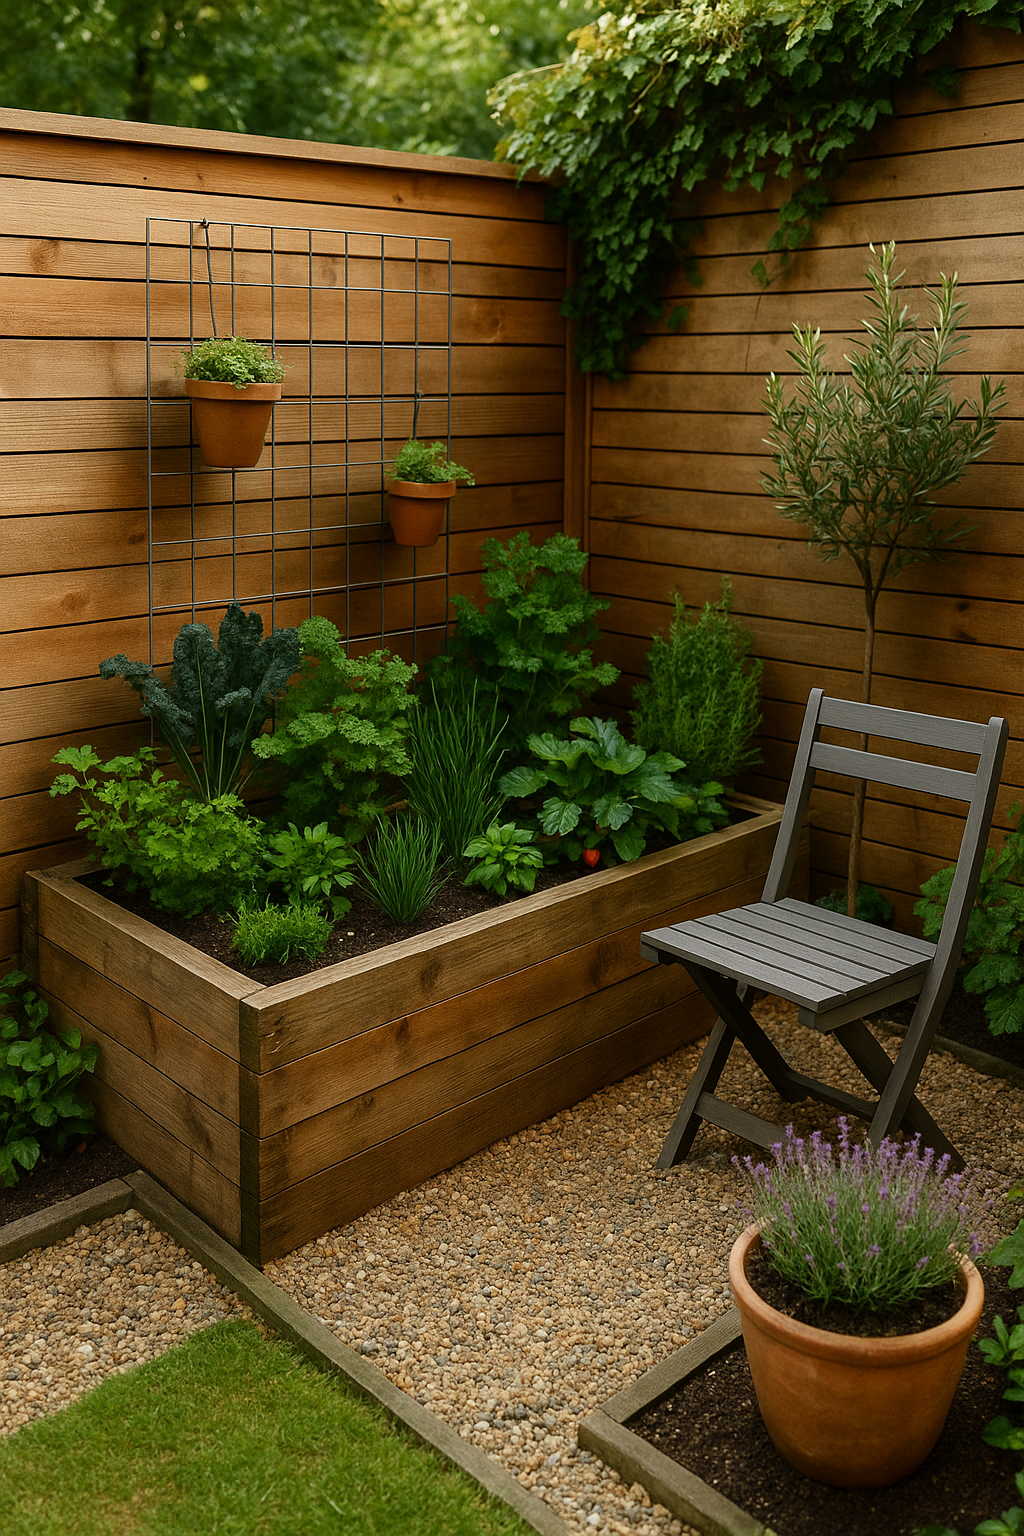
- Compact Kitchen Garden: There’s no reason a small yard can’t be productive. Dedicating even a tiny zone to growing food or herbs can be incredibly rewarding. If you have a sunny spot, consider a raised bed or a collection of containers for veggies and herbs. You might be surprised how much you can grow in just a few square feet. In fact, you can even raise vegetables on the tiniest patio using hanging baskets, railing planters, or vertical gardens – think tomatoes cascading from a hanging pot or a tower of strawberry planters. If you have a mere 4×4 foot patch of soil or can build a small raised box, you could try intensive methods like square-foot gardening to maximize yields. For instance, a single 4×4 bed divided into a grid can grow a mix of salad greens, carrots, bush beans, and more in a very organized, efficient way. If ground space is nonexistent, use a vertical trellis for climbers like cucumbers or beans, and grow herbs in wall-mounted planters. The kitchen garden zone might sit along a fence or in one corner, so it’s out of the way of foot traffic but still gets plenty of sun. By concentrating edibles in one area, you make maintenance (like watering and harvesting) easier, and you won’t infringe on your relaxation space when things get a bit wild in midsummer. Plus, it’s pretty fun for guests to see tomatoes or peppers thriving in your tiny yard – a great conversation starter!
- Relaxation Nook: Every garden needs a place to unwind. Create a zone that’s all about relaxation – your personal retreat within the retreat. In a small backyard, this might be a single comfortable chair or a cozy bench tucked among the plants. Think about where you might enjoy sitting with a morning coffee or an evening book. Perhaps under the dappled shade of a small tree or pergola, or next to a fragrant flower bed. A hammock can be a fantastic addition in a narrow yard (they often fit well slung between two fence posts or trees, and can be taken down when not in use). If you prefer something upright, a lounge chair with a small side table for your drink could do the trick. Add a throw pillow or outdoor blanket to make it extra inviting. For ambiance, surround your nook with a few planters of your favorite flowers or herbs, or incorporate a small water feature (even a little solar-powered fountain bowl) for soothing sounds. This relaxation corner doesn’t have to be large – even a 4-foot-wide side patio can host a comfy chair and a little garden stool as a footrest. The idea is to create a spot where you can mentally escape, even if you’re only steps away from your back door. Use the height around you as well: a trellis with a climbing jasmine or a wall-mounted planter of lavender can envelop your seating area in greenery and scent, enhancing the sense of privacy and peace.
- Dual-Purpose Spaces: In ultra-small gardens, you may find that one area has to play more than one role – and that’s perfectly fine. With a bit of creativity, you can design multi-functional zones that seamlessly shift uses. For example, your entertaining area might double as your gardening area: a lidded storage bench in the patio can hide garden tools and also serve as extra seating, or your dining table might also be your potting bench when guests aren’t over (just protect it with a tarp during messy projects). Likewise, a corner trellis can provide privacy for your seating nook while also acting as a vertical vegetable garden if you grow cucumbers or beans on it. If children use the yard, maybe a small cleared spot of lawn can be both their play zone and your yoga/stretch area – you simply roll out a mat when it’s your turn to use it. Use movable elements to your advantage: foldable chairs can be brought out or tucked away as needed, and planter boxes on wheels can be shifted to open up space for different activities. The beauty of a small garden is that it can transform quickly – a quiet weekday reading spot might turn into a weekend barbecue zone by just rearranging a few pieces. By designing flexibility into the layout, you ensure that your limited space lives larger than it really is.
In creating these zones, remember to maintain some cohesion through the overall design (common materials or colors, as mentioned in the design principles). You want each zone to feel special, but the garden should still read as one unified space. Transitions between zones can be gentle – a stepping stone path leading from the deck to the garden bed, or a container that visually ties an entertaining area to the adjacent herb garden. And don’t forget vertical zoning: overhead elements like a pergola, an umbrella, or even those string lights can “roof off” an area to make it feel like its own room, while lower barriers like raised beds or planters edge a zone without isolating it completely. With well-planned zones, your small garden will offer the excitement of discovery (“Oh, here’s a cute little seating area!”) and the practical benefits of organization, all while feeling cohesive and inviting.
Low-Maintenance Landscaping Choices
A small garden should be a joy, not a chore. One advantage of limited space is that it’s easier to maintain than a sprawling yard – but it’s still important to make smart choices that minimize upkeep. By opting for low-maintenance plants and design elements, you’ll spend more time relaxing in your garden and less time weeding, mowing, or fussing over finicky plants. Here are some strategies to keep your small garden easy-care:
- Shrink (or Skip) the Lawn: Traditional turf grass can be one of the most labor- and resource-intensive parts of a yard. Mowing, edging, fertilizing, and watering a lawn takes time and money. In a small space, consider whether you really need a grass area at all. Often, you can replace a lawn with attractive hardscaping or groundcover plants. Less lawn equals less work – that’s a big reason many small-space gardeners choose to install a patio, deck, or gravel courtyard instead of grass. Hardscape surfaces like pavers, brick, or crushed stone create a durable area that never needs mowing or watering and can be used year-round for seating or entertaining. If you love the look of green, you might opt for a groundcover plant (like clover, thyme, or sedum) that forms a low mat and doesn’t need weekly cutting. There are even eco-friendly lawn mixes with slow-growing grasses that only require trimming a few times a year. And if you do keep a small patch of lawn, make it as easy as possible – a flat, regular shape (easier to mow) and perhaps bordered by mowing strips or edging so grass doesn’t creep into beds. Or, go synthetic: a high-quality artificial turf can give the look of green without any maintenance (just be mindful it can get hot in full sun and doesn’t have the environmental benefits of real plants). The bottom line: don’t be afraid to ditch or scale down the traditional lawn in a small garden, because freeing yourself from mower duty can dramatically reduce maintenance.
- Choose Easy-Care Plants (Perennials and Natives): When selecting plants, favor those that thrive on benign neglect. Perennials, which come back every year on their own, are a great foundation – once established, many perennials are very hardy and low effort. You won’t have to replant your core garden each season as you would with annual flowers. Consider flowering perennials like coneflowers, Black-eyed Susans, daylilies, or lavender for reliable color year after year. Pair those with some evergreen shrubs or ornamental grasses for year-round structure. Even better, choose native plants adapted to your region’s climate and soil. Native species typically require far less fertilizer, watering, and pest control than exotic plants, since they’re well-suited to the local conditions. They also support local pollinators and wildlife, making your garden more ecologically healthy. Check with your state’s extension service or native plant society for lists of low-maintenance natives that do well in small gardens (for example, many dwarf cultivars of native shrubs exist that stay small and neat). Another tip: look for “dwarf” or “compact” varieties of your favorite plants – many popular flowering shrubs and even fruit trees come in petite forms that won’t outgrow a small space or require heavy pruning. By picking the right plants (ones that more or less take care of themselves), you set your garden up for easier long-term maintenance.
- Mulch and Groundcover Magic: Exposed soil in garden beds invites weeds to sprout and moisture to evaporate quickly. Covering the ground is a simple way to cut down on both weeding and watering. After planting your beds or containers, add a layer of mulch on top of the soil – this could be wood chips, bark, straw, pine needles, or even a layer of small rocks or gravel, depending on your aesthetic. Mulch suppresses weed growth by blocking light to weed seeds, and it helps the soil retain moisture, meaning you’ll need to water less frequently. As a bonus, organic mulches (like bark or compost) will break down slowly and improve your soil over time. In areas you don’t plant at all, consider using decorative gravel or stepping stones with creeping groundcover plants in between. For instance, a flagstone path with thyme or baby’s tears planted in the gaps is not only charming but also very low maintenance – you get a green look without having to mow or weed much (once the groundcover fills in, it out-competes most weeds). Essentially, keep the soil covered – either with plants or mulch – and you’ll have a healthier garden with fewer pesky chores.
- Smart Watering (and Less of It): Water can be a big maintenance factor – both the act of watering and the consequences of overwatering (like fungal issues or fast weed growth). Designing a small garden with water efficiency in mind will save you effort. First, group plants with similar water needs together (this is called hydrozoning). That way, you won’t overwater the drought-tolerant plants or underwater the thirsty ones, because each zone can be watered appropriately. For many small gardens, a simple drip irrigation system or soaker hose setup can be a game changer. These systems slowly deliver water right at the plant roots, which is efficient and also keeps the foliage dry (reducing disease). You can put the drip lines on a timer, and voilà – your garden essentially waters itself! If irrigation systems sound intimidating, even setting up a drip hose that you attach to an outdoor faucet with a timer is fairly easy DIY and inexpensive. In container gardens, use self-watering planters (which have reservoirs that keep soil moist) or group pots together so they shade each other’s soil – they’ll dry out more slowly than solitary pots baking in the sun. Also consider harvesting rainwater in a barrel; it’s free irrigation you can use during dry spells. And of course, by choosing native/drought-tolerant plants as mentioned, you’ll naturally need to water less. The goal is to give plants the water they need in an efficient way, and avoid setups that demand you stand there with a hose every evening.
- Low-Maintenance Design Hacks: A few design choices can further reduce upkeep in a small yard. Simplify your plant palette – having just a few types of plants repeated can be easier to care for than a dozen different species with different needs. Also, avoid invasive or fast-spreading plants that will take over and need constant pruning (for example, if you love bamboo or mint, keep them in containers or use clumping, non-invasive varieties). Consider using containers for plants that might otherwise overrun a small bed; containers limit their growth and make maintenance more contained. Incorporating some hardscape (like a gravel section or paver courtyard) not only reduces watering and weeding area but also gives a clean, organized look. When it comes to edging and borders, choose materials that won’t require a lot of effort to keep neat – a row of bricks or steel edging along a flower bed will prevent grass from creeping in, so you don’t have to edge it constantly. And think about long-term tasks: for instance, if autumn leaf drop is a big issue in your area, a small garden will fill up with leaves quickly – maybe opt for a gravel or deck surface that’s easy to rake or blow clean, rather than tiny rock mulch where leaves get stuck. By anticipating maintenance challenges and designing around them, you’ll save yourself headaches later. The measure of success here is a garden that largely takes care of itself – with just occasional check-ins from you to trim a little, tweak a little, and then get back to enjoying your outdoor haven.
Material Options for Fences, Paths, Raised Beds, and Seating
The materials you choose for the “bones” of your small garden – things like fences, paving, planters, and furniture – can have a big impact on both the look and functionality of the space. The right choices will complement your design and also work well in tight quarters (for example, a huge blocky bench might not suit a petite patio). Below, we’ll go through some material and structural options for key features in a small yard, along with tips on what works best in limited spaces.
Fences and Privacy Screens
Fencing in a small garden often serves multiple purposes: it defines the boundary, provides privacy, and can even act as a support for plants or decor. When selecting fence materials and styles, consider how they affect the sense of space. A solid, tall fence (like a standard 6-foot wooden privacy fence) will certainly give you seclusion, but it can also make a tiny yard feel more confined if used all the way around. Lighter-looking options can keep the space from feeling closed in. For instance, a horizontal slat fence (with narrow gaps between boards) offers privacy but lets a bit of light and breeze through, creating an airy, modern vibe. In fact, one clever small-yard design used a slatted fence with the boards spaced slightly wider than usual – this not only provided an attractive contemporary look but also reduced the amount of wood needed (saving money). The result was a feeling of enclosure without the “stockade” effect.
Another option is a lattice or trellis fence for portions of the perimeter. Lattice panels (criss-cross wood or vinyl strips) can be attached to a frame to create a semi-transparent wall. They screen views while giving a surface for vines to climb. Imagine a flowering clematis or climbing rose covering a lattice section – it becomes a green wall that’s much more pleasant to look at (for you and your neighbors) than a blank fence. Tall trellises or pergola-style screens can also partition off a seating area in a shared space like a townhouse yard, offering a sense of privacy where you need it most. If you prefer living barriers, consider using hedges or plants in place of a fence on one side. A row of narrow evergreen shrubs or a line of tall ornamental grasses in planters can form a soft privacy screen. For example, clumping bamboo in large pots can create a lush, tropical wall that sways beautifully in the breeze (just be sure to choose a clumping, non-invasive variety for sanity’s sake). Ornamental grasses like Miscanthus or switchgrass can grow to 5-6 feet in summer, making a seasonal screen that you can cut back in winter.
Material-wise, here are a few popular fence options and how they suit small gardens:
- Wood Fences: Classic and versatile. You can paint a wood fence a light color like white or pale gray to make a small yard feel a bit more open and bright (light colors reflect light). Or stain it a natural tone to blend with the plants. Vertical board fences give a more traditional look; horizontal boards skew modern and can make the space feel broader. Make sure to use weather-resistant wood (cedar, redwood, or treated lumber) or composite so it lasts. Wood is also easy to customize – you can cut it to any height or add decorative cut-outs, etc. Just remember that solid wood will block wind; in some small yards, that might create a heat trap or stagnant air, so slatted designs can help mitigate that.
- Vinyl or Composite Fences: These come in panels, often mimicking wood pickets or privacy fences. They are very low-maintenance (no painting or staining, just the occasional wash). For a small yard owner who doesn’t want to worry about upkeep, vinyl is attractive. The downside is, panels are usually solid – so you might consider patterns that have a lattice top or picket top to break up the mass. Also, vinyl tends to come in limited colors (white, tan, gray) – but white vinyl, for example, can give a crisp frame to a small garden and make green foliage pop. One tip: if you go with a solid fence, you can always soften it by mounting planters, hanging outdoor artwork, or letting vines climb on trellises attached to the fence to add visual interest.
- Metal Fences: Wrought iron or aluminum fences (the kind with vertical bars) are another possibility, especially for a more formal or classic look. They don’t do much for privacy since they’re mostly open, but they do keep the space feeling larger because you can see through them to the surroundings (your brain perceives more depth). If privacy is less a concern than security (keeping kids or pets in), an open metal fence might be a good choice for a small front yard garden, for example. You can always combine it with shrubs or a hedge behind to get the best of both worlds. Chain-link is a budget metal option – not the prettiest, but in a pinch, you can dress it up by weaving slats into it or training vines along it. Some creative gardeners have even treated chain-link as a trellis and grown flowering annual vines (like morning glories) to turn it into a living wall each summer.
- Creative Screens: In a small space, you can also get creative beyond typical fences. Things like bamboo fencing rolls can be attached to an existing chain-link or rail fence to provide a quick privacy solution with a tropical feel. There are also modern laser-cut metal panels with decorative patterns (ferns, geometric shapes, etc.) that you can mount on posts; these can act like artwork in the garden while giving some privacy. Outdoor curtains, as briefly mentioned earlier, can be installed on a pergola or a wire to create a flexible screen – you can draw them closed when you want seclusion and pull them open to enlarge the space visually at other times. Even a simple shade sail or piece of outdoor fabric overhead can make a space feel more intimate and hidden from above (useful if you have tall neighboring buildings). Just be cautious not to introduce too many different fence/screen styles in one small area – it could look patchwork. Often, doing a standard fence around the yard and then adding one accent screen where you need extra privacy or a focal point is a good approach.
Whichever fence or screen material you choose, remember that in a small garden it will be a prominent backdrop, so consider its aesthetic carefully. Many small-space gardeners treat the fence itself as a design element: painting a mural on it, hanging decor, or allowing plants to climb. For instance, a mirror mounted on a fence can visually “expand” the garden (more on that trick in the decor section). The fence doesn’t have to be just a boundary; it can support the whole design theme of your cozy space.
Paths and Surfaces
How you cover the ground in your small garden is a crucial decision. The ground plane is both your floor (for functionality) and a big part of the visual field. The materials you choose for paths, patios, or open areas will affect drainage, maintenance, and the overall style of your garden. In limited space, simplicity is usually best – too many different materials can chop it up. Often, you might only need one kind of primary surface with maybe a secondary accent material.
If your goal is an entertaining area or patio, you’ll likely be looking at some kind of paving. Common small-space patio materials include concrete pavers, natural stone, brick, decking (wood or composite), or gravel. Each has pros and cons:
- Pavers: Precast concrete or stone pavers are popular for patios and paths. They come in various sizes, shapes, and colors. Large-format pavers (like 24″x24″ squares or bigger) are very trendy and can actually make a small space feel larger because fewer seams means a cleaner, more expansive look. You can place them tightly for a solid patio or spaced out as stepping stones with gravel or groundcover in between. One budget-friendly idea is to use oversized concrete pavers instead of natural stone – you get a similar modern look for a fraction of the cost. You can even mix and match; for example, a small grid of big pavers set in pebbles looks chic and is cheaper than a whole cut-stone patio.
- Natural Stone: Flagstone or slate gives a beautiful, organic look, but real stone can be pricey for a large area. In a small garden, however, you might not need much, so it could be worth the splurge for a jewel-like little patio. Irregular flagstones can be pieced together into a puzzle-like terrace, which has a charming cottage feel (with moss or thyme in the cracks). Stone is permanent and adds value, but keep in mind it can be heavy work to install and often needs a good base to sit properly. For a DIY approach, some people use a few large flat stones as feature steps or a tiny terrace and surround them with pea gravel to avoid having to cut and fit many pieces.
- Brick: Brick pavers or reclaimed brick can lend a classic or rustic vibe. They’re usually small units (like 4″x8″), so laying a patio of brick in a tiny yard might visually busy it up unless you go with a simple pattern. One trick is to use brick as an edging or detail rather than the whole surface – for example, a brick border around a concrete paver area, or a single course of brick running through a gravel path for interest. Bricks are pretty affordable, especially if you find salvaged ones, and they’re manageable for a homeowner to install. Just be sure to lay them on a good sand or screenings base and consider a border to keep them from shifting.
- Decking (Wood or Composite): If your back door is elevated or you prefer a level, splinter-free surface, a small deck might be ideal. A simple platform deck made of cedar, redwood, or pressure-treated lumber can define an outdoor living area. You can build it low to the ground (often no permit needed if under a certain height) – essentially a wooden patio. Wood decks do need some maintenance (staining or sealing every few years), but the warmth of wood underfoot is hard to beat. Composites (made of wood fiber + plastic) are an alternative that require almost no upkeep and come in modern colors, but they can get hot in sun and are usually more expensive initially. In a tiny yard, a deck can also incorporate built-in seating or planters along the edges, which is a bonus (more on that in seating). One thing to note: if you go this route, plan for how water will drain (spacing between deck boards, etc.) and consider the impact of height (a 12-inch-high deck in a small yard might need a step and also changes the feel versus being on ground level).
- Gravel and Loose Materials: Pea gravel, crushed stone, or decomposed granite are fantastic for small gardens – they’re relatively cheap, easy to install, and allow rainwater to soak through (no puddling). A gravel patio or path has a casual, relaxed feel and pairs great with plants (think Mediterranean courtyard or modern zen garden). To make a stable seating area, you’d want to lay gravel fairly thick and use a compactable base underneath so chairs don’t sink. One advantage in DIY is you don’t have to do precise cutting – just spread it out and maybe use stepping stones for a solid surface under table legs. You can also get creative with gravel: different colors can be raked into patterns, and you can change the shape of a gravel area down the line if you redesign. Maintenance is minor – occasional raking, maybe adding a new layer every few years. For small paths, stepping stones in gravel or mulch are a timeless solution that breaks up the monotony of a single material. They also let you plant low groundcovers in between to soften the look.
- Mulch or Bark: In very planted gardens, you might use organic mulch (bark, wood chips, etc.) as the primary “floor” in areas, essentially extending the planting bed look across the whole yard. This is inexpensive and good for the soil, but not as durable for high-traffic spots (you’d want a solid path through if it’s a route you’ll walk daily). However, for out-of-the-way corners or interim solutions, covering bare ground with a thick layer of mulch is an easy fix to make it look tidy and suppress weeds. It can be a nice natural-looking play area ground for kids (soft to fall on). Just remember mulch will decompose and need refreshing.
For tiny gardens, combining materials can delineate areas: maybe a small deck by the house transitions to a gravel path leading to a back corner. Keep combinations simple – two is often enough (like deck + gravel, or pavers + groundcover). Too many surface changes can make the space choppy. Also consider permeability: If stormwater drainage is an issue, lean toward permeable options like gravel, spaced pavers, or pervious concrete pavers that let water soak in, rather than a big solid slab that might cause runoff.
Don’t overlook the visual effect of your surface choices. Light-colored materials (like blonde wood, light gray pavers, or white gravel) will reflect light and can make the space feel a bit larger and brighter, especially useful if your garden is shady or hemmed in by tall buildings. Dark materials (charcoal pavers, dark wood stain) can be very chic and make plants stand out, but in a small area, too much darkness might feel enclosing – a mix of light and dark can be nice (e.g., dark furniture on a light patio). And consider texture: smooth, uniform surfaces (like concrete or composite decking) read as more expansive than very busy ones (like a mosaic of multicolored pavers). Simplicity, again, is often the way to go.
One more creative idea: If you have an artistic streak, a small patio is a great place to do something bold like stenciling or painting a design. Some DIYers paint concrete or even a deck in patterns (like a faux rug or geometric shapes) to spice up a tiny courtyard. This adds personality without adding clutter. Just use proper outdoor paint/stain so it holds up to foot traffic.
To illustrate the power of thoughtful material choices, consider the example mentioned earlier: a homeowner combined a spaced-board slatted fence with affordable large concrete pavers and DIY planters made from leftover materials. The slatted wood fence gave structure and style without feeling heavy, the oversized pavers created a clean patio area at low cost, and even the planters and a table base were fashioned from extra construction materials. This kind of resourcefulness shows that you don’t need the most expensive stone or a fancy tile to have a stunning small garden – with a bit of creativity, basic materials can look upscale and custom. And by choosing materials wisely, you ensure your little garden is as functional as it is beautiful.
Raised Beds and Containers
Raised beds and containers are invaluable in small gardens – they allow you to control your soil, define planting areas neatly, and often save your back by bringing plants up to a easier working height. They also add architecture to the space, breaking up flat ground with some height and structure. When it comes to materials for raised beds and planters, you have quite a few options, each with its own look and cost:
- Wooden Raised Beds: Wood is one of the most common materials for DIY raised beds. Cedar and redwood are popular because they’re naturally rot-resistant and can last many years without treatment. They also have a pleasant, natural look that blends in with gardens. Pine or fir (including pressure-treated lumber) can be used too; just be cautious with older pressure-treated wood that may contain chemicals – newer treated lumber is generally safer, but lining the interior of the bed with heavy plastic can ease any concerns and also extend the wood’s life. For a small garden, think about scale: an 8’x4’ bed might be too big; you might do better with a couple of 4’x4’ or even 3’x3’ beds to allow access from all sides without stepping in. Also consider height – a 10-12” tall bed is standard and works well for most veggies/flowers. If you go taller (say 2’ bench height), the bed can double as a seating ledge which is great in tiny yards (people can perch on the edge during a barbecue, etc.). Just make sure the construction is sturdy if it’s going to bear weight – use thick boards and add support posts. Wood beds can be stained or painted on the outside to match your style (fun project: paint them the same color as your fence or house trim for a coordinated look).
- Metal Raised Beds: Galvanized metal raised bed kits (often those round or oval “stock tank” style planters) have become very popular. They add a cool modern-farmhouse aesthetic and are super durable. The corrugated metal look provides texture and contrast against plants. They typically come in gray or maybe colors, and in various sizes (some are trough-shaped, others more circular). Metal beds are great for small spaces because you can often find narrow sizes that fit along a fence or tuck into a corner. One thing to note: metal can heat up in full sun, which can warm the soil – this can be a pro or con depending on your climate and what you’re growing (great for heat-loving plants, maybe less so for things that prefer cool roots). Usually not a big issue if the plants have sufficient water. These beds don’t rot, obviously, so they’re long-lasting. And if you like the DIY approach, you can even repurpose other metal containers – old washtubs, barrels, etc. – as planters for a funky eclectic look.
- Stone or Brick Raised Beds: If you want a more permanent, structured feel, you could build small raised beds from stone, brick, or concrete blocks. For example, stackable concrete retaining wall blocks from the home center can be used to create a circular or rectangular bed with no mortar needed – just dry stack them in a staggered pattern. This is like building giant LEGOs and can look really polished. Bricks can be mortared to make a classic raised planter too, which can match a brick patio. Natural stone (if you have the budget) creates a beautiful rustic wall that also functions as a raised bed. Keep in mind masonry beds eat up a bit more space (the walls have thickness), so in a very small garden you might opt for thinner materials or just one feature bed made of stone as a focal point. The plus side is they won’t rot and can double as seating if made broad enough on top. A low stone wall around a flower bed at the edge of the patio, for instance, invites people to sit.
- Concrete Blocks (CMUs): For a quick and cheap raised bed, concrete cinder blocks (the hollow ones) can be laid out in a rectangle. You can leave them plain industrial gray or paint them. The cool part is the hollow cores of the blocks can be filled with soil and used to plant small succulents or herbs, making a quirky border of mini-planters around the main bed. It’s not the prettiest option for some, but it’s affordable and effective. Some folks even cap the blocks with flat capstones or wood to make it look nicer. This approach is good for utility gardens or if you think you might reconfigure things later (not as permanent as mortared brick).
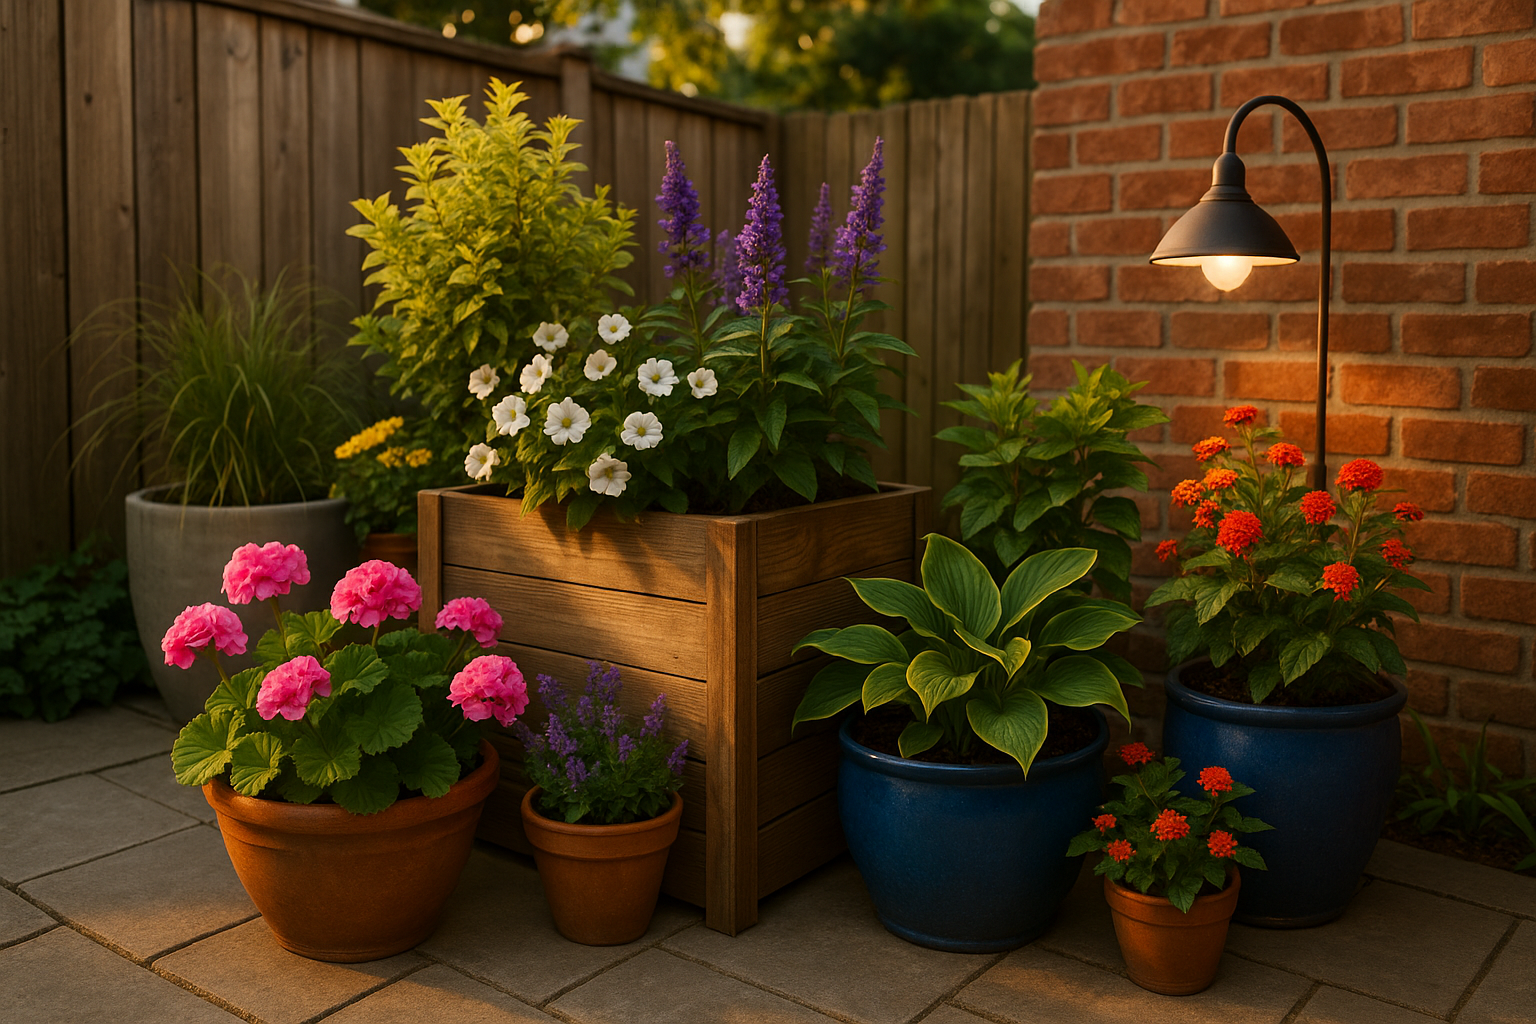
- Containers and Planters: Beyond built-in raised beds, containers are the small-space gardener’s best friend. They come in every shape and style imaginable. Terra cotta pots, ceramic planters, whiskey barrels, plastic pots, resin planters that look like stone or wood – take your pick. For a cohesive look, you might stick to one color scheme or material for containers, especially if you have many in view. For example, a collection of sleek white fiberglass pots can create a modern, unified feel, whereas a motley of different pots is more cottage/eclectic (which can be charming but might appear cluttered if overdone in a tiny space). Think about weight: lightweight resin or plastic pots are easier to move around (and won’t crack if you have freeze/thaw winters). Many of these mimic heavier materials convincingly now. Also consider size – a few larger containers often look better in a small space than lots of dinky ones which can feel like clutter. A big planter can be a statement piece and hold a substantial grouping of plants, acting almost like a raised bed. You can even put small trees or shrubs in large pots (just ensure they’re winter-hardy in your climate or can be protected).
- Vertical Planters: Since this section is about structures, it’s worth noting some planters go up. Tiered planters (like multi-level shelves or stair-step designs) let you cram more plants vertically. There are nifty space-saving planters such as strawberry towers, pallet planters (where a wooden pallet is turned upright into a planting wall), and hanging pocket planters made of felt or canvas that you attach to a fence. These vertical planters can be considered “containers” too – they’re just oriented differently. Use them where floor space is at a premium. For example, a vertical herb garden mounted right outside your kitchen door can hold dozens of plants in a few square feet of wall space. We’ll talk more about vertical gardening in the next section, but keep in mind the material for these: wood pallets should be safe (heat-treated, not chemical-treated) if you’re growing edibles; felt pockets need a waterproof backing if against a wall, etc. Many people DIY vertical planters from recycled materials – old gutters, shoe organizers, bookshelves – so materials can be very creative here.
A small garden often looks sharp with defined edges for beds and matching materials echoing through the space. For instance, if you have a cedar deck, building cedar raised beds and maybe even a matching cedar trellis ties everything together. Or if your patio is gray stone, some galvanized metal planters or gray concrete planters might complement the cool tones. Don’t be afraid to coordinate colors and textures for unity.
One more tip: mobility. Consider putting some of your containers on wheels or casters. There are rolling plant stands and even raised beds on wheels (like planter boxes with lockable casters). In a small space, being able to shift a planter easily can be great for reconfiguring the layout for a party, or just chasing the sun as seasons change. A mobile planter box could serve as a movable privacy screen – for example, a trough of tall grasses on wheels that you can roll wherever you need a visual barrier.
Lastly, remember that planters and raised beds can be more than utilitarian – they are design features too. Painting or decorating them can add pops of color. One idea for kids: paint a few containers in bright colors and let the kids have their own little garden pots. Or use stencils to put patterns on the outside of wooden beds. In tiny gardens, every element is on display, so have fun making your planters as stylish as the plants they contain.
Seating and Furniture
Furnishing a small garden is like furnishing a small living room – you want comfort and functionality without overcrowding. The right seating and furniture choices can actually make your space feel larger and more versatile. Here’s how to approach it:
Built-In Seating: In a tight outdoor space, built-ins can be a game changer. For example, installing a bench along a fence or wall uses space efficiently – you don’t need clearance to pull a chair in and out, and the bench can be just as long as your boundary, accommodating more people than separate chairs would in the same area. Built-in benches can also have storage beneath the seat (a flip-up top or doors) to hide away garden tools, cushions, or kids’ toys. This kind of multi-function furniture is gold in small gardens. Picture a corner L-shaped bench nestled by the back fence: it defines an instant lounge zone, offers lots of seating, and if you lift the seats, there’s room for your outdoor throw pillows and even a small folding table to tuck inside. If you’re DIY-inclined, building a simple bench from wood or cinder blocks + lumber is doable; otherwise, a handyman or landscape carpenter could create one to fit your space exactly. The advantage of custom built-ins is you can tailor them to awkward spots (like that 18-inch gap by the shed). Don’t forget, those raised planters we discussed can double as seating if the edges are wide enough and at chair height (~18-20 inches). Sitting on a planter ledge surrounded by flowers is a delightful experience for guests, and you’ve integrated seating into a necessary garden feature.
Smart Furniture Choices: When selecting individual furniture pieces, look for items that are proportional to the space and, ideally, serve more than one purpose. A two-in-one piece – like a bench that converts to a lounge, or a coffee table that contains storage – maximizes utility and can be more cost-effective than buying multiple single-use pieces. Folding and stacking furniture is also your friend. You might have a pair of nice chairs that stay out all the time, then keep a couple of lightweight folding chairs hung on the wall or stashed behind the shed for when company comes. There are folding picnic tables, collapsible stools, and extendable tables that give you flexibility. For instance, a drop-leaf table can stay small for daily use but open up to feed four at a dinner party. Outdoor storage ottomans or coffee tables with storage inside are fantastic – they give you a spot to put your feet up or your drink down, and inside they can hold the garden hose or kids’ toys or the BBQ tools, etc. Look for furniture labeled for outdoor use (teak, eucalyptus, metal, all-weather wicker, plastic) so it can handle the elements. In small spaces, pieces that are visually lightweight help – like chairs with slender legs or made of transparent materials (there are cool polycarbonate “ghost” chairs for outdoor use that almost disappear, making the area feel more open). Similarly, chairs or benches with open lattice backs or wire framing can feel less bulky than solid blocky forms.
Multi-Purpose Structures: Sometimes a structure can do double duty as furniture. A low wall (maybe 18” high) around a raised bed or patio can act as seating in a pinch – throw a cushion on it and it’s a bench. A sturdy planter box could be built with a flat ledge to sit on. A stair or two (if you have a high deck) could be broad enough to be additional perching spots during a party. If you incorporate a storage box or deck box, choose one strong enough to sit on, effectively making it a bench. There are designs for fold-down tables that attach to walls – imagine a narrow bar shelf that flips down from the fence when you want to have an al fresco drink, then folds back up to reclaim space. These kinds of solutions are great for ultra-small courtyards or balconies, and they can work in yards too.
Materials and Comfort: For seating, comfort is key – no one will enjoy the garden if the chair is painful! Luckily, even compact furniture can be made cozy with cushions and pillows. In a small garden, you probably don’t have room for plush outdoor sofas (though if you do, there are some love-seat sized sectionals on the market perfect for petite patios). More likely you’ll have something like a bistro set or a wooden bench. Invest in a good cushion or two that fit those seats; it makes a world of difference. Just remember to store cushions or choose weather-resistant ones if they’ll be exposed – many small yard owners use a storage bench or a deck box for cushions so they don’t have to haul them inside every time. As for material, teak or eucalyptus wood furniture is classic and sturdy – it can be left out (it weathers to gray unless oiled) and tends to be heavy enough not to blow around but not too bulky. Metal furniture (aluminum, wrought iron) can be more delicate-looking and is often slim in profile – great for a hint of vintage charm (think little café table) or modern minimalism. Just check that chairs are comfy shape-wise (you might need a pad on an iron chair). Modern synthetic wicker (resin woven) furniture offers a nice blend – it has an airy look, is usually lightweight, and pretty durable; a couple of wicker chairs with a small side table can look inviting without dominating a patio. And for a really small balcony or deck, consider floor cushions or low seating like poufs – they can be stacked or moved easily, and it creates a casual lounge feel (maybe not for everyone, but young folks love a good floor cushion hangout).
Layout and Storage: Once you have the pieces, arrange them in a way that doesn’t block the natural flow. In a narrow space, lining seating along the edges (like against a wall or fence) is usually smart, leaving the center open. Round tables can often fit better than square in tight spots (no sharp corners to bump). If you have a grill or bar cart, put it at the perimeter so it’s not in the walkway. Think vertical for storage: mount shelves or hooks on walls for things like garden tools, hats, or even hanging fold-up chairs. A tall, slim shelving unit or etagere can hold plants and also double as storage (baskets on the shelves with your stuff). Some small gardens have little sheds or closets – if you do, utilize that for all the clutter so your seating area stays clear.
To recap the furniture strategy: prioritize pieces that fit the scale, look for multi-functional designs (especially those with storage or fold-away abilities), and don’t skimp on comfort because you want to actually use this space. By doing so, you’ll have a garden that not only looks good but also works beautifully for your lifestyle. When your seating and tables suit the space, you’ll find it’s easy to transition the garden from a quiet morning coffee spot to an evening gathering space with friends, without tripping over anything or feeling cramped. It’s all about smart choices: for instance, selecting a bench with built-in storage gives you two benefits in one – exactly the kind of win-win that makes small-space living enjoyable.

Vertical Gardening and Space-Saving Structures
When horizontal space is limited, it’s time to start thinking vertical. Vertical gardening is all about using the upright dimension – walls, fences, trellises, poles, and ceilings – to grow plants and expand your usable area. In a small garden, it’s often the key to maximizing your greenery and creating a lush, layered look without consuming precious floor space. Essentially, you’re gardening up instead of out.
Vertical gardening comes in many forms, from simple DIY solutions to more elaborate installations. The concept is well-suited to urban areas and tiny yards where square footage is at a premium – you can adorn balconies, decks, patios, and fence lines with plants by taking advantage of vertical surfaces. By growing upward, you can accommodate an abundance of plants in a very small footprint. Just imagine a blank fence transformed into a green wall of herbs and flowers, or a bare side of a shed now covered with cucumber vines – that’s the magic of vertical gardening.
Here are several vertical gardening ideas and structures to inspire you:
- Trellises and Arbors: A trellis is a classic tool to lead plants upward. In a small garden, a trellis can be placed against a wall, along a fence, or even freestanding to act as a living partition. You can grow flowering vines like clematis, morning glories, or jasmine for fragrance – giving you a beautiful vertical display that takes up almost no ground space. For edible yields, consider vining vegetables: cucumbers, pole beans, peas, and even small squash varieties love to climb. A teepee trellis made of bamboo poles stuck in a pot can let beans or cherry tomatoes soar upward. Arbors (arched trellis structures, often over a gate or path) are wonderful for marking an “entrance” to a garden zone and can be covered in climbing roses, grapes, or wisteria. They add vertical interest and a bit of shade or enclosure. In a side yard, a series of trellises can even create an “outdoor hallway” effect, guiding you through the space while draped in greenery. Trellises come in many materials – wood lattice, metal grids, even repurposed items like an old crib frame or a section of cattle panel wire can serve as a sturdy vine support. One vertical trick: if you plant cucumbers or beans at the base of a trellis, you not only save horizontal space, but the trellis can cast a little shade on other plants that may need protection from harsh sun, doing double duty.
- Wall-Mounted Planters: Turn your walls or fences into a garden by using wall-mounted planting systems. There are modular living wall kits available that include a frame and pocket planters – you just add soil and plants to create a tapestry of foliage on the wall. But you can also DIY a solution: for example, attach window boxes or half-gutter sections to a fence to create rows of planters for shallow-rooted plants like lettuce, strawberries, or succulents. Hanging cloth or felt pocket planters are another popular approach (these often have multiple pockets in a grid; you’ve probably seen products that let you grow an herb garden on your apartment wall). Just ensure that there’s adequate support and that you can water them without everything dripping and staining your wall – many systems have trays or you can line the back with plastic. Pallet gardens are a well-loved DIY vertical project: take a wooden shipping pallet, staple landscape fabric to the back and bottom, fill it with soil, and plant in the gaps between slats – when you stand it upright, you have a rustic vertical planter great for flowers, herbs, or salad greens. Mount the pallet securely to a wall or lean it at an angle. The effect is like a bookshelf of plants. Wall planters are fantastic for herbs near the kitchen (snip, snip, dinner’s seasoned) or for an array of colorful annuals at eye level. They effectively give you extra “beds” that don’t take up floor area.
- Hanging Planters and Baskets: Look up – is there a place you could hang a plant? It could be from an overhead pergola beam, the edge of a roof or balcony, or a mounted bracket on a wall or fence. Hanging baskets overflowing with flowers like petunias or fuchsias can add a lush, cascading element to the vertical plane. You can also hang planters with trailing foliage (ivy, pothos for a shaded nook, etc.) to create a curtain of green. Edibles work too: cherry tomatoes and strawberries do well in hanging planters, and herbs like thyme or oregano will spill attractively over the sides. Macrame plant hangers have made a big comeback for a boho look – you can suspend small pots at different heights to form a floating garden. If you have a pergola or arbor, hang planters at various levels to fill the airspace with plants (just be mindful of weight and secure them well). Hanging planters essentially give you a second story of gardening above any ground-level plantings.
- Shelves, Ladders and Tiered Stands: Creating vertical layers doesn’t always mean the plants themselves climb – sometimes you simply stack the plants at different heights. A plant shelf or etagere is a piece of furniture (could be metal, wood, or bamboo) with multiple shelves that you can load up with potted plants. This is perfect against a wall or fence; it’s like an outdoor bookshelf for greenery and can also hold decorative items. A ladder shelf (literally an old wooden ladder, or a ladder-style plant stand) is a charming way to display plants in ascending tiers. You could lean an old ladder against a wall and attach pots to its rungs, or buy a tiered plant stand meant for patios. Tiered stands are great for a collection of herbs or succulents – they pack many pots into a tight footprint by going up vertically. Another idea: mounting simple shelves or crates on a wall to place planters on. For example, a couple of wooden crates attached to a fence can hold terra cotta pots as little “wall cubbies.” These shelving ideas not only save ground space, they also make a visual statement by grouping plants into a vertical tableau.
- Vertical Vegetable Structures: If you’re serious about maximizing vegetable output in a small space, there are interesting vertical systems to consider. For instance, vertical garden towers or stacking planters allow you to grow dozens of plants in a small cylindrical footprint. Some are tiered, interlocking pots that stack upward (often used for strawberries, herbs, lettuce, etc.), and some are more engineered solutions like hydroponic towers with multiple planting pockets and maybe even a built-in watering system. These can be pricey but are very space-efficient. Simpler: using tomato cages, stakes, or pole teepees to grow vertically upward rather than letting plants sprawl. Tomatoes, peppers, and eggplants can be grown in large pots with cages to keep them tall and contained. Cucumbers, melons, and squash can be trained up trellises or A-frame supports – you might need to use slings for heavy fruits like melons, but smaller squash and cucumbers will hang just fine. Not only does this save space, it can improve yields by getting plants up into better sun and air circulation. One cool DIY structure is an A-frame trellis over a raised bed: you plant vining crops at the base of two leaning trellises (forming an “A” shape), and the plants grow up to meet at the top. Underneath the trellis, in the shade, you can grow shade-tolerant plants or use that as a little storage area. The “green roof” of vines also looks neat and creates a tunnel effect.
- Pergolas, Arches, and Overhead Greening: We often forget the “ceiling” of the outdoor room. Even if you have no ground to spare, you might train plants overhead. A pergola or simple overhead frame can support grapevines, wisteria, or even hanging gourds or squash, effectively greening the sky. In a small patio, a full pergola draped with vines can create a sheltered, intimate feel – just be mindful of the shade it casts (you might love that or not, depending on if you want sun). If a pergola is too much, even a few strong wires or strings can be run across an area to support lightweight annual vines like morning glories or runner beans, creating a temporary leafy canopy. An arch or arbor at the garden entry, as mentioned, also counts as overhead vertical use. It invites climbing roses, honeysuckle, or other climbers to create a flowering tunnel. These overhead structures give height to the garden and draw the eye up, which is especially useful in a narrow space where otherwise everything is happening at ground level.
- Using Existing Vertical Elements: Don’t overlook things that are already vertical in your space – like fence posts, railings, or walls of the house/shed – as opportunities. Attach eye hooks to fence posts to string wire supports for vines. Use the sunny side of a shed to mount a grid of planters. If you have a railing around a deck or balcony, use railing planter boxes that hang over the side (they make ones that straddle the top of the rail securely). These are perfect for adding flowers or a cascade of greens without taking up any floor area on the deck itself. You can also fix trellises flat to walls (leaving a small gap for air circulation) and grow climbers up them to turn a blank wall into a garden feature.
When doing vertical gardening, consider weight and attachment carefully. Plants plus soil plus water can be heavy, so ensure whatever you hang or attach can support the load (hit studs or use masonry anchors in walls, use strong hooks for hanging, etc.). Safety first – you don’t want a wall of pots crashing down. Also think about watering: higher planters might dry out faster due to wind exposure, and water from top tiers can drip onto lower ones. You might set up drip irrigation lines going up your vertical structures, or make a habit of checking them frequently. Some vertical setups (like living wall systems) have built-in watering trays at the top or channels to distribute water.
Vertical gardening not only increases your planting area – it also adds a rich visual tapestry to a small garden. Climbing plants can cover plain fences with blooms, hanging baskets can sway and add movement up high, and a collection of wall pots can turn into a piece of living art. The vertical dimension brings the third dimension to your design, creating depth and lushness that can make a small space feel like a verdant jungle or a structured green gallery. It’s often the difference between a nice small garden and a stunning one that people can’t believe fits in the space. By “going up,” you truly make the most of what you have and create an immersive garden experience.
Budget Considerations and Time Commitment Estimates
Designing your dream small garden doesn’t have to mean draining your bank account or devoting every weekend to yard work. In this section, we’ll talk about balancing your budget and time – two very real constraints for most of us – while still achieving a great result. The key is planning smart, prioritizing what matters to you, and being resourceful. Here are some tips and considerations to keep your project realistic and enjoyable:
- Start with a Plan (and a Budget): It’s tempting to dive right in with buying plants or decor, but you’ll save money and time if you step back and make a simple plan first. List the features you want (patio, raised bed, lighting, etc.) and research ballpark costs for each. Determine how much you’re willing to spend overall and allocate it to high-priority items. Having a rough budget in place from the beginning can guide your decisions – maybe you realize that building a deck and a new fence might be too costly, so you opt for a gravel patio and refresh the existing fence with paint instead. A plan also helps you phase the project (more on that next). Remember, a thoughtful garden design need not be expensive to be beautiful. Often it’s the simple, creative ideas that shine, not the lavish materials. So scope out what you can afford and focus on clever design within those means.
- Implement in Phases: You don’t have to do everything at once. In fact, most people with great gardens got there over a few seasons or even years, adding bits as they could. Break your project into phases or individual projects that you can tackle one by one. Perhaps this spring you build the raised bed and do some planting, then in summer you add the patio furniture, and next year you put in that water feature. This approach spreads out costs and labor. It’s also a good way to learn as you go – you might discover after phase one that you want to tweak the plan for phase two. Few of us have a blank check and unlimited time to build the garden of our dreams from scratch; more likely, we make gradual improvements as time and budget allow. By prioritizing your wishlist, you can do the most important things first (say, establishing privacy or getting the veggie garden started) and save some less critical or more cosmetic upgrades for later. This staged approach not only is easier on your wallet, but it also keeps the project from feeling overwhelming. You’ll get to enjoy each piece as it comes together.
- DIY Where You Can (and Know When Not To): Sweat equity – your own labor – is often the biggest money-saver in any home or garden project. If you’re up for it, many small garden improvements are very DIY-friendly: painting a fence, assembling a pergola kit, building a simple raised bed or bench, laying a DIY stone path, planting containers, installing drip irrigation kits, hanging lights, etc. There’s a wealth of tutorials online that can guide you through these tasks. By doing it yourself, you primarily pay for materials, not labor, which can be a huge cost reduction. Plus, you can reuse materials – maybe you have some old bricks under the deck that can become a border, or you find free pallets to turn into a vertical planter. Repurposing and upcycling materials is like a badge of honor among DIY gardeners: an old ladder becomes a plant stand, a vintage sink becomes a planter, shipping pallets become furniture, and so on. Check online marketplaces or local community groups for free or cheap materials; people often give away rocks, pavers, pots, even plants. However, also know your limits. Some things are worth hiring out or getting a friend’s help if you’re not confident – for example, running electrical lines for lighting (for safety, you might stick to solar or plug-in solutions instead), or heavy concrete work which might need special tools. The cost of a mistake can be higher than the cost of a pro for certain tasks. Focus your DIY energy where you’ll get the most savings and satisfaction – like building that custom bench or doing the planting yourself.
- Good Design on a Dime: As mentioned, creativity can often substitute for cash. A few low-cost ideas can have high impact: paint is one of the cheapest ways to transform a space (consider painting your fence a new color or adding a painted pattern to a plain concrete slab). Plants can be obtained inexpensively if you’re savvy – grow from seed, take cuttings from friends’ gardens, or divide perennials (many gardeners are happy to share splits of plants like hostas, daylilies, iris, etc., for free). Instead of splurging on large plants, buy smaller ones and let them grow into the space; patience can save a lot of money. Use gravel or mulch in lieu of costly pavers for areas where appropriate. Shop second-hand for furniture or pots – you’d be amazed what a coat of weatherproof spray paint can do to revitalize an old metal bistro set or a collection of mismatched planters. Pallet wood or scrap lumber can become a charming mini-deck or raised bed with basically zero material cost if you find it. Also consider creative alternatives: want a fancy outdoor kitchen? Maybe a simple charcoal grill and a tiled countertop on a budget-friendly storage cabinet will serve the purpose at 1/10th the cost of a built-in. Or instead of an expensive custom water fountain, perhaps use a large ceramic bowl with a small solar fountain pump for a mini water feature. Keep an eye on clearance sections at garden centers or end-of-season sales for bargains on plants and decor. A small space means you don’t need a lot of any one thing – a couple of pavers or a gallon of paint might do the job – so often you can find remnants or leftovers cheaply. Challenge yourself to think outside the box and use what you have. You might end up with unique features that money just can’t buy, giving your garden personality and charm.
- Time Management: Little and Often: When it comes to time, consider not just the installation of your garden but also its upkeep. Installation-wise, doing a bit at a time (phasing, as above) is helpful if you’re fitting projects into weekends. A small garden project can often be completed in a weekend or two – for example, building a raised bed on Saturday and filling it with soil and plants on Sunday. If you break tasks down (digging one day, planting the next, etc.), it feels more doable. Also, enlist help if you can: a friend or family member’s labor in exchange for pizza can speed up things like moving soil or constructing a kit pergola. For maintenance, design with your realistic time commitment in mind. If you know you’re super busy and can only garden on occasional weekends, lean toward that low-maintenance design we discussed (hardscapes, drip irrigation, perennials, etc.). If you enjoy puttering in the garden daily, you might be fine with a few more high-maintenance choices. It’s easy to underestimate how much time ongoing maintenance can take – even a tiny garden needs regular watering, pruning, and cleaning. One approach: create a simple maintenance calendar for yourself. For instance, plan that every Saturday morning you’ll spend one hour on garden chores (weeding, deadheading, etc.). Small chunks regularly are easier to handle than a whole day once a season when things might get out of control. Also consider seasonal tasks: Do you have time (and space) to start seeds indoors in spring? If not, maybe you buy starters from a nursery instead. Can you bring pots into a garage for winter? If not, choose frost-hardy pot materials or plan to replace a few annuals each year. Being honest about the time you want to spend will guide your design to be enjoyable rather than burdensome.
- Leveraging Professional Help Wisely: Even on a budget, sometimes hiring a professional for a small, specific task can be worth it. For example, if you want a patio but have zero masonry skills, you might hire a hardscape installer for a day or two to lay a perfect paver foundation, and then you do the finishing touches. Or consult with a landscape designer just for an hour of their time to get ideas (some offer short consultations) which you then implement yourself. This can prevent costly mistakes or re-dos. If your budget is tight, save the professional help for things that truly need it (structural work, major tree pruning, electrical lines, etc.) and handle the fun, creative stuff yourself.
- Reuse and Freebies: A budget-friendly garden often involves scavenging and reusing materials. Keep an eye out for demolition or remodel waste – sometimes people give away bricks, stones, or plants when they redo a yard. Reuse your own materials: if you tear out an old deck, maybe the wood can become planter boxes. An old door could become a table. Check if your city has a “fill dirt” or compost giveaway program (some municipalities give residents free compost or mulch). Community plant swaps are a gem – you can trade your extra seedlings for someone else’s. Being resourceful not only saves money, it gives your garden a story and reduces waste, which is a win-win.
- Budget-Friendly Planting Plans: If funds are low for plants, prioritize a few impactful purchases and fill the rest with inexpensive strategies. For example, maybe you splurge on one ornamental tree or a statement shrub (since those take longest to grow and really define the space), but for the flower beds you buy packets of seeds for cosmos, zinnias, or wildflowers which cost only a few dollars and cover a lot of ground with color. Use fast-growing annual vines (like nasturtiums or morning glories) for quick vertical cover while you wait for a perennial climber to establish. Also, remember that a sparse new garden will fill in with time – resist the urge to overplant just to make it look “finished” immediately. Plant spacing exists for a reason, and filling every gap with plants can not only blow the budget but also lead to overcrowding and more maintenance down the line. Mulch the gaps for now and give plants a season or two; your wallet will thank you.
In summary, think of your small garden project as a journey rather than an overnight transformation. With careful planning, phased execution, some DIY spirit, and creative shortcuts, you can achieve a lot without overspending or overexerting yourself. And because the space is small, even modest investments of time and money can have a noticeable impact – one weekend and a few hundred dollars might completely refurbish a little patio corner with new paint, a chair, and some planters. By balancing your vision with your resources, you’ll create a garden that is not only delightful but also sustainable for you to build and maintain. After all, the goal is to enjoy the process and, ultimately, to enjoy the space you’ve created without stress. As the Penn State Extension wisely notes, few of us can do it all at once, but step by step, you can bring your garden dreams to life within your means.
Seasonal Flexibility and Container Planting
One of the joys of gardening is that it changes with the seasons – and in a small garden, you can really embrace seasonal shifts to keep your space engaging all year long. A fantastic way to do this is through container planting, which offers incredible flexibility. Containers (pots, planters, hanging baskets, etc.) are mobile and changeable; you can swap out plants as they go in and out of season, ensuring there’s always something fresh and beautiful in your garden. In fact, the flexibility and mobility of container gardening are among its biggest advantages: you can display spring bulbs, summer annuals, or fall bloomers as they come into season, simply moving plants in and out to add beauty throughout the year.
Flowering shrubs and spring bulbs bring vibrant seasonal color to a small garden. By planning for different bloom times – like early spring blossoms followed by summer flowers – you can keep a small space lively year-round. One strategy is to plan your container plantings in “waves” or rotations. For example, you might start the year with pots of tulips, daffodils, or hyacinths for spring color. These bulbs could be planted in the fall in some containers (kept in a cold spot over winter, or bought pre-chilled from a nursery) and as they bloom, they announce the start of the gardening season with cheerful color. Once their show is over in late spring, you don’t have to keep staring at dying bulb foliage – because in containers, you can simply replace them with something new. Early summer is a great time to pop in heat-loving annuals like petunias, geraniums, marigolds, or foliage plants like coleus. If ornamentals aren’t your thing, those same pots could be replanted with edibles – maybe a tomato plant or some basil and pepper, which will thrive through summer.
As summer progresses to fall, you again can refresh your containers. Perhaps swap the tired summer annuals for autumn charmers like mums, ornamental kale, pansies (which enjoy cooler weather), or even small ornamental peppers with purple or red fruits. A pot of asters or a cascading pumpkin vine can be lovely in fall. And when temperatures really drop, don’t think your garden has to go dark. For winter, especially in milder climates, you can have evergreen containers that carry the garden through. Choices include little conifers (dwarf Alberta spruce or junipers in pots), holly or nandina (for berries and color), or simply arranging evergreen boughs, twigs with berries, and dried seed heads in your empty containers to make a decorative display (like a winter bouquet in the pot). In many parts of the U.S., cold-hardy pansies and violas can bloom through much of the winter, and hellebores (Lenten rose) could be planted in a container for late winter blooms.
The beauty of using containers is you’re never stuck – if something isn’t working or looking good, you can change it out. And you can reposition pots as needed. Say one corner of your patio gets all the winter sun – you might move your sun-loving potted rosemary or a collection of succulents over there for the season, then shift them to a shadier spot come summer if they’d fry in the heat. Mobility is a big advantage: you can also pull pots into a protected spot (like against the house wall, or into a garage if portable) during extreme weather, or rotate them to give each side of a plant light for even growth.
Containers also allow you to grow plants that might not be hardy in your zone by treating them as seasonal “display” plants. For instance, in a cold-winter area you could have a pot of tropical canna lilies or a small citrus tree outdoors in summer (splendid for a lush vibe), then bring it inside or let it go dormant in a garage over winter. Conversely, in a hot climate, you might grow a pot of tulips by chilling the bulbs first – enjoying a taste of spring that wouldn’t normally thrive in, say, Florida.
For small gardens, seasonal container displays can be the stars of the show. You might have relatively static permanent plantings in the ground (like evergreen shrubs or perennials that provide structure), and then use a handful of prominent containers to create changing highlights throughout the year. A pair of beautiful pots by your door could have rotating displays: maybe spring bulbs, then summer geraniums, then autumn chrysanthemums, then an arrangement of evergreen branches with fairy lights in winter. This keeps your entrance looking great year-round without redoing the whole garden each time – you just replant those two pots.
If you have a tiny balcony or patio with only containers, you can still do the seasonal switcheroo. In fact, it’s even more important to refresh container plantings because that’s your entire garden. Embrace the idea that some plants are meant to be temporary, and that’s okay. Garden centers and even grocery stores often sell seasonal plants relatively cheaply (a tray of pansies in spring, a decorative pepper in fall, etc.). You can compost or gift away the previous plants if they’re spent – or if they’re perennials, find a spot in the ground somewhere for them to live on. For example, after tulips finish in a pot, you could transplant the bulbs into a garden bed or even a community garden and see if they come up next year, rather than discarding them.
Another aspect of seasonal flexibility is thinking of the garden’s uses throughout the year. A small garden can often change its function by season. In summer you might use it for grilling and dining outside frequently, whereas in winter maybe it becomes a serene view from indoors (so you plan some elements that look good from the window, like an interesting branch structure or winter-hardy planter). If you get snow, having a bird feeder or some winter berries out there can attract birds – turning your garden into a little wildlife viewing station in the cold months.
One more way to keep a small garden dynamic is with seasonal decor in addition to plants. For example, you could hang a seasonal wreath or sign on a fence (flowers for spring, patriotic colors for July, harvest themes for fall, holiday wreath for winter). String lights can be swapped out or re-arranged for festive looks (orange lights for Halloween in the garden, or twinkle lights shaped like snowflakes in winter). These touches add fun and keep the garden feeling like an extension of your living space that changes with holidays and seasons.
Keep in mind the practical side: containers need winter care in cold regions. Terracotta and ceramic can crack with freeze/thaw cycles if left wet; consider using fiberglass, plastic, or concrete planters for things that will be out year-round, or at least emptying ceramic pots and storing them inside for winter. Plants in pots are more exposed to cold – a plant that’s hardy in the ground to zone 5 might only survive to zone 7 in a pot, because the roots get colder. So either choose slightly tougher plants for containers or be prepared to protect them (wrap the pot in burlap, group them together against a wall, etc., to insulate). Conversely in summer, container plants may need daily watering in hot weather since they can dry out faster – using larger pots and water-retentive potting mix, or self-watering inserts, can mitigate that.
In summary, container gardening gives you incredible seasonal flexibility. You can essentially “redecorate” your garden with plants as often as you like. This keeps a small space continuously interesting – there’s always something coming into bloom or being swapped in, so the garden never feels static or boring. Plus, it allows you to experiment: you can try out a plant in a pot and see how you like it or how it performs, with the option to rearrange or replace it easily. Your small garden can celebrate spring, burst with summer, mellow into fall, and still have structure in winter, all by the clever use of containers and seasonal plantings. It’s a bit like having a rotating art exhibit on your patio – each season brings new “pieces” to admire, keeping you engaged and delighted year-round.
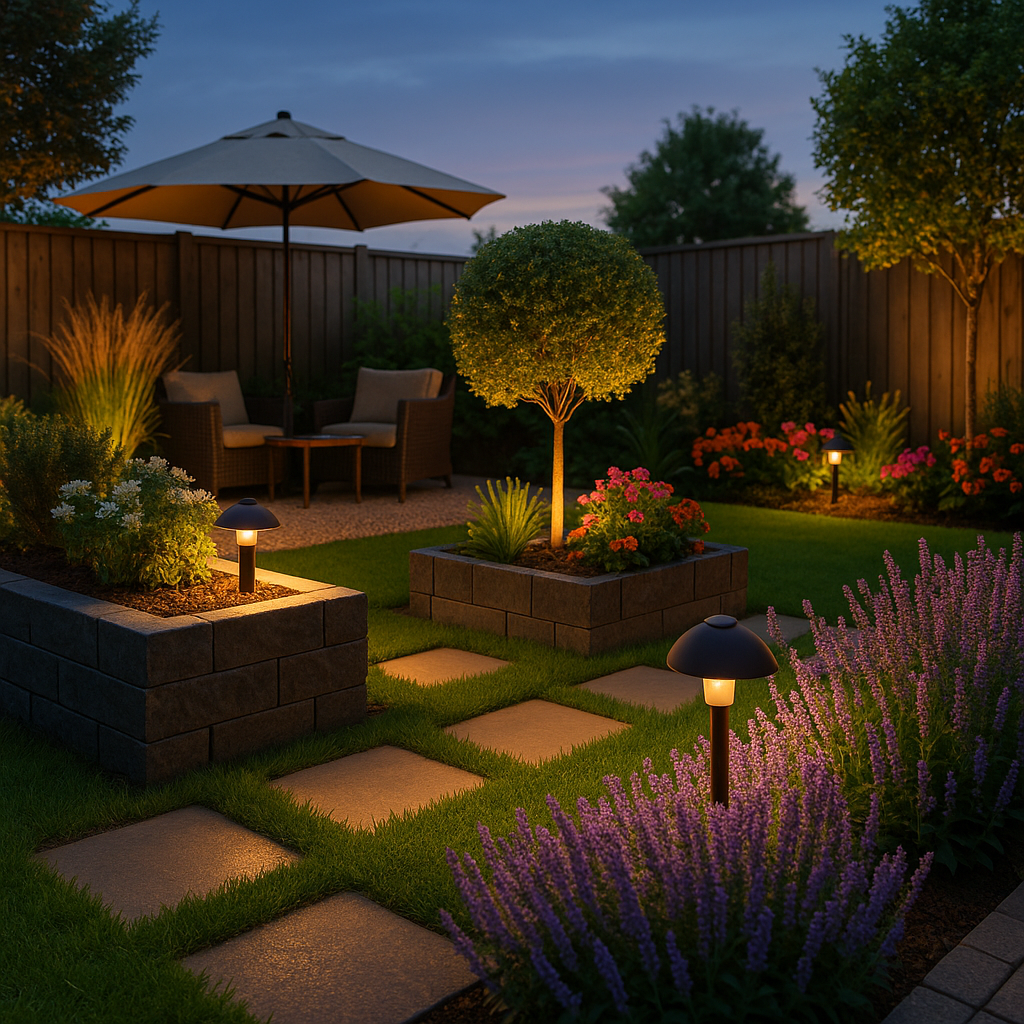
Lighting and Decor to Enhance Small Spaces
The final touches in a garden – lighting and decor – can really make a small space shine (sometimes literally!). These elements elevate your garden from simply functional to truly atmospheric and personal. They’re also great for small budgets and small spaces because they often don’t require much room and can be added gradually. Let’s break down some ideas for lighting and decor that especially suit small gardens:
- String Lights and Ambient Lighting: One of the easiest and most enchanting additions to any small outdoor space is a strand or two of string lights. Whether you choose classic white fairy lights, Edison bulb-style cafe lights, or lantern-shaped strings, they instantly create a warm, inviting glow. In a small garden, string lights serve multiple purposes: they provide functional illumination and they visually expand the space by drawing the eye upward and outward. By stretching lights above a seating or grilling area, you help merge those separate zones and make it easier to entertain after dark. You don’t even need permanent structures to hang them – you can attach strings to the house, a fence, or use shepherd’s hooks/posts set in planters to hold them up. Many people crisscross lights overhead to form a “ceiling” of light for an intimate patio effect. As an added bonus, string lights are much easier to install than wired fixtures and often run on a simple plug or even solar power. Aside from string lights, consider other ambient lighting: solar-powered stake lights can line a path or accent a flower bed (no wiring, they charge by day and glow by night). LED candles or lanterns on a table are wonderful for mood (look for outdoor-rated ones, and weight them or bring them in so they don’t blow away). If you have a pergola or tree, hanging a few solar lanterns or even mason jars with fairy lights can add a magical touch. For a small modern courtyard, you might incorporate low-voltage landscape lighting – like small spotlights to uplight a feature plant or wash a fence with light – which makes the space feel larger at night by adding depth (dark corners can seem to extend beyond what you see lit). The key with lighting is to create a cozy atmosphere and highlight what you want to see (a pathway, your beautiful tree, the sitting area) while leaving other areas dim – that contrast actually tricks the eye into perceiving a more expansive environment.
- Outdoor Rugs and Textiles: Adding an outdoor rug is a decor trick that can define a space and add color/pattern without taking up any vertical space. A rug under your seating area, for instance, instantly creates an “outdoor living room” vibe and makes it feel like a distinct area. Choose a rug made from polypropylene or other outdoor fabric that can handle moisture and is easy to clean (many you can just hose off). In a small yard, a rug with a bold pattern or color can be a focal decor piece, especially if your furniture is plain. It also feels nice underfoot and can cover up less-than-perfect patio floors. Similarly, throw outdoor cushions or pillows on your chairs or bench to bring indoor-level comfort and style outside. You can pick vibrant colors that complement your garden’s flowers or go with soothing neutrals – whichever suits your vibe. Just remember to store textiles out of the rain when not in use (in that bench storage or a deck box) to prolong their life. These soft furnishings not only make the space more comfortable physically, they also signal that this is a place to relax and lounge.
- Mirrors and Reflective Tricks: This is a classic small-space decorator’s trick that can work outdoors too: use a mirror to create the illusion of more space. Mounting a mirror on a fence or wall can make it seem like there’s a window or doorway into another garden, visually expanding the area. It also reflects light and greenery, doubling the view of your plants. For safety, use an outdoor-rated mirror (or mirror material like polished metal or acrylic) that can withstand weather and won’t easily shatter. One neat idea is to frame a mirror with a windowpane frame to make it look like a window looking into a secret garden. Place some plants around it and it can really fool the eye at first glance. Even reflections in other things – a shiny gazing globe, a stainless steel planter, or water in a birdbath – add a bit of sparkle and depth to a small garden. Just be mindful of positioning; you don’t want to accidentally create glare or signal to birds in a way that confuses them. But done right, reflective surfaces are like adding “air” to the layout.
- Vertical Decor and Wall Art: In a tight footprint, the vertical surfaces are prime real estate for decoration. Just as you might hang art or shelves inside your home, you can adorn fences and walls outside. Consider outdoor wall art such as metal art pieces, ceramic plaques, or even a weather-resistant canvas. These can bring personality (maybe a sun motif, or a favorite quote painted on wood) and fill blank fence space nicely. Clocks, thermometers, or signs can also be decorative and functional. Another idea: hang collections – for example, decorative plates or mirrors, or a set of sculptural planters. The fence is also a great place for a piece of functional decor like a vertical herb planter or a series of decorative hooks holding lanterns or hanging candle holders. A trellis with nothing on it yet can itself be a geometric art piece on the wall until a plant covers it. And as mentioned, a painted mural on a fence can be a wonderful art injection – even simple geometric color blocks could enliven a dull wall. The key is to choose a theme or style and sprinkle the decor without overloading (too many small decorations might read as clutter, so maybe go for fewer, larger-impact pieces). A little sculpture or two in the planting beds can also be lovely – think a small Buddha statue nestled among ferns for a zen vibe, or a whimsical gnome peeking out, whatever suits your taste.
- Small Water Features: The sound of water can transform a space into a tranquil retreat. In a small garden, you likely won’t have room for a large pond or fountain, but there are compact water feature options. For example, a simple recirculating fountain bowl: you can purchase a ready-made one or DIY with a large ceramic pot, a small pump, and some stones. The pump pushes water up and it trickles over the stones, giving that gentle babbling sound. Because it’s just a bowl, you can place it on a deck or patio – no digging required. There are also fountains that hang on a wall or fence, cascading water into a small basin. These wall fountains are great space-savers and can be quite decorative (traditional European-style, or modern slate designs, etc.). If you have a table on the patio, even a little tabletop fountain can do the trick. And don’t forget the wildlife: a birdbath is both decor and a great way to attract birds (which add life to the garden). There are birdbaths that are bowl + stand which you can tuck in a corner, or you can hang a shallow dish from a tree. Moving water (like a small bubbler) will attract birds even more and prevent mosquitoes. The scale of water features should match the space – small garden, small fountain. But even a tiny water element can provide that pleasant sensory experience and become a focal point. Just ensure you have access to power (or use a solar pump) and plan to refill it due to evaporation.
- Plants as Decor: This might sound obvious, but don’t forget that plants themselves are decor too. In a small garden, you can treat certain plants like artistic features. For instance, an espaliered fruit tree (trained flat against a wall) is living art with its symmetrical branches. A topiary or a uniquely shaped driftwood placed among groundcover becomes a sculptural element. If you have favorite plants, display them prominently – maybe your love of cacti means you arrange a cool cactus/succulent display in a special container that becomes a conversation piece. Or you create a theme like a moonlight garden (white and silver plants that shine in evening) which doubles as decor for nighttime gatherings. You can also use plant color as decor accents: if your decor scheme is blue and yellow, plant some blue hydrangeas and yellow coreopsis to echo that in the garden itself.
- Personal Touches: Ultimately, decor should reflect you. Small gardens often feel very personal because they are so closely tied to the homeowner’s daily life. So include things that make you happy: maybe it’s a wind chime singing softly in the breeze, or a flag of your favorite sports team on game days. Maybe you hang a hammock with a colorful hammock blanket, which becomes part of the visual appeal. Perhaps you have a collection of pretty wine bottles that you turn into a bottle border or hang on a fence as suncatchers. If you have kids, maybe a section of fence is painted with chalkboard paint for them to draw on (temporary art!). These individual touches are what transform a generic patio into your special haven.
When adding decor and lighting, a little goes a long way in a small space. You don’t need a lot of objects – just a few well-chosen pieces to create focal points and atmosphere. One word of caution: especially with small spaces, keep it cohesive. It’s easy to end up with a mishmash of styles if you grab every cute thing you see. Try to stick to a general theme or color scheme. For example, if you want a boho eclectic vibe, then yes mix and match by all means; but if you’re aiming for modern minimalist, be selective and go for one or two statement pieces.
Lighting, particularly, has a huge impact. A string of lights can make a space useable after dusk, essentially extending the hours you can enjoy your garden. And in winter, when it gets dark early, having some attractive lights means you can still look out and enjoy the scene (maybe your little tree wrapped in fairy lights, or a lantern glowing). Solar lights are wonderful because they require no ongoing effort – they charge up and turn on automatically, adding a nice glow along pathways or near the door.
In sum, don’t skip the finishing touches. They are the layer that makes your small garden feel polished and cozy. With thoughtful lighting, your garden will come alive at night, and with personal decor, it will feel like an outdoor extension of your home’s personality. It’s often these small additions – a twinkle of string lights, the gentle trickle of a fountain, a pop of artwork on the fence – that elicit the “wow, I love this space” reactions from guests and give you that warm fuzzy feeling when you step outside. And ultimately, that’s what a garden, no matter its size, is all about: creating a little world that brings you joy.
Conclusion
Designing a small garden is a rewarding adventure in creativity. Limited space by no means limits the enjoyment or beauty you can achieve – in fact, it often inspires the most imaginative solutions. By applying smart design principles, you can make a humble patch of outdoors feel purposeful, inviting, and even more spacious than it really is. You’ve seen how thoughtful layouts can turn a single yard into a versatile collection of “rooms,” how choosing the right plants and materials can minimize chores while maximizing impact, and how every vertical plane and seasonal change is an opportunity to add interest. Whether your budget is shoestring or generous, and whether you’re a DIY novice or a seasoned builder, there’s a path forward to create a garden you’ll love.
Remember, the goal is not a perfect garden lifted from a magazine, but your perfect sanctuary that reflects your needs and style. Maybe that’s a calm retreat with a simple bench among lush greenery, or maybe it’s a lively social spot with a fire pit and veggie planters – or a bit of both. Use the ideas here as inspiration, and don’t be afraid to adapt them to your space. Start small, start smart, and build up layer by layer. One of the wonderful things about gardens is that they’re living, evolving creations – you can always tweak and grow into the space over time.
As you embark on transforming your limited space, keep the tone in mind: practical and positive. There’s almost always a do-it-yourself solution or a clever hack for any challenge a small yard throws at you. And if something doesn’t work right away, iterate and try again – that’s part of the fun. Your small garden is a canvas that you can keep painting across the seasons and years, each addition making it a little more you.
In the end, no matter its size, a garden offers the simple pleasures of being outdoors – feeling the sun, smelling the flowers, listening to the birds or the trickle of a fountain, and having a personal green space to unwind. Those rewards far outweigh the effort it takes to set up. So go ahead: take that first step, implement one idea, then the next. Before you know it, your once-plain patch will be a thriving, charming oasis that friends and family can’t believe you created in such a small spot. More importantly, it will be a place that brings you daily joy. Happy gardening, and enjoy every minute in your new little paradise.