This step by step diy woodworking project is about hammock stand plans free. Building a basic hammock stand for your garden is a great project if you like to spend time outdoor. Irrespective of you budget, make sure you gather all the tool before starting the project, as to save both money and time. Make sure the structure is rigid an well locked together, if you want to get a professional result.
If you are going to place the hammock stand outdoor, we recommend you to invest in high quality lumber that is weather-resistant (cedar, pine, redwood). Take accurate measurements and align the components at both ends before inserting the screws. Work with attention and adjust the size and the design of the stand to your tastes and budget before buying the materials and taking car of the assembly.
Building a hammock stand
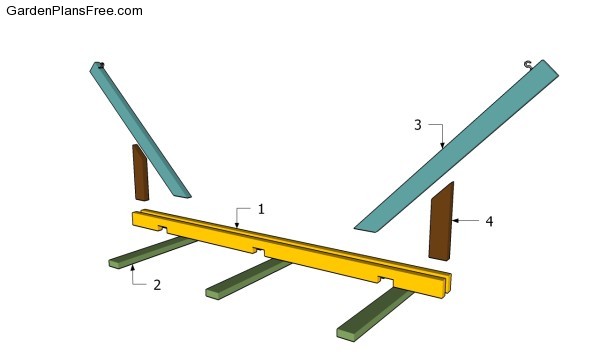
Building a hammock stand
Materials
- 1 – 2 pieces of 2×6 lumber – 88″ BASE
- 2 – 3 pieces of 2×4 lumber – 36″ SLATS
- 3 – 2 pieces of 2×4 lumber – 48″ SUPPORTS
- 4 – 2 pieces of 2×4 lumber – 15″ BRACES
- 2 pieces of 2×6 lumber – 8 ft
- 3 pieces of 2×4 lumber – 8 ft
- 4 pieces 5″ carriage bolts
- 50 pieces of 2 1/2″ screws
- 20 pieces of 3 1/2″ screws
- wood glue, stain/paint
- hardware
Tools
- Hammer, Tape measure, Carpentry square
- Miter saw, Drill machinery, Screwdriver, Sander, Router
- Safety Gloves, Safety Glasses, Respiratory Mask
Time
- One day
Hammock stand plans
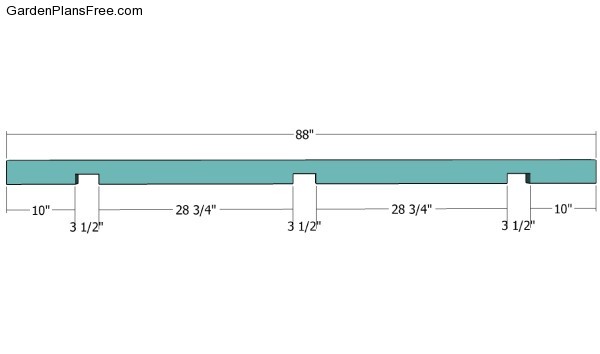
Building the frame
The first step of the woodworking project is to build the base of the hammock stand. As you can easily notice in the plans, we recommend you to build the supports out of 2×6 lumber.
PRO TIP: Cut out notches inside the beams following the pattern describe din the image. Make several cuts inside the marked area and clean the recess by using a chisel and a piece of sandpaper.
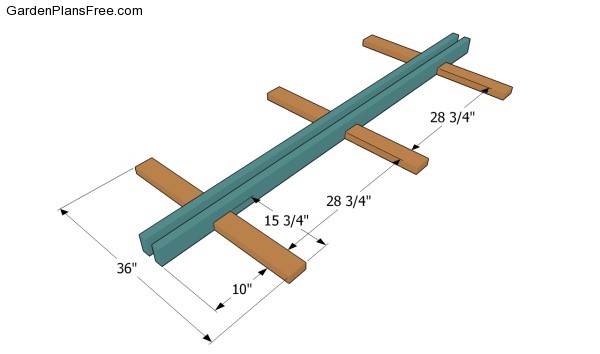
Building the base of the hammock
The next step of the project is to attach the slats to the base of the hammock stand. Therefore, fit the slats inside the notches making sure they are perfectly centered and horizontal. Work on a level surface and leave 1 1/2″ between the beams, as the leave enough room for the rest of the components.
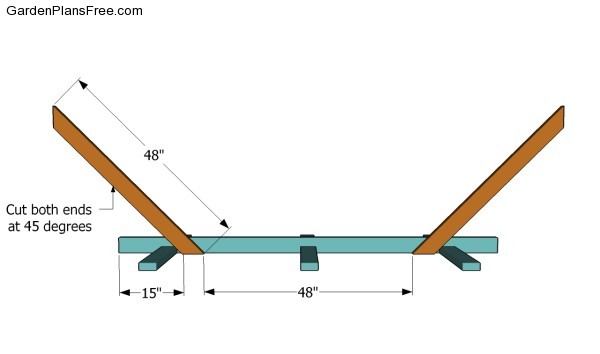
Attaching the supports
Continue the woodworking project by attaching the wooden supports. In order to get the job done in a professional manner, we recommend you to cut both ends of the supports at 45 degrees by using a circular saw.
PRO TIP: Drill pilot holes through the 2×6 beams and insert carriage bolts into the supports. Add waterproof glue to the joints, if you want to reinforce the hammock stand
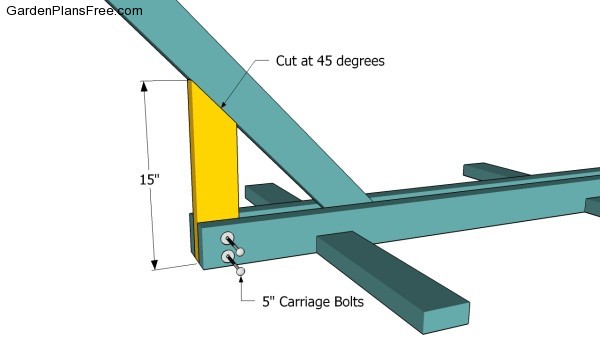
Attaching the braces
Afterwards, fit the braces to the frame of the stand, as shown in the free plans. Cut one end of the braces at 45 degrees and fit them between the base components. Drill pilot holes and insert carriage bolts after making sure the supports are plumb. Lock the brace to the diagonal components by driving in several 3 1/2″ galvanized screws.

Attaching the hook screws
One of the last steps of the project is to insert hook screws to both sides of the hammock stand. Align the eye screws one with another, as shown in the plans.

Hammock stand plans free
Lastly, we recommend you to get the final touches done. Therefore, fill the holes with putty and sand the surface thoroughly, after it gets dry. Check if the components are locked together properly, before using it for the very first time.
PRO TIP: Apply a few coats of paint to the wooden components, in order to protect them from water damage. Move the hammock stand to a proper location that is not exposed to excessive moisture.
This diy project was about hammock stand plans free. If you have enjoyed the free project, we recommend you to share it with your friends, by using the social media widgets. LIKE us on Facebook in order to be the first that gets our latest projects.


4 comments
In the material list says that the SLATS are 2×4. In the figure above named “Building the frame” says that the recess is 3 1/2”. Which of two is correct. Pls clarify.
Gerry.
Both, since 2x4s are 1 1/2″ x 3 1/2″
built for my Teardrop camper this will be fun! thanks
For what size hammock are these plans for?