This detailed garden project is about adirondack chair plans free. Building a wooden chair for your garden is a quick project that shouldn’t take more than a few days even for beginners. Take a look over the instructions and get used to the basic woodworking techniques before buying the materials. Invest in quality lumber (redwood, cedar or pine), as the components will be highly durable and have a nice appearance. See all furniture plans HERE.
We strongly recommend you to take a look over the rest of our plans, as there are may projects that could suit your needs and budget. Moreover, plan every aspect of the project to your needs before starting the actual construction. In this manner you can prevent mistakes and keep all the costs under control. Sand the edges of the slats with a sand-block in order to enhance the look of the chair.
Building an adirondack chair
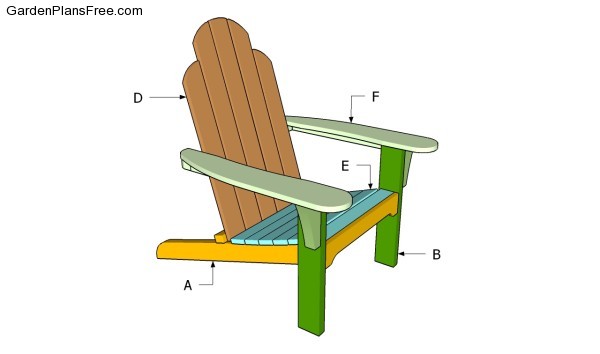
Building an adirondack chair
Materials
- A – 2 pieces of 2×4 lumber – 35″, 1 piece of 2×3 lumber – 32″, 1 piece of 1×4 lumber – 21″ LEGS
- B – 2 pieces of 2×4 lumber – 21″ LEGS
- D – 2 pieces of 1×4 lumber – 27″ long, 2 pieces – 32 1/4″, 1 piece – 32 3/4″ BACKREST
- E – 6 pieces of 1×4 lumber – 21″ SEAT
- F – 2 pieces of 2×2 lumber – 20 1/4″, 1 piece of 2×3 lumber – 25 1/2″, 2 pieces of 1×6 lumber – 29 1/2″ ARMRESTS
- 1 piece of 2×4 lumber – 10 ft
- 2 pieces of 1×4 lumber – 10 ft
- 1 piece of 2×3 lumber – 8 ft
- 1 piece of 1×6 lumber – 8 ft
- 1 piece of 2×2 lumber – 8 ft
- 50 pieces of 2 1/2″ screws
- 50 pieces of 1 5/8″ screws
- wood glue, stain/paint
Tools
- Hammer, Tape measure, Carpentry square
- Miter saw, Drill machinery, Screwdriver, Sander, Router
- Safety Gloves, Safety Glasses, Respiratory Mask
Time
- One day
Adirondack chair plans free
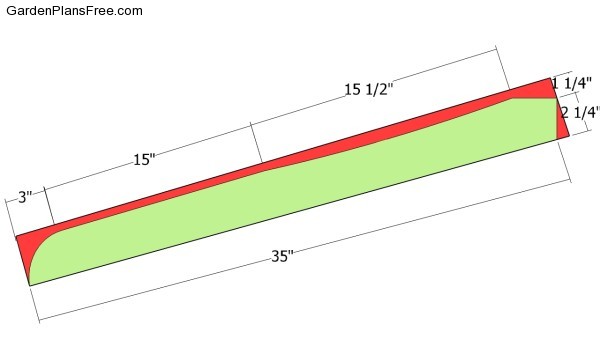
Building the back legs
The first step of the woodworking project is to build the back legs. As you can see in the image, we recommend you to build the components from 2×4 lumber, making sure you follow the pattern shown in the plans. Use a good jigsaw to make the cuts and smooth the edges with sandpaper.
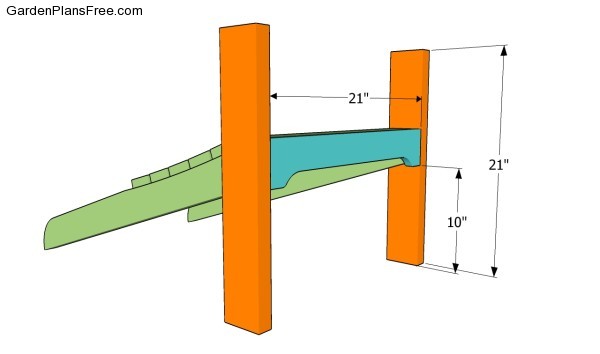
Building the chair frame
The next step of the project is to attach the front legs to the frame, as well as the frame of the chair. As you can see in the plans, we recommend you to plumb the sides of the adirondack chair with a spirit level and to insert 2 1/2″ screws, after drilling pilot holes. Align the components at both ends, if you want to get the job done in a professional manner.
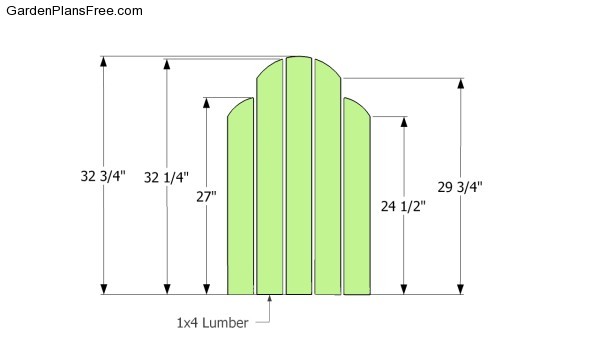
Building the back support
Building the back support is a straight forward job, but you need to make sure the top of the slats will have a decorative shape. Mark the cut lines with a pencil and make the cuts with a jigsaw. Leave about 3/4″ between the slats, if you want to get a a professional result.
Support
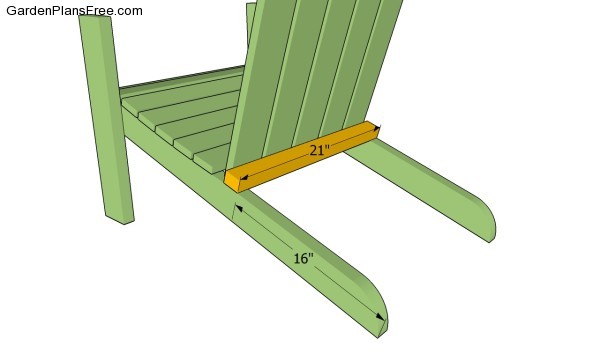
Attaching the back support to the frame of the chair is a complex process, as it requires at least two persons. One should hold the components together, while the other one drives the 2 1/2″ screws in. Align everything at both ends and make sure the back support has a 15 degrees lean.
Building the backrest frame
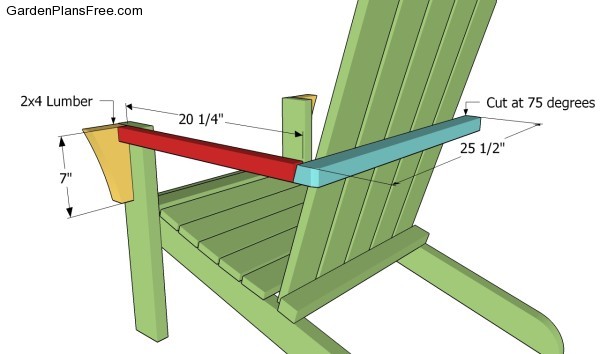
Cut one edge of a 2×3 slat at about 75 degrees and attach it to the back of the slats, as in the free adirondack plans (set the miter saw at 15 degrees). Continue the project by installing the armrest supports between the front legs and the backrest frame. Place a spirit level on the supports to check if they are perfectly horizontal.
Fitting the seat slats
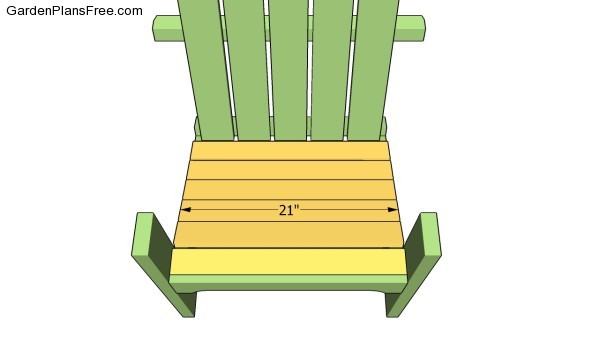
Continue the woodworking project by installing the seat slats. A you can see in the image, we recommend you to use 1×4 slats. Align all the slats and place a nail between them, in order to get consistent gaps. Smooth the edges of the slats before locking them into place, in order to get a professional result. Drill pilot holes at both ends and insert 1 5/8″ screws to lock the slats to the seat frame.
Fitting the armrests
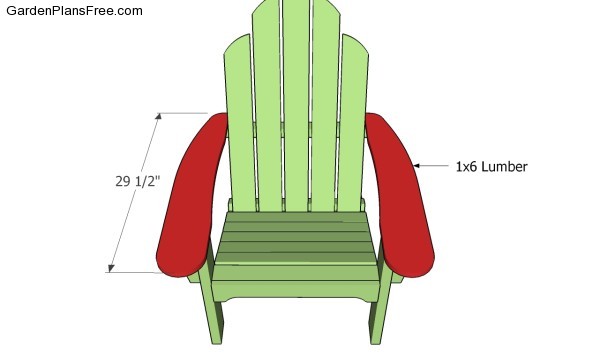
Build the armrests from 1×6 slats, making sure you follow the pattern shown in the plans. Attach the components over the supports and lock them into place with 1 5/8″ galvanized screws and waterproof glue. Round the exposed edges with a router or by using a sand-block.
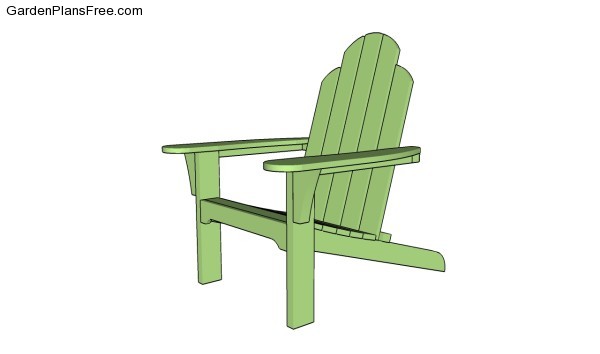
Adirondack chair plans free
Lastly, we recommend you to get the final touches done. Fill the holes with putty and let it dry out for several hours. Afterwards, even out the whole surface of the chair, by using medium-grit sandpaper.
PRO TIP: Apply several coats of paint or stain over the components, in order to protect them from decay. We recommend you to check out the rest of the garden projects, as there are many plans that could suit your needs.
This diy project was about adirondack chair plans free. If you have enjoyed the free project, we recommend you to share it with your friends, by using the social media widgets.


2 comments
signed up. how do you get plans
See GET PDF PLANS button at the end of the article