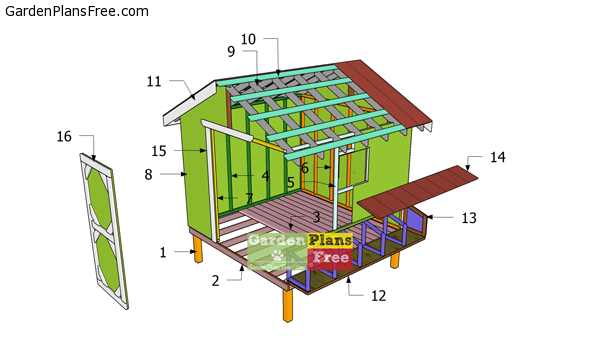
If you want to learn more about how to build a 8×8 chicken coop you have to take a close look over the free plans in the article. This is a large chicken coop with a front door to have and easy access inside the coop and clean it. The attached nesting boxes will make harvesting the fresh eggs really easy. You can also build a matching run, if you want to keep the chickens safe while moving on the ground. See PART 2 of the project to learn how to build the nesting boxes.
If you want to get the job done in a professional manner, we recommend you to plan everything with attention, as to prevent costly mistakes and to build a professional garden project. Invest in high quality materials, such as cedar, pine or redwood, as the bench will be exposed to all kinds of weather. Apply a few coats of paint over the components, to enhance their appearance and to protect them from bad weather.
8×8 Backyard Chicken Coop – Free DIY Plans
Building-a-chicken-coop
Materials
- 1 – 4 pieces of 4×4 lumber – 24″ long BASE
- 2 – 2 pieces of 2×4 lumber – 96″ long, 7 pieces – 93″ long POSTS
- 3 – 18 pieces of 2×6 lumber – 96″ long FLOOR
- 4 – 2 pieces of 2×2 lumber – 96″ long, 7 pieces – 69″ long SIDE WALL FRAME
- 5 – 2 pieces of 2×2 lumber – 96″ long, 2 pieces – 69″ long, 1 piece – 93″ long, 2 pieces – 51 1/2″ long, 2 pieces – 24″ long, 1 piece – 7 1/2″ long SIDE WALL FRAME
- 6 – 2 pieces of 2×2 lumber – 93″ long, 7 pieces – 69″ long BACK WALL FRAME
- 7 – 1 piece of 2×2 lumber – 93″ long, 2 pieces – 30 1/2″ long, 6 pieces – 69″ long FRONT WALL FRAME
- 8 – 6 pieces of 1/2″ plywood – 48″x72″ long, 4 pieces – 48″x96″ long PANELS
- 9 – 14 pieces of 2×4 lumber – 65 1/4″ long RAFTERS
- 10 – 10 pieces of 1×4 lumber – 108″ long PURLINS
- 11 – 4 pieces of 1×6 lumber – 67″ long, 2 pieces – 108″ long TRIMS
- 12 – 6 pieces of metal roof sheets – 3’x8′ long ROOFING
- 13 – 2 pieces of 1×3 lumber – 70 1/2″ long, 1 piece – 47″ long JAMBS
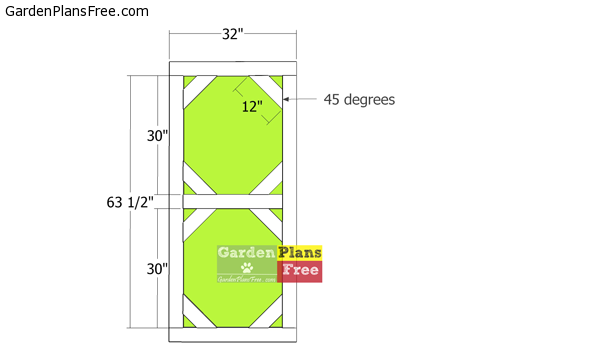
- 14 – 2 pieces of 1×3 lumber – 32″ long, 2 pieces – 63 1/2″ long, 4 pieces – 16″ long, 1 piece of 1/2″ plywood – 32″x70 1/2″ long DOOR
- 1 piece of 4×4 lumber – 8 ft
- 32 pieces of 2×2 lumber – 8 ft
- 9 pieces of 2×4 lumber – 8 ft (floor frame)
- 18 pieces of 2×6 lumber – 8 ft
- 8 pieces of 2×4 lumber – 12 ft
- 10 pieces of 1×4 lumber – 10 ft
- 6 pieces of 1×3 lumber – 8 ft
- 9 pieces of 1/2″ plywood – 4’x8′
- 2 pieces of 1×6 lumber – 10 ft
- 2 pieces of 1×6 lumber – 12 ft
- 6 pieces of metal roof sheets – 3’x8′ long
- 1 piece of window – 20″x24″
- 40 ft of drip edge
- 150 pieces 1 5/8″ screws
- 4 pieces of hinges, latch
- 300 pieces of 2 1/2″ screws
- 50 pieces of 3 1/2″ screws
- 50 pieces of 1 1/4″ screws
- 14 rafter ties
- 2″ nails
- 1 1/2″ structural screws
- wood glue, stain/paint
- chicken feeder
Tools
- Hammer, Tape measure, Carpentry square, Pocket Hole Jig
- Miter saw, Drill machinery, Screwdriver, Sander, Router
- Safety Gloves, Safety Glasses, Respiratory Mask
Time
- One week
How to build a gable 8×8 chicken coop
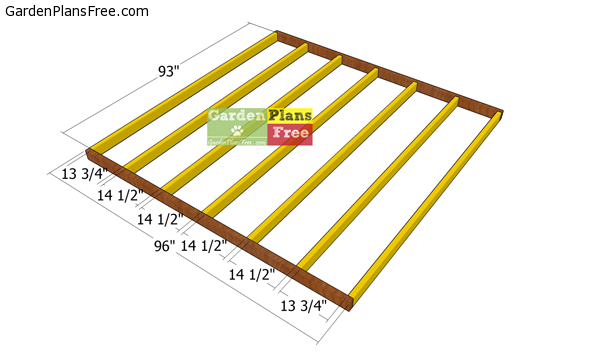
Floor-frame—chicken-coop
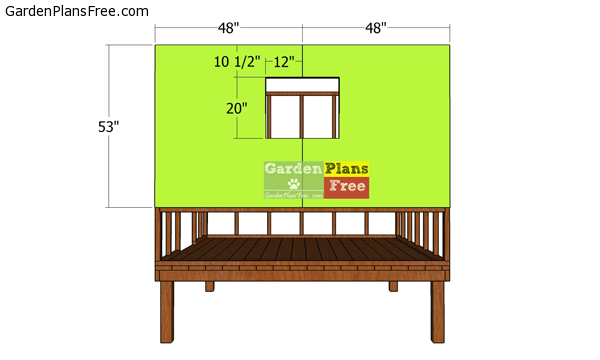
The first step of the project is to build the floor frame for the large backyard coop. Use 2×4 lumber and cut everything as shown in the diagram. Drill pilot holes through the rim joists and insert 3 1/2″ screws into the perpendicular components. Make sure the corners are square. Place the joists every 16″ on center.
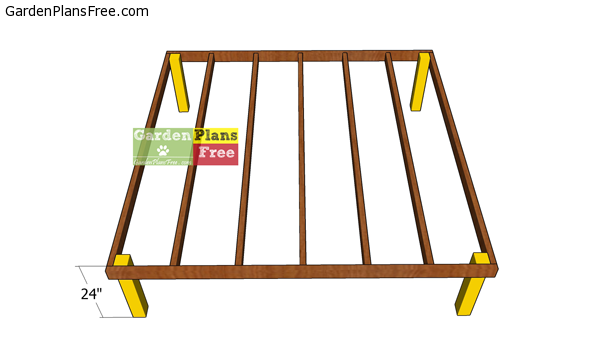
Fitting-the-legs-to-the-floor-frame
Use 4×4 lumber for the legs. Cut the legs at 24″ (or adjust to suit your needs). Fit the posts to the corners of the floor frame. Drill pilot holes through the floor frame and insert 3 1/2″ screws into the legs. Plumb the legs and make sure the floor frame is perfectly horizontal.

Fitting-the-floor-boards
Use 2×6 lumber for the floor. Align the edges flush with the frame and secure them to the frame with 2 1/2″ screws.
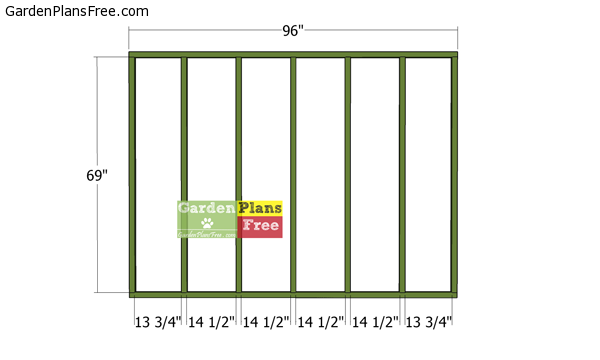
Side-wall-frame-2
Use 2×2 lumber for the frame of the chicken coop. Cut all components from 2×2 lumber. Drill pocket holes at both ends of the vertical components and at both ends of the middle support. Insert 2 1/2″ screws to assemble everything. Alternatively, if you don’t own a pocket hole jig, you can just drill pilot holes and insert the screws.
Side-wall-frame-plans
Use 2×2 lumber for the other side wall frame. Drill pocket holes at both ends and insert 2 1/2″ screws into the top and bottom components. Make sure the corners are square and align the edges flush.
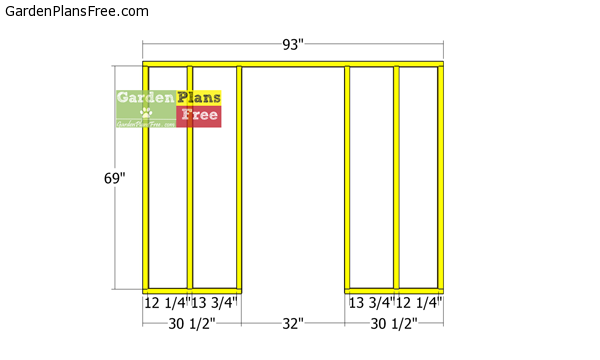
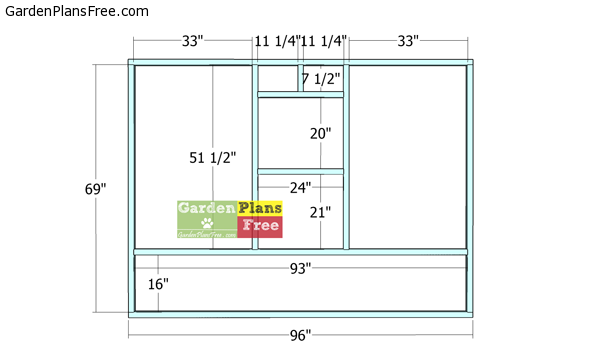
Front-wall-frame
Next frame the front wall for the large coop. Cut the components at the dimensions shown in the diagram. Drill pilot holes through the plates and insert 2 1/2″ screws into the studs. You can adjust the opening of the door to suit your needs.
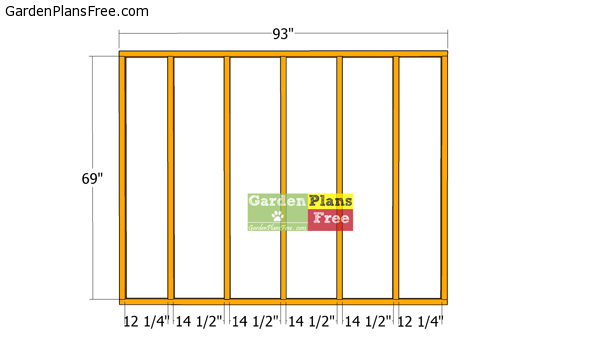
Back-wall-frame
Build the back wall frame, using the same techniques described above.
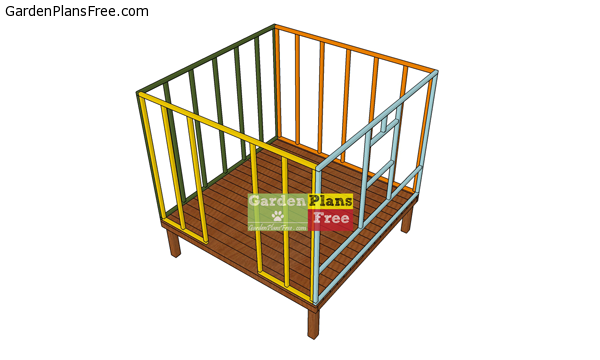
Fit the wall frames to the floor of the backyard chicken coop. Plumb the walls with a spirit level and align the edges to the floor. Drill pilot holes through the bottom plates and insert 2 1/2″ screws. Lock the adjacent wall frames together tightly. Drill pilot holes and insert 2 1/2″ screws. See all my chicken coop plans HERE.
Side-wall-2-panels
Use 1/2″ plywood for the exterior wall panels. Make a cut out for the side wall around the opening. Align the edges flush and insert 1 5/8″ screws to lock the panels to the frame of the coop.
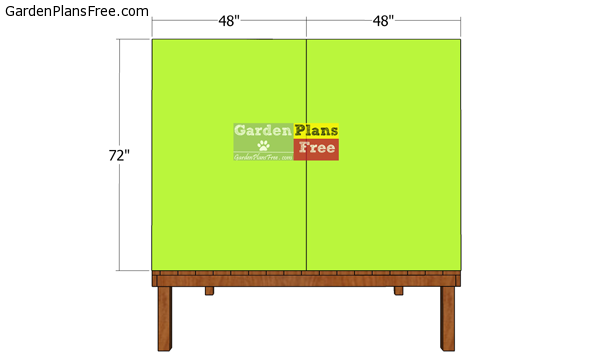
Side-wall-panels
Attach the panels to the opposite side of the coop. Insert the 1 5/8″ screws along the wall framing, every 8″. Leave no gaps between the panels and align the edges flush.
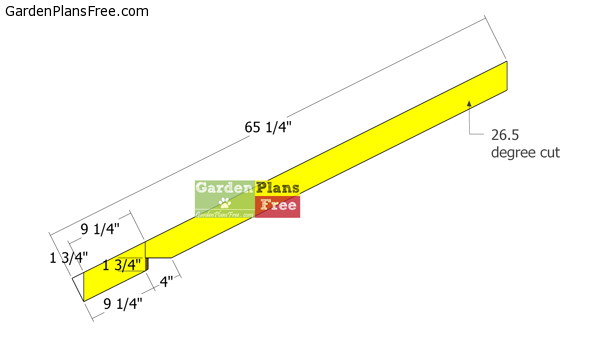
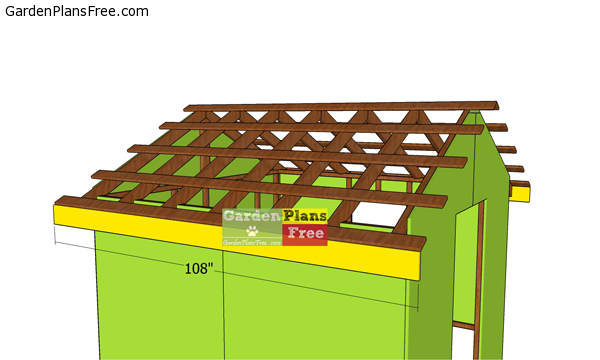
Rafters-for-8×8-coop
Build the rafters for the roof of the coop using 2×4 lumber. Use a miter saw to make the 26.5 degree cuts to both ends of the rafters. In addition, mark the cut lines on the rafters and make the birdsmouth cuts so you can set them into place tightly.
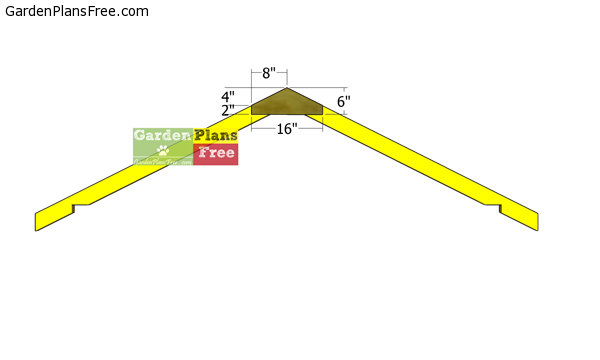
Fitting-the-gussets
Use 1/2″ plywood for the gussets. Attach the gussets to the top of the rafters. Align the edges flush, drill pilot holes and insert 1 5/8″ screws to lock the gussets to the rafters.
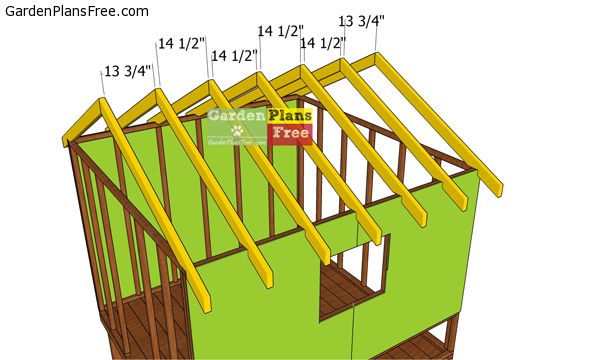
Fitting-the-rafters-to-the-8×8-coop
Fit the trusses to the top of the chicken coop. Plumb the trusses and secure them to the frame of the coop with ties. Place the trusses every 16″ on center. Use 1 1/2″ structural screws and ties to secure the trusses into place tightly.
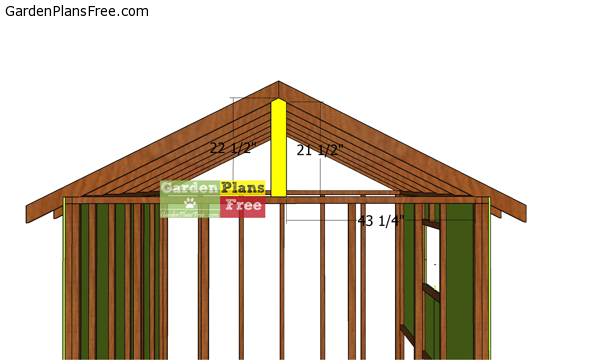
Attach the 2×4 supports to the gable ends of the coop. Drill pocket holes at both ends of the support and insert 2 1/2″ screws to lock them into place tightly.
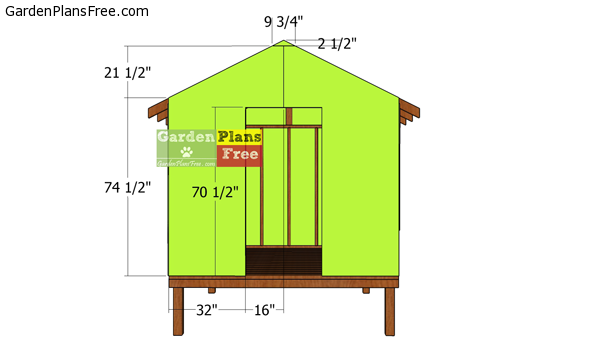
Front-wall-panels
Attach the plywood panels to the front and back of the chicken coop. Align the edges and make the cuts around the gable ends and around the door opening. Secure the panels to the wall framing with 1 5/8″ screws.
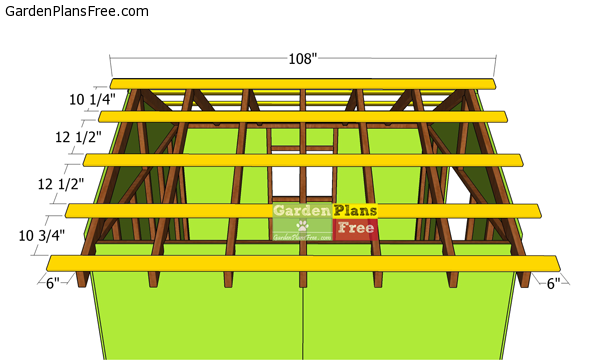
Fitting-the-purlins
Use 1×4 lumber for the purlins. Center them to the top of the roof structure and make sure the overhangs are equal. Drill pilot holes through the purlins and insert 1 5/8″ screws into the rafters.
Side-roof-trims—large-coop
Fit the 1×6 trims to the sides of the roof. Align the edges and make sure you secure them to the rafters with 2″ nails.
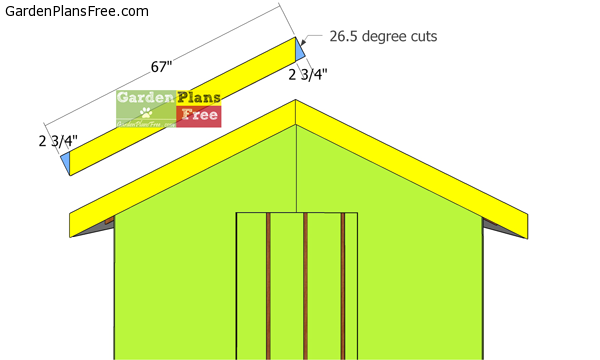
Fitting-the-front-gable-roof-trims
Use 1×6 lumber for the gable roof trims, as well. Make a 26.5 degree cut at both ends of the trims and secure them into place with 2″ nails.
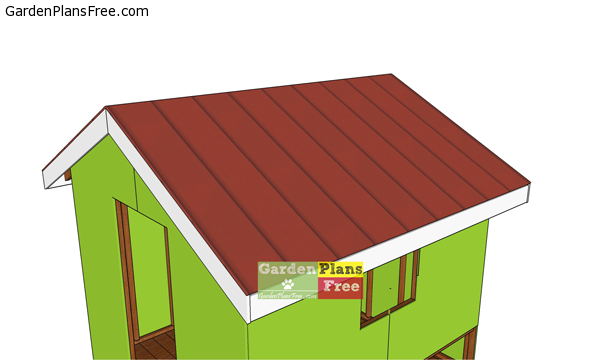
Fitting-the-roofing
Fit the roofing sheets to the top of the chicken coop. Align the edges flush, drill pilot holes and secure the sheet to the purlins with the appropriate screws.
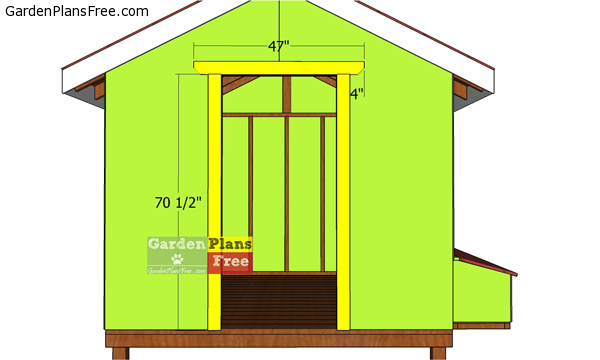
Building-chicken-coop-jambs
Use 1×3 lumber for the door jambs. Align the jambs around the door opening and secure them to the frame with 1 5/8″ screws.
Door-frame-for-coop
Use 1×3 lumber for the door frame. Drill pocket holes at both ends of the vertical components and at both ends of the horizontal support. Assemble everything together with 1 1/4″ screws. Make sure the corners are square and align the edges flush.
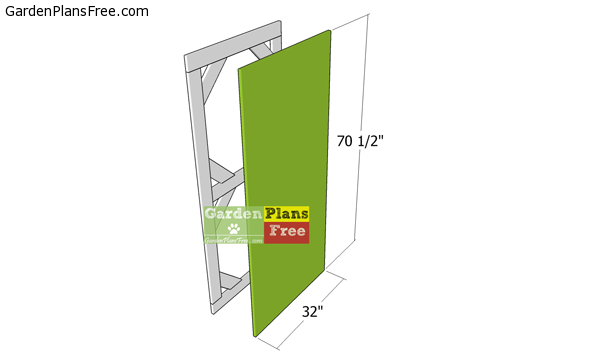
Assembling-the-shed-door
Use 1/2″ plywood for the door panel and 1×3 lumber for the trims. Attach the trims to the door with glue and 1 1/4″ screws.
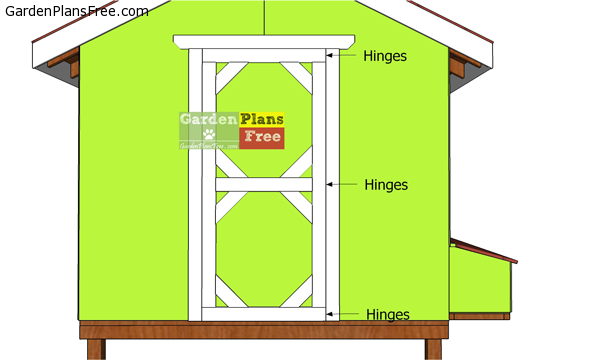
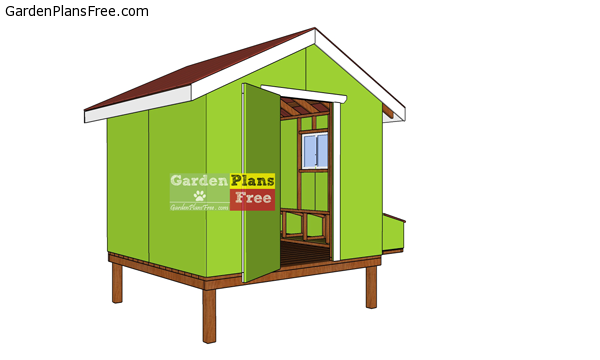
Fitting-the-door-to-the-coop
Fit the door to the front opening. Align the edges flush and use hinges to secure the door to the jambs. Install a latch.
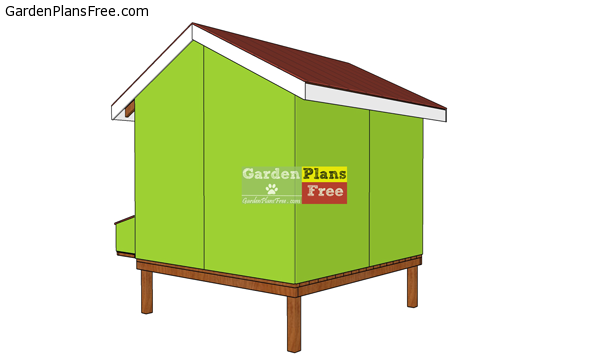
8×8-chicken-coop-plans—back-view
Last but not least, you need to take care of the finishing touches. Fill the holes with wood putty and smooth the surface smooth with sandpaper
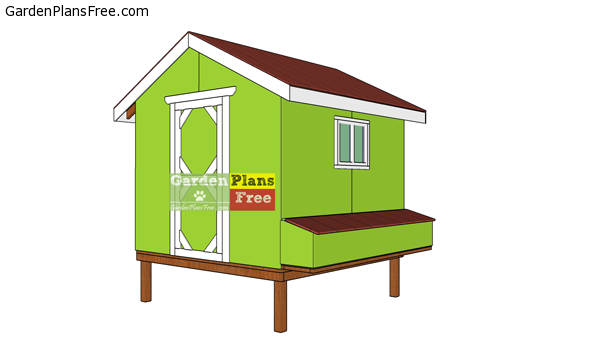
8×8-chicken-coop-plans-free
Apply a few coats of paint over the chicken coop to enhance the look of the project and to protect them from the elements. You can cut out a small and simple door to the side or to the back of the coop, for easy access of the chickens in and out of the coop.
How-to-build-a-chicken-coop
This chicken coop can shelter up to 16 chickens. You can build a matching chicken run, so your chickens can move freely on the ground. Check out PART 2 of the project, so you learn how to build the nesting boxes. The attached nesting boxes are very cool, because you can harvest the eggs from the outside of the coop, by simply lifting the lid. Take a look over my other 4×4 chicken coop plan, if you are looking for something smaller.

Thank you for reading this article on how to build a 8×8 backyard chicken coop. If you enjoy the plans, please consider sharing them with your friends. Spreading out the word about my website goes a long way for me. Also consider taking a look over my other project plans, because I have a large variety of designs you can choose from.

11 comments
Can you use 2 x4 instead of 2×2 lumber for the walls. And can I use nails instead of screws. Also can you use 2×6 for floor joist. Will the 4 x 4 post hold it up securely if I did. Thanks
Yes, to all questions
Thanks. This will be the first project I ever built so I appreciate your response. Will the 3 1/2 inch screws that hold the rim joist be strong enough to hold up the coop and support the weight if a person walks inside if using 2 x 6 or can you get a way with 2 x 4 joist to account for the wait of a person. Thanks again.
I did the same changes as well then I seen your post and was like okay im not the only one.
It doesn’t say how many 2×2’s needed. How many are needed to complete this?
I love the design of this coop is they away I can get a digital plans of this chicken coop
Can you provide the dimensions/cuts for the nesting box area?Thank you!
See part 2
How much is this going to cost?
How much money is it to build
What kind of rafter ties do we use?