Trellises and garden screens are the unsung heroes of backyard design. They’re those versatile structures that can turn a bland outdoor space into a charming oasis. Imagine a wooden lattice bursting with climbing roses by your porch, or a sleek metal screen hiding your AC unit from sight – these simple additions can completely transform the look and feel of your yard. In this guide, we’ll explore everything about trellises and garden screens in a friendly, DIYer-to-DIYer way. Whether you’re a beginner with your first fixer-upper yard or a seasoned pro looking for new ideas, we’ve got design inspiration and practical tips to help you make the most of these structures.
We’ll dive into different styles (from rustic cottage charm to sharp modern lines), creative uses like concealing eyesores, and even the magic of wall-mounted trellises that turn boring fences or walls into leafy masterpieces. You’ll learn how trellises support climbing plants (and which plants love them back), basic maintenance to keep them looking great, and construction tips with suggested materials suited for various U.S. climates. We’ll also give an overview of the palisade screen (a fancy term for a certain style of privacy fence) and shine a light on decorative timber screens with eye-catching motifs. So grab your cup of coffee (or sweet tea) and let’s talk trellises – by the end, you might just be sketching up your next weekend project!
Trellises vs. Screens: What’s the Difference?
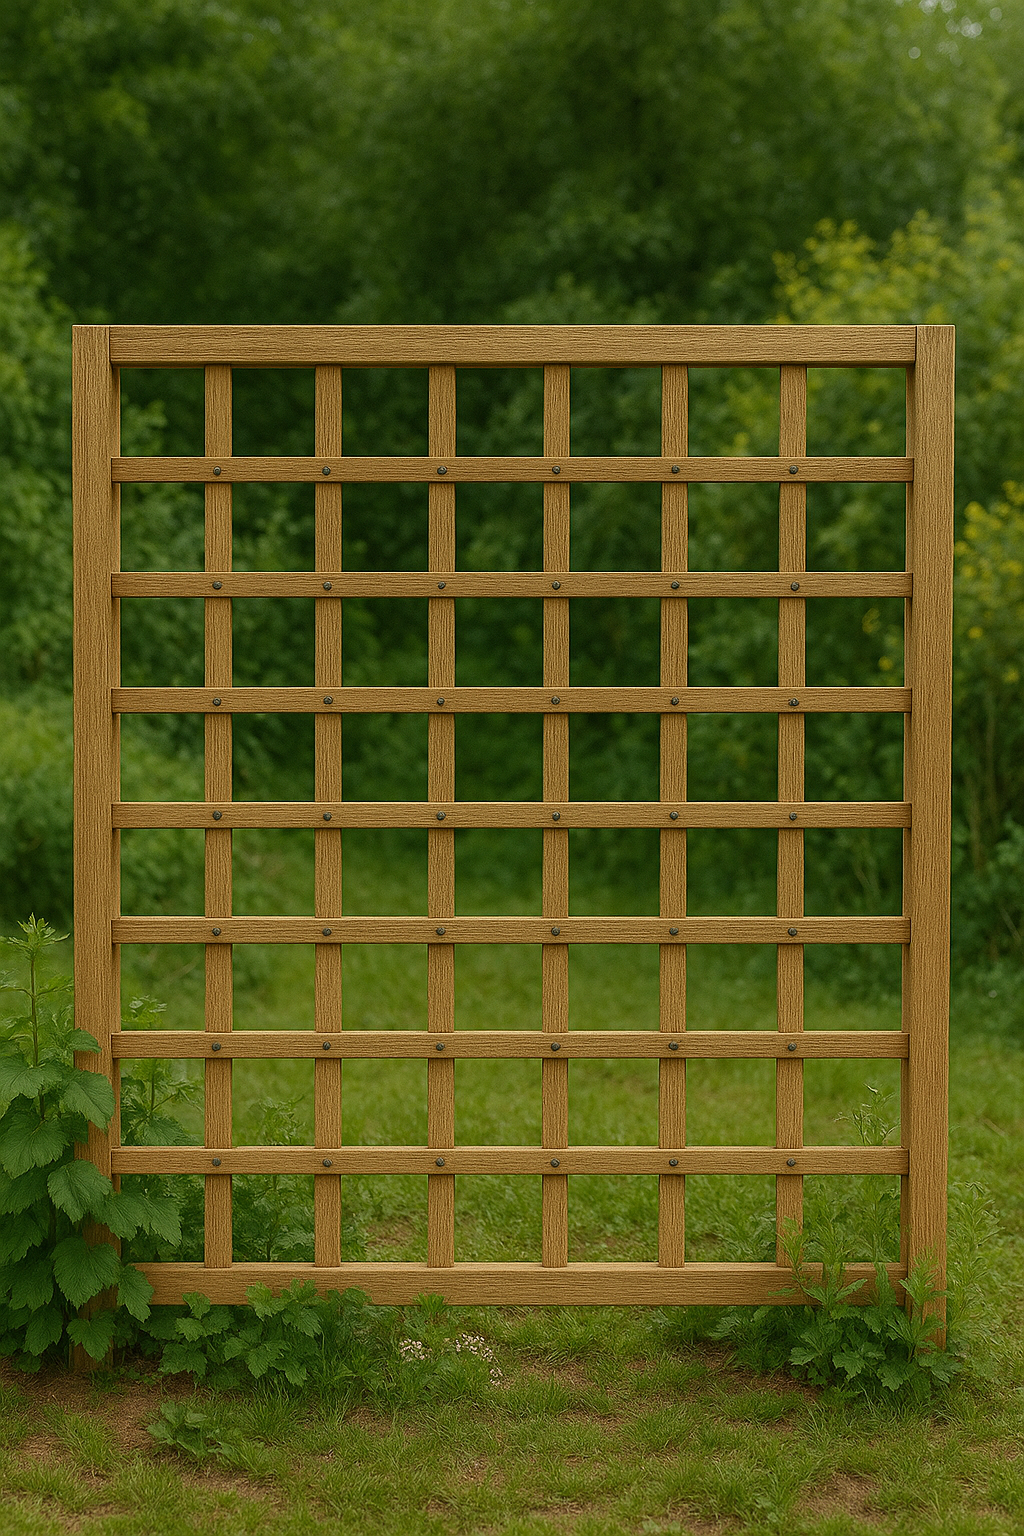
Before we jump into styles and ideas, let’s clarify what we’re talking about. A trellis is typically an open framework, often a grid of wood or metal, that supports climbing plants. Think of that crisscross lattice panel covered in ivy, or a fan-shaped wooden frame where your clematis happily climbs. A garden screen, on the other hand, usually refers to a panel or series of panels (which could be lattice, slats, or solid material) used to provide privacy, block wind, or hide unsightly views. The lines can blur – a trellis can act as a privacy screen when covered in foliage, and a screen can support vines if it has some sort of open pattern. In this article, we’ll use trellis for plant supports (often more open) and screen for privacy or decorative panels (which might be more solid). But remember, many structures in your garden can be dual-purpose – it’s all about how you use them!
For instance, a wall trellis is simply a trellis attached to a wall or the side of a building. It gives climbing plants a place to latch on, turning a plain wall into a vertical garden. A freestanding screen might be a section of fence or a folding divider that stands on its own, perfect for shielding a view or creating a cozy nook on your patio. And then we have palisade screens, which we’ll cover later – picture a mini fence made of vertical boards or stakes, offering privacy with a decorative twist. No matter what you call them, trellises and screens are all about adding structure, style, and function to your outdoor space.
Now that we’ve got the basics down, let’s get into the fun part: choosing a style that suits your taste and seeing what these babies can do for your yard!
Style Showcase: Modern, Rustic, Traditional (and More!)
One of the best things about trellises and garden screens is that they come in endless styles. No matter your home’s aesthetic – be it a sleek urban patio or a quaint country garden – there’s a trellis or screen to match. Let’s explore a few popular styles and what sets them apart:
- Modern Style Trellises & Screens: Modern designs favor clean lines and minimalism. Imagine a black powder-coated metal trellis with a simple grid pattern, or a series of horizontal wooden slats evenly spaced in a frame. Modern trellises often use materials like metal or smooth cedar, and they keep ornamentation to a minimum. The result is a chic, architectural look that complements contemporary homes. For example, a tall panel with evenly spaced horizontal boards can serve as a privacy screen with a modern vibe – it’s semi-transparent, creating privacy without feeling too heavy. Geometric patterns are popular too: think laser-cut panels with abstract designs or trellises with grid or chevron patterns for a striking effect. Modern screens can double as art pieces, especially those metal ones with cool cut-outs that cast interesting shadows in the sunlight. The key to modern style is simplicity and elegance – it proves that even a plain trellis against a wall can look like a sophisticated design element when done right.
- Rustic Charm Trellises & Screens: If you love the warmth of farmhouse or cottage style, rustic trellises will speak to you. These often embrace the natural look of wood – sometimes even imperfect wood. Reclaimed lumber, rough-sawn cedar, or even branches can become a charming rustic trellis. Picture a crisscross lattice with a slightly weathered paint finish, or a trellis crafted from birch branches tied together for a fairy-tale garden vibe. Rustic screens might be as simple as a section of old picket fence or shutters hinged together to form a folding screen. The beauty is in the character: knots in the wood, uneven patina, maybe a coat of whitewash or pastel paint that’s purposely distressed. These styles are right at home in cottage gardens with climbing roses, or as a backdrop to a vegetable patch. You can also go full-on DIY here – pallet wood can be reworked into a rustic screen, and an old ladder can become a trellis for your morning glories. Rustic trellises and screens give a friendly, lived-in feel – they say “come relax in the garden” rather than “look but don’t touch.”
- Traditional & Classic Trellises & Screens: Traditional designs include the quintessential white lattice trellis, the kind you might see in an English garden or framing a classic front porch. They tend to have balanced, uniform patterns (like the familiar diagonal lattice or square grid) and often are painted white or natural wood tones. Materials like painted cedar or even wrought iron (for a Victorian flair) fit into this category. For example, a classic fan-shaped trellis that fans out wider at the top is a traditional choice for roses or peonies, adding a touch of old-world elegance. Traditional garden screens might look like sections of a picket fence or formal trellis panels with decorative tops (like an arched arbor with lattice sides). They blend well with most homes – from colonial to Craftsman – because of their timeless look. If you’re aiming for that storybook garden or just a neat, orderly backdrop for your flowerbeds, traditional trellises are a go-to. And don’t think boring – you can still get creative within this style, for instance by painting a trellis a cheery color (a mint green or sky blue) for a cottage look, or by adding a trellis topper with a gentle curve for extra charm.
- Creative & Whimsical Options: Beyond the big three styles above, keep in mind you can mix and match or go totally offbeat. Some folks create whimsical trellises from metal bed frames, bicycle wheels, or other repurposed items – giving an artsy, eclectic vibe. Others might combine materials, like a wood frame with wire mesh inside (functional and modern-looking), or a metal trellis with decorative ceramic knobs or glass bottles incorporated for color. The sky’s the limit, and your trellis or screen can truly be a form of self-expression in the garden. The goal is to complement your house and garden style, but also to make you smile every time you see it.
No matter the style, remember that form and function go hand-in-hand here. A beautiful trellis should also be sturdy enough for your plants or purpose, and a rustic screen should still stand up to the elements. In the next sections, we’ll look at the many jobs these trellises and screens can do – from hiding ugly utilities to supporting your prize-winning roses – and how to make them work for you.
Hiding the Ugly: Using Trellises to Conceal Unsightly Views
Let’s face it – not every part of our yard is postcard-perfect. Maybe it’s the trash bins, the AC unit, the pool pump, or that lovely view of the neighbor’s shed. The good news is, trellises and garden screens are experts at playing hide-and-seek with ugly sights. With a bit of creativity, you can conceal those problem areas while adding style (and even some new planting opportunities!).
One popular trick is using lattice panels or trellis screens around AC units or trash can storage. These panels provide a visual barrier without blocking airflow or access, which is crucial for anything like an air conditioner that needs ventilation. For example, a simple U-shaped screen made of lattice can hide your AC unit from view on three sides, but the gaps in the lattice allow air to circulate freely so the equipment stays cool and functional. Just remember to leave enough space for maintenance – you’ll want to be able to get in there when it’s time to service the unit or take the trash out. Thin, pre-made wooden or vinyl lattice panels are great for this because you can cut them to size and even attach them with hinges for an easy-open gate if needed.
Screens can also be used to mask less-than-lovely views beyond your yard. If your kitchen window stares right at a blank wall or the neighbor’s RV, consider placing a tall freestanding trellis panel in between as a softer focal point. Plant a fast-growing vine at its base, and in no time you’ll be looking at green leaves and flowers instead of Mr. Jones’s camper. Even if you don’t add plants, a decorative screen by itself can be far prettier than what’s behind it – think a stylish panel with a lattice or cut-out pattern positioned to block that eyesore. Many homeowners put up trellis screens along property lines or next to patios to create a privacy wall, so they can enjoy a cup of coffee without feeling like they’re on display. Unlike a solid fence, a trellis with climbers gives a sense of seclusion while still feeling garden-y and open.
Here are a few ideas for concealing common yard eyesores:
- Garbage & Recycling Bins: Enclose them with a three-sided trellis screen. You can DIY this with two sides and a front panel, maybe even add a small gate for easy access. Grow a vine like clematis or even some annual morning glories on it for a floral disguise. It turns a mundane area into a charming little nook of greenery.
- HVAC Units or Pool Equipment: As mentioned, use lattice or slatted panels that allow airflow. A three-sided box or an L-shaped corner screen works well. Pro tip: use hinges on one panel to create a door if you need to occasionally get large equipment in/out or service the unit. And use weather-resistant materials (cedar or vinyl won’t rot quickly from constant moisture).
- Under Deck or Porch: The open space under a raised deck can be an eyesore (and a magnet for critters). Installing trellis skirting (lattice all around) tidies it up instantly. This is a traditional look – often painted white – and not only hides the clutter but also provides ventilation to prevent mold under the deck. You can dress it up by planting shrubs or flowers in front, or let a vine cascade down for a very cozy effect.
- Neighboring Views & Property Lines: If you have a chain-link fence or a low fence that isn’t giving you the privacy you want, attaching trellis panels can help. For example, secure a few tall trellis sections to the existing fence or on posts just inside your property line where you need screening. Morning glories, ivy, or climbing roses can then fill in the blanks. It’s like creating a living wall that separates the spaces. This is especially handy for small urban yards – you can screen off a corner with a trellis and suddenly have your own secret garden hideaway.
When concealing views, think about height and width: you want the screen tall and wide enough to cover the target, but it doesn’t have to be huge. Often, your eye will be drawn to the beautiful trellis and plants in front, effectively distracting from whatever is behind. Also consider the seasons – if you rely on a deciduous vine (one that loses leaves in winter) and privacy is a year-round need, you might opt for an evergreen vine (like evergreen clematis or star jasmine in warmer zones) or use a decorative panel that looks good on its own even when plants die back.
Finally, ensure your trellis or screen is stable. The last thing you want is a windstorm blowing it over onto the very thing you’re trying to hide (or into something worse). For lightweight panels, you can secure them to small posts sunk into the ground, or even use brackets to attach them to the side of the house or existing fence for stability. Free-standing screens with feet should be placed on flat, level ground (you can even stake them down discreetly). With a sturdy setup, you’ll have a long-lasting solution that keeps the ugly out of sight and the pretty front and center.
The Wall Trellis: Transforming Blank Walls
Do you have a boring blank wall on your garage or house that’s just begging for some love? A wall trellis might be your new best friend. Wall trellises are trellis panels or frameworks attached to a wall, giving climbing plants a place to grow up instead of just along the ground. They can turn a flat, featureless wall or fence into a lush vertical garden, adding tons of character and curb appeal.
One big benefit of a wall trellis is how it protects your wall while still letting you enjoy climbing vines. Some climbers like ivy or trumpet vine will cling directly to brick or wood, but that can trap moisture and even damage surfaces over time. By putting up a trellis a few inches off the wall, you give those plants something else to hold onto and allow airflow behind the greener. This helps keep your siding or brick in good shape (and makes it easier to repaint or do repairs – you can just gently tie back or unwrap the vines from the trellis instead of scraping them off your wall).
A climbing rose happily sprawls across a wall trellis mounted on a brick wall. The trellis keeps the plant supported and creates a gorgeous living tapestry against what was once a plain surface.
Think of a wall trellis as installing a piece of garden art. Even before your plants fill in, a nicely designed trellis adds visual interest. You could have a simple grid of wooden slats, an ornate wrought iron panel, or even a series of wire cables in a cool pattern for a modern look. For example, some modern wall trellises are just stainless steel cables arranged in a diamond pattern across a wall – almost invisible until the vine grows, perfect for a subtle, contemporary vibe. In contrast, a classic white lattice panel on a wall instantly gives a cottage feel, even before the first tendril climbs up.
When mounting a trellis on a wall, here are a few quick tips to keep in mind:
- Use Spacers: Don’t mount the trellis flush against the wall. You want a gap (usually 2–4 inches) so that plants can twine behind it and air can circulate. You can achieve this by using small blocks of wood or stand-off brackets at the attachment points. This gap helps prevent mold or paint problems on the wall and gives vines room to wrap around the trellis bars.
- Secure it Properly: A wall trellis with a thriving plant can get heavy over time. Make sure you’re attaching it to something solid – ideally into studs or masonry. Use appropriate anchors (ex: masonry anchors for brick/concrete, heavy-duty screws for wood walls). Stainless steel or galvanized screws are best so they won’t rust with the moisture that plants bring. The last thing you want is your beautiful trellis pulling out of the wall on a windy day or under the weight of a vigorous vine!
- Plan Plant Placement: Before mounting, know what you’re planting and where. If you’re training an espalier fruit tree or a specific vine pattern, you might mount multiple small trellis sections or wire guides in a deliberate arrangement. If you just want a general coverage (like with climbing roses or ivy), one large panel could do. Also consider sun exposure of that wall – a south-facing wall can get hot. Some plants (like roses or jasmine) will love it, while others might get scorched. Choose a plant that suits the location (more on plant picks in the next section).
- Protect Your Wall: If your wall is wood, consider sealing the area or painting behind the trellis before mounting, because once the plant grows, it’ll be harder to get in there. Also, for wood siding, keep an eye that the trellis isn’t rubbing or chafing the paint or wood in wind – another reason spacers and secure attachments are important. For brick, check that your vine (if clinging) isn’t sending roots into the mortar – training it on the trellis will prevent that.
Wall trellises are especially awesome for small gardens where ground space is limited. If you don’t have room for sprawling flower beds, go vertical! You can even create a living wall effect by combining a trellis with planter boxes – mount the planter at the base of the wall, let the vines climb up the trellis, and voila: you have a green wall that doesn’t require fancy hydroponics, just a good old trellis and some climbers. And even if you’re renting or can’t attach things to your walls, you can place a freestanding trellis a few inches in front of a wall or fence, anchor it in the ground, and get a similar effect without drilling into the structure.
One more nifty idea: use a wall trellis indoors for plants like pothos or ivy, or on an apartment balcony wall (if allowed). It can bring a bit of the garden vibe to even a small balcony – just use planters and ensure your wall can handle a few small screw hooks or adhesive anchors.
The wall trellis proves that even the plainest surface can become a canvas for nature. With your wall trellis up, it’s time to talk about the stars of the show – those climbing plants and how to pair them with supports.
Living Supports: Trellises & Screens as Climbing Plant BFFs
If trellises are the stage, climbing plants are the performers. Together, they put on a spectacular show in your garden. Using trellises and screens as support structures for vines and climbers is as practical as it is beautiful – many plants need something to climb on, and in return they will adorn your trellis with leaves, flowers, and even fruits. Let’s explore how to make perfect pairings and ensure both the plant and the structure thrive.
How Plants Climb: Different plants have different climbing methods, and knowing this helps you pick the right trellis for them. Some vines have tendrils – little curly appendages (think peas or passionflower) – that grab onto anything less than about a quarter-inch thick. These do great on wire trellises, thin wood strips, or mesh. Others are twiners, meaning their whole stem wraps around a support (like morning glories or wisteria). These prefer something vertical to coil around – a pole, a lattice with enough gap to wind through, or even another plant. Then there are adhesive climbers like ivy or climbing hydrangea that have tiny rootlets or sticky pads; they naturally cling to walls or fences. Those guys will use a trellis if one’s there, but they can also stick to a flat surface – though as mentioned, it’s better to give them a trellis to protect the wall. And finally, some plants are leaners or sprawlers – like climbing roses – they don’t have a mechanism to cling strongly, so you have to tie or weave their canes into the trellis. Knowing this, you wouldn’t put a heavy twining wisteria on a flimsy plastic trellis, nor would you expect pea tendrils to climb a 4-inch wide post (they just can’t get a grip). Always match the support to the plant’s style of climbing.
Plant and Trellis Pairings – A Few Ideas: Here are some classic (and fun) combos of climbing plants and the trellis or screen styles they love:
- Morning Glories or Sweet Peas on a Fan Trellis: Morning glories, moonflower, and sweet peas have twining stems and tendrils that are perfect for a traditional fan-shaped trellis or any narrow lattice. These annual vines are vigorous – morning glories can easily reach 8+ feet in a season – so give them a trellis that’s tall enough to handle their enthusiasm. A fan trellis against a fence or in a large pot will let their trumpet-shaped flowers create a gorgeous display every morning.
- Clematis on a Lattice Panel: Clematis vines have leaf stems that wrap around supports and they do best on something not too thick – a wire, twine, or thin wood lattice is ideal. A classic pairing you’ll see in many gardens is a purple clematis weaving through a white lattice trellis – it’s picture-perfect. Clematis can live for decades if given the right support and care, and they’ll happily cover a trellis, turning it into a wall of color. Just ensure your trellis has a grid or pattern the clematis can actually grab (big open panels might need additional horizontal wires strung across so the vine doesn’t just flop).
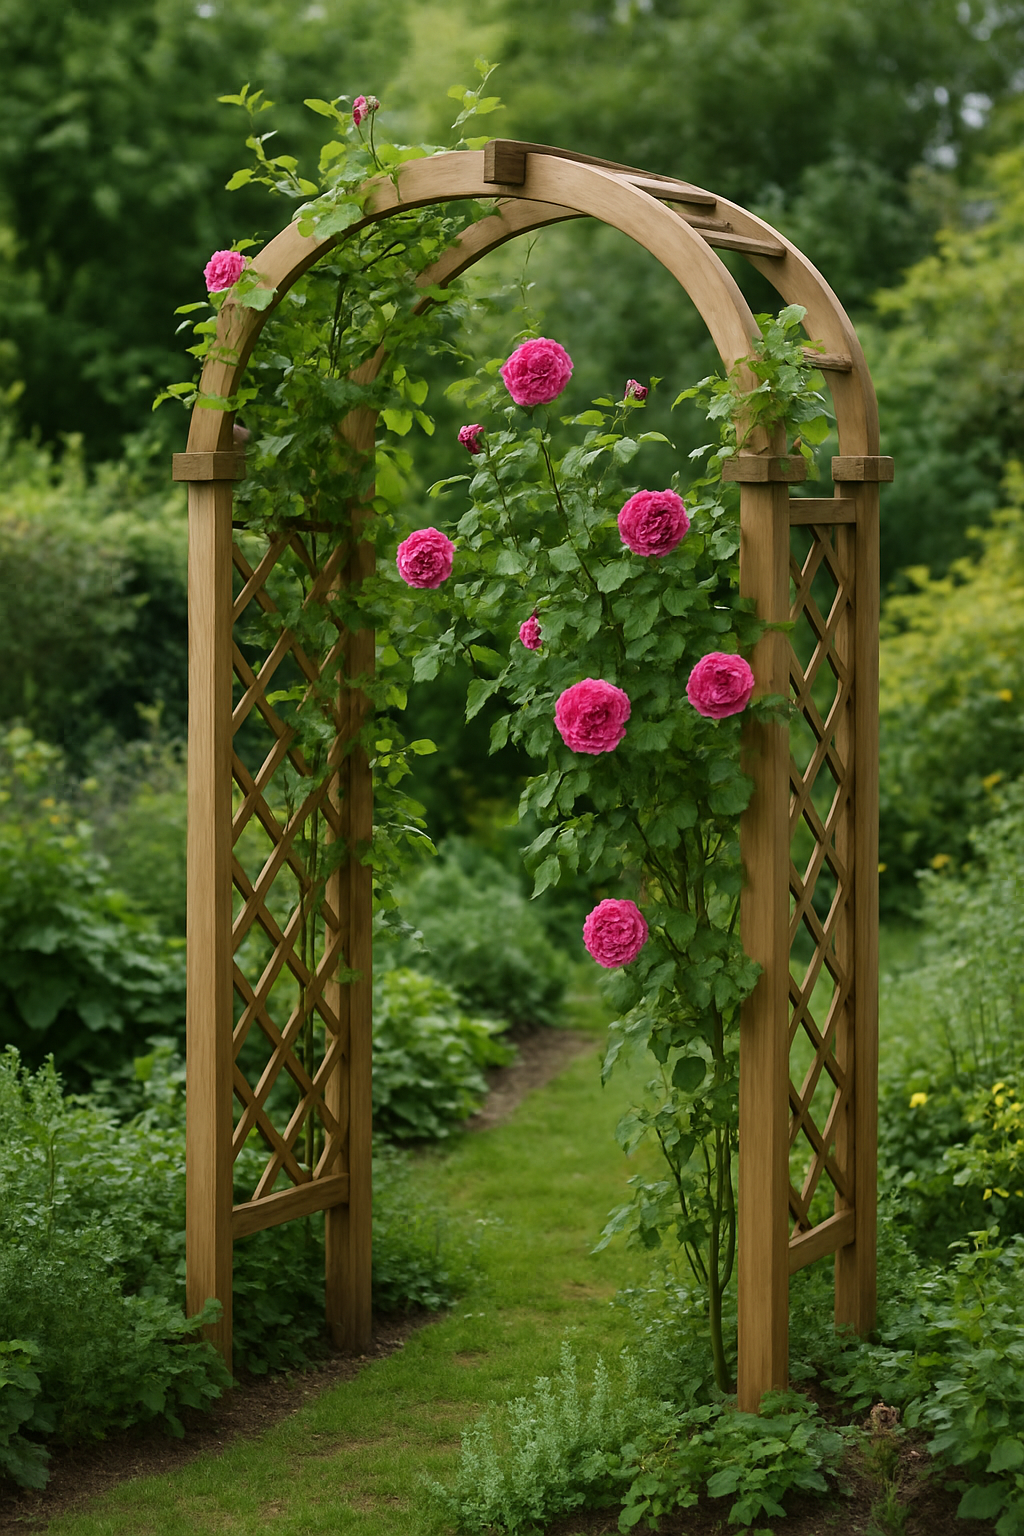
- Climbing Roses on a Sturdy Grid or Arbor: Unlike clematis, most climbing roses don’t cling by themselves – you’ll be doing a bit of tying and guiding. They have long canes that you can loosely secure to a trellis or screen using plant ties or even strips of soft cloth. For roses, a strong trellis is a must. A metal trellis, a thick wooden lattice, or an arbor (arch) works great. The structure should be able to support the weight of a mature rose and not flex too much in the wind. A popular traditional look is a rose on an arched arbor at the entrance to a garden path. For a wall trellis, you can train a rose in a fan shape by tying canes to a series of horizontal wires or a flat trellis – this can cover a large wall area beautifully with blooms. (Our earlier image of the pale pink rose on a brick wall trellis is a perfect example of how charming this can be!)
- Ivy or Evergreen Vines on Privacy Screens: If your goal is year-round coverage on a privacy screen, consider evergreens like English ivy (in cooler climates) or star jasmine/Trachelospermum (in warmer areas). Ivy will attach itself (it’s a clinger), so it can actually climb a flat surface, but it will readily go up a trellis too. A wooden screen with a diamond lattice or even a chain-link fence can become a green wall of ivy. Just be warned, ivy can get heavy and needs trimming to not get out of control. Jasmine has twining stems and can be helped by a lattice; plus it brings wonderful fragrance. These are great for blocking a view because they keep their foliage all year (or most of it, in jasmine’s case in mild climates).
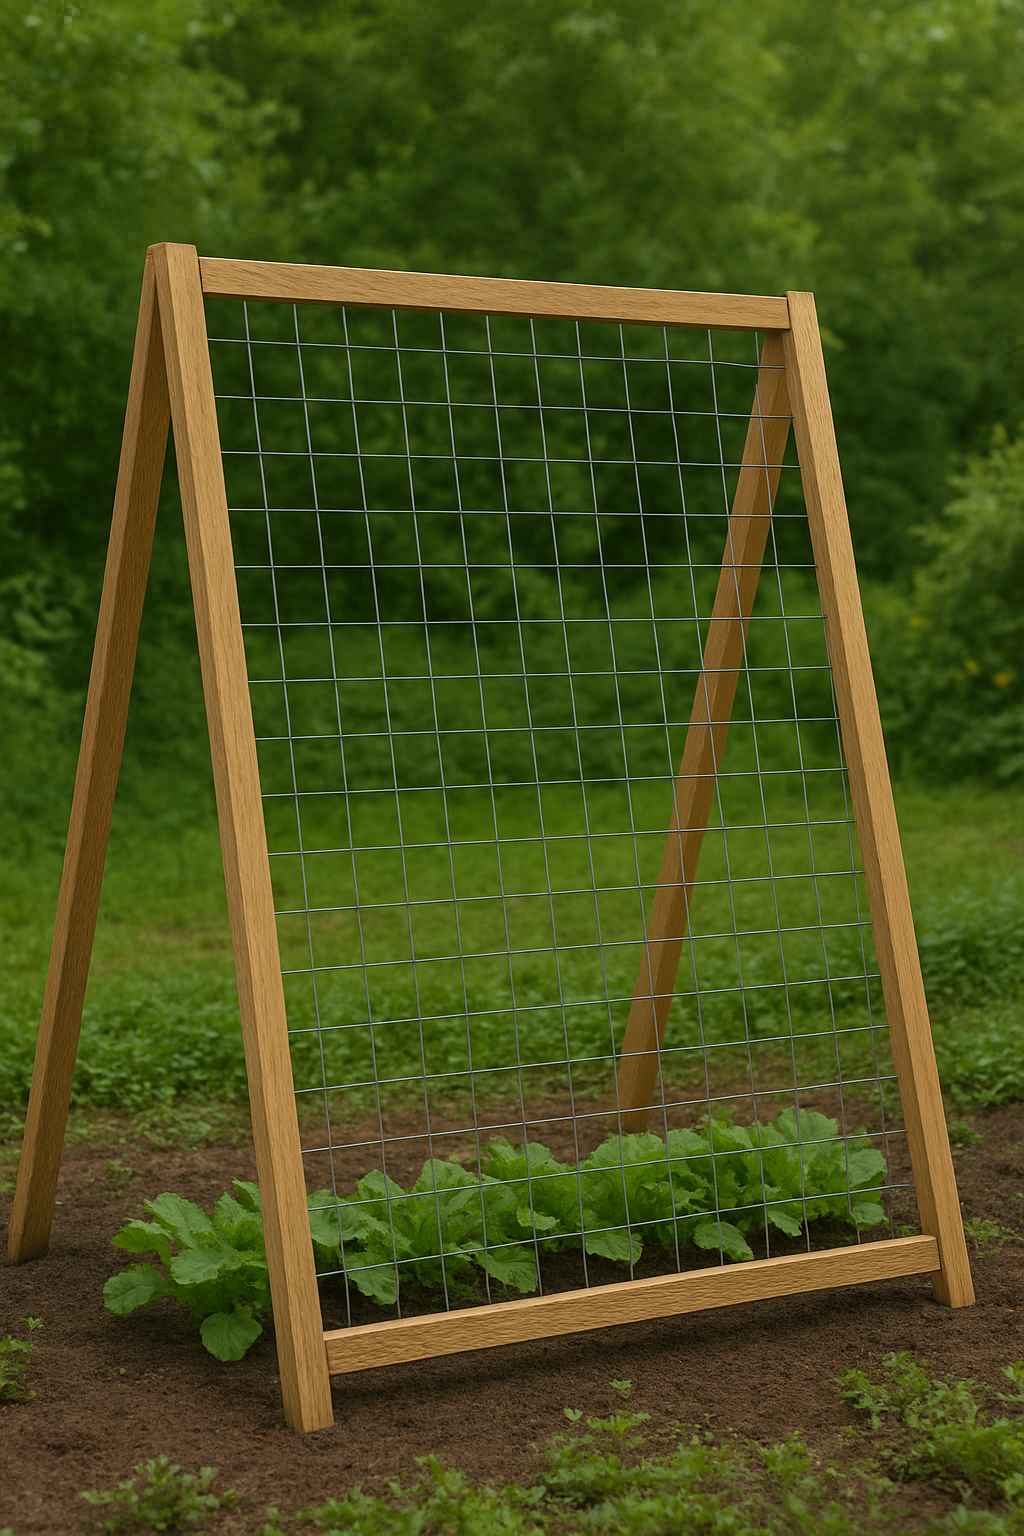
- Edibles & Annuals on Functional Trellises: Trellises aren’t just for ornamentals – they’re a staple in veggie gardens too. Got cucumbers, pole beans, or peas? Give them a trellis teepee or an A-frame made of wood or metal mesh. They’ll climb up and reward you with easier harvesting and cleaner veggies. For example, a simple cattle panel arch (a heavy-duty wire grid bent into an arch shape) is a fantastic, sturdy trellis for squashes, cucumbers, or even melons. In a flower bed, you could let decorative gourds or climbing nasturtiums twine up a rustic bamboo trellis for a splash of color and interest. Even tomatoes can be trellised using string or wire systems (that’s more for the hardcore veggie nerds, but it’s effective).
Whatever you choose, always consider the weight and vigor of the plant. A tiny metal obelisk (those tower-like trellises) might hold up a clematis or a few pea vines, but it won’t handle a rampant wisteria or a grapevine loaded with grapes. For heavy or woody vines like wisteria, grapes, large roses, or bougainvillea, think in terms of structures you’d build a kid’s playset out of – 4×4 posts, strong crossbeams, metal rebar, etc. Those vines will thicken into almost tree-like trunks over years and can literally tear down flimsy support. A well-anchored pergola or a very stout trellis is the way to go for the big guys.
Helping Your Climbers Along: When first planting a climber, you might need to “train” it to use the trellis. This could mean loosely tying stems to the structure with plant tie tape or garden twine, especially for roses or any vine that isn’t a natural gripper. Check on them every couple of weeks during the growing season – gently weave new shoots into the trellis in the direction you want them to go. They’ll get the hint over time. Tendril vines usually find their way, but if you see a wandering shoot, just tuck it back toward the trellis. This little guidance early on results in a much fuller coverage later.
Also, don’t be afraid to prune and manage the climbers. If one shoot is hogging all the space, trim it back to encourage side growth that will better cover the trellis. Many flowering vines bloom on new growth, so a light prune can even increase flowering. And always tie in vines with a bit of slack – they often thicken as they grow, and you don’t want your tie to pinch or bite into the stem (a good reason to use soft ties or old pantyhose, which have some stretch).
In return for a bit of support (literally and figuratively), your trellised plants will reward you by turning flat ground or empty air into a vertical tapestry of greenery and blooms. There’s something magical about seeing a once-bare wall covered in living color, or walking under an archway dripping with wisteria flowers. With the right pairing of plant and trellis, you create living architecture in your garden – and it’s truly a sight to behold.
Basic Maintenance and Care Tips
You’ve installed your trellis or screen, your plants are growing happily – now how do you keep everything looking great for years to come? Like any part of your home, trellises and screens benefit from a little TLC. The good news is, maintenance is pretty straightforward and doesn’t take much time if you keep up with it. Here’s how to care for both the structures and the climbing plants that love them.
Keep it Clean (and Check for Problems): Every so often, give your trellis or screen a quick once-over. Remove any dead leaves, cobwebs, or debris that might have accumulated, especially in the off-season. A neglected trellis can accumulate moist debris that invites pests or rot, so tidying up helps prevent that. While you’re at it, inspect for any early signs of damage: wobbly connections, rust starting on metal, or wood that’s getting punky (soft) in spots. Catching those issues early means simpler fixes – maybe tightening a few screws or sanding and repainting a small area – rather than dealing with a broken panel down the line.
For wooden trellises and screens, a gentle cleaning once a year can do wonders. Use a mild soapy water solution to wash off dirt and algae (a pump sprayer or just a bucket and soft brush will do). Rinse with a garden hose. This brightens it up and lets you see the condition of the wood. If the wood is painted or stained, check if it’s time for a fresh coat. A good rule of thumb is to re-stain or repaint every few years, or whenever the finish is visibly wearing thin. This protects the wood from the elements, much like a coat of wax on a car. In harsh climates (intense sun or heavy rain), you might do it more often; in mild climates, less. Also, look at where the trellis meets the ground – that’s where rot usually sneaks in first. If you used untreated wood in contact with soil, that part might need replacing after some years. Using rot-resistant wood or setting wood posts on metal bases initially will greatly extend life (we’ll talk materials soon).
For metal trellises, the biggest enemy is rust. Most garden metalwork like wrought iron or steel screens are painted or powder-coated to prevent rust, but scratches or dings can expose bare metal. If you see any rust spots, take action: use a wire brush or sandpaper to remove the rust, then apply a rust-inhibiting primer and repaint that spot with a matching color. It’s a quick touch-up that stops rust from spreading. Some people like to give their metal trellises a wipe-down with a cloth and a little diluted vinegar or just water to keep them clean, especially if you live somewhere with acid rain or salty air (coastal areas). Also check joints on metal arbors/trellises – if they are bolted together, tighten any loose nuts; if they’re welded, make sure no cracks in welds.
Mind the Vines: Maintenance isn’t just about the structure – your climbing plants need care too, and it often goes hand-in-hand with trellis care. Prune your climbers as needed to keep them healthy and within bounds. For instance, if a vine has completely overgrown and is pulling heavily on a lattice, it’s probably time to trim it back for the trellis’s sake as well as the plant’s. Many vines benefit from a good prune annually or after flowering. This also gives you a chance to carefully inspect the trellis itself (it’s hard to see the wood or metal when it’s covered in foliage). If you need to do repairs or repaint, you might do it in late fall or winter when many plants have died back or lost leaves – easier to get in there. Tie-in points should be checked too; sometimes old ties can constrict stems (especially on roses) – replace them with new ones tied a bit looser if needed.
Be on the lookout for pests or diseases that could affect the structure. For example, some vines (especially dense ones) can harbor mildew or attract insects. If you notice mold on the trellis, a little scrub with vinegar or a bleach solution (very mild) can sanitize it – just be careful not to splash on plants too much. If you have termites in your area, keep an eye on wooden trellises for any telltale signs (little mud tubes or tiny holes). Cedar and treated wood usually deter them, but it’s good to check. Also, certain pesky insects like Japanese beetles might skeletonize the leaves on your climbers, leaving a not-so-pretty look on your screening plant. Regular garden pest control (picking them off, using soapy water sprays, or neem oil etc., depending on your preference) will keep the foliage lush and the overall effect beautiful.
Seasonal Care: Different seasons might call for different tasks:
- Spring: As plants start growing, do a walkthrough. Reattach any vines that may have come loose in winter winds. Check the trellis is firmly in the ground after winter frosts (ground heave can nudge things). Tighten screws. Maybe add a fresh coat of paint or water sealer to wood if it looks dry.
- Summer: This is showtime – mostly, enjoy the beauty! Water the plants as needed, especially those in pots or planters against a wall (they can dry out faster). You might need to guide some fast growers back to the trellis now and then. Ensure heavy bloomers are well-supported (tie up extra if a rose is drooping with blooms, etc.).
- Fall: Time to clean up. Remove any annual vines that are done (like yank out those dead morning glory vines). For perennials, do any pruning now (some you might wait until late winter, depends on the plant). Clean off fallen leaves. Fall is also a great time to stain or paint wood because the weather is cooler and drier in many places – perfect for outdoor painting.
- Winter: In cold regions, if you get snow, be mindful if snow is piling on a trellis laden with dead vines or evergreen foliage. Heavy wet snow can cause lattice to crack or screens to topple. Gently knock off excess snow from evergreens on your trellis with a broom. If you have a removable screen (like those pretty folding screens), it’s wise to store it indoors or in a shed for the winter to prolong its life, especially if it’s not made of super durable material. Winter is also when you really appreciate those evergreen screens, so pat yourself on the back if you planted one – you’ve got some green while everything else is brown.
Remember, a well-maintained trellis or screen not only lasts longer but also looks nicer day-to-day. It’s the difference between a charming, inviting garden feature and a dilapidated eyesore (we don’t want that!). The bit of effort you put in – tightening a bolt here, a dab of stain there, trimming a vine – will keep your outdoor structures safe, sturdy, and beautiful. As one guide puts it, routine cleaning and care keep your garden structures elegant and prevent little issues from becoming big headaches. So include your trellises in your annual home maintenance checklist, and they’ll reward you with many years of service.
Next up, let’s talk about building and material tips – what to use, what lasts where, and how to approach construction if you’re keen to DIY a trellis or screen from scratch.
Construction Tips and Suggested Materials
Ready to roll up your sleeves? Whether you’re looking to buy or build, knowing the right materials and some construction basics will ensure your trellises and screens stand the test of time (and weather). In this section, we’ll go over popular material options – like cedar, pressure-treated lumber, metal, and more – and dish out some handy construction tips. We’ll also touch on which materials are best suited for different U.S. climates, because what works in Arizona might not be ideal in Florida. Let’s get into it!
Popular Materials for Trellises & Screens:
- Cedar Wood: Cedar is a superstar for outdoor projects. It’s naturally rot-resistant and contains oils that repel insects, which means it can handle rain, sun, and bugs better than many other woods. Cedar is also relatively lightweight and stable – it tends not to warp or crack as much with weather changes. That makes it awesome for trellises and screens. It has a pleasant smell and a lovely natural color (reddish or creamy) that ages to a silver-gray if left untreated. You can seal or stain cedar to maintain its color, or just let it weather. Because of its rot resistance, cedar is a top choice for contact with the ground (though any wood will last even longer if not touching soil directly). In a humid or rainy climate, cedar is a solid pick since it won’t rot away like untreated pine. It’s a bit pricier than common pine, but many DIYers find the longevity worth it. Cedar also fares well in dry climates – interestingly, cedar doesn’t warp badly even in arid heat, partly because quality cedar is often kiln-dried and has low moisture content. All around, you can’t go wrong with cedar for a classic wood trellis.
- Pressure-Treated Lumber (usually Pine or Fir): If you’re on a budget, pressure-treated (PT) wood is the go-to for outdoor structures. This is usually pine that’s been chemically treated to resist rot and termites. It’s what most fences and decks are made of nowadays. PT lumber is strong and can last a long time, but it does have some quirks. It often comes rather wet from the treatment process, and as it dries out, it can warp or twist if it wasn’t dried properly after treatment. In a hot, dry climate (say the high desert), untreated sections of PT lumber can lose moisture too fast and bend out of shape if you’re not careful. One tip is to let new PT wood dry out for a while before building, or buy kiln-dried after treatment (KDAT) lumber if available, which is more stable. PT wood usually has a greenish or brown tint (from the copper compounds in it). You can certainly paint or stain it to look nicer – just wait a few weeks or months until it’s dry enough to absorb finish (otherwise the paint may not stick well). PT is safe for use in trellises, but I generally wouldn’t use it where it directly touches edible plants (like for a cucumber trellis) unless it’s an older, well-weathered piece, or you line it with something. Modern PT chemicals (copper-based) are much less toxic than the old stuff, but still, an extra precaution for veggies. In termite-heavy regions (the Southeast, for example), PT lumber is very common because termites won’t munch it like untreated wood. It’s also ubiquitous in big box stores in all sizes, so it’s convenient. Just select the straightest pieces you can and have a plan to keep them straight (framing or bracing) as you build.
- Redwood and Other Natural Woods: If you’re on the West Coast, you might have access to redwood which is similar to cedar in rot resistance and often used for trellises/fences. It’s typically a bit more expensive than cedar. Cypress is another rot-resistant wood (more common in the South) – sometimes used in place of cedar. Even oak or black locust can be used for stout posts as they’re hard and fairly rot-resistant when dry. These woods can be great if you can find them, each with their own look. Tropical hardwoods like teak, ipe, or mahogany are super durable outside (termite and rot resistant to the extreme) but are usually overkill for a trellis and hard to work with (also expensive!). But hey, if you have some lying around, they will certainly last. Just remember to pre-drill holes in hardwoods to avoid splitting screws.
- Metal Options (Wrought Iron, Steel, Aluminum): Metal trellises and screens can be both beautiful and incredibly durable. Wrought iron or steel are common – you’ll see those classic black iron trellises with ornate scrolls, or contemporary steel panels with laser-cut designs. The big advantages of metal: strength and longevity. A well-made steel trellis can bear a lot of weight (great for heavy vines like wisteria) and won’t rot or get eaten by bugs. In places with extreme weather – high winds, heavy snow – a metal structure can often fare better without cracking or breaking. However, steel does rust if not protected. Always look for galvanized (zinc-coated) steel or powder-coated finishes for outdoor metalwork. If you fabricate your own (say, from rebar or steel rods), be prepared to paint it with exterior metal paint for rust prevention. Aluminum is another metal you might consider. It doesn’t rust (aluminum oxide forms a protective layer), and it’s lightweight. You can find aluminum lattice or decorative panels. Aluminum is great for coastal areas with salty air since salt will rust steel quickly if the coating fails, but aluminum will stay intact. It’s also easier to move around due to weight. The downside is aluminum isn’t as strong as steel – a thin aluminum trellis could bend under a heavy vine or a kid climbing on it (it happens!). So if using aluminum, get a robust design or use it for lighter-weight plant duty. One cool DIY metal option: concrete reinforcing mesh or cattle panels (galvanized steel grids) – these are cheap, super strong, and make excellent support for veggie trellises or modern-industrial screens. They are a bit utilitarian looking, but you can frame them with wood to dress them up.
- Vinyl and Composite: If zero maintenance is your goal, vinyl might be tempting. Vinyl trellis panels (often in a lattice pattern) and PVC garden arches are readily available. The pros: they don’t rot, they never need painting, and insects don’t care for them. They can also be quite clean-looking (bright white, etc.). In a mild climate, a good-quality vinyl trellis will last many years. However, be aware that vinyl can become brittle in very cold temperatures – a hard knock in freezing weather might crack it. Conversely, in very hot climates, vinyl can soften or warp a bit, especially if it’s a darker color or in direct sun all day. Generally, the better (and usually more expensive) vinyl products have UV inhibitors to prevent sun damage. Composite materials, like those used in decking (a mix of wood fibers and plastic), are also used for some privacy screens and panels. These tend to be very durable and often have wood-like textures. They won’t rot or warp easily, but they can be heavy. Drilling into composite requires a bit of muscle and the right screws (always pre-drill to avoid splitting it). Vinyl and composite are great for a no-fuss solution, but stylistically they lean towards either traditional (for vinyl lattice) or modern (for some composite screens). One more plastic option: fiberglass rods or structures – not common for garden decor, but some pergolas use fiberglass beams which are super strong and weatherproof (and can look like wood when painted). Just to know it exists!
- Bamboo & Natural Materials: Bamboo deserves a mention as it’s a popular trellis material, especially in Asian-inspired gardens or for quick DIYs. Bamboo poles tied together can make excellent tripods for beans or peas, or even an attractive panel (tie a grid of bamboo with twine – it looks rustic and cool). Bamboo is quite strong for its weight and naturally water-resistant, but it will eventually weather and split after a few years outdoors. It’s best for temporary or semi-permanent structures, or for that light, tropical aesthetic. Other natural materials like willow or hazel branches can be woven into beautiful wattle screens or bent into arches. These have a limited lifespan (a few years) but are inexpensive and eco-friendly – and they scream cottage charm. Use them where you want a softer, organic look and are okay replacing them down the line.
Now, materials by climate: The USA has a range of climates, so it’s smart to factor that in:
- In humid, rainy climates (like the Southeast, Pacific Northwest): Rot and mold are your main concerns. Cedar, redwood, cypress or pressure-treated wood are almost a must for wood structures. Regular pine will rot very fast. Metal works well too, but make sure it’s well-coated to prevent rust in constant moisture. Also, consider mildew-resistant paint for wood (some exterior paints have anti-mildew additives). If you get a lot of rain, design your screens with the idea that they shouldn’t trap water – for example, avoid flat horizontal surfaces where water can pool; allow gaps for airflow to dry things out.
- In dry, hot climates (like the Southwest deserts or high plains): Sun and dryness can be brutal on wood, causing warping and cracking, and UV rays degrade many materials over time. Here, a stable wood like cedar is good because it’s less likely to warp than wet-pressure-treated pine. You might also consider metal here, since bugs aren’t a huge issue and rust is slower in dry air (though if you have irrigation hitting it, rust can still happen). One climate-specific tip: in places like Colorado with very dry air, contractors prefer cedar for fences because pressure-treated pine can warp badly as it dries. So the same logic for trellises – cedar or other stable woods will behave better. Also, UV can make plastics brittle, so if using vinyl, ensure it’s high-quality. You may need to reseal or stain wood more often due to intense sun – UV breaks down coatings faster, so a UV-protective stain is important.
- In cold, snowy climates (Upper Midwest, New England, Mountain areas): Freeze-thaw cycles can affect materials. Water can seep into wood, freeze, and cause cracks – so keeping wood sealed is key. Metals here need to handle possibly heavy snow loads if the trellis is horizontal (like an arbor top). If you expect snow to sit on it, over-engineer it a bit. For instance, use thicker lumber or more support pieces so it can handle that weight. Also, consider seasonal removal: maybe use connectors that allow you to take an insert panel out for winter if it’s something fragile. In cold areas, plastic can get brittle as mentioned – a vinyl screen could crack under weight of snow or even just extreme cold over time, so wood or metal might be a safer bet structurally. Treated wood does fine in cold, as long as you keep water from penetrating it too much. And speaking of water, make sure any posts in ground are set below frost line or in a way that frost heave won’t jack them up (this is more for fences, but if you do a large screen with posts, similar rules apply).
- In coastal climates (e.g. Florida, Gulf Coast, coastal California): Here the challenges are salt air corrosion, high humidity, and often strong winds (even hurricanes). Stainless steel or aluminum are excellent for hardware and trellis material because they resist salt corrosion. If you use regular steel, it needs a super good powder coat and even then, expect to touch up paint often. Wood will be exposed to constant moisture, so again cedar/redwood or PT are best; however, in hot coastal areas, wood also gets attacked by insects (termites, etc.) – double reason to go with rot-resistant or treated wood. Another consideration: wind. Lattice and screens can act like sails. If you’re in a hurricane zone or just a generally windy spot, build your screens with gaps (lattice or slatted designs allow wind to pass through) or make sure they are very securely anchored (posts in concrete, heavy-duty brackets). Quick hardware tip: use screws, not nails, in windy areas – nails can work loose with vibration over time, while screws hold tight. And use stainless steel screws or bolts for coastal installations; they won’t rust and stain your wood black like normal galvanized hardware might under salty conditions.
Now, onto some construction tips for the DIYers:
- Keep It Square & Sturdy: When building a trellis or screen frame, taking the time to get your corners square and joints tight will pay off. A simple rectangle frame of 2×2 or 2×4 lumber can be the base for many projects – make sure to use a square when assembling and maybe add a temporary diagonal brace while you work so it doesn’t rack (parallelogram). Once you attach your lattice or slats, that will help firm it up. If you’re making something tall and narrow, consider a diagonal brace in the back for stability. For example, a 3-foot wide, 6-foot tall trellis panel can have a diagonal from bottom left to top right to prevent it from wobbling side to side in the wind.
- Choose the Right Fasteners: Use exterior-grade screws or nails. Galvanized or stainless steel are best for screws; for nails, hot-dipped galvanized (they have a thick zinc coating) won’t rust easily. Avoid plain steel screws – they’ll rust and streak stains down your wood. Deck screws (coated) or exterior structural screws are excellent for assembling wood trellises. Bolts can be used for heavy connections (like attaching a trellis panel to a post – using carriage bolts can be stronger than screws in some cases). If attaching metal pieces, use rust-resistant bolts/nuts and maybe some Loctite or lock nuts so they don’t loosen.
- Easy Lattice Frame Tip: If you want a quick privacy screen, you can buy a 4×8 piece of lattice (wood or vinyl) and frame it with 1×3 or 1×4 wood all around like a picture frame. This keeps the lattice from flexing too much and gives you something solid to attach to posts or hinges. Many a DIYer has built a garbage can corral or AC unit screen this way in a single afternoon. You basically sandwich the lattice edge between two boards at the top and bottom, and cap the sides similarly, screwing it all together. It looks finished and adds strength.
- Hinges & Folding Screens: If you’re making a folding screen (say, three panels that can zigzag and stand by themselves), use outdoor-rated hinges (heavy duty brass or stainless). Attach hinges in alternating directions (one on front, next one on back of the seam) so that it can concertina. This alternating hinge setup lets the screen stand in a zigzag without falling flat. Also, consider drop latches or a simple hook to connect the ends of a folding screen in a U-shape for extra stability when it’s standing (forming a partial enclosure that holds itself up).
- Mounting to the Ground or a Deck: For a permanent screen, setting posts is the way to go. Typical method: dig a hole ~2 feet deep, set a 4×4 post (cedar or PT) with concrete, attach your screen panel to that post. If digging is not an option (like on a patio), you can use metal post anchors that bolt to a concrete slab or deck. There are steel brackets made for 4×4 posts that you can bolt down – very handy for securing a privacy screen on a hard surface. Always over-engineer a bit if people might lean on it or if it catches wind. For a wall trellis, we already noted to hit studs or use anchors rated for the weight.
- Protect Cuts and Ends: When you cut pressure-treated wood, the cut ends are more vulnerable (the treatment often doesn’t penetrate fully to the center). It’s good practice to dab some wood preservative or at least primer paint on cut ends before assembling – prolongs the life. Similarly, drill pilot holes for screws near the ends of wood pieces to prevent splitting (especially in hardwoods or thin strips). Splits invite water and rot.
- Metal DIY Builds: If you’re handy with a welder, metal trellises can be super fun to create – but even without welding, you can do some metal builds using off-the-shelf items. For instance, EMT conduit (metal electrical tubing) can be bent into an arbor shape and screwed together with brackets. Or you can use copper pipes and solder for a cool copper trellis that will patina green over time. Always think about rust: if you bolt pieces of metal, either paint them after assembly or use stainless parts. If you have raw steel (like rebar), you can spray it with clear enamel or a rust-inhibiting paint so it lasts longer.
- Hardware for Climbing Plants: Don’t forget the little things like plant ties, eye hooks, or wire guides. On a flat wall, you might use heavy-duty vine eyes (basically big screws with a loop) and run wires between them for climbers – great for espaliers or vine lines. These need anchors in the wall but can hold a surprising weight if done right. On trellises, having a few eye screws or hooks can let you tie a stubborn branch exactly where you want it. Keep a pack of garden Velcro ties or soft twine handy to train plants – they’re a small investment for a polished outcome.
Whew! That’s a lot of info, but in short: pick quality materials that suit your climate and the look you want, and build with longevity in mind. A well-constructed cedar trellis or properly coated metal screen can last decades with minimal issues, whereas a slapdash untreated pine lattice might barely get you through a couple summers. Invest a little time and care up front, and you’ll have structures that not only look fantastic but also stand up to the sun, rain, wind, and curious kiddos or pets. Now, let’s zoom in on a particular type of screen that’s both functional and decorative: the palisade screen.
Palisade Screens: Function and Aesthetic Overview
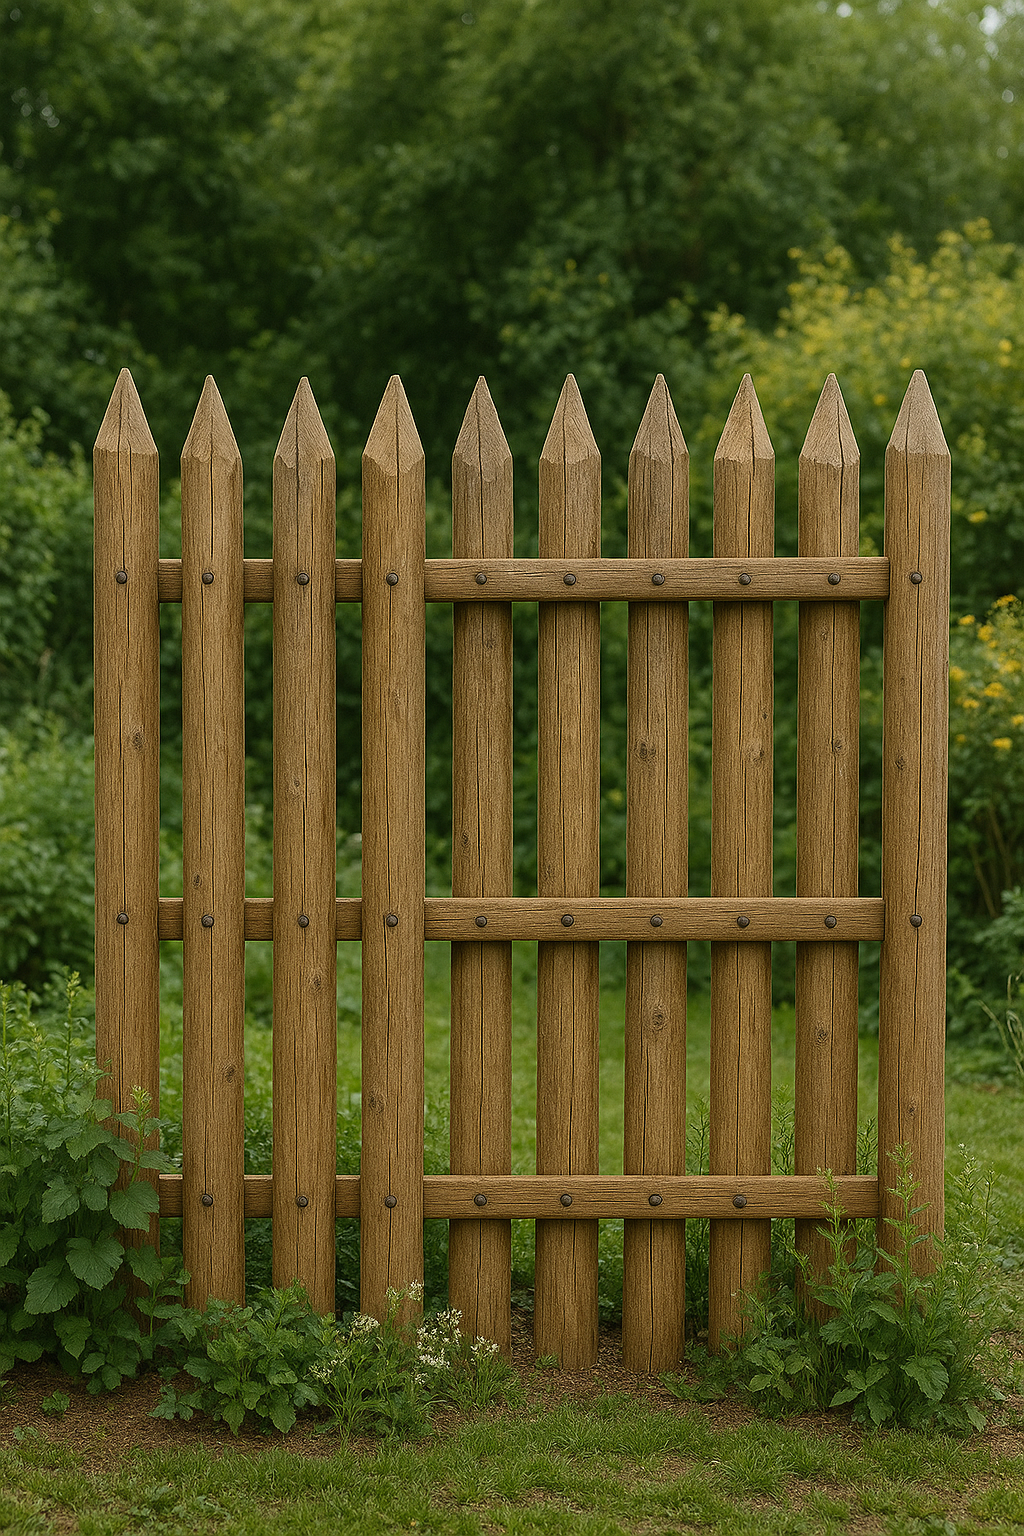
You may not have heard the term palisade screen before, but it’s a concept you’ve likely seen. The word “palisade” originally refers to a fence made of wooden stakes or iron railings fixed in the ground, historically used for fortifications. In the garden context, a palisade screen usually means a series of vertical boards or slats placed side by side to form a screen that’s mostly solid but with small gaps. Think of it like a stylish fence panel that isn’t completely opaque. These screens offer privacy and protection while still letting a bit of light and air through – and they can look awesome as a design element.
Function: Palisade screens are champions of privacy. Because they consist of closely spaced vertical elements, they block views better than, say, a wide-gap lattice. This makes them great for shielding a patio or hot tub from prying eyes, or for creating a private corner in your yard. They also work as windbreaks to some extent. If you have a breezy site, a solid fence might take a beating from wind, but a palisade screen with gaps can break the wind’s force while reducing risk of the screen toppling (the air can pass through the small gaps). It’s a similar principle to those semi-open snow fences you see on roadsides. Palisade screens can also keep out unwelcome critters more than an open trellis would – for example, if you want a barrier that looks nicer than chain-link to keep deer out of an area, a tall palisade-style fence could do it (though you might need it pretty high – deer are agile!). According to some privacy screen manufacturers, these vertical-slat designs are quite flexible in use: they can serve as standalone decorative features, be grouped to form effective privacy walls, or even act as modern art installations in a landscape.
Aesthetic: A palisade screen has a distinctive look that can range from rustic to ultra-modern. The classic image is a row of pointed wooden stakes (like a colonial fort stockade) – that’s the rustic end of the spectrum, great for a log cabin or a woodland garden vibe. But nowadays, you’ll also find very sleek palisade designs: imagine evenly spaced vertical cedar boards mounted in a frame, all cut to the same height for a clean top line – it’s simple and elegant. Or alternating board heights for a more dynamic, uneven top silhouette (kind of like city skyline shape) for artistic flair. There are also metal palisade panels made from vertical metal fins or louvers; these can look quite contemporary and can be powder-coated in any color. One high-end example is an aluminum screen with vertical slats that overlap at an angle, creating a cool shadowbox effect where you can’t see through directly, but a little light comes in at angles. The overlapping or alternating pattern gives a sense of depth – it’s not just a flat panel, but has texture and thickness. Wood palisade screens can achieve a similar effect if boards are staggered on two parallel rails (often called a shadowbox or board-on-board fence style in fencing terms). This not only looks nice, but as mentioned, it cleverly allows air flow while blocking view.
Another aesthetic aspect: vertical lines tend to draw the eye up, adding a sense of height. If you have a small yard, a vertical board screen at the back can make the space feel taller, which is a neat trick. And palisade screens make great backdrops for plants. For instance, a row of vertical timber posts behind a flower bed can make the colors of the flowers pop against the uniform background. Even if there are small gaps, the overall visual is like a wall that accentuates what’s in front of it.
DIY or Buy? If you want to create a palisade screen yourself, it’s very doable with basic materials. You can take 1×4 or 1×6 fence boards (cedar or PT) and attach them vertically to two or three horizontal rails, just like building a short section of fence. Space the boards with maybe a half-inch to 1-inch gap between them (you can use a spacer block to keep it consistent). This is basically building a shadowbox fence panel. You could also stagger boards on either side of the rails (one on the front, next on the back, alternating) to create that overlap where there’s no direct line of sight through the gaps. Each approach gives a slightly different look. If you prefer a more polished look, cut the tops of the boards level and maybe cap it with a horizontal piece for a finishing touch. For a rustic look, vary the heights or cut points on top of each board (picket fence style). Finish it with stain or paint as you like. Pre-made palisade panels might be available through fencing suppliers – they might call them vertical slat screens or privacy panels.
One interesting variant is using round wooden stakes or logs instead of flat boards. You might see this in European gardens – a low border fence made of half-round logs side by side (like a mini palisade). It’s decorative and functional for defining spaces or keeping pets out of flowerbeds, etc. You can buy those as sections that just stake into the ground.
Material-wise, the same climate advice applies: use rot-resistant wood if setting in ground or use metal posts. If doing a full-height palisade screen (like over 6 feet), treat it like a fence – you’ll need posts every so often to keep it upright. Metal versions often come as modular panels that you bolt to posts or brackets.
In terms of color and finish, a wooden palisade screen can be stained to show off wood grain (cedar stain, teak oil, etc.) for a natural look, or painted to match trim of a house for a tailored look. A deep brown or black stain on a palisade can look very modern and chic, especially when paired with green plants. On the flip side, a white-painted palisade screen gives off a classic vibe (great for cottage or coastal themes).
Using Palisade Screens in the Garden: Here are a few ideas:
- Use a palisade screen as a backdrop for a seating area. Place a bench or a set of chairs in front of it, and it will feel like an outdoor room.
- Create a division between garden areas. Maybe you want to separate the veggie garden from the lawn, or the play area from the formal garden. A partial palisade screen (doesn’t have to go all the way across) can indicate a transition and guide people to an opening (like a gate or arbor).
- Artwork display: Hang some outdoor art or planters on a palisade screen. Because it’s solid, you can attach brackets for hanging plants, or mount a piece of metal art, or even string lights on it. It’s sturdy enough to take some decoration.
- Security: If you have a vulnerable spot (like a window by a sidewalk) and want to add a bit of security without bars on the window, a palisade style trellis in front with a thorny climbing rose could be a beautiful deterrent. It says “pretty garden” to people but “no entry” to would-be intruders (hard to climb through a tight vertical slat fence covered in roses!).
All in all, palisade screens marry the practical aspects of a fence (privacy, protection) with the decorative potential of a trellis or panel. They’re a strong statement in a yard, so use them where you want to create a focal point or a clear boundary. And as we’ve seen, you can tailor the look to your taste – uniform and modern, or rugged and rustic. Keep the boards/slats in good shape with a nice finish and they’ll serve you well. A well-built palisade screen is indeed “fort-like” in strength but far more welcoming in appearance than a plain wall – it’s a true blend of function and aesthetic appeal.

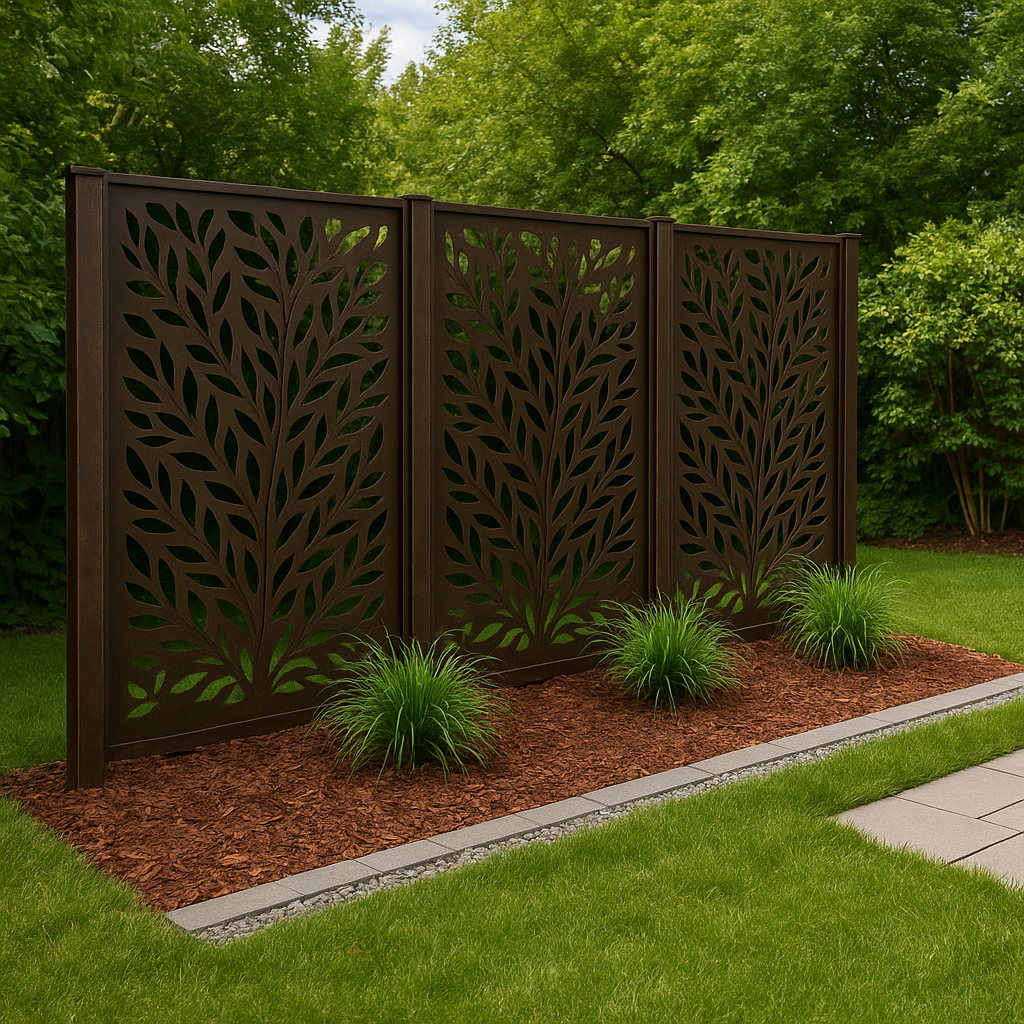
Decorative Timber Screens: Design Motifs and Creative Uses
Now for something a little more artful: decorative timber screens. These are like the fanciful cousins of the straightforward trellis. While a basic garden screen might just have straight slats or simple lattice, decorative screens feature intentional patterns or motifs cut into or built out of the wood. They can be absolutely stunning and can elevate the style of your outdoor space, making it feel custom and curated.
What are Decorative Timber Screens? Imagine a large wooden panel where a beautiful pattern – say, an intricate lattice of leaves or an abstract geometric design – has been carved or cut out. These patterns could be cut through the wood (like a stencil, creating see-through areas), or they could be created by layering wood pieces (like a fretwork applied on top). These screens often serve the same purposes as any garden screen (privacy, partition, shade), but they do it with extra flair. Design motifs can range widely: common ones include floral or vine themes (to complement a garden setting), Islamic or Moroccan-inspired geometric patterns (for a touch of the exotic), modern abstract shapes, or even themed images (like birds, trees, etc.). A modern laser-cut wood privacy screen with a geometric pattern, for example, can turn a simple backyard lounge into a chic retreat.
Materials and Making: Decorative screens can be made from timber (wood), as the name suggests, but also from metal or composite. Since we’re focusing on timber here, let’s talk about that. Typically, a decorative timber screen panel is made from a sturdy wood like hardwood plywood, cedar, or composite wood panels, which is then cut with the desired pattern. Laser cutting or CNC routing has become a popular way to achieve those detailed patterns cleanly. If you’ve ever seen those pretty privacy panels in a garden store with fancy cutouts, they were likely made by a CNC machine following a design. However, you can also create your own patterns with simpler tools – for instance, drilling holes and using a jigsaw to cut organic shapes (it’s like making a big jigsaw puzzle piece out of the panel). Traditional decorative trelliswork might use thinner strips of wood layered in patterns (e.g., a classic Greek key pattern or oriental lattice made by carefully joining many small wood pieces). That’s more labor-intensive, but it was the norm before laser cutting – and it can still be a fun woodworking challenge if you’re up for it.
Design Motifs: Let’s explore a few motif ideas:
- Geometric Patterns: These could be anything from diamonds and squares (like a classic lattice, but maybe done in a creative way), to hexagons (honeycomb pattern, which looks very modern), to overlapping circles (creating a sort of trefoil or floral look). Mid-century modern breeze block walls (those retro cinder blocks with cutouts) are an inspiration here – you can mimic those patterns in wood. Geometric screens tend to fit well in contemporary designs or to add a bit of edge to a traditional space.
- Nature-Inspired Motifs: Leaves, branches, flowers, even animal shapes can be incorporated. For instance, a screen might have silhouettes of bamboo stalks and leaves, giving an Asian zen vibe. Or a screen could have a big tree of life motif carved in it for a dramatic focal piece. If you love a certain plant, you could stylize it into a repeating pattern (ferns, palm fronds, oak leaves – anything!). These naturally feel at home in gardens since they echo the actual plants around.
- Cultural/Decorative Motifs: Think of the ornate latticework in Moroccan riads or the jaali screens of Indian architecture – intricate, lace-like patterns in wood or stone. You can bring a bit of that global flair to your backyard with panels featuring such designs. Or maybe a Celtic knot pattern for a touch of folklore. These motifs often impress visitors because they’re not something you see in every standard-issue fence.
- Contemporary Art: If you’re artistic, you could design a unique pattern or image that means something to you. Some people incorporate their family name or initials into a screen as a monogram piece. Others might do a skyline of their city, or a mountain outline if they love hiking. The cool thing with custom screens is you can really personalize your space – it becomes functional art.
Creative Uses for Decorative Screens:
- Privacy with Style: The most straightforward use is as a privacy screen that’s also a statement piece. Instead of a plain panel blocking the neighbor’s view, you have a piece of art that also provides privacy. For example, on a deck or balcony, you could install a decorative screen on the side that faces neighbors, instantly upping the ambiance. In the evening, those cut-out patterns can create beautiful shadows or let the glow of outdoor lights through in pretty shapes.
- Feature Walls and Backdrops: You can use a decorative timber screen as a backdrop for a seating area or a focal point in the garden. Think of it like how inside a house you might have an accent wall with wallpaper or art – outside, you could have an accent screen. Place a bench in front of a screen with, say, a laser-cut floral design, and suddenly it feels like an intentional garden “room.” They also work behind fountains or small water features, adding depth to that element.
- Shade Panels: A horizontal application – some people use decorative screens as overhead panels for partial shade. For instance, attach a patterned screen on top of a pergola. The sun filtering through will cast dappled light with the pattern onto the space below. It’s like sitting under a tree with patterned leaves, but the design is man-made. Just ensure the material is thick enough to span overhead safely or is supported well.
- Deck or Porch Skirting: Instead of basic lattice under a deck, imagine sliding decorative panels in those openings. It turns a usually forgettable area into something eye-catching. And since many decorative panels are made from composites or treated wood, they can handle being low to the ground.
- Gate Inserts and Doors: You can incorporate a decorative screen into a gate or a door for a semi-transparent effect. For instance, a wooden garden gate could have a cut-out pattern top half – gives a peek-a-boo of what’s inside while looking fabulous. Or use a decorative panel in a screen door for a porch, for an old-fashioned ornate look.
- Indoor/Outdoor Blur: These screens can also be used indoors (as room dividers, headboards, wall art) and then echoed in the outdoor design for cohesion. If you have a sunroom or covered patio, a decorative screen could partition areas or hide pool equipment in a stylish way.
- Lighting Effects: Try placing lights (like LED strip lights or solar lights) at the base or behind a decorative screen. At night, the light will shine through the cutouts and project the pattern onto the ground or wall behind it. This creates a lovely atmosphere – almost like a giant lantern. A screen with a Moorish pattern backlit in the evening can transform a plain patio into something really magical.
Durability and Care of Decorative Screens: Since many are essentially big flat panels with cutouts, you want to use material that won’t split easily. Exterior-grade plywood (like marine plywood) is often used for DIY cutout screens – just be sure to seal the edges really well to prevent water delamination. Some manufacturers use compressed hardwood or resin-infused wood panels that hold up to weather (one Australian company “Outdeco” makes these, for example). Regular wood screens can last a long time if maintained – keep them painted/stained so water doesn’t seep into the cut edges. Because there’s less material (due to all the holes), they can be a bit weaker structurally than a solid panel, so handle them carefully during installation to avoid cracks. Once mounted (especially if in a frame), they’re fine.
Also, consider the background: A light-colored screen against a light wall might not show the pattern strongly. Usually, contrast helps – dark patterns stand out against a light background and vice versa. If you mount a decorative screen away from a wall (like as a standalone divider), both sides will be visible and it can serve as a partition that looks good from either side.
One more tip: mix and match with plants. For example, a timber screen with a tree pattern could be placed where real vines and leaves can intertwine with it, creating a cool mix of real and art. Or a screen with a leaf motif could complement a nearby foliage plant with similar shaped leaves – designing with echoing shapes is a trick designers use to create harmony.
To sum up, decorative timber screens are where functionality meets creativity. They do the job of providing privacy or structure, but they also give your space a customized, artistic touch. If you have a bit of an artistic soul (and I suspect you do if you’re reading a 5,000-word treatise on trellises!), incorporating one of these screens could be the highlight of your yard. Whether you buy a ready-made panel or craft your own design, you’ll have a piece that’s uniquely yours and a conversation starter at the next barbecue.
Conclusion
From humble lattice panels to ornate laser-cut masterpieces, trellises and garden screens offer a world of possibilities for the creative homeowner. They’re the multitaskers of the backyard: providing privacy, supporting your favorite climbing roses and sweet peas, hiding the not-so-pretty stuff, and adding architectural interest all at once. The best part is how accessible these projects can be – with a little elbow grease and some basic tools, even a DIY beginner can put together a simple trellis and see their garden transform as a result.
We’ve journeyed through modern, rustic, and traditional styles, so you can pick a look that makes your heart happy. We talked about using trellises as clever camouflage for eyesores, turning blank walls into lush green tapestries, and giving your climbing plants the support they deserve (they’ll reward you with more blooms and veggies, promise!). We also delved into the nuts and bolts – quite literally – of materials and construction, so you know what works best in Seattle drizzle versus Arizona sun versus salty Cape Cod air. And let’s not forget our deep dive into palisade screens and decorative timber panels, showing that these structures can be more than utilitarian – they can be downright artistic.
As you ponder your own yard, think about the spots that could use a trellis or screen. Maybe it’s that patio that feels a tad too exposed, or the garden shed wall that could use some love (a wall trellis with a vine can do wonders there). Perhaps you’re dreaming of biting into homegrown grapes – time to build that sturdy arbor. Or you just want a pretty backdrop for your flower bed photos – a decorative screen could be your answer.
Remember, the tone of this project is casual and fun – so approach it that way. There’s no need for perfection; vines will cover a crooked screw and paint can always be redone. It’s incredibly rewarding to stand back and admire a trellis or screen that you built with your own hands, knowing it’s going to make your outdoor space more enjoyable and beautiful.
A few final helpful hints: always plan for the plant (make sure your structure can handle it), prioritize good anchoring and hardware for safety, and do yourself a favor by choosing low-maintenance materials if you’re not the upkeep type. And if you’re ever in doubt, look back at resources or consult the friendly community of DIY gardeners online – there’s a wealth of shared knowledge out there.
So go ahead – sketch that idea, pick up some cedar boards or that cool screen panel you saw at the store, and create your own leafy hideaway or artistic garden wall. Your future self, sipping iced tea in the private shade of your gorgeous trellis screen, will high-five you. Happy building, and may your gardens grow greener and your outdoor living get even sweeter with the help of these trellises and screens!