If you want to enhance the look of your home, you should consider building a wooden bar. The first step is to choose home bar plans free that suit your needs and fit within your budget. Afterwards, you should take a look at these instructions and adjust the size and the design of the bar until they satisfy your needs. Select the lumber with attention, making sure the components are straight and in a good condition.
There are many things that you should take into account when building the wooden bar, such as its size, its design or the materials you are going to use. From our experience, we recommend you to buy cedar, pine or redwood, as these materials are durable and they will enhance the look of your home bar. Always drill pilot holes before inserting the screws, to prevent the wood from splitting.
Building a home bar

Building a home bar
Materials
- 1 – 4 pieces of 2×4 lumber – 40″, 4 pieces of 2×6 lumber – 40″ LEGS
- 2 – 4 pieces of 2×4 lumber – 48”, 6 pieces – 15″ FRAMES
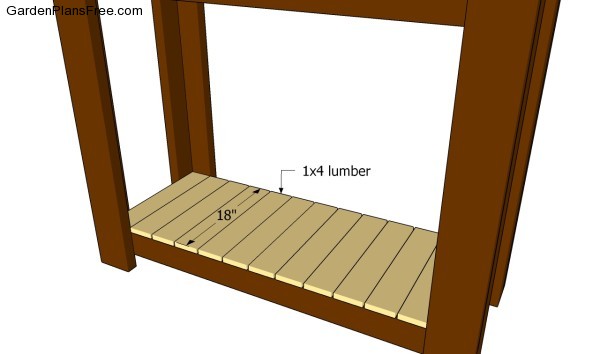
- 3 – 13 pieces of 1×4 lumber – 18″ FLOOR
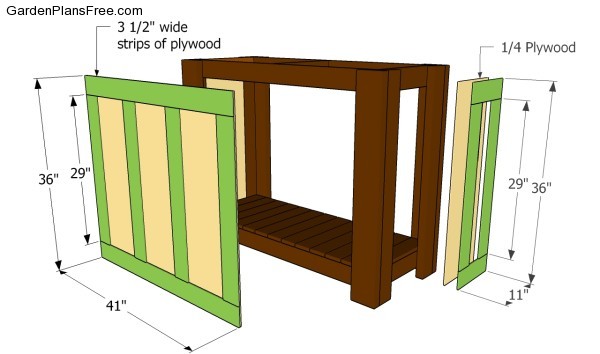
- 4 – 2 piece of 1/2″ plywood – 11″ x 36″, 1 piece – 41″ x 36″, trims PANELS
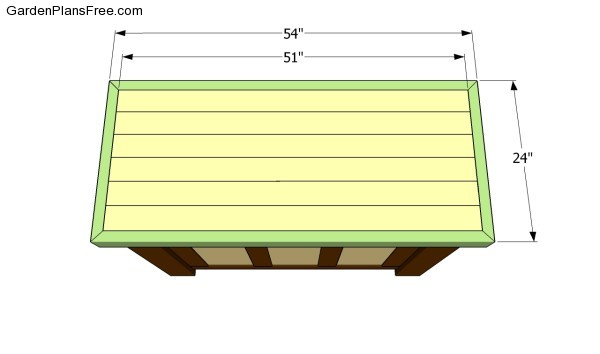
- 5 – 6 pieces of 2×4 lumber – 51″, 2 pieces – 24″, 2 pieces – 54″ TABLETOP
- 6 pieces of 2×4 lumber – 8 ft
- 4 pieces of 2×4 lumber – 10 ft
- 2 pieces of 2×6 lumber – 8 ft
- 3 pieces of 1×4 lumber – 8 ft
- 1 piece of 1/2″ plywood – 4’x8′
- wood glue, stain/paint
Tools
- Hammer, Tape measure, Carpentry square
- Miter saw, Drill machinery, Screwdriver, Sander, Router
- Safety Gloves, Safety Glasses, Respiratory Mask
Time
- One day
Home bar plans free

Building the frame of the bar
First of all, you need to build the frame for the home bar using 2×4 and 2×6 lumber. As you can see in the image, you need to adjust the width of the 2×6 slats at 5″, as to create a nice symmetrical effect when adding the rest of the legs. Drill pilot holes trough the bottom and top frames and insert 2 1/2″ screws into the legs, from the inside.
PRO TIP: Don’t forget to add waterproof glue to the joints, if you want to create a rigid structure. In this manner, the head of the screws will be hidden and the wooden bar will have a nice appearance.

Attaching the floor
Afterwards, attach the bottom floor into place, making sure you leave about 1/4″ between the slats. Attach the slats to the frame, drill pilot holes and insert 1 1/4″ screws through the 1×4 slats into the frame.

Fitting the front and side panels
Building the side and the front panels is a straight-forward job, especially if the right steps and techniques are used. Rather than installing 1×4 slats, we recommend you to try something unique and to enhance the look of the home bar. Therefore, build the panels from 1/2″ plywood and attach 3 1/2″ wide strips to the edges, as in the free plans.
PRO TIP: Use waterproof glue and 5/8″ nails to lock the components together. Afterwards, drill pocket holes around the edges of the panels and secure them to the frame with appropriate screws.

Building the bar top
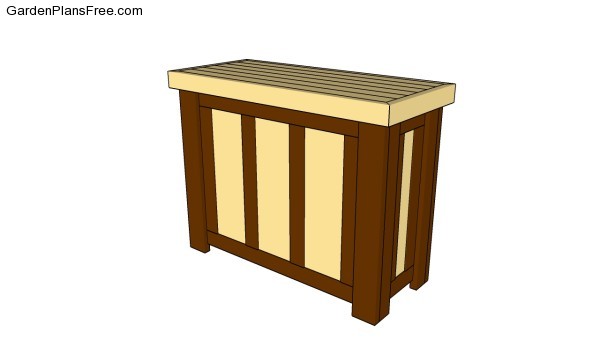
The last step of the project is to build the top of the bar. As you can see in the image, the easiest method to get the job done quickly is to use 2×4 lumber. After securing the slats to the frame of the bar, you need to install trims to hide the edges.
PRO TIP: Drill pilot holes before inserting the screws and add waterproof glue to enhance the bond of the joints. Check if the corners are right-angled before continuing the project.

Home bar plans free
Last but not least, you should take care of the finishing touches. Fill the holes and irregularities with putty and let it dry for several hours. Smooth the wooden surfaces with 120-grit sandpaper along the wood grain and clean the residues with a dry cloth.
PRO TIP: Apply several coats of paint or stain over the components, in order to protect them from decay. Check out the rest of the garden projects, as there are many plans that could suit your needs.
This diy project was about home bar plans free. If you have enjoyed the free project, we recommend you to share it with your friends, by using the social media widgets.
