If you want to learn more about how to build a 20×30 wooden pavilion you have to take a close look over the free plans in the article. This rectangular pavilion will shelter a 600 sq ft area, so just image how many things you could do with it. Read the local building codes so you come with the most appropriate dimensions for the components. The roof pitch is 6:12. You can change that by adjusting the height of the supports.
If you want to get the job done in a professional manner, we recommend you to plan everything with attention, as to prevent costly mistakes and to build a professional garden project. Invest in high quality materials, such as cedar, pine or redwood, as the structure will be exposed to all kinds of weather. Apply a few coats of paint over the components, to enhance their appearance and to protect them from bad weather.
20×30 Pavilion – Free DIY Plans

Building-a-20×30-pavilion
Materials
- A – 9 pieces of 6×6 lumber – 8′ long POSTS
- B – 3 pieces of 6×10 lumber – 20′ long, 4 pieces – 180″ PLATES
- C – 3 pieces of 6×6 lumber – 49 3/4″ long, 2 pieces of 6×10 – 180″ long RIDGE BEAM
- D – 22 pieces of 6×6 lumber – 48″ long BRACES
- F – 32 pieces of 2×6 lumber – 12′ long RAFTERS
- H – 18 pieces of 1/2″ plywood – 4’x8′, 4 pieces – 4’x6′, 2 pieces – 4’x4′, 2 pieces – 2’x4′ ROOF
- I – 4 pieces of 1×8 lumber – 145″ long, 2 pieces – 14′ long, 2 pieces – 16′ long TRIMS
- J – 800 sq ft of tar paper and asphalt shingles ROOF
- 17 pieces of 6×6 lumber – 8′
- 6 pieces of 6×10 lumber – 16′
- 3 pieces of 6×10 lumber – 20′
- 1 piece of 6×6 lumber – 12′
- 32 pieces of 2×6 lumber – 12′
- 6 pieces of 1×8 lumber – 14′
- 2 pieces of 1×8 lumber – 16′
- 23 pieces of 1/2″ plywood – 4’x8′
- 800 sq ft of tar paper and asphalt shingles
- 1 5/8″ screws
- 36 pieces of 10″ screws
- 2″ nails
- 40 pieces of 5 1/2″ screws
- 64 rafter ties
- 3 boxes of 1 1/2″ structural screws
- 1 box of 2 1/2″ structural screws
- 6 pieces of post to beam connectors
- 9 post anchors
- wood glue, stain/paint
Tools
- Hammer, Tape measure, Carpentry square
- Miter saw, Drill machinery, Screwdriver, Sander, Router
- Safety Gloves, Safety Glasses, Respiratory Mask
Time
- One week
How to Build a large pavilion
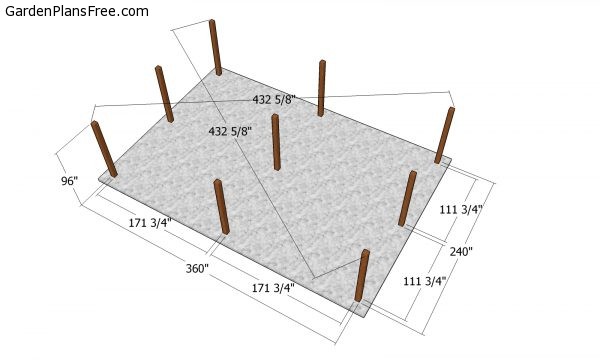
Laying out the posts
The first step of the project is to layout the posts for the pavilion using string and batter boards. Make sure the diagonals are equal and also apply the 3-4-5 rule to the each corner. Select the location for the pavilion making sure you comply with the codes. Remove the vegetation layer and then try to level it as much as possible.
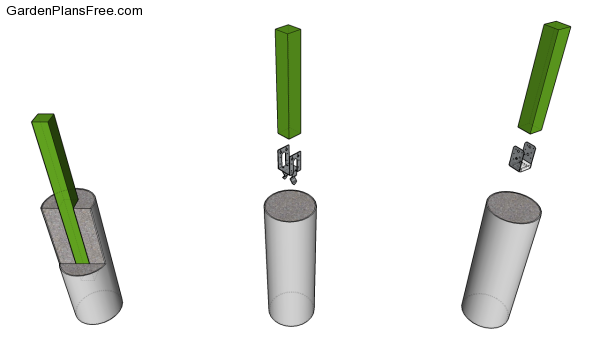
Dig holes under the front line (at least 3 ft) and fit the tube forms into place. Fill them with concrete and then install the post anchors. Fit the posts to the anchors and then plumb them with a spirit level. Use temporarily braces to lock the posts into place until assembling the frame of the pavilion.
Read the local building codes to determine the right location for your pavilion, as well as the size of the footings.
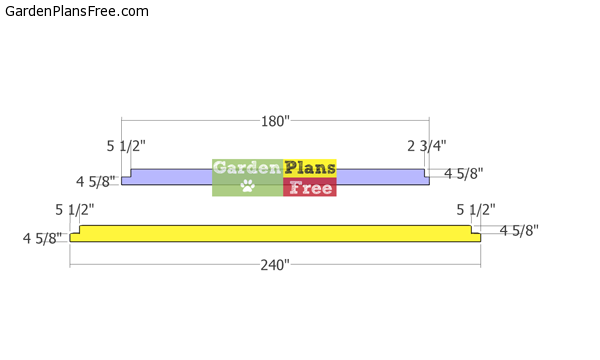
Top-plates-for-large-gable-pavilion
Use 6×10 lumber for the top plates, as well. Use a circular saw and set the blade at 4 5/8″. Make parallel cuts inside the marked areas and then remove the excess with a chisel. Smooth the surface with sandpaper. Pay attention to these instructions, otherwise you won’t be able to assemble the top plates properly.
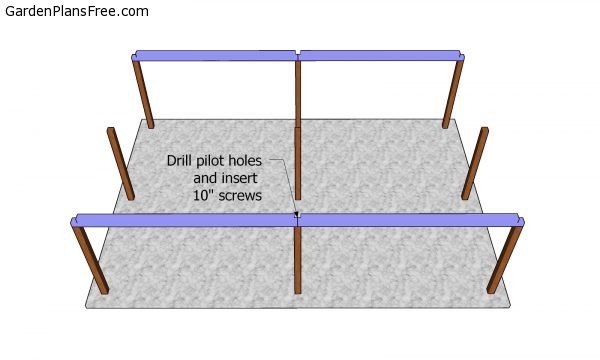
Fitting the side top plates
Fit the 6×10 plates to the top of the posts, as shown in the diagram. Align the edges flush and make sure the corners are square. Drill pilot holes through the top plates and insert 10″ screws into the posts.
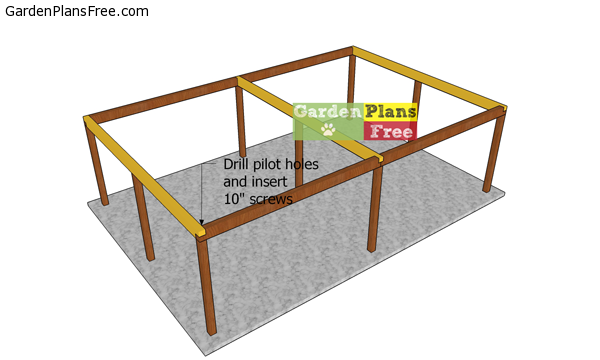
Fitting-the-cross-plates
Fit the crossbeams to the top of the beams. Align the edges flush and check if the corners are square. Drill pilot holes and insert 10″ screws into the side plates.
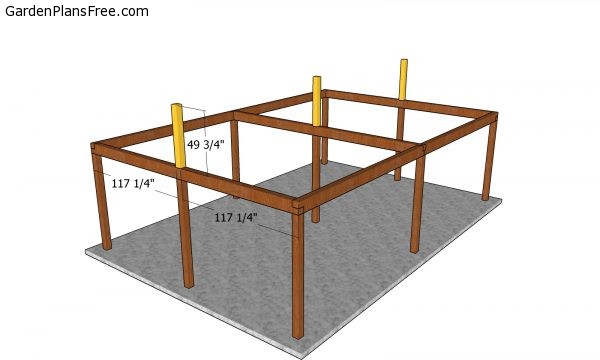
Fitting the supports for the ridge beam
Use 6×6 lumber for the ridge beam supports. Cut the supports to 49 3/4″ and then center them to the top of the cross beams. Use post to beam connectors to secure the supports into place. Use 2 1/2″ screws to lock the connectors into place. Plumb the posts with a spirit level before inserting it into place.
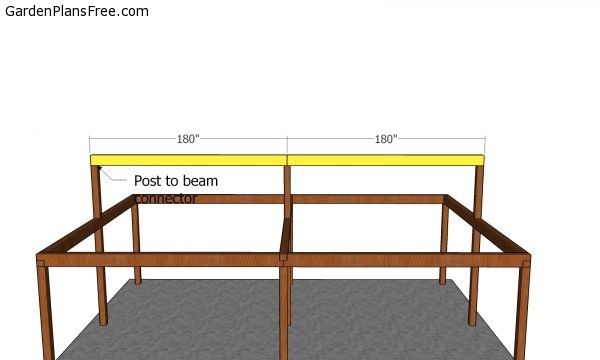
Fitting the ridge beams
Fit the 6×6 beam to the top of the supports. Check if the corners are square and align the edges. Use post to beam connectors to lock it into place.
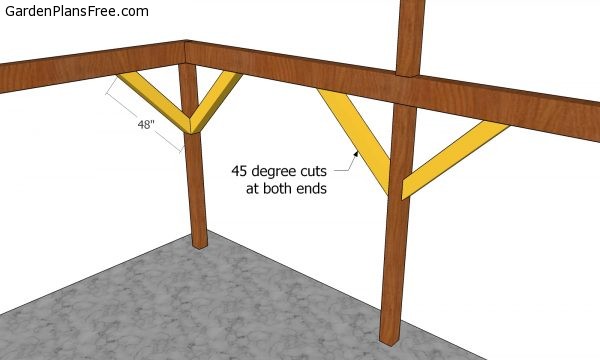
Braces for 20×30 pavilion
Use 6×6 lumber for the braces. Cut both ends of the 48″ long braces at 45 de degree cuts. Plumb the posts with a spirit level and make sure the corners are square. Fit the braces into place, drill pilot holes and insert 5 1/2″ screws to lock them into place tightly.
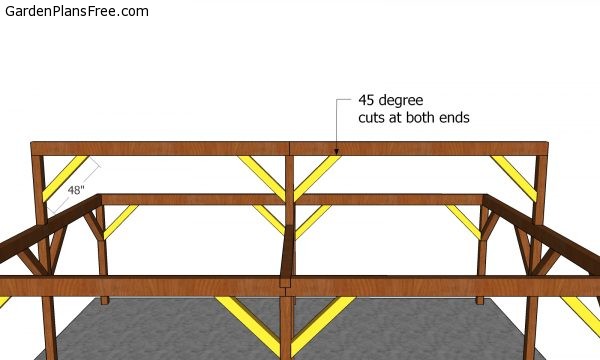
Ridge beam braces
Cut the braces for the ridge beam. Make 45 degrees cuts to both ends. Drill pilot holes and insert 5 1/2″ screws to lock the braces into place.
Rafters-for-20×30-pavilion
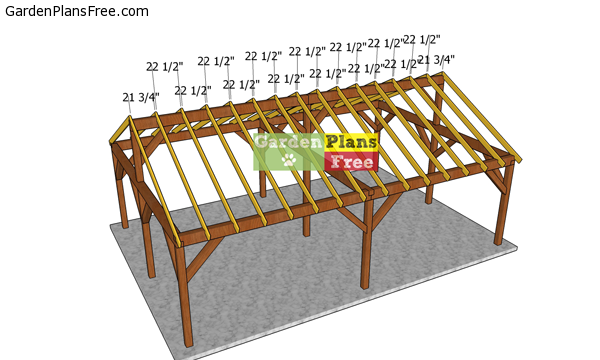
Use 2×6 lumber for the rafters. Mark the cut lines to the beams and then get the job done with a circular saw. Smooth the edges with attention and pay attention to the birdsmouth cuts.
Fitting-the-rafters
Fit the rafters to the top of the pavilion and place the rafters every 24″ on center. Use rafter ties and 1 1/2″ structural screws to lock the rafters into place tightly. If you change the pitch of the roof, these angles will change as well.
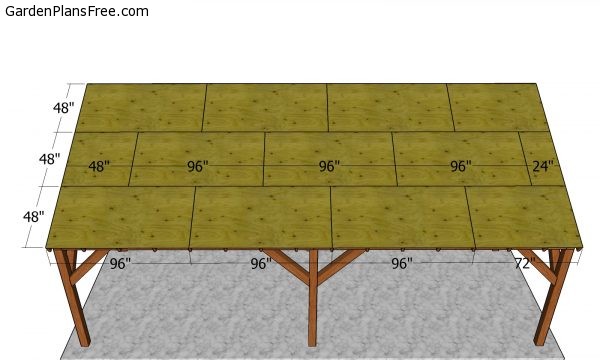
Roof sheets
Lay the 1/2″ plywood sheets to the top of the pavilion. Align the edges flush and leave no gaps between the sheets. Insert 1 5/8″ screws every 8″ along the rafters.
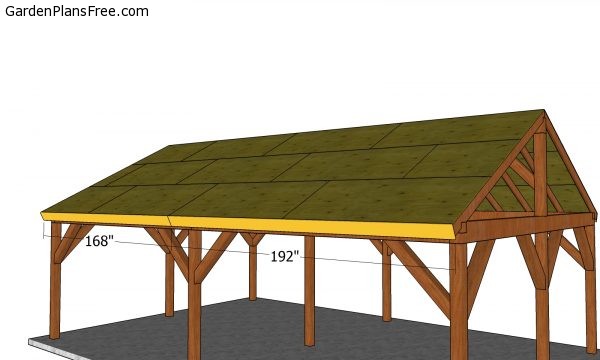
Side roof trims
Use 1×8 lumber for the side roof trims. Align the edges flush and insert 2″ nails to secure the trims into place tightly.
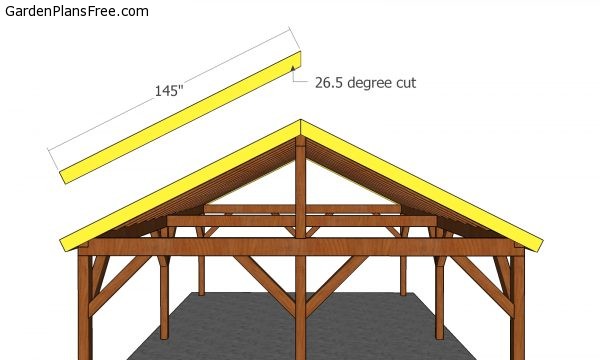
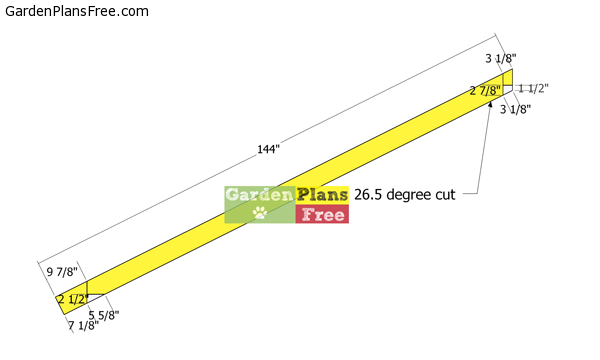
Front and back roof trims
Cut the trims for the front and back of the roof using 1x8s. Make the 26.5 angle cuts and fit the trims into place with 2″ nails.
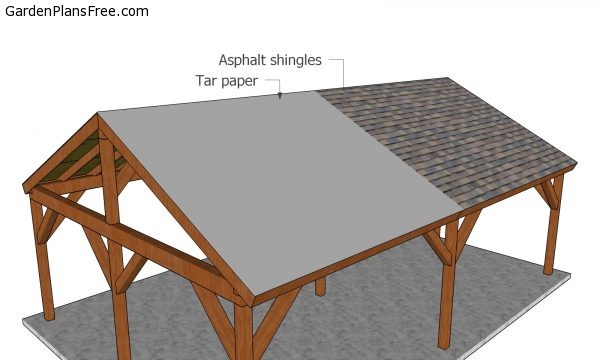
Roofing for 20×30 pavilion
In order to waterproof the pavilion, you have to cover the roofing sheets with felt. Make sure the strips of roofing felt overlap at least 2-3″ and staple them to the plywood sheets every 8″. Continue the project by installing the asphalt shingles. Place the starting course at the bottom of the roof, before fitting the rest of the shingles.
PRO TIP: Always read the manufacturer’s instructions, before installing the shingles. They provide essential information about the installation of the shingles.
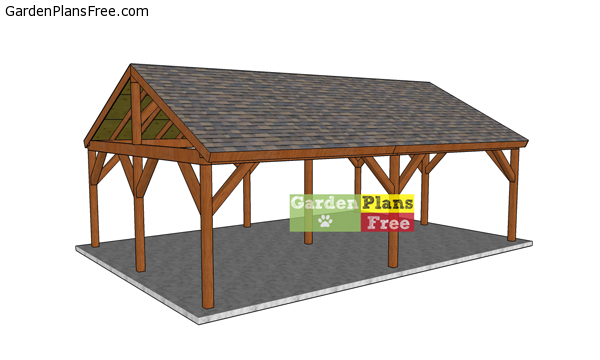
How-to-build-a-20×30-pavilion
Next, make sure everything is assembled together tightly. Fill the holes with wood putty and smooth the surface with 120-220 grit sandpaper. Apply a few coats of paint or stain to enhance the look of the pavilion and to prevent the wood from decay.
This is a large gazebo built on a sturdy 6×6 and 6×10 structure. The pitch of the gable roof is 6:12 and it features a simple but elegant design. Check out my other pavilion plans for a 16×20 structure.
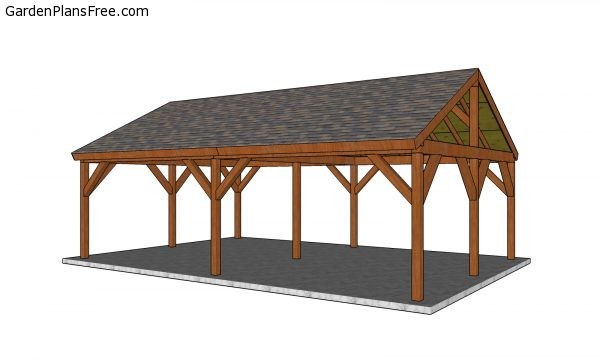
How to build a 20×30 pavilion
This 20×40 large pavilion with a gable roof is easy to make and it will shelter a relaxation area or an outdoor serving space. As you saw in this tutorial, the structure is sturdy but also well thought, so you can keep the costs affordable.
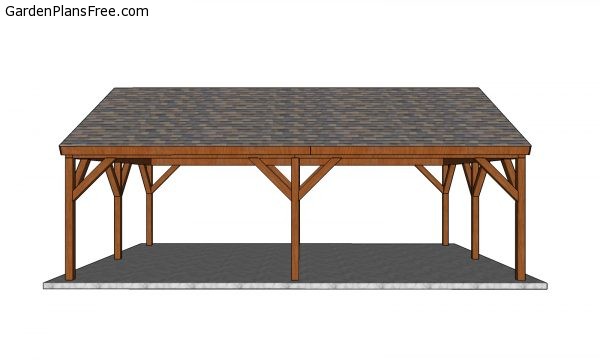
20×30 Pavilion Plans – side view
This pavilion has a base of 20’x30′ and it features a roof with a 6:12 pitch. This roof features overhangs on both sides of the pavilion.
PRO TIP: Apply several coats of paint or stain over the components, in order to protect them from decay. Check out the rest of the project plans to learn more about building garden projects.


8 comments
I’m looking for plans for a 40 x 60 do it yourself pavilion. Do you have anything like that?
No
I’m looking for the plans to the 20 x 30 pavilion.
See the GET PDF PLANS button, at the end of the article.
Your site is one of the best I have found. I am looking for a 20×30 or 20×40 pavilion for a hunting club. I would also like to do metal roof. Is there a way to find an approximate cost if giving location? We would also only be using crushed stone for base being this would be 500yds into a clearing on a 300 acre parcel of land. Willing to pay for assistance.
I dont do custom plans and I dont build projects. Sorry
Do you have plans for a 20×30 pavilion with a hipped roof?
the braces are wrong, I’m counting 22 total braces, 18 on first level and 4 on second level, its showing 16 on the list posted