If you need a nice area for leisure that you could build by yourself in just a few days, you should consider building a garden pergola. As you will see in the instructions, using proper 10×12 garden pergola plans will make the whole woodworking project a lot easier, as you just need to build the components and assemble them together. If you plan everything properly, you can assemble the components into place in just an weekend.
Use quality materials if you want to get the job done in a professional manner and build a durable pergola. Pine, redwood or cedar are great choices, as the components have a nice finish and are also weather-resistant. Nevertheless, when choosing the slats, make sure their are perfectly straight and in a good condition. Always drill pilot holes before inserting the galvanized screws, to prevent the wood from splitting.
Building a garden pergola

Building a garden pergola
Materials
- 1 – 4 pieces of 4×4 lumber – 108″ long POSTS
- 2 – 4 pieces of 2×6 lumber – 140″ long SUPPORT BEAMS
- 3 – 10 pieces of 2×6 lumber – 167″ long CROSSBEAMS
- 4 – 3 pieces of 2×2 lumber – 131″ long SLATS
- 5 – 8 pieces of 2×2 lumber – 113″, 8 pieces of 2×2 – 71″, 2 pieces of 4×4 – 113″ TRELLIS
- 6 – 4 piece of 2×4 lumber (both ends cut at 45º) – 35″ long BRACES
- 6 pieces of 4×4 lumber – 10 ft
- 4 pieces of 2×6 lumber – 12 ft
- 10 pieces of 2×6 lumber – 14 ft
- 2 pieces of 2×4 lumber – 8 ft
- 7 pieces of 2×2 lumber – 12 ft
- 8 pieces of 2×2 lumber – 10 ft
- 4 post anchors
- 200 pieces of 2 1/2″ screws, 200 pieces of 1 5/8″ screws
- 100 pieces of 4″ screws
- 8 pieces of 7″ carriage bolts
- wood glue, stain/paint (for base)
Tools
- Hammer, Tape measure, Carpentry Square
- Miter saw, Drill machinery, Screwdriver, Sander
- Safety Gloves, Safety Glasses, Respiratory Mask
Time
- One Weekend
Garden Pergola Plans
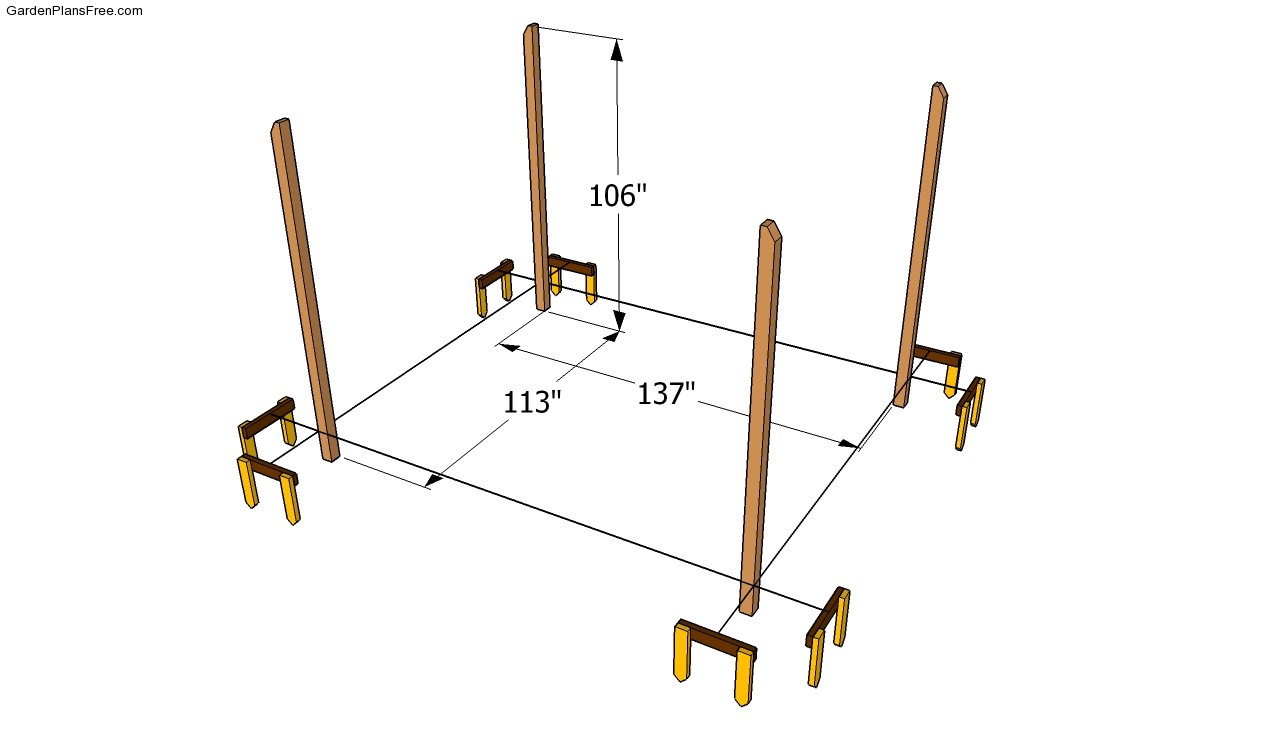
Laying out the pergola
The first step of the project is to lay out the pergola in a professional manner, using batter boards or string. After setting the batter boards into place, we recommend you to check if the corners are right-angled, using the 3-4-5 rule or an L-square. In addition, make sure the diagonals are equal and adjust the strings if necessary.
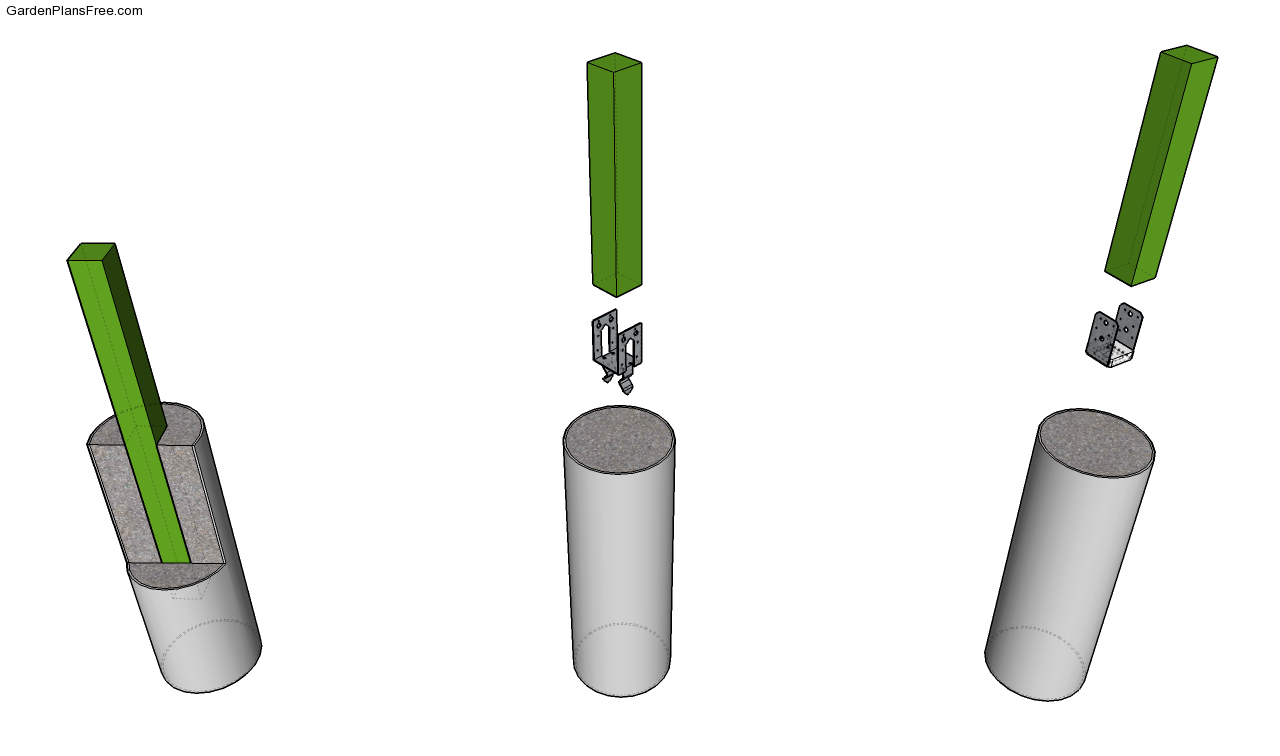
Fitting the posts into concrete
Taking into account the pergola is a complex project, you should secure the 4×4 posts into concrete tightly. On one hand, you could set the posts into concrete or attach them to a concrete surface with anchors. Irrespective of your choice, you need to dig 3′ deep holes in the ground (at least 6” under the frost line) and fit a tube form. Pour a 2” layer of gravel on the bottom of the holes and compact it thoroughly.
PRO TIP: We strongly recommend you to check if the concrete surface is level. In addition, you need to plumb the posts with a spirit level and secure them temporarily with braces. Let the concrete to dry out for several hours, before continuing the project.
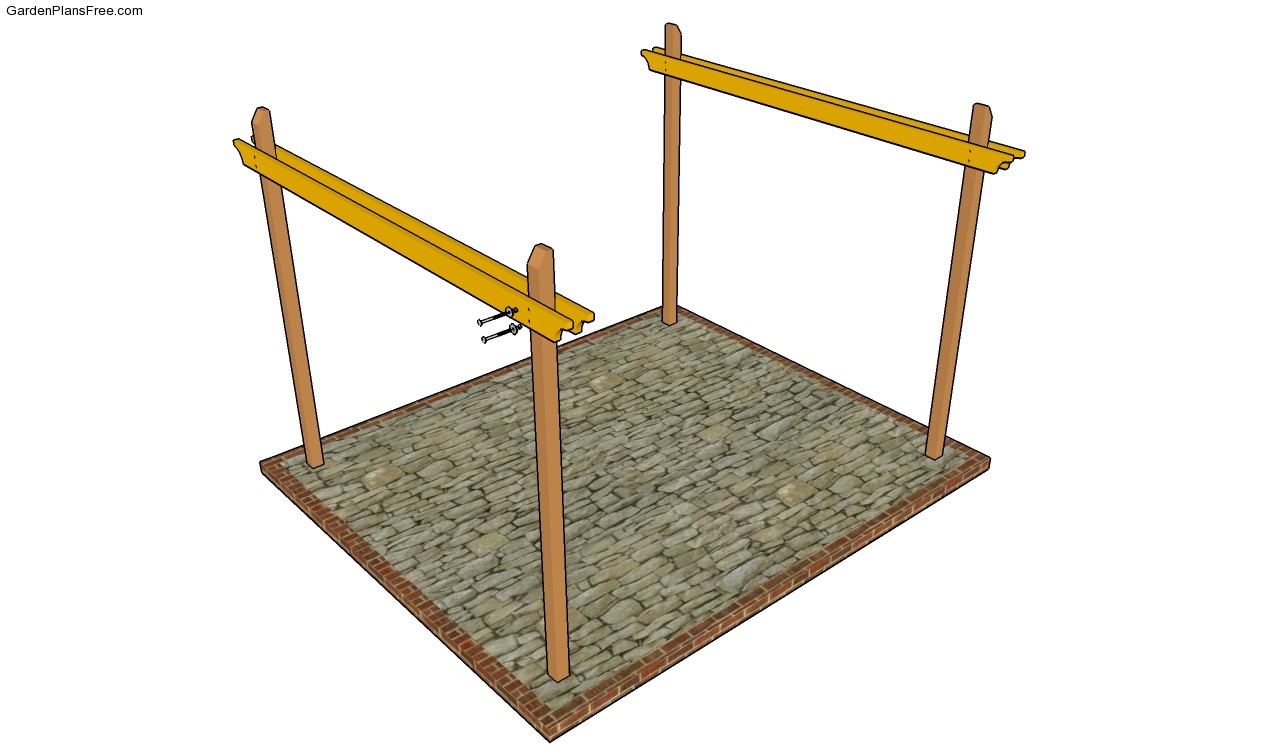
Installing the support beams
Continue the project by fitting the crossbeams to the posts. As you can easily notice in the plans free, you should secure the beams to the posts with C-clamps, after leveling them thoroughly. Drill pilot holes trough the beams as well as through the posts and insert 7″ carriage bolts.
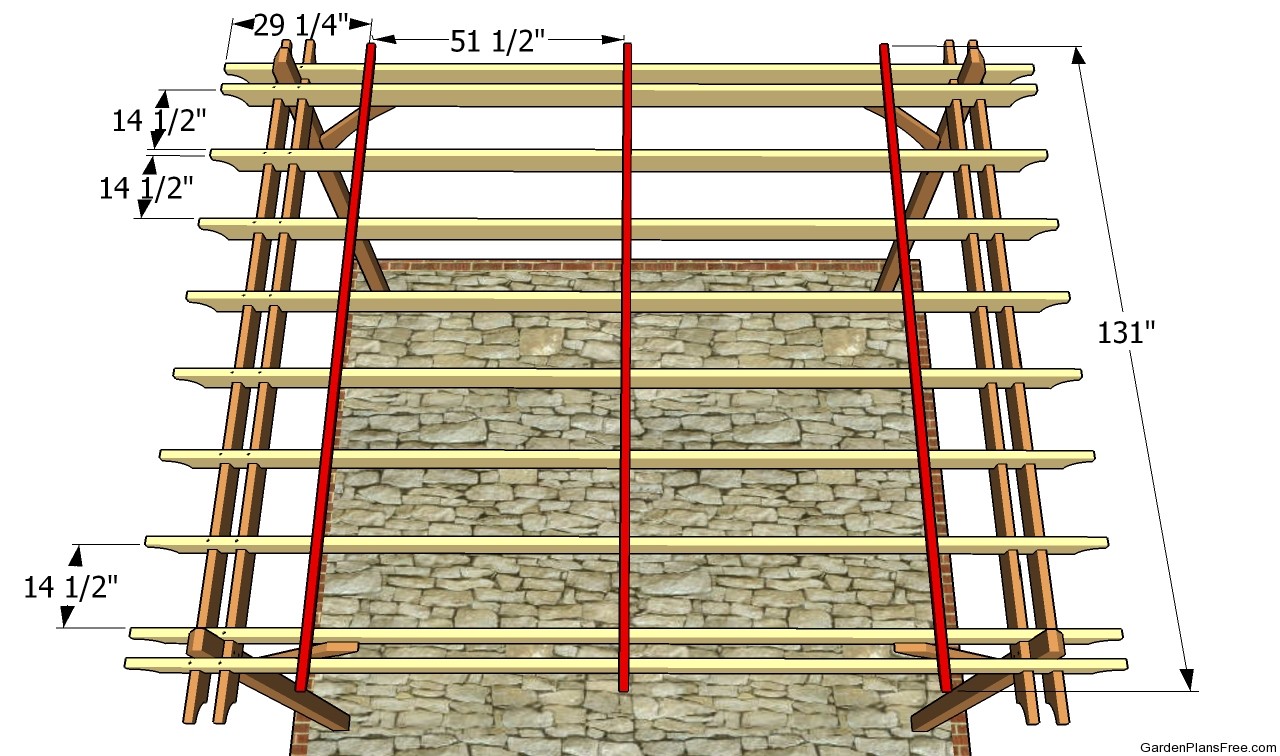
Installing the crossbeams
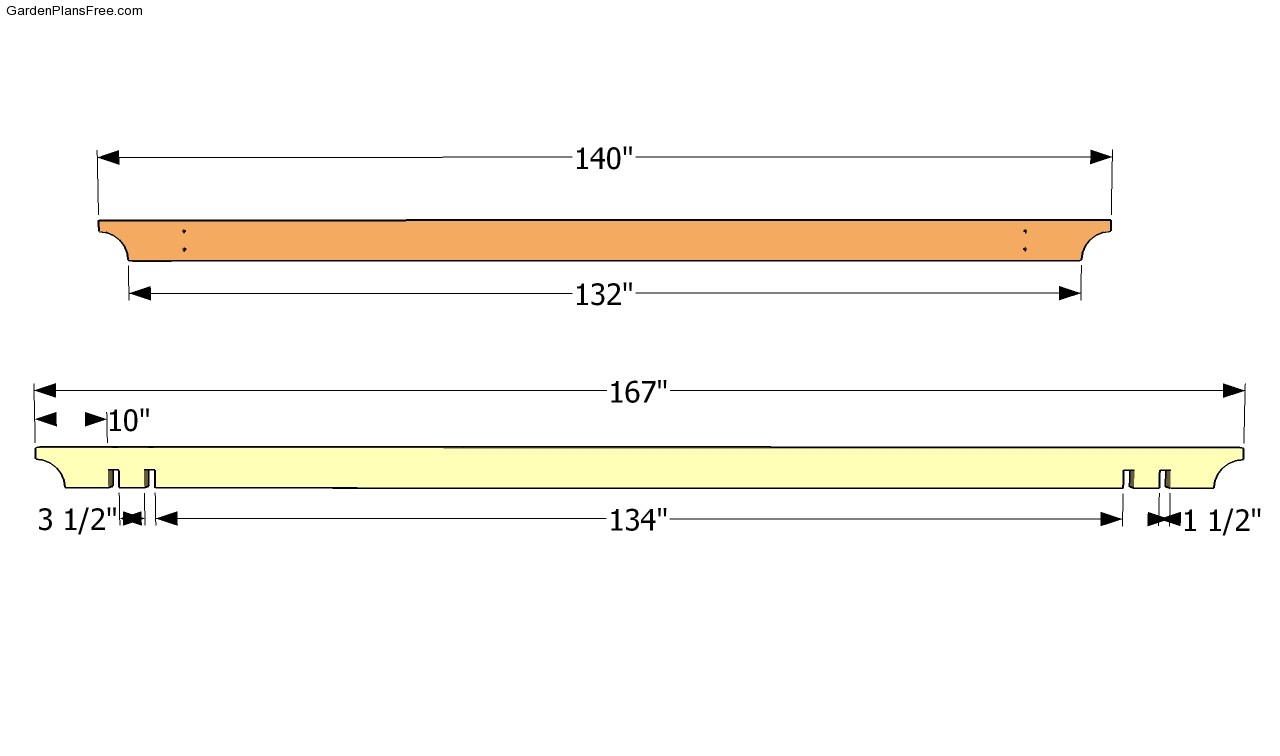
Afterwards, fit the crossbeams into place. The first step is to build the components from 2×6 lumber, using a food circular saw. If you want to add character to your garden pergola, you should consider cutting the ends of the beams in a decorative manner. Cut small notches in the beams to fit into place properly, drill pilot holes and secure them to the support beams with 3 1/2” galvanized screws.
Beams plans
As you can see in the image, you need to cut 2″ deep notches in the beams, as to fit to the support beams properly. Use a circular saw to make several parallel cuts into the beams and clean the recesses with a chisel. In addition, make the curves cuts at both ends of the beams with a jigsaw. Use a spirit level to check if the components are level and plumb.
Installing the side panels
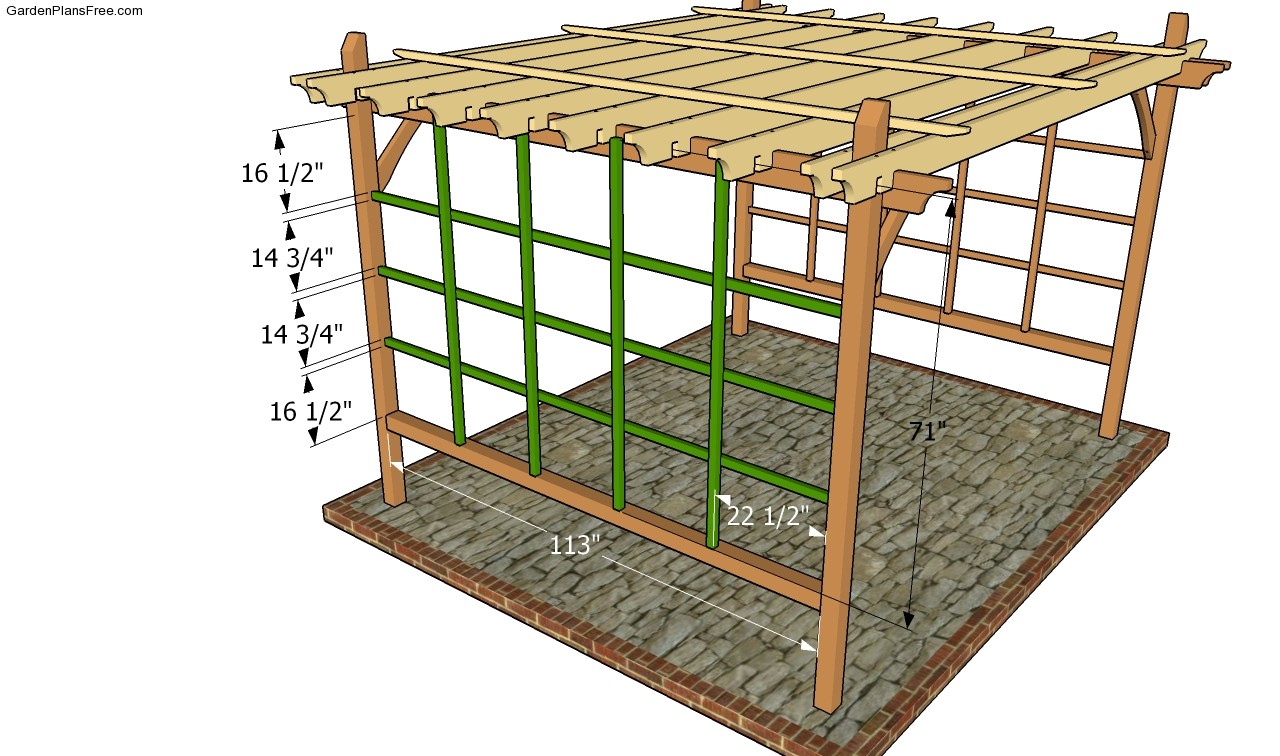
Although this is not a compulsory step, you could attach trellis to the sides of the pergola. In this manner, you could attach 2×2 slats between the posts, as in the image. Drill pilot holes trough the slats and insert 2 1/2” galvanized screws. Check out the grape arbor plans, to see other pergola designs.

Garden patio plans
Last but not least, you should take care of the final touches. Fill the holes with a good wood filler and let it dry out for several hours, before smoothing the surface with medium-grit sandpaper. Add 2×4 braces to the front and back ends of the pergola, if you want to add character to the pergola. You need to also take a look over my 12×12 pergola plans.
PRO TIP: Protect the wooden components of the trellis from decay by applying several coats of paint. In addition, if you choose the right color and finish, the trellis will enhance the look of your garden.
This diy project was about garden pergola plans. If you have enjoyed the free project, we recommend you to LIKE and SHARE it with your friends, by using the social media widgets.
