If you want to learn more about how to build a small 5×10 greenhouse, we recommend you to pay attention to the instructions described in the article. Work with attention and plan every aspect of the project from the very beginning, in order to prevent costly mistakes and to save time. there are a lot of plans and designs to choose from, so make sure you take a look over the rest of the related projects.
It is essential to select the right small greenhouse plans from the very beginning, as the construction should fit within your budget and to match the style of your garden. Invest in weather-resistant lumber, as the components will be exposed to moisture. Take accurate measurements before making the cuts and drill pilot holes before inserting the screws, to prevent the wood from splitting.
Small Greenhouse Plans

Building a small greenhouse
Materials
- 1 – 14 pieces of 2×2 lumber – 21″, 4 pieces – 120″ SIDES
- 2 – 2 pieces of 2×2 lumber – 57″, 2 pieces – 48 1/4″, 1 piece – 120″ FRAME
- 3 – 14 piece of 2×2 lumber – 42 1/2″ RAFTERS
- 4 – 1 piece of 1×4 lumber – 120″ LIDS
- 4 – 4 piece of 2×2 lumber – 60″, 4 pieces – 39 1/2″ LIDS
- 11 pieces of 2×2 lumber – 12 ft
- 1 piece of 1×4 lumber – 10 ft
- 9 pieces of 2×2 lumber – 8 ft
- 2 pieces of 2×2 lumber – 10 ft
- 3 1/2″ screws
- 4 pieces of hinges
- greenhouse film
- wood stain
Tools
- Hammer, Tape measure, Carpentry square
- Miter saw, Drill machinery, Screwdriver, Sander, Router
- Safety Gloves, Safety Glasses, Respiratory Mask
Time
- One weekend
Building a small greenhouse
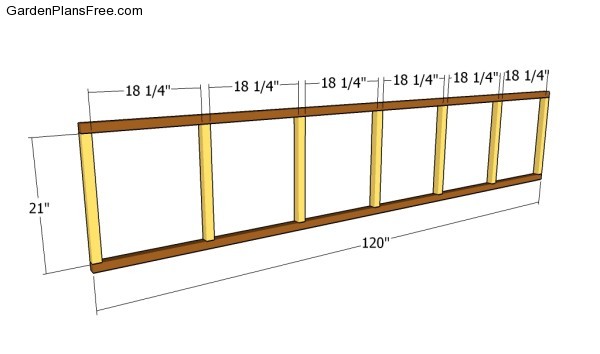
Building the side walls
The first step of the woodworking project is to build the side walls. As you can easily notice in the plans, we recommend you to build the components out of 2×2 lumber and to lock them together with 3 1/2″ galvanized screws. Drill pilot holes through the plates and insert the screws into the studs, after making sure the corners are right-angled. Assemble the walls on a level surface, if you want to get the job done in a professional manner.
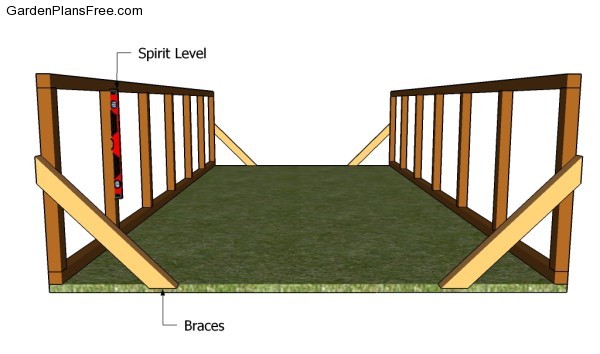
Fitting the side walls
Choose the location for the greenhouse and set the walls into place with temporarily braces. Use 2×4 braces to lock the walls into place, after making sure they are perfectly plumb. Take accurate measurements, if you want to get the job done in a professional manner.
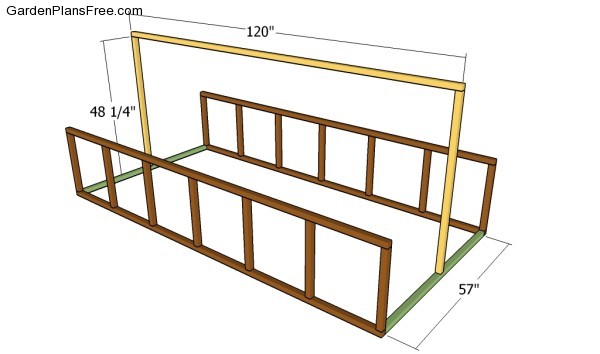
Building the rafters supports
The next step of the project is to build the supports of the rafters and to secure them into place as shown in the image. Plumb the supports with a spirit level and attach the top ridge with galvanized screws. It is essential to focus on creating rigid joints, otherwise the end result might not raise up to your expectations.
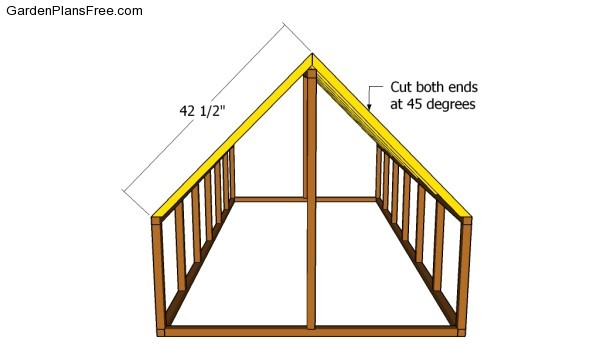
Building the rafters
Cut both ends of the rafters at 45 degrees by using a miter saw and secure them into place with galvanized screws. Make sure you build the rafters from quality materials, as to create a rigid and durable structure for the small greenhouse. Follow the plans and the instructions described in the image, if you want to get a professional result.
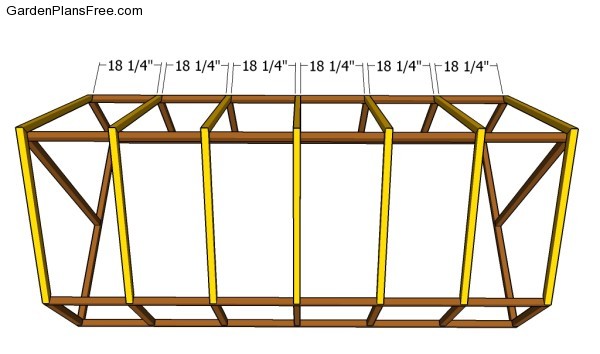
Fitting the rafters
Place the rafters equally-spaced and secure them into place with galvanized screws, after drilling pilot holes. Align the rafters at both ends before locking them into place with screws.
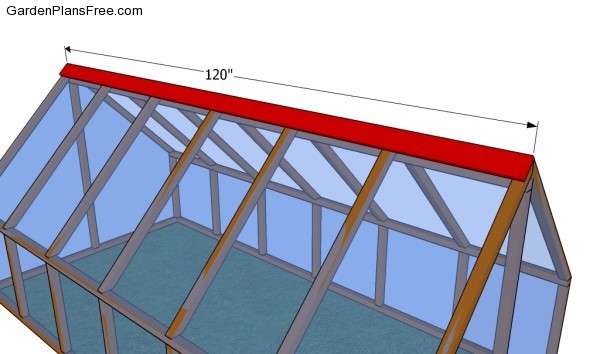
Attaching the top slat
In order to protect the polyethylene foil, we recommend you to attach a nice 1×4 slat to the top of the roof, on one side of the greenhouse. Align the slat at both ends and secure it into place with galvanized screws.
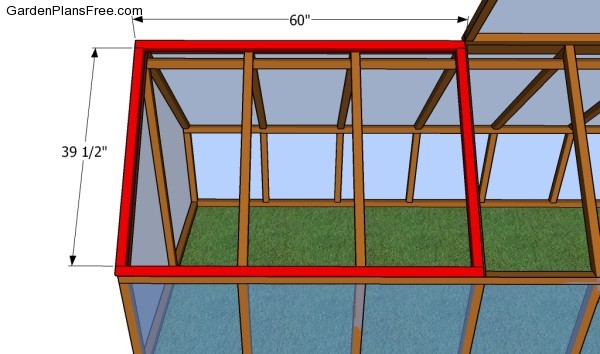
Building the lids
One of the last steps of the project is to build the lids and to secure them into place with metal hinges. Check if the corners are right-angled before locking the components together, if you want to get a professional result. Attach the lids on the wooden rafters and secure them to the top slat by using metal hinges. Build the second lid in the same manner described above, as to have a proper access to the interior of the small greenhouse.

Small greenhouse plans
Last but not least, you should cover the rest of the structure with foil and secure it into place tightly. Make sure there are no gaps or holes, as to keep the warmth inside and the protect the plants from bad weather. Open the lids whenever is necessary, in order to ventilate the interior of the greenhouse.
PRO TIP: Fill the holes with a good wood filler and smooth the surface with 120-grit sandpaper. Apply several coats of paint or stain over the components, in order to protect them from decay.
This diy project was about small greenhouse plans. If you have enjoyed the free project, we recommend you to share it with your friends, by using the social media widgets. LIKE us on Facebook if you want to be the first that gets our latest projects.


4 comments
Looks like you might motivate me to try some of these Ideas
Thank you. Looking forward to seeing your future projects!
How the heck do I download and print these plans?
Check the Get PDF Plans button at the bottom of the article.