This detailed woodworking article is about workbench plans free. Building a heavy duty workbench is a great project if you like to work with lumber in your workshop. Pay attention to the diagrams and instructions shown in this project and you will be able to get the job done in just a few hours. Plumb the legs with a spirit level and check if the corners are right-angled, in order to get a professional result.
There are a few things that you should consider before starting the woodworking project. Therefore, we recommend you to adjust the size and the shape of the workbench as to suit your needs. If you need more additional space, you could add more shelves or even drawers. In addition, choose durable lumber for this project, such as pine, cedar or redwood. Nevertheless, you can pull it off even with pressure-treated lumber, if the budget is really tight.
Building a workbench
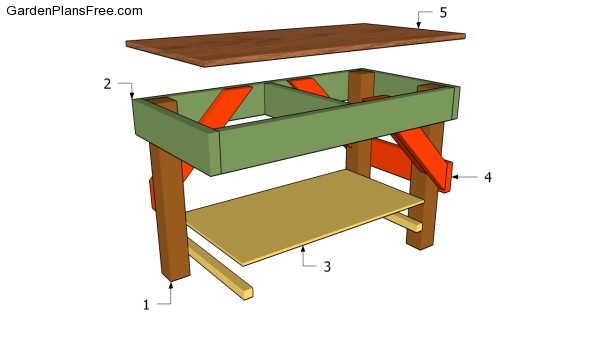
Building a workbench
Materials
- 1 – 4 pieces of 4×4 lumber – 30″ LEGS
- 2 – 2 pieces of 2×6 lumber – 24″, 2 pieces of 2×4 lumber – 45″, 1 pieces – 21″ FRAME
- 3 – 2 pieces of 2×2 lumber – 21″, 1 piece of 1/2″ plywood – 21″ x 38″ SHELF
- 4 – 4 pieces of 2×4 lumber – 18 1/4″, 4 pieces – 21″, 2 pieces of 2×6 lumber – 24″ BRACES
- 5 – 1 pieces of 3/4″ plywood – 24″ x 48″ TABLETOP
Tools
- Hammer, Tape measure, Carpentry square
- Miter saw, Drill machinery, Screwdriver, Sander, Router
- Safety Gloves, Safety Glasses, Respiratory Mask
Time
- One day
Workbench Plans Free
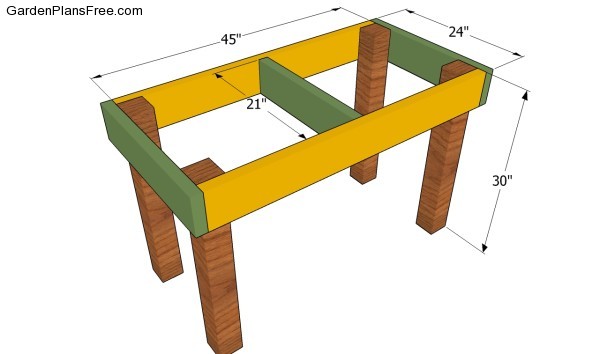
Building the frame of the workbench
The first step of the project is to build the frame of the workbench. As you can easily notice in the plans, we recommend you to use 4×4 lumber for the legs and 2×6 lumber for the tabletop frame. It is essential to plumb the legs with a spirit level and to check if the corners are right-angled by using a carpentry square. Drill pilot holes through the frame of the table and insert galvanized screws into the legs.
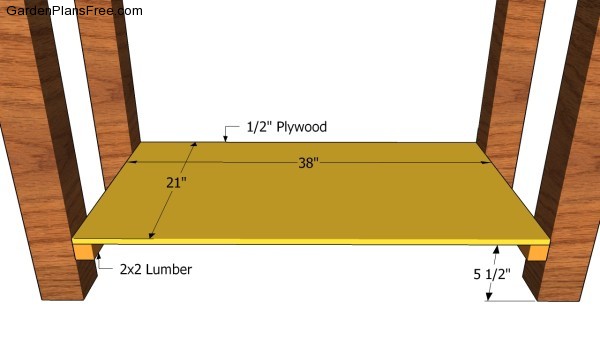
Attaching the bottom shelf
Afterwards, you could also create additional storage space by attaching a shelf to the bottom of the workbench. Therefore, attach 2×2 supports to the interior faces of the legs and lock them with screws. Afterwards, attach a small piece of 1/2″ – 3/4″ plywood to get the job done quickly.
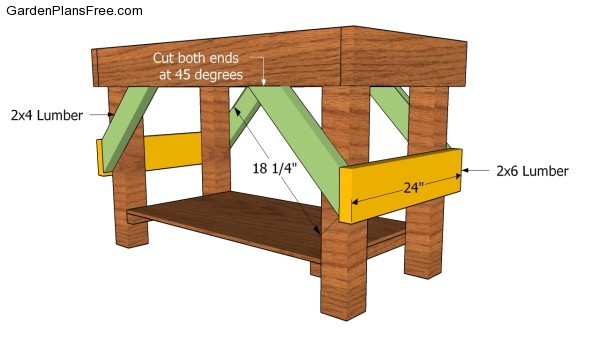
Attaching the braces
If you want to build a heavy duty work bench, we strongly recommend you to attach braces to all the sides. First of all, you need to make the diagonal braces from 2×4 lumber, making sure the ends are cut at 45 degrees. Drill pilot holes and lock the braces to the legs and to the frame of the table, after aligning them at both ends.
PRO TIP: Attaching 2×6 slats to the side faces of the workbench will add support the the table, so you should also consider this step when building it.
Fitting the interior braces
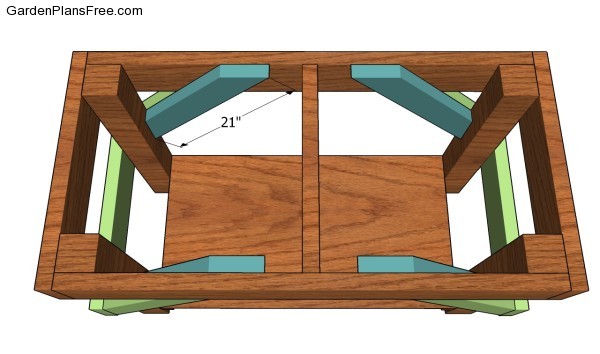
Furthermore, you could also add braces to the interior of the workbench, as it can be seen in the image. Cut both ends of the braces at 45 degrees and lock them to the frame with 2 1/2″ galvanized screws. Add waterproof glue to the joints, if you want to get a rigid frame.
Attaching the tabletop
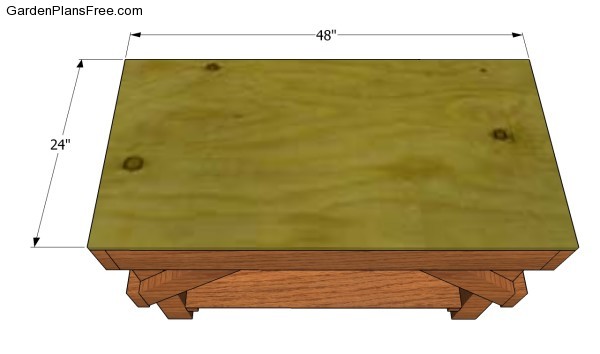
Cut a small piece of 3/4″ plywood and attach it on top of the workbench. Smooth the cut edges of the tabletop before driving 1 1/4″ screws into the frame. It is essential to align the tabletop properly before inserting the screws.
Workbench plans free
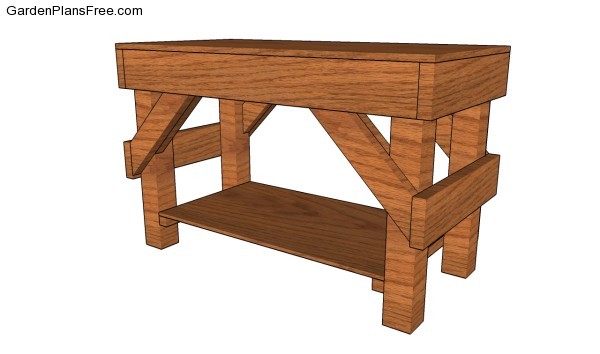
Lastly, we recommend you to get the final touches done. Therefore, fill the holes with putty and sand the surface thoroughly, after it gets dry. Check if the components are locked together properly, before using it for the very first time.
PRO TIP: Apply a few coats of paint to the wooden components, in order to protect them from water damage.
This diy project was about workbench plans free. If you have enjoyed the free project, we recommend you to share it with your friends, by using the social media widgets. LIKE us on facebook in order to be the first that gets our latest projects.
