This diy woodworking project is about chicken coop plans free. Therefore, if you want to have fresh eggs every morning or you just want a relaxing hobby, you should consider raising chickens in your backyard. Nevertheless, you should start with building a small shelter for the chickens, that is not only essential for your hobby but it also has the opportunity to be an attraction point of your garden.
Before starting the actual construction project, we recommend you to consider the local building codes and to get accustomed with the legal requirements. Afterwards, you should pay attention to the plans and designs you can choose from, taking into account your budget. Select the materials with great, making sure the plywood sheets and the lumber are in a good condition.
Building a small chicken coop
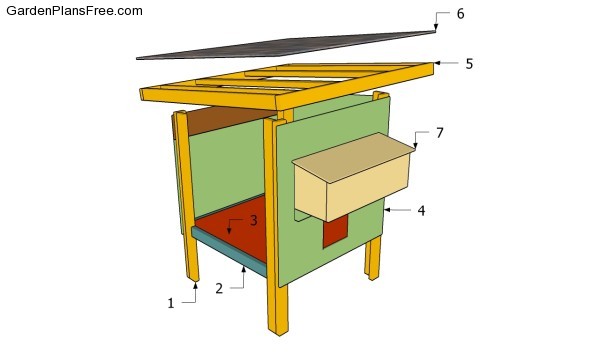
Building a chicken coop
Materials
- 1 – 4 pieces of 2×4 lumber – 62 1/2″, 4 pieces – 68″ LEGS
- 2 – 4 pices of 2×4 lumber – 42″, 2 pieces – 45″, 2 pieces – 38″, 2 pieces – 41″ FLOOR
- 3 – 1 piece of 3/4″ plywood – 45″x45″ FLOORING
- 4 – 4 pieces of 1/2″ plywood – 48″x48″ FACES
- 5 – 6 pieces of 2×4 lumber – 61″, 2 pieces of 2×4 lumber – 64″ RAFTERS
- 6 – 1 piece of 3/4″ plywood – 64″x64″, 40 sq ft of tar paper, 40 sq ft of asphalt shingles ROOFING
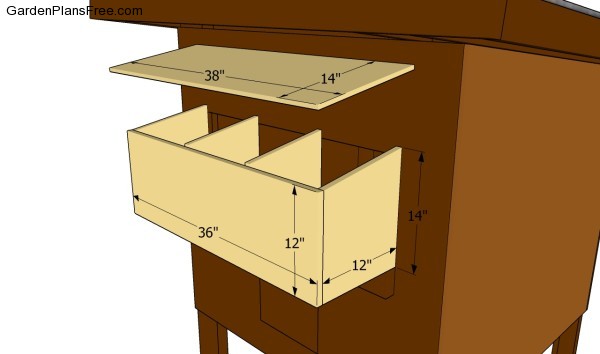
- 7 – 2 piece of 1/2″ plywood – 12″x36″, 4 pieces – 12″x14″, 1piece – 14″x38″ NEST
Materials
- Hammer, Tape measure, Carpentry square
- Miter saw, Drill machinery, Screwdriver, Sander, Router
- Safety Gloves, Safety Glasses, Respiratory Mask
Time
- One day
Chicken Coop Plans Free
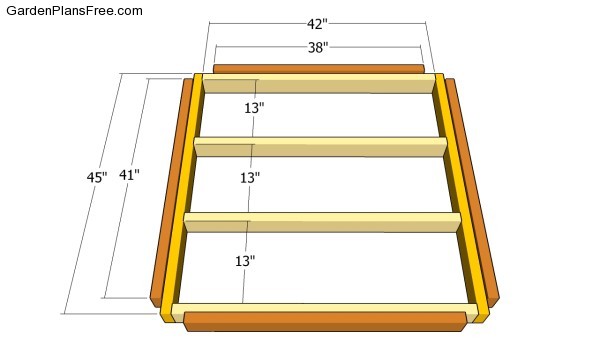
Building the floor frame
The first step of the woodworking project is to build the frame of the floor. As you can see in the image, we recommend you to use 2×4 lumber, as to create a rigid structure. Check if the corners are right-angled and drill pilot holes through the components before inserting the screws. Attach the brown components about 3/4″ higher as compared to the frame of the floor.
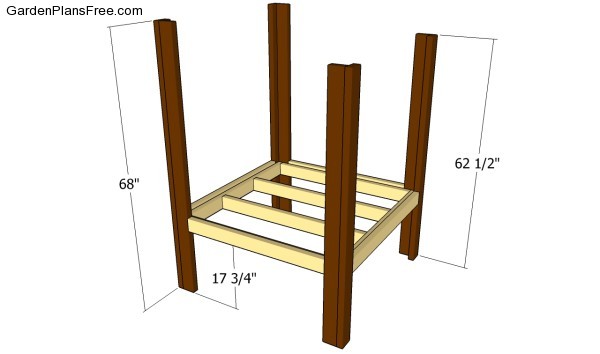
Attaching the legs
Afterwards, attach the 2×4 legs to the floor, as shown in the free chicken coop plans. In order to get a professional result, we recommend you to align the L-shaped legs, drill pilot holes and insert galvanized screws into the frame. Use a spirit level to check if the floor is perfectly horizontal.
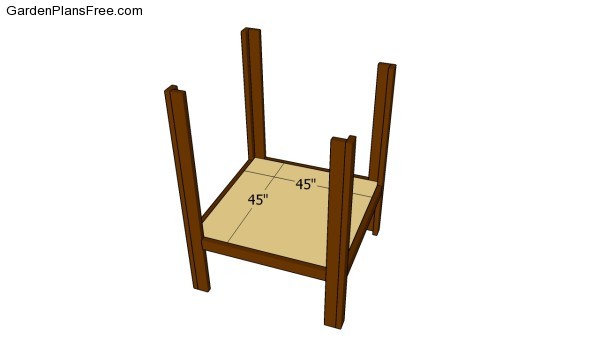
Fitting the floor
Continue the woodworking project by attaching a piece of 3/4″ plywood over the frame of the floor and locking it into place with 1 1/4″ screws. Check if there are gaps around the plywood floor and adjust the piece of plywood until you close them.
Attaching the back wall
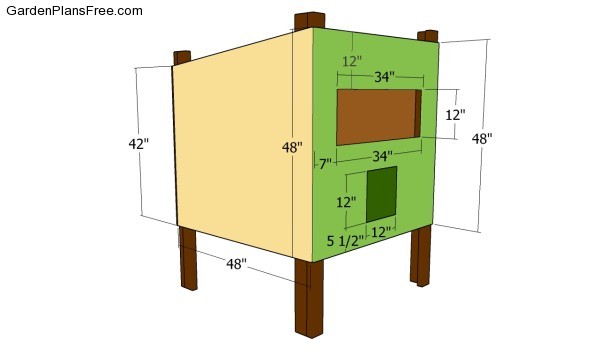
The nest step of the garden project is to attach the walls to the chicken coop. In order to get the job done quickly and to keep the costs under control, we recommend you to use 1/2″ plywood sheets. Mark the cut lines on the plywood sheets and get the job done with a circular saw. Cut the opening with a jigsaw and smooth the edges with sandpaper.
Attaching the back wall
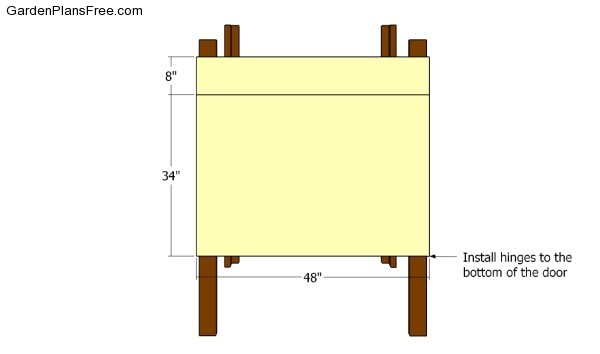
In order to have access to the chicken coop, we recommend you to make a large door at the back of the construction. As you can see in the plans, we recommend you to attach the door to the floor frame with hinges. Install a small latch to keep the door locked during the nights.
Building the roof
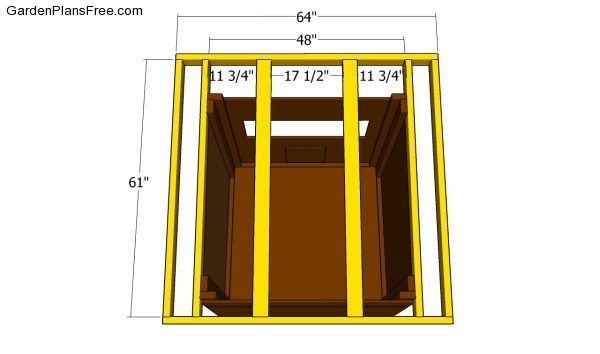
Continue the project by building the rafters and installing them to the legs of the chicken coop. In order to get the job done as a professional, we recommend you to assemble the roof structure on a level surface and to attach it to the legs with several galvanized screws. Drill pilot holes through the rafters and level the structure, before inserting the screws.
Building the roof of the chicken coop
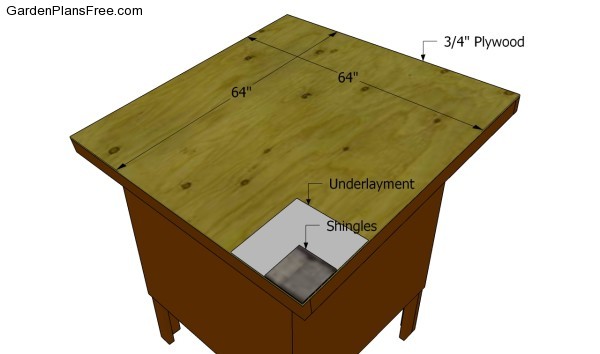
Next, attach a piece of 3/4″ plywood over the roof structure and lock it into place with 1 1/4″ galvanized screws. Align the plywood sheet at both ends before inserting the screws into the rafters. Cover the roof structure with tar paper and install asphalt shingles, in order to drain the water properly.
Building the nest boxes
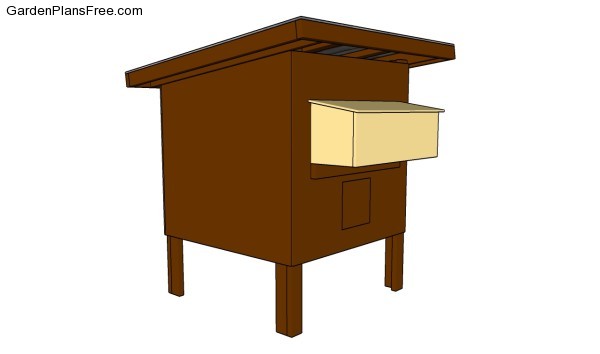
One of the lat steps of the project is to build the nesting boxes and attach them into place. In order to get the job done, we recommend you to build the components from 1/2″ plywood and to lock them together with waterproof glue and finishing nails. Attach the nest box to the opening and lock it into place with several nails.
PRO TIP: Attach the lid into place and lock it to the wall with hinges. Cover the lid with shingles, in order to protect the nests from water damage.
Chicken coop plans free
Lastly, we recommend you to get the final touches done. Therefore, fill the holes with putty and sand the surface thoroughly, after it gets dry. Choose a proper location for the chicken coop, making sure it complies with the local building codes.
PRO TIP: Applying a few coats of paint will not only enhance the look of the trellis, but it will also protect the wooden components from water damage.
This diy project was about chicken coop plans free. If you have enjoyed the free project, we recommend you to share it with your friends, by using the social media widgets.

1 comment
Would love plans to build nesting boxes. 3-4. Any help would be appreciated