This woodworking project about daybed plans free. Building a day bed is not only easy but it is also a great way to add value to your backyard, while spending a small amount of money. Taking into account there are many plans to choose, you should adjust the design of our project to your needs. Moreover, it is essential to build the daybed having the style of the rest of your furniture in mind.
When buying the lumber for your woodworking project, you should select the slats that are in the best condition. In addition, if you are going to place the sofa in your backyard, we recommend you to choose weather-resistant components, such as cedar, pine or redwood. Always align the components at both ends and pre-drill the slats, in order to prevent the wood from splitting.
Building a daybed
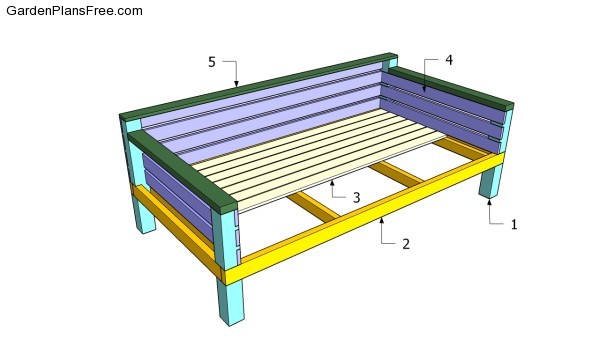
Building a daybed
Materials
- 1 – 2 pieces of 4×4 lumber – 25 3/4″, 2 pieces – 30″ LEGS
- 2 – 4 pieces of 2×3 lumber – 42″, 2 pieces of 2×4 lumber – 42″, 2 pieces – 87″ FRAME
- 3 – 9 piece of 1×4 lumber – 80″ SUPPORTS
- 4 – 6 pieces of 1×4 lumber – 44 1/4″, 4 pieces – 87″ SLATS
- 5 – 2 pieces of 2×4 lumber – 41 1/2″, 1 piece of 1×4 lumber – 87″ TRIMS
- 2 pieces of 4×4 lumber – 8 ft
- 2 pieces of 2×3 lumber – 8 ft
- 4 pieces of 2×4 lumber – 8 ft
- 13 pieces of 1×4 lumber – 8 ft
- 2 1/2″ screws
- wood glue, stain/paint
Tools
- Hammer, Tape measure, Carpentry square
- Miter saw, Drill machinery, Screwdriver, Sander, Router
- Safety Gloves, Safety Glasses, Respiratory Mask
Time
- One day
Daybed Plans
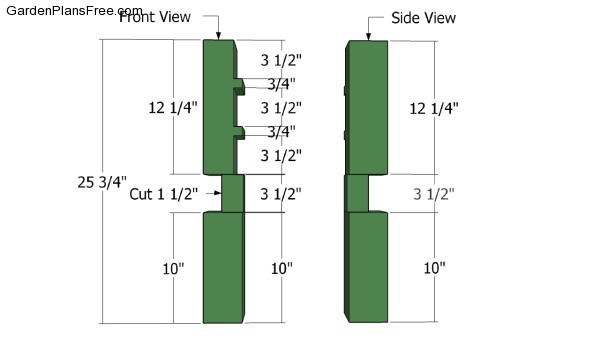
Front leg Plans
The first step of the woodworking project is to build the front and the back legs of the daybed. As you can see in the image, we recommend you to use 4×4 lumber and to make a few notches, otherwise the components won’t fit into place. Mark the lines, make several parallel lines with a circular saw and clean the recess with a chisel.
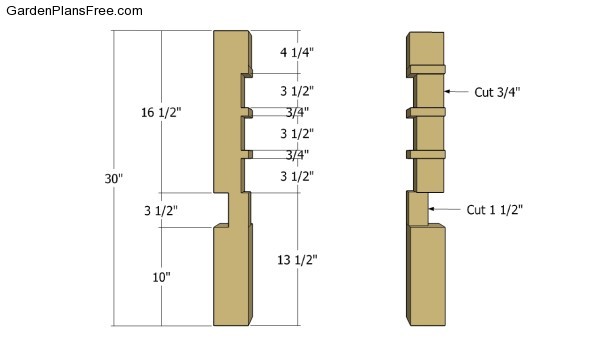
Back legs plans
Building the back legs is a straight forward job if you have done the previous components. Make sure you take accurate measurements before making the notches, as the slightest mistake could hinder the appearance of the daybed. Smooth the recesses with 120-grit sandpaper.
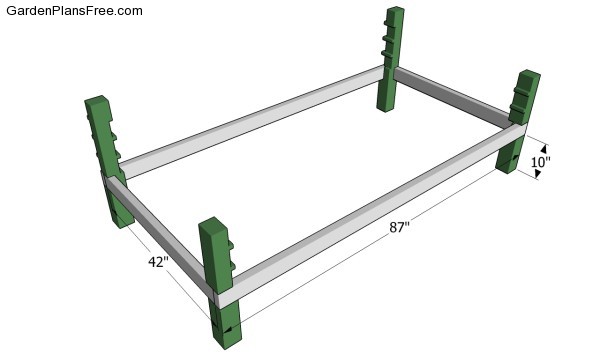
Building the daybed frame
Cut the components of the frame from 2×4 lumber and attach them to the four legs, as shown in the plans. We strongly recommend you to plumb the legs with a spirit level and to check if the corners are right-angled before drilling pilot holes and inserting the screws. Countersink the head of the 2 1/2″ galvanized screws, in order to get a neat result.
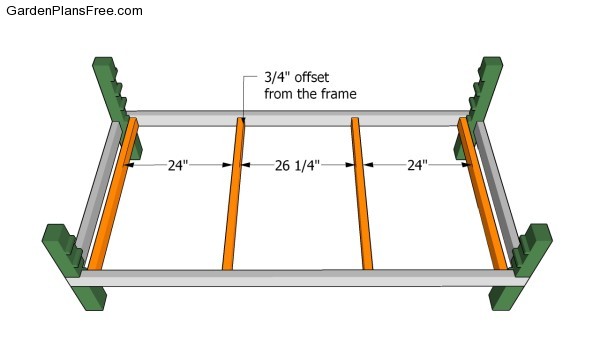
Building the support frame
Afterwards, you have to make a basic frame for the slats that will support the mattress. As you can notice in the image, you have to use 2×3 beams, as to leave enough room for fitting support slats. Drill pilot holes through the frame of the daybed before inserting the screws into the beams.
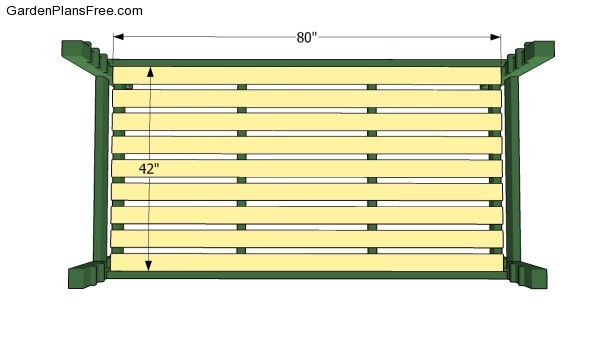
Attaching the support slats
Next, attach 1×4 slats to the supports, making sure you place them equally spaced. Pre-drill the slats before inserting the galvanized screws, to prevent them from splitting. Place a wood block between the slats, in order to get equal gaps.
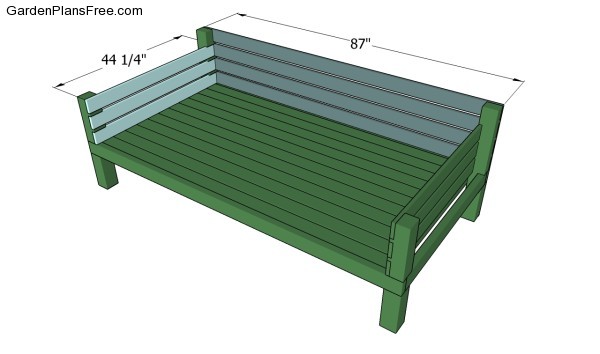
Fitting the side slats
Continue the woodworking project by attaching the 1×4 slats to the sides and to the back of the daybed. Attach the slats into the notches and lock them into place with 1 1/4″ screws. Add waterproof glue the joints, in order to enhance the bond of the joints.
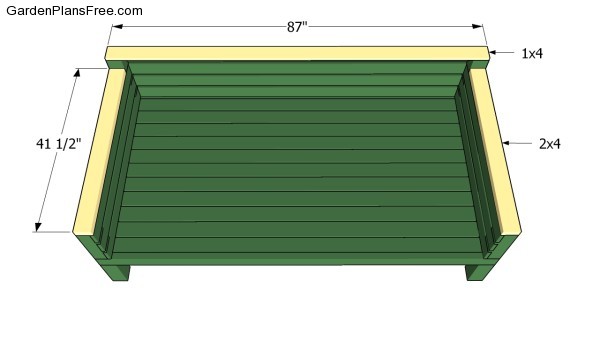
Attaching the trims
Attach 1×4 and 2×4 trims on top of the armrests and to the back support, as to get a nice appearance. Use finishing nails and waterproof glue to lock the trims into place.
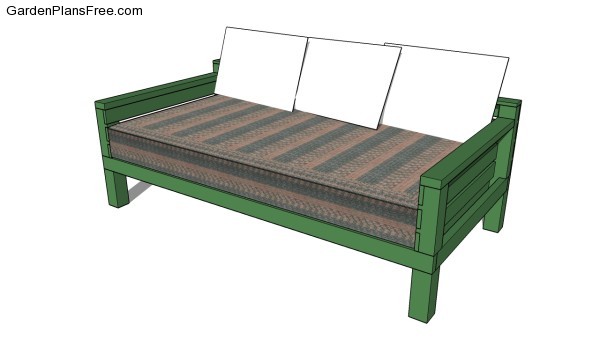
Daybed plans
Lastly, we recommend you to get the final touches done. Therefore, fill the holes with putty and sand the surface thoroughly, after it gets dry. Check if the components are locked together properly, before fitting the mattress into place.
PRO TIP: Applying a few coats of paint will not only enhance the look of the daybed, but it will also protect the wooden components from water damage.
This diy project was about daybed plans free. If you have enjoyed the free project, we recommend you to share it with your friends, by using the social media widgets. LIKE us on facebook in order to be the first that gets our latest projects.


1 comment
my question os about screw thickness. These are galvanised 2.25 inch long screws but what is the ticckness of screws for all the joints. 2 by 4 joining the legs, then slants of 2 by 3 joining the 2 by 4 s.
then support slants joining with support slants 1.25 long galvanised screws but of what thickness.
Please advise.
Thanks