This detailed project is about wood tool box plans. Choose proper wood tool box plans before starting the woodworking project and adjust its size and design to your needs. Use quality lumber if you want to build a durable box, such as pine, cedar or redwood. Make sure the boards are perfectly straight and don’t have any flaws, such as knots, cracks or wanes. Pay attention to the instructions and gather all the tools from the very beginning.
If you are a handy person, you want to build something easy by yourself or you just want to organize your tools efficiently,we recommend you to pay attention to this article. A wooden tool box is a straight-forward project as it doesn’t require complex techniques nor a large amount of materials. You just need to make a wooden frame and to attach the handle into place with screws/nails and waterproof glue.
Building a wooden tool box

Building a tool box
Materials
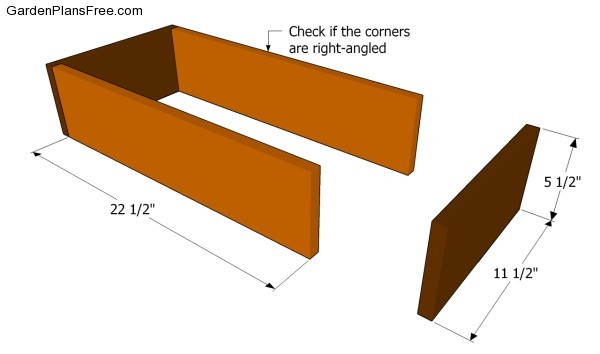
- 1 – 2 pieces of 1×6 – 11 1/2″ SIDES
- 2 – 2 pieces of 1×6 lumber – 22 1/2” FRONT AND BACK
- 3 – 3 pieces of 1×12 lumber – 22 1/2″ BOTTOM
- 4 – 5 piece of 1×8 lumber – 22 1/2″ HANDLE
Tools
- Hammer, Tape measure, Carpentry square
- Miter saw, Drill machinery, Screwdriver, Sander, Router
- Safety Gloves, Safety Glasses, Respiratory Mask
Time
- One day
Wood tool box plans

Building the frame of the tool box
The first step of the woodworking project is to build the frame of the tool box. As you can see in the plans, you need to cut several pieces of 1×6 lumber as shown in the image and lock them together. Drill pilot holes and insert finishing nails, after checking if the corners are right-angled. In addition, add waterproof glue to the joints, if you want to make sure the corners are square.

Attaching the bottom
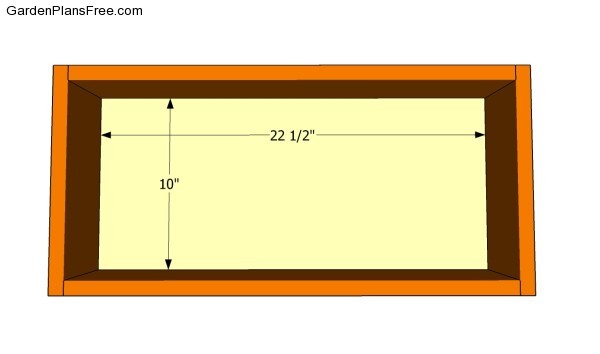
Continue the project by attaching the bottom of the wood tools box. Adjust the with of a 1×12 board to 10″ and fit it between the walls of the frame, as in the image. Align the bottom with all edges add waterproof glue and insert finishing nails trough the frame into the bottom.

Building the handle
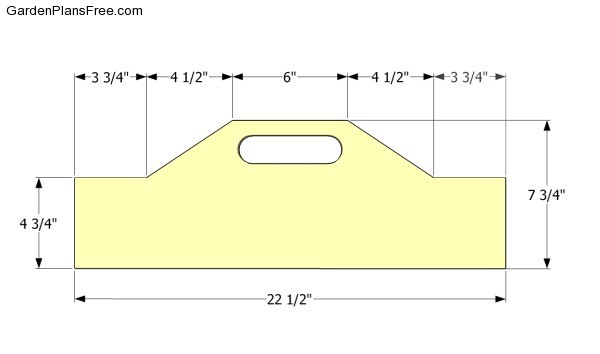
One of the last steps of the project is to build the handle of the tool box. Nevertheless, taking into account one usually needs more compartments for tools and screws, we recommend you to follow the pattern shown in the image. Drill a starting hole and cut out the handle with a jigsaw. Smooth the cut edges with sandpaper and vacuum the residues.

Wood tool box plans
Last but not least, you should pay attention to the final touches. Therefore, we recommend you to check if the components are locked into place properly and structure is rigid. Fill the holes with wood putty and let it dry out for several hours.
PRO TIP: Smooth the surface with medium-grit sandpaper along the wood grain. Apply several coats of paint or stain over the components, in order to protect them from decay. Check out the rest of the garden projects, as there are many plans that could suit your needs.
This diy project was about wood tool box plans. If you have enjoyed the free project, we recommend you to share it with your friends, by using the social media widgets.
