Building a lean to shed is a good choice if you like the simple but efficient designs. In addition, although it might look bulky to most of you, by choosing proper lean to shed plans free, you would create a significant storage space in your backyard. Work with attention and with great care, if you want to get the job done quickly and to prevent costly mistakes. These preliminary steps are essential for any woodworking project. A lot more storage shed plans and other projects HERE.
Adjust the size of the lean to shed to your needs, but you should use the same techniques described in this diy article. Moreover, we recommend you to ask a friend to assist you when building the construction, as one has to hold the components into place, while the other one drives the screws. Align the wooden parts at both ends before inserting the screws, to get a neat appearance.
TABLE OF CONTENTS:
PART 1: Lean to shed plans
PART 2: Shed door plans
Building a lean to shed
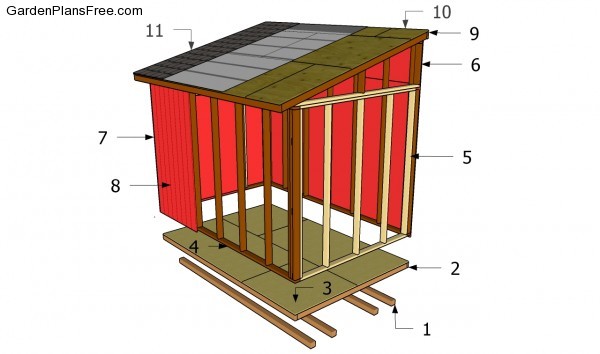
Building a lean to shed
Materials
- 1 – 4 pieces of 4×4 lumber – 144″ SKIDS
- 2 – 2 peices of 2×6 lumber – 144″, 10 pieces of 2×6 lumber – 93″ JOISTS
- 3 – 3 pieces of 3/4″ plywood – 4×8′ FLOORING
- 4 – 11 pieces of 2×4 lumber – 90″, 2 peices – 144, 1 piece – 137″ SIDE WALL
- 5 – 5 pieces of 2×4 lumber – 90″, 1 piece – 89″, 1 piece – 92 1/2″, 1 piece – 96″ BACK WALL
- 6 – 9 pieces of 2×4 lumber – 116 1/2″, 2 pieces – 144″ SIDE WALL
- 7 – 6 pieces of 2×4 – 90″, 1 piece – 89″, 1 piece – 92 1/2″, 1 piece – 96″, 3 pieces – 12″ FRONT WALL
- 8 – 13 pieces of 5/8″ grooved plywood SIDING
- 9 – 11 pieces of 2×4 lumber – 110 3/4″ RAFTERS
- 10 – 5 pieces of 3/4” grooved plywood – 4×8′ ROOF DECKING
- 9 – 150 sq ft of roofing felt, 150 sq ft of asphalt shingles ROOFING
- 4 pieces of 4×4 lumber – 12 ft
- 2 pieces of 2×6 lumber – 12 ft
- 10 pieces of 2×6 lumber – 8 ft
- 8 pieces of ¾” plywood – 4’x8’
- 33 pieces of 2×4 lumber – 8 ft
- 16 pieces of 2×4 lumber – 12 ft
- 7 pieces of 1×4 lumber – 8 ft
- 12 pieces of 5/8” T1-11 siding – 4’x8’
- 150 sq ft of roofing felt, 150 sq ft of asphalt shingles
- 100 pieces of 2 ½” screws
- 800 pieces of 3 ½” screws
- 1000 pieces of 1 5/8” screws
- 1000 pieces 8d nails
- Hinges + door latch
- Construction glue
- Rafter ties
- 1 ½” structural screws
- 60 ft of drip edges
Tools
- Hammer, Tape measure, Carpentry Square
- Miter saw, Drill machinery, Screwdriver, Sander
- Safety Gloves, Safety Glasses, Respiratory Mask
Time
- One Weekend
Made from this plan
Lean To Shed Plans Free
Building the floor frame
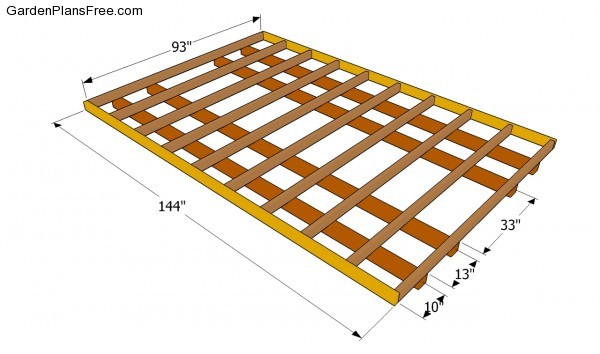
The first step of the project is to build the frame of the floor. As you can see in the image, you need to use 2×6 joists and create a rigid frame. Drill pilot hole trough the rim joists and insert 3 1/2″ galvanized screws into the regular beams. Check if the corners are right-angled and make sure the diagonals are right-angled.
Place the joists every 24″ on center, otherwise you won’t be able to fit the plywood sheets properly. Work with attention and with great care, if you want to prevent costly mistakes.

Attaching the plywood flooring
Attach 3/4″ tongue and groove plywood sheets to the frame of the floor and secure them into place with 1 1/4″ galvanized screws. Make sure you don’t leave any gaps between the sheets, as to get a professional result.
Front wall plans
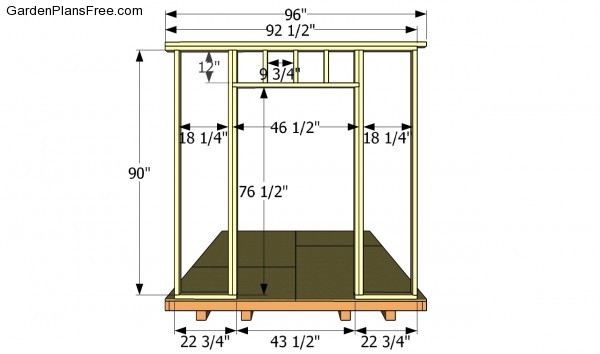
Building the front wall of the lean to shed is easy, especially if you use proper plans and quality materials. As you can see in the free plans, you should frame the door opening in a professional manner and create a rigid structure. Work with attention and with great care, if you want to prevent costly mistakes. Drill pilot holes trough the plates and insert 3 1/2″ screws into the studs.
Back wall plans
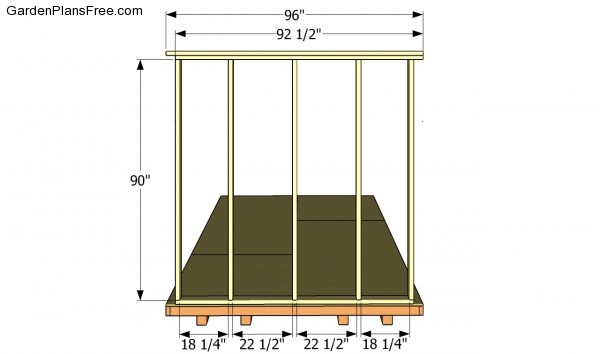
Build the back wall of the shed as in the plans. Make sure the corners of the shed are right-angled, by using a large carpentry square.
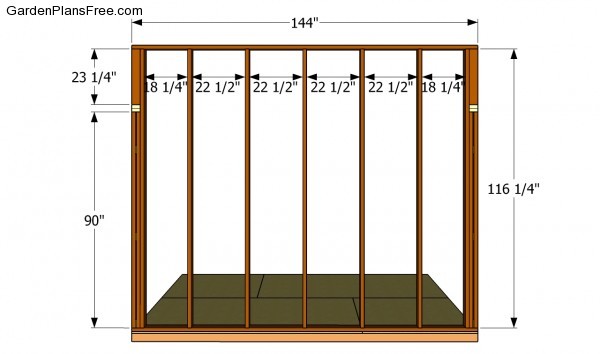
Side wall plans
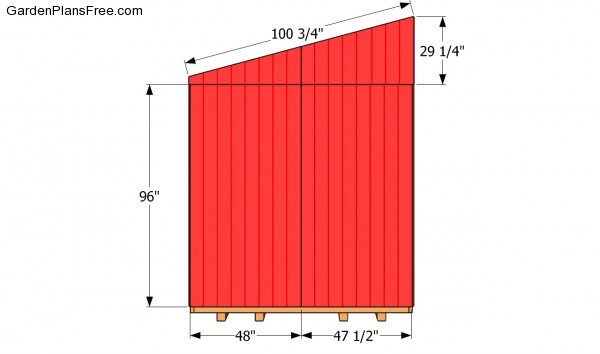
Continue the project in the same manner, by assembling the tall side wall. Place the studs as in the image, as our plans are optimized for 4×8″ sheets of exterior siding. Check if the corners are right angled after fitting each component. Work on a level surface if you want to get consistent results.
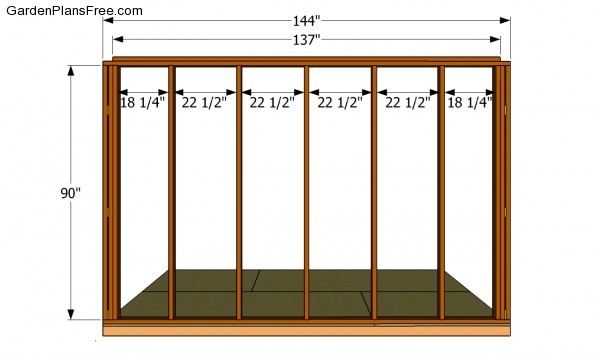
Side wall plans
Building the short side wall is a straight-forward process. All you have to do is to cut the studs at the right size and lock them between the top and bottom plates. Place the studs equally spaced, as in the plans free. Check if the corners are right angled, by using a carpentry square.
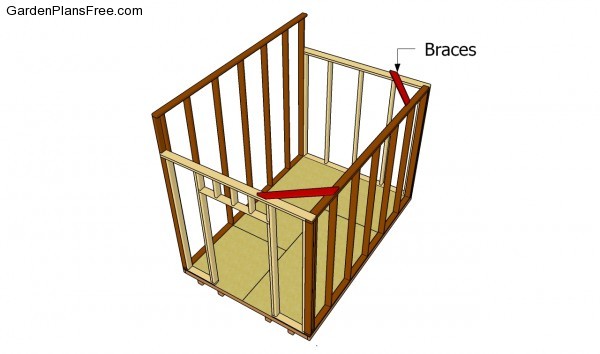
Installing the wall frames
Ask a friend to assist you when installing the wall frames into place. As you can notice in the image, you need to place the wall frames on top of the flooring and lock them to the joists with 4 1/2″ wood screws, after making sure the walls are plumb. Use 2×4 braces to lock the frames into place temporarily.
Attaching the siding
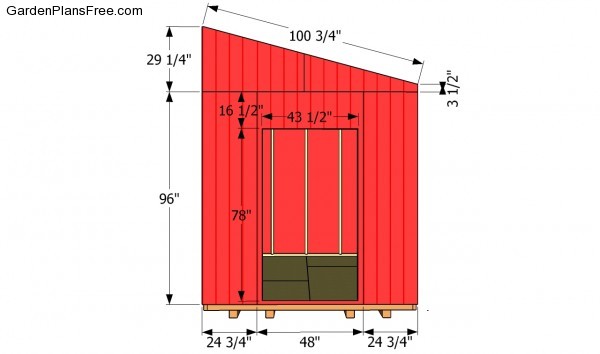
Installing the siding to front wall
Use 5/8″ grooved plywood to cover the exterior faces of the lean to shed. As you can see in the image, you need to cut out a small piece of siding inside the sheet, as to fit it around the door opening. Align the sheets at both eds and lock them into place with 1 1/4″ finishing nails.
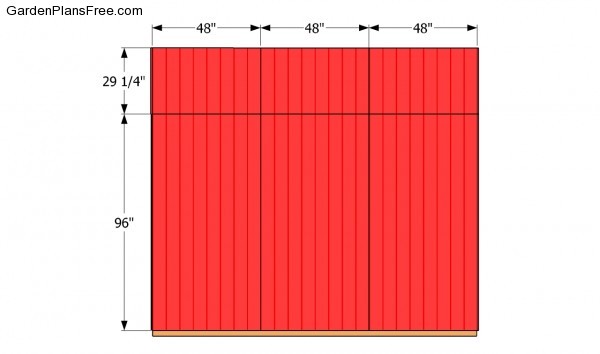
Siding – Back Wall
Attaching the exterior siding to the back wall is a straight forward job, if you follow our instructions and use tongue and groove 5/8″ plywood sheets. Work with attention and with great care, making sure you don’t leave any gaps between the sheets.
Attaching the siding
Attach 5/8″ siding to the side walls, following the pattern described in the image. In order to get a professional result, we strongly recommend you to insert 1 1/4″ finishing nails into the studs, every 6-8″. Work with attention and with great care, as to prevent potential issues.
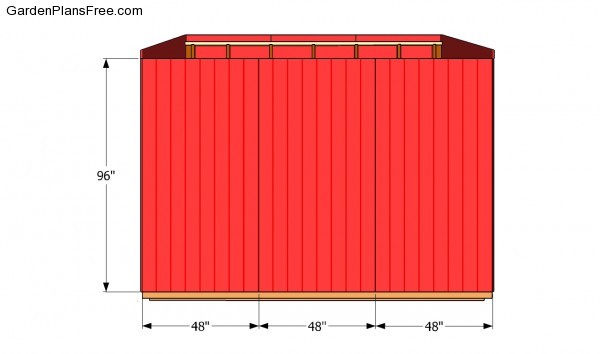
Siding – Side wall
Continue the project in the same manner as described above. Align the sheets at the top edge of the plate and lock it into place with finishing nails.
Building the lean to roof
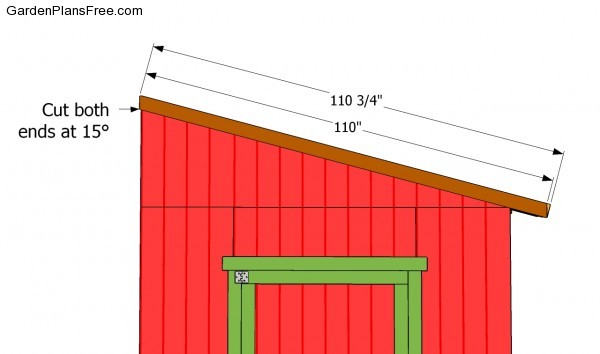
Rafter plans
Building the roof of the lean to shed is a simple and quick process, if the right plans and instructions are used. As you can see in the image, you need to build the rafters from 2×4 lumber and lock them to the top plates with 3 1/2″ wood screws. Cut the ends of the rafters at 15º as to drain the water properly.
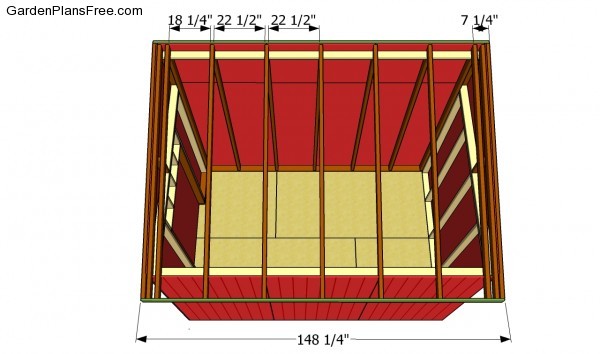
Installing the rafters
Place the rafters on top of the top plates and space them as in the image. Drill pilot hole trough the rafters, at both ends, and lock them into place with 3 1/2″ galvanized screws. Use a spirit level to check if the rafters are plumb and at the same level.

Fitting the roofing sheets
Attach 3/4″ tongue and groove plywood sheets over the rafters, as in the plans. Start the installation process from the bottom of the roof and use 1 1/4″ wood screws to lock them to the rafters, every 6-8″. Don’t leave any gaps between the sheets, to prevent the construction from water damage.
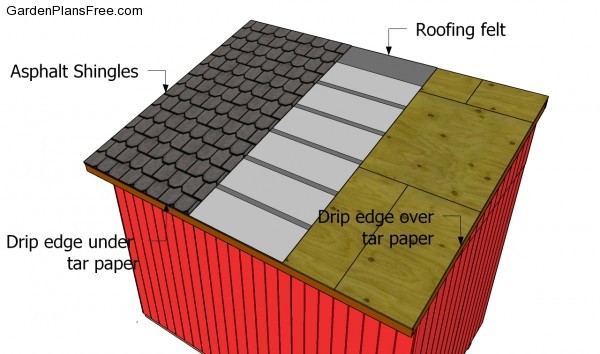
Installing the roofing
In order to waterproof the shed, you have to cover the roofing sheets with felt. Make sure the strips of roofing felt overlap at least 2-3″ and staple them to the plywood sheets every 8″. Continue the project by installing the asphalt shingles. Place the starting course at the bottom of the roof, before fitting the rest of the shingles.
PRO TIP: Always read the manufacturer’s instructions, before installing the shingles. They provide essential information about the installation of the shingles.
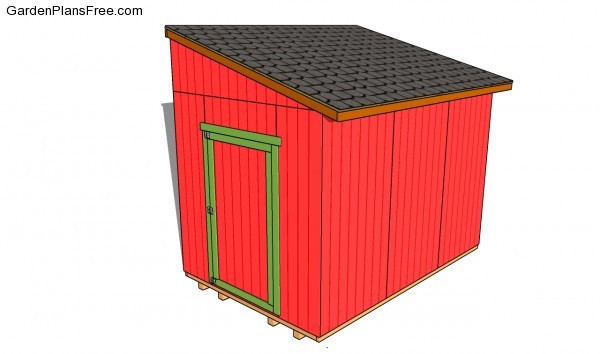
lean to shed plans free
After installing the roof and the asphalt shingles, there are still a few finishing touches you have to take care of. First of all, you could fill the holes and gaps with wood filler and smooth the surface with medium-grit sandpaper.
PRO TIP: Apply a few coats of paint to the wooden components, in order to enhance the look of the shed and to protect it from decay. Don’t forget to check out the rest of the project, in order to learn how to build a shed door. Don’t forget to check out my project about a 10×12 lean to shed plans.
This diy project was about lean to shed plans free. If you have enjoyed the free project, we recommend you to share it with your friends, by using the social media widgets.
<<<< PREVIOUS | NEXT >>>>


11 comments
I’m looking to build this exact shed but 24′ long and 8′ wide, anything different I would need because of the expansion of the distance? Besides more materials of course.
Thanks
I would build the long walls in two equal sections: 2×12′
Are these stamped by the engineer ? I need that to get a permit.
No
Do you have plans for an 8Dx10Tx10W
Why not just screw the flooring directly into 4×4 and eliminate 2 x 6’s?
Because any shed required a proper floor frame.
The floor joists can be 2×4 lumber on 16″ centers. As a 2×4 can span 6′ as floor joists (the max span on this is less than 3′). No need for 2×6. If you are exceptionally worried- then do 2×4 on 12″ centers.
what would be the material list if I built on a cement slab and put metal sheet roof?
what is the estimated cost of the materials listed?
2000 usd more or less