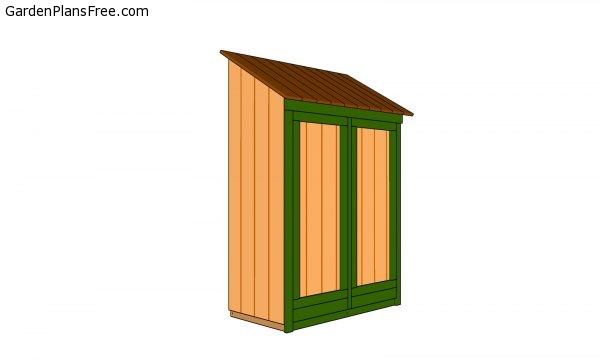
If you like to work in your garden, you probably need 2’x4′ small shed plans to store all your tools. The most important step of this woodworking project is to choose the right garden tool shed plans for your needs and tastes. In this article, we show you how to build a basic lean to shed, large enough to store lots of tools, but still compact and affordable for almost any pocket. Build the frame of the shed from 2×4 lumber and attach 5/8” tongue and groove plywood to make the exterior walls. The shed features double front doors for an easy access inside.
If you want to get a professional result, we strongly recommend you to use quality materials. Choose weather-resistant lumber and check if all the slats are straight and in a good visual condition. Always pre-drill holes before inserting the galvanized screws, to prevent the wood from splitting. Use a spirit level to plumb the walls, before locking them into place with wood screws.
RELATED PLANS:
How to build a garden tool shed

Garden tool shed
Materials
- 1 – 4 pieces of 2×4 lumber – 48”, 3 pieces of 2×4 – 21″ JOISTS
- 2 – 1 piece of 3/4″ plywood – 2’x4′ PLYWOOD
- 3 – 2 pieces of 2×4 – 58 1/2″, 2 pieces – 70 1/4″, 4 pieces – 21 3/4″ FRONT AND BACK FRAMES
- 3 – 8 pieces of 2×4 lumber – 17″, 3 pieces – 21 3/4″ SIDE FRAMES
- 4 – 2 piece of 5/8″ T-11 siding – 24″x74″, 1 piece – 48″x74 1/4″ SIDING
- 5 – 2 pieces of 1×3 – 57 3/4”, 2 pieces – 21 3/4″, 1 piece of 1×2 lumber – 55 1/2″, 1 piece of 2×4 lumber – 49 1/2″ TRIMS
- 6 – 2 piece of 5/8” T1-11 siding – 21 3/4 x 52″, 4 pieces of 1×3 – 47″, 4 pieces – 21 3/4” DOORS
- 7 – 10 pieces of 1×6 tongue and groove lumber – 34″ long ROOF
- 11 pieces of 2×4 lumber – 8 ft
- 1 piece of 3/4″ plywood – 4’x4′
- 3 pieces of 5/8″ T1-11 siding – 4’x8′
- 6 pieces of 1×3 lumber – 8 ft
- 1 piece of 1×2 lumber – 8 ft
- 3 pieces of 1×6 cedar – 12 ft
- 100 pieces of 2 1/2″ screws
- 100 pieces of 1 5/8″ screws
- 24 pieces of 1 1/4″ screws
- shed hinges
- shed latch
- wood glue, stain/paint
Tools
- Hammer, Tape measure, Carpentry square
- Miter saw, Drill machinery, Screwdriver, Sander, Router
- Safety Gloves, Safety Glasses, Respiratory Mask
Time
- One day
Garden Tool Shed Plans

Building the frame of garden tool shed
The first step of the project is to build the frame of the floor. As you can see in the plans, you should use 2×4 lumber to build the joists. Drill pilot holes trough the perimeter joists, before locking the components together with 2 1/2” galvanized screws. Check if the corners are right-angled, using a carpentry square.
PRO TIP: Attach a piece of 3/4” plywood to the joists and secure it into place tightly, using 1 5/8” wood screws. Make sure the edges are flush with the joists.
Wall frame

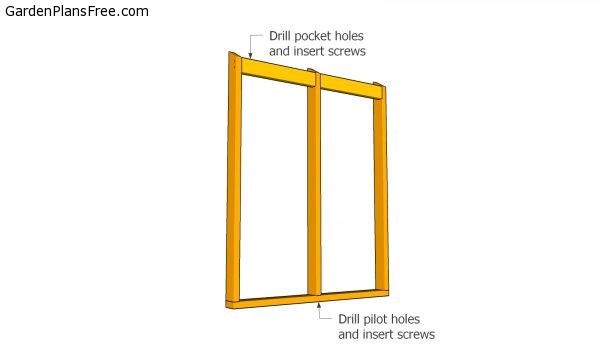
Assembling the front and back faces
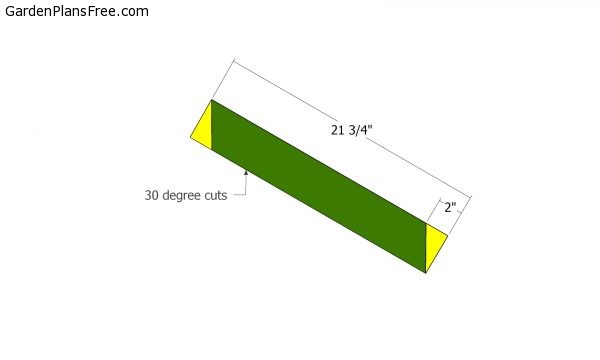
Build the front and back frames of the shed on a level surface. Drill pilot holes trough the plates and insert 2 1/2” wood screws into the studs. Fit the 2×4 blocking between the studs, at the top of the studs, as in the plans. Drill pocket holes at both ends of the blockings and insert 2 1/2″ screws into the studs. Cut one end of the studs at 30º, using a circular saw.
Place the frames on the floor, making sure they are flush with the joists. Drill pilot holes and drive in 3 1/2” galvanized screws, after plumbing the frames with a spirit level. Plumb the wall frames vertically with a spirit level and check if the corners are square.

Building the frame of the tool shed
Rafters for tool shed
Fit wooden blockings between the front and back wall frames, in order to enhance the rigidity of the structure. The best technique you could use is to drill pocket holes at both ends of the blockings and to drive in 2 1/2″ screws screws.
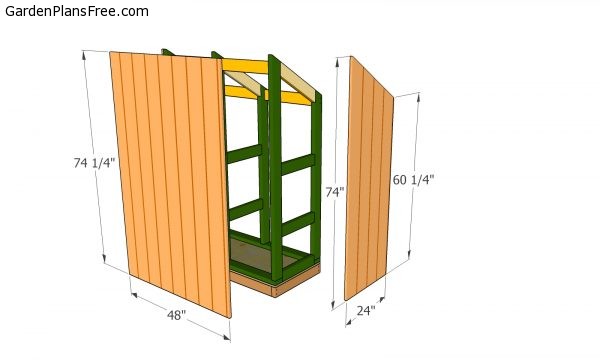
Exterior wall panels
Build the exterior walls of the tool shed from 5/8” plywood siding. Mark the cut lines on the plywood sheets and adjust the size of the panels, using a circular saw (long straight lines)or a jig saw (curved lines). Attach the plywood panels to the frame and lock them into place with 1 5/8” screws / nails.

Attaching the trims
Attach 1×3 trims to the sides and bottom of the shed. In addition, fit a 1×2 trim on the middle of the front face of the shed and a piece of 2×4 lumber at the top. Align the components with great attention, before driving in the 1 5/8″ finishing nails into the frame.

Building the doors
Building the doors of the tool shed is a straight forward task, as you need to use a piece of 5/8” siding and 1×3 trims. As you can easily notice in the plans, you should assemble the frame using pocket holes screws and 1 1/4″ screws. Drill pocket holes at both ends of the vertical components. Make sure the corners are square.
Attach the panels to the door frame, align the edges flush, drill pilot holes and insert 1 5/8″ screws, every 8″ along the framing.
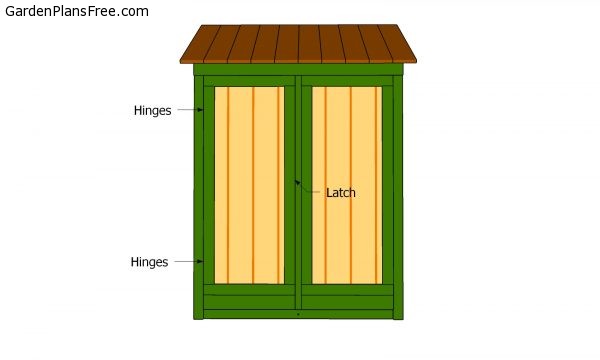
Fitting the doors
PRO TIP: Check if the corners of the frame are square, before securing the doors into place. Use shed hinges to secure the doors inside the frame. In addition, fit a door latch, if you store valuable items inside the shed.

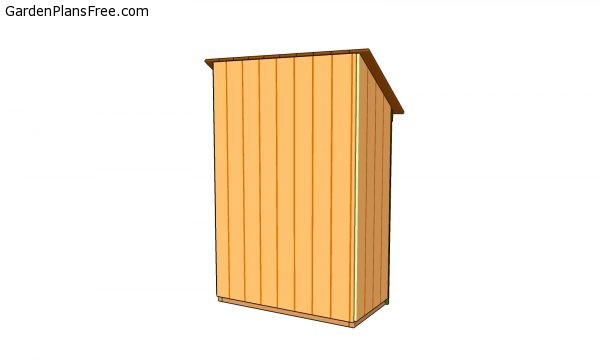
Installing the roof
One of the last steps of the project is to build the roof of the shed. As you can easily notice in the image, you need to use cedar siding, as the components lock together easily and protect the shed from water. Alternatively, you could also use 1×6 lumber, provided you lock them together with wood glue.
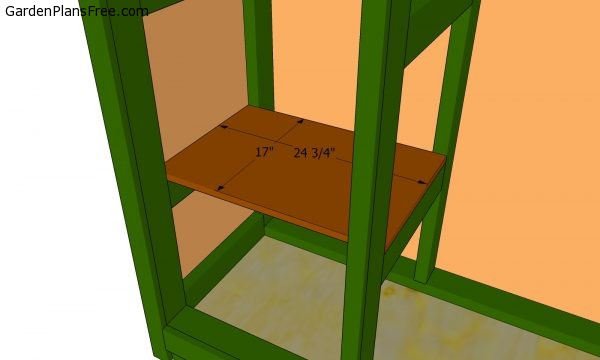
Shelves
Use 3/4″ plywood for the shelves. Cut the panels as shown in the diagram and then fit them to the supports. Drill pilot holes and insert 1 5/8″ screws to lock the shelves into place.

Garden tool shed plans
Last but not least, you should take care of the final touches. Fill the holes with wood filler and let the compound to dry out for several hours, before sanding the surface with 120-grit sandpaper, along the wood grain.
Tool shed plans
Garden tool shed plans – back view
PRO TIP: Protect the wooden components from decay and enhance the look of the garden tool shed by applying several coats of paint.

This diy project was about garden tool shed plans free. If you have enjoyed the free project, we recommend you to LIKE and SHARE it with your friends, by using the social media widgets.
4 comments
I really like the way you lay out each of the steps, taking the intimidation factor out of the process.
Thank you!
Really a bummer I can’t do anything besides view the plan on the web page. Can’t seems to download it anyway (free or paid), can’t print it, can’t anything. I’m all for putting information out there, including plans – charge a nominal fee to download, whatever. Just seems odd I can’t do anything other than view the plan. Big drag, wanted to make this one because my wife really liked it but I’ll just move on.
See the Download button at the end of the article
Where is the cedar used?