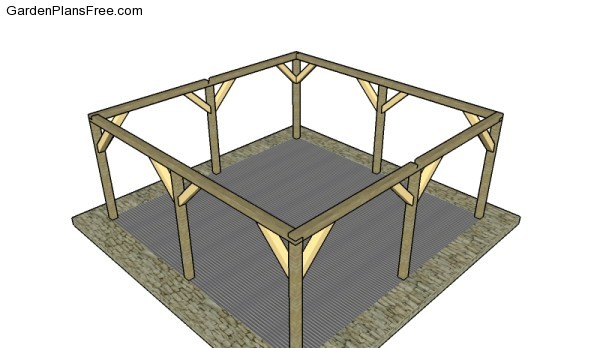
If you want to learn more about how to build a 20×20 outdoor shelter, take a close look over this article. Follow our outdoor shelter plans and build this awesome structure with a gable roof that can be used in so many ways. You can use it as a picnic shelter or even as a double carport. See how to build a small outdoor pavilion.
Even if you have no prior woodworking experience, you can still build this hunting blind in one weekend. The project is basically a simple box made form 2×4 lumber and 3/4″ plywood. If you want to get the job done in a professional manner, we recommend you to plan everything with attention, as to prevent costly mistakes and to build a professional garden shelter. Invest in high quality materials, such as pressure treated lumber, as the stand will be exposed to all kinds of weather.
Outdoor Picnic Shelter Plans
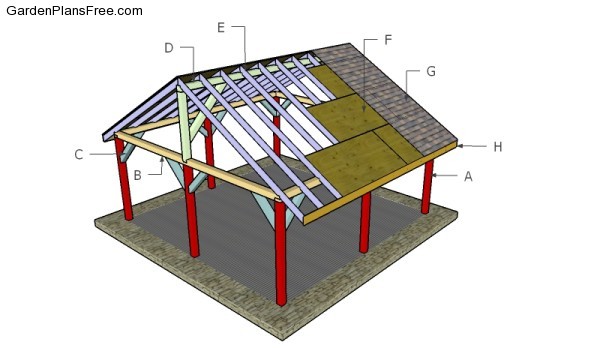
Building an outdoor picnic shelter
Materials
- A – 8 pieces of 6×6 lumber – 96″ long POSTS
- B – 4 pieces of 6×6 lumber – 240″ long TOP RAILS
- C – 16 pieces of 6×6 lumber – 39 1/4″ long BRACES
- D – 2 pieces of 6×6 lumber – 65″ long, 1 piece – 240″ long, 2 pieces – 68″ long TOP RIDGE
- E – 22 pieces of 2×6 lumber – 169 3/4″ long RAFTERS
- F – 12 pieces of 3/4″ plywood – 48″x96″ long, 6 pieces – 48″x48″ long, 4 pieces – 22 3/4″x96″ long, 2 pieces – 22 3/4″x48″ long ROOF
- G – 600 sq ft of tar paper, 600 sq ft asphalt shingles ROOFING
- H – 2 pieces of 1×8 lumber – 240″ long TRIMS
- 18 pieces of 6×6 lumber – 8′
- 5 pieces of 6×6 lumber – 20′
- 22 pieces of 2×6 lumber – 16′
- 2 pieces of 1×8 lumber – 20′
- 18 pieces of 3/4″ plywood – 4’x8′
- concrete form tube
- 8 post anchors
- 20 pieces of 8″ screws
- 20 pieces of 5″ screws
- 100 pieces of 3 1/2″ screws
- 44 pieces of rafter ties
- 1000 pieces of 1 5/8″ screws
- 500 pieces of 2″ brad nails
- 600 sq ft of tar paper, 600 sq ft asphalt shingles
- wood glue, stain/paint
Tools
- Hammer, Tape measure, Carpentry square
- Miter saw, Drill machinery, Screwdriver, Sander, Router
- Safety Gloves, Safety Glasses, Respiratory Mask
Time
- One day
Made from this plans
Double Carport Plans

Laying out the 20×20 pavilion
The first step of the project is to layout the posts for the outdoor shelter. Use string and batter boards to make sure the location of the posts will be accurate. Apply the 3-4-5 rule to every corner and make adjustments until the diagonals are perfectly equal.
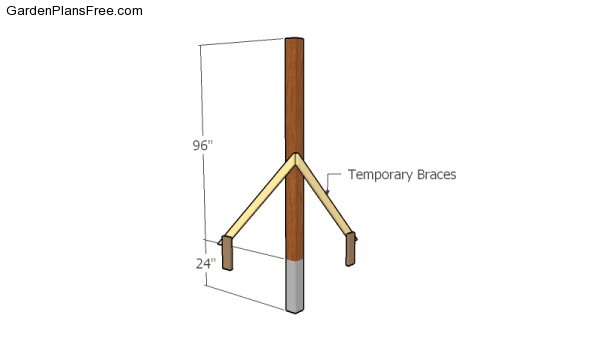
Fitting the posts
Dig 2-3′ deep footing and make sure they are about 12″ in diameter. The easiest way to get the job done and to prevent the 6×6 posts from rotting is to pour footing and to use metal anchors. Use a spirit level to plumb the posts and set temporarily braces until you install the top rails. Repeat the process for the other posts.
Make sure you tale a look over the local building codes, so you know what depth you should dig the footings. Remember that the footings should be under the frost line, otherwise they won’t be strong enough to support the weight of the pavilion.
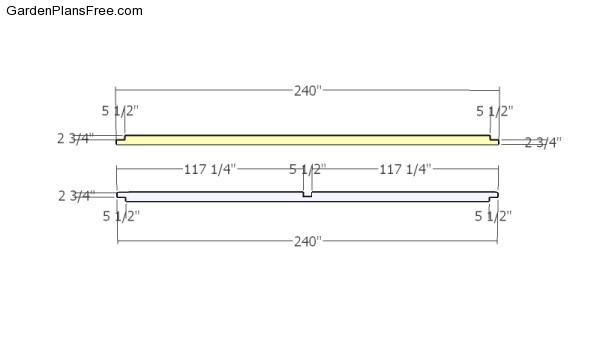
Building the top rails
Build the top rails for the shelter from 6×6 lumber. Make notches to both sides of the beams, as shown in the diagram. The process is really straight-forward. All you need to do is make parallel cuts after you set the depth of the blade at 2 3/4″. Use a chisel to remove the excess and smooth the recess with sandpaper.

Fit the top rails
Fit the top rails to the posts, as shown in the outdoor shelter plans. Use a spirit level to make sure the posts are plumb and to check if the top rails are perfectly horizontal. In addition, use a square to make sure the corners are square. Drill pilot holes and insert 8″ screws to lock the rails to the posts.
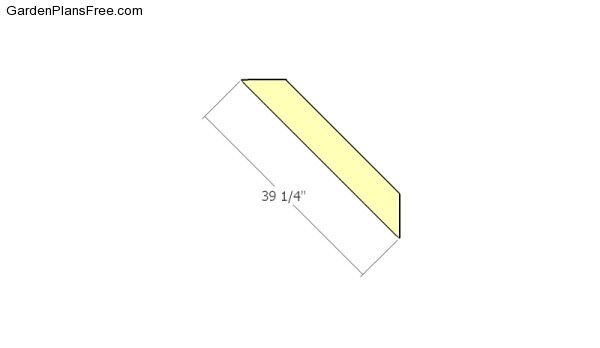
Building the braces
Build the braces from 6×6 lumber. Cut both ends of the braces at 45 degrees and smooth the edges with sandpaper.
Fitting the braces
Fit the braces to the structure. Make sure the corners are square and insert 3 1/2″ screws to lock them to the posts and to the top plates.
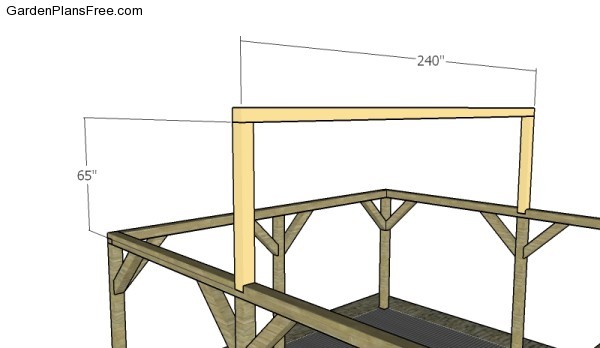
Fitting the top ridge
Fit the 6×6 supports to the front and bottom top rails, as shown in the diagram. Make sure the corners are square and plumb them with a spirit level. Use corner brackets to lock the supports into place tightly. Next, fit the beam to the supports. Align the edges with attention and secure the top beam into place with 8″ screws.
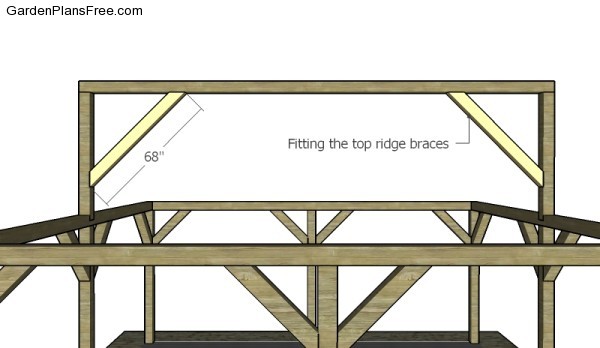
Top ridge braces
Attach the 6×6 braces to enhance the rigidity of the roof. If you live in an area with strong winds, you should make sure you add more strength to the joints.
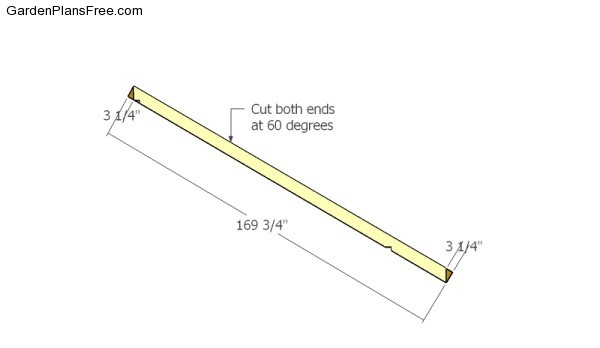
Building the rafters
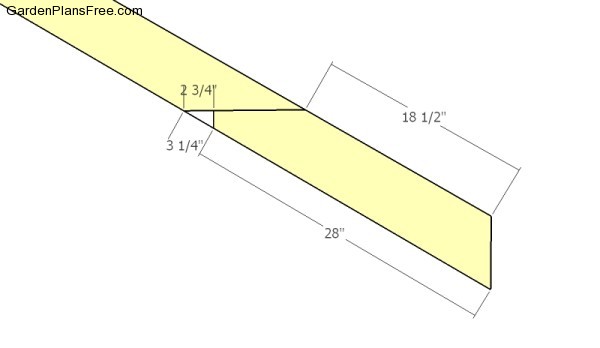
Build the rafters from 2×6 beams. Cut both ends of the beams at 60 degrees using a saw.
Top notch
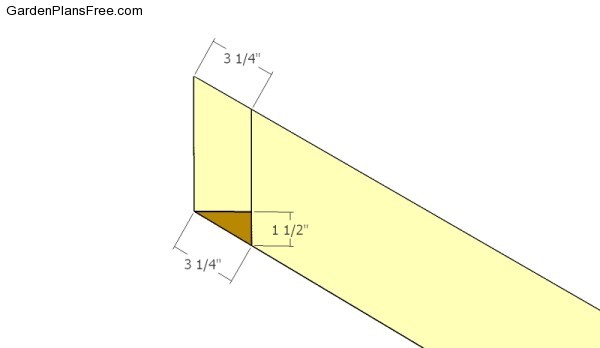
Make a notch to the top of the rafters, so they can fit easily to the top ridge. Use a saw to cut out the excess material and smooth the cuts with sandpaper.
Bottom notch
Make notches to the bottom of the rafters, as well. The notches will help you fit the rafters to the top rails.
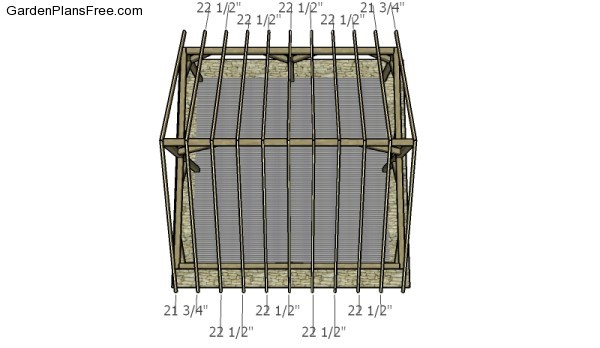
Fitting the rafters
Fit the rafters to the top of the picnic shelter and place them every 24″ on center. Use rafter ties to lock the beams to the top ridge and to the top plates. Leave no gaps between the components and make sure the joints are really rigid.
In order to enhance the look of the 20×20 shelter, attach 1×8 trims to the end of the rafters. Use 2″ brad nails to secure the trims into place. Align the edges with attention for a professional result.
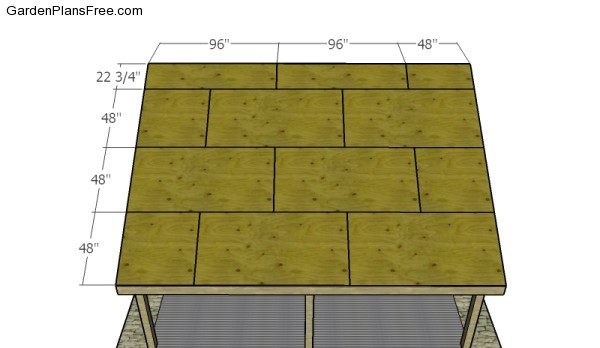
Fitting the roofing sheets
Fit sheets of 3/4″ plywood to the rafter, using the pattern shown in the diagram. Use 1 1/4″ screws to lock the sheets into place. Leave no gaps between the sheets and insert screws every 8″ or so.
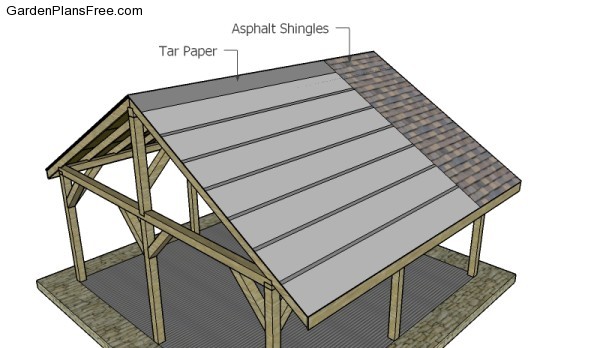
Fitting the roofing
Cover the roof with tar paper, making sure the strips overlap at least 2″. Lay the tar paper over the roof, starting with the bottom of the roof and secure them to the plywood with roof staples. Afterwards, install the asphalt shingles, starting with the bottom of the roof. Align everything with attention, making sure you don’t forget to fit the starting course.

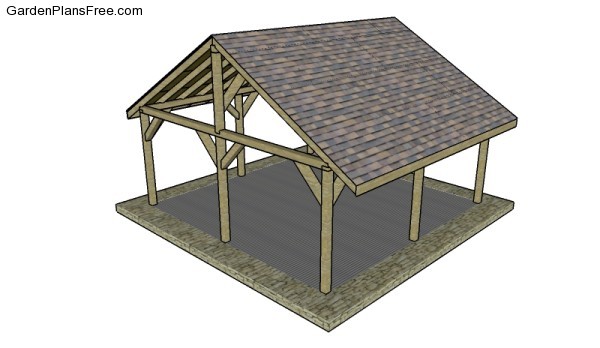
Picnic Shelter Plans
Now it’s the best time to customize your shelter so that it reflects your personality and it fits the design of your backyard. You can fit panels to the gable ends or you can even build railings. In addition, this would make for a great double carport. Free 20×30 pavilion plans on my blog, as well.
If you have two cars and you want to build a basic structure so you can protect them from the elements, make sure you follow these plans.
Outdoor Shelter Plans
We recommend you to check if the components are locked into place properly and structure is rigid enough for your garden. Make sure there are no protruding screws or sharp edges.
PRO TIP: Fill the holes with a good wood filler and smooth the surface with medium-grit sandpaper. Apply several coats of paint or stain over the components, in order to protect them from decay. Check out the rest of the project to learn more about building garden projects.

This diy project was about outdoor shelter plans. If you have enjoyed the free project, we recommend you to share it with your friends, by using the social media widgets.
3 comments
Hi..
Interested in this design.
Any guide as to how much it would cost?
I would say in the range of 2000-2400 usd
how do I get the free copy