If you are looking for an useful bench for your garden projects, you should pay attention to this project. In this article we show you free potting bench plans, as well as a list with all the materials needed to get the job done by yourself. This makes for a sturdy work bench, that is ideal for your garden. This project can be completed in one afternoon by a person with basic woodworking skills, if you have gathered all the materials and tools required.
It is essential to use quality materials, if you want to build a durable potting bench. Therefore, if you have a tight budget, the best solution is to use pressure-treated lumber. Alternatively, if you want to add character to your project and to focus on the appearance of the bench, you should make an additional investment and buy cedar, redwood or other type of lumber that fits your tastes.
RELATED PLANS:
Building a potting bench
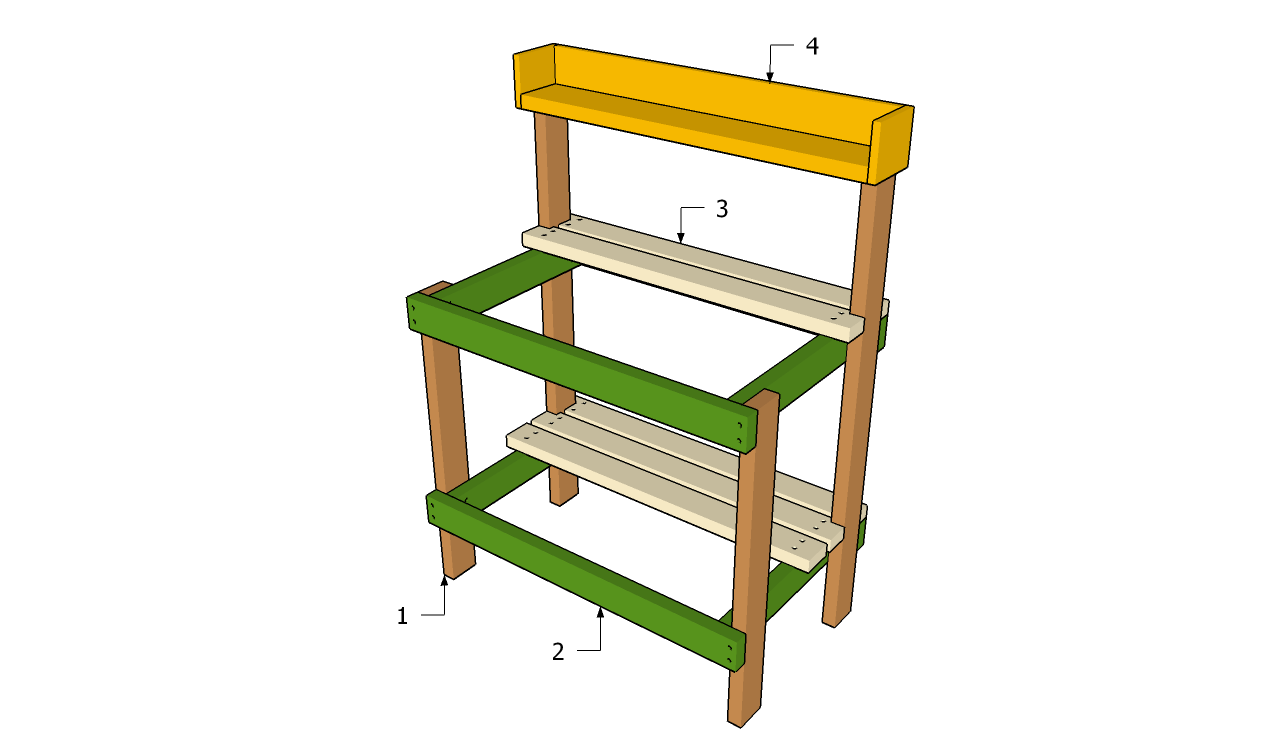
Building a potting bench plans
Materials
- 1 – 2 pieces of 2×4 lumber – 35” long, 2 pieces of 2×4 lumber – 50” long LEGS
- 2 – 4 piece of 2×4 lumber – 40″ long, 4 pieces of 2×4 lumber – 22” long BRACES
- 3 – 12 pieces of 2×4 lumber – 40” long SLATS
- 4 – 1 piece of 2×6 lumber – 40” long, 1 piece of 1×6 lumber – 40” long, 2 pieces – 6” long SHELF
- 11 pieces of 2×4 lumber – 8 ft
- 1 piece of 2×6 lumber – 4 ft
- 1 piece of 1×6 lumber – 4 ft
- 100 pieces of 2 1/2″ galvanized screws
- wood filler, outdoor paint
Tools
- Hammer, Tape measure, Carpentry square
- Miter saw, Drill machinery, Screwdriver, Sander, Router
- Safety Gloves, Safety Glasses, Respiratory Mask
Time
- One day
Made from this plan
Building a potting bench
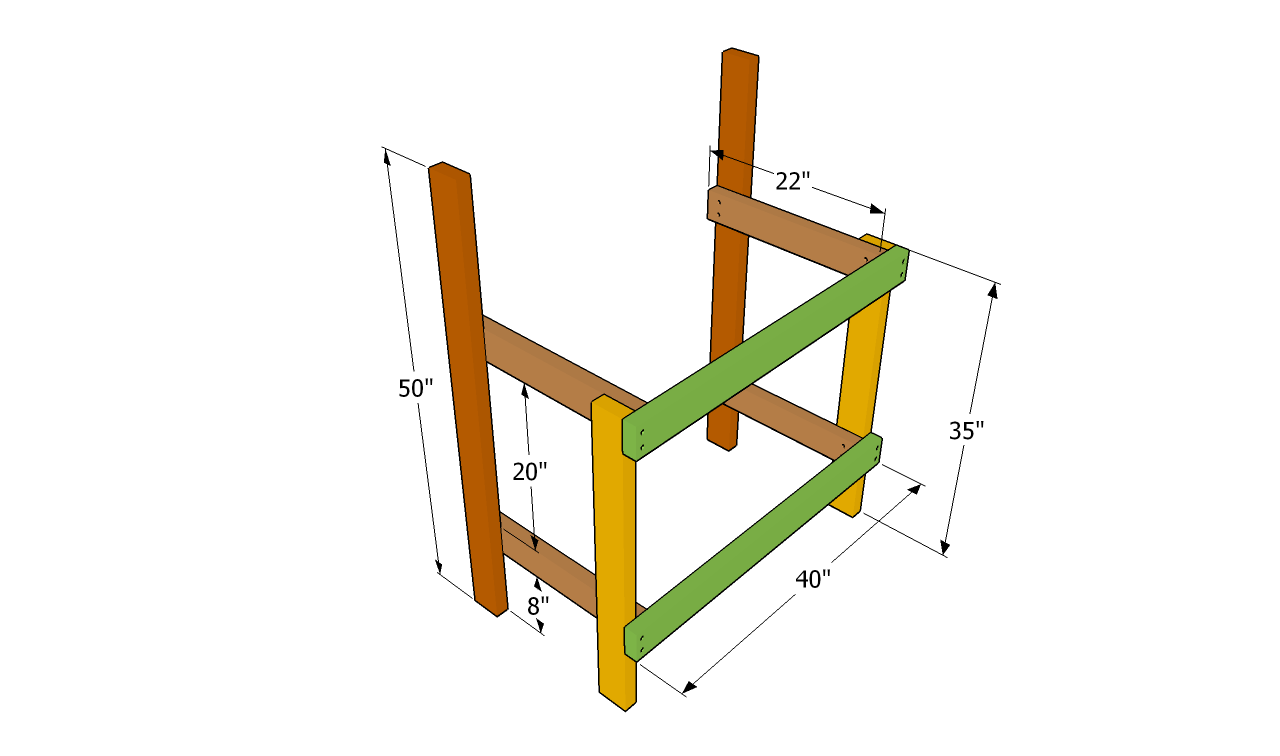
Building the frame of the potting bench
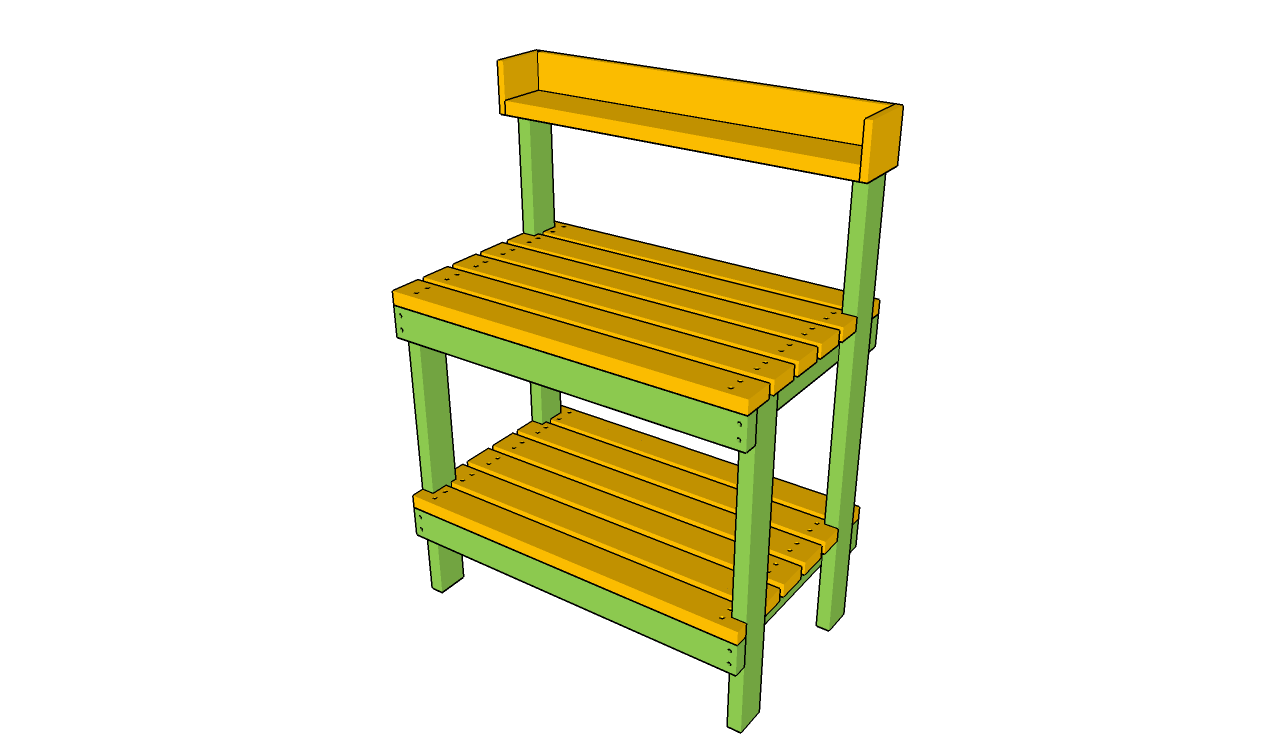
The first step of the garden project is to build the frame of the potting bench. As you can see in the image, you need to build the components out of 2×4 lumber. Assemble the sides of the bench on a level surface, making sure the corners are right angled. Drill pilot holes and insert 2 1/2” wood screws trough the braces into the legs.
PRO TIP: Level the braces with a spirit level and make sure the legs are perfectly plumb. In this manner, you will reinforce the structure and build the supports for the shelves.
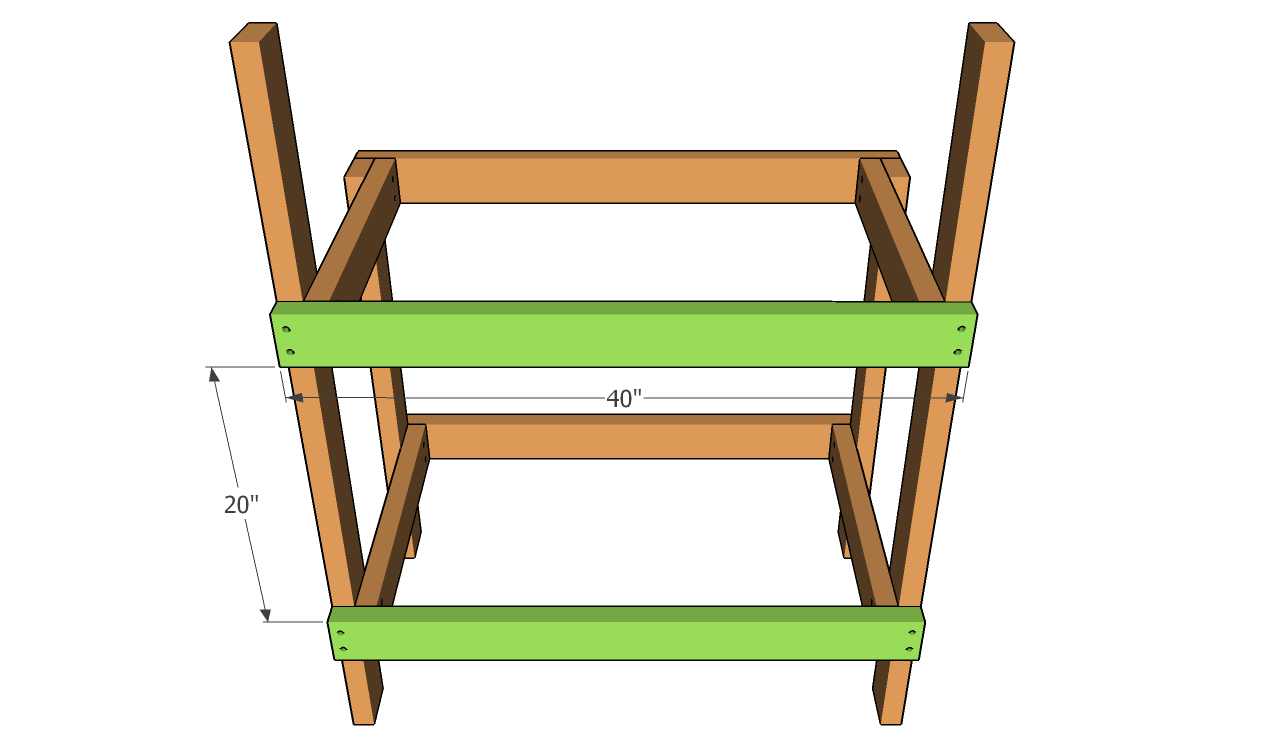
Attaching the back braces
The next step of the project is to make the frame of the potting bench rigid, by attaching 2×4 braces to the back of the bench. Drill pilot holes at both ends of the braces before driving in the screws, to prevent the wood from splitting. Level the braces with a spirit level, if you want to get a professional result.
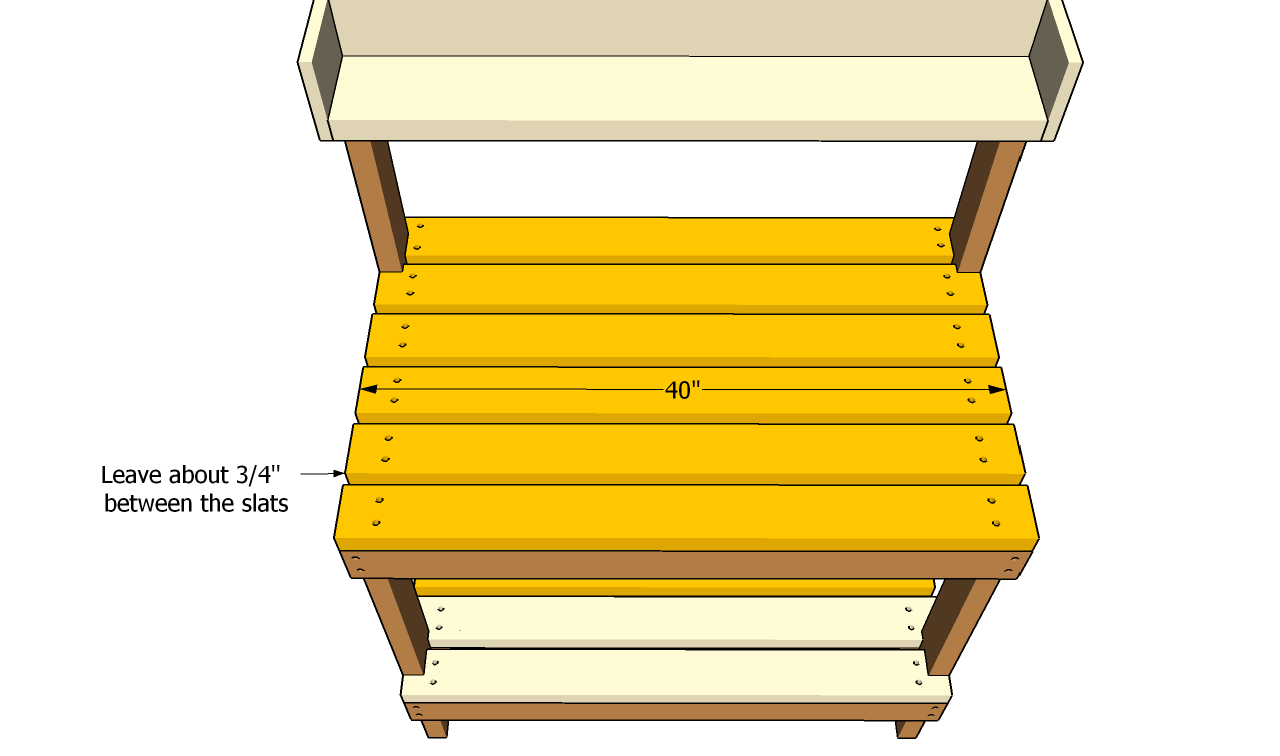
Installing the slats
Attack 2×4 slats to the bottom and middle shelves, as in the image. As you can easily notice in the plans, you should leave about 3/4” between the slats. Drill pilot holes, countersink the head of the screws and lock the components into place with galvanized screws. Check if the ends of the slats are flush with the frame of the bench, before inserting the nails.
Installing the top shelf
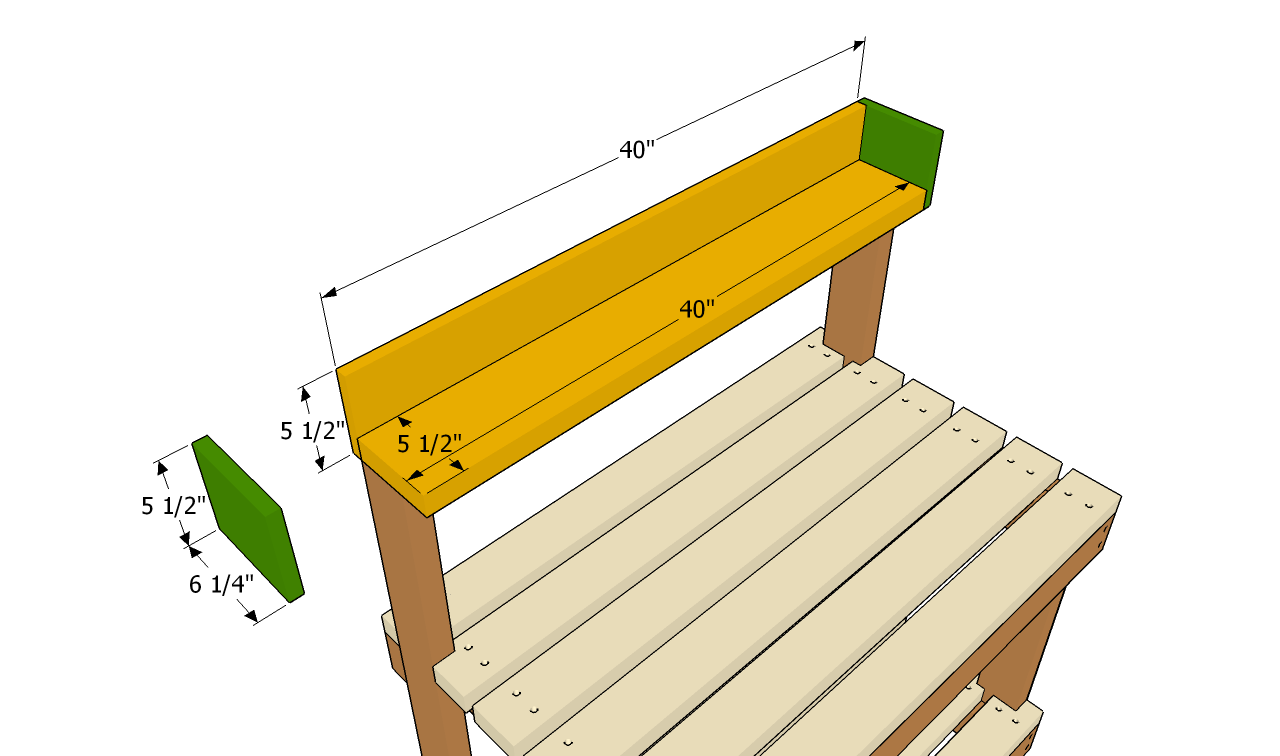
Building the top shelf is not compulsory, but it will most certainly add more storage space to your potting bench. In order to get the job done properly, you should use 2×6 lumber for the bottom of the shelf and 1×6 lumber for the sides. Secure the side faces to the bottom components with 2 1/2″ screws.
Potting bench plans
Last but not least, you should take care of the finishing touches. Therefore, fill the holes with wood filler and let it dry out for about one hours (read the manufacturer’s instructions for precise information). Sand the wooden components along the wood grain and remove the residues.
PRO TIP: Apply several coats of stain or paint to enhance the look of the potting bench and to protect it from wood decay on the long run.
This diy project was about free potting bench plans. If you have enjoyed the free project, we recommend you to LIKE and SHARE it with your friends, by using the social media widgets.

