This step by step woodworking project about deck plans free. Building a small free standing deck is a project that will liven-up the look of your garden, as it has an exquisite look and also a functional role. Plan every step of the project with attention, as you need to keep the costs under control and to prevent costly mistakes. Using a deck blocks is a cheap and durable solution, as the frame need a proper support on the long run.
This project is ideal for any small backyards, as it has compact dimensions and it doesn’t have a massive look. Make sure you invest in high quality lumber that is weather-resistant, as the components will be exposed to moisture and sunlight. Adjust the size and the design of the deck to suit your needs and to match the design of your garden. Check out the rest of the projects for more ideas for your backyard.
Building a garden deck
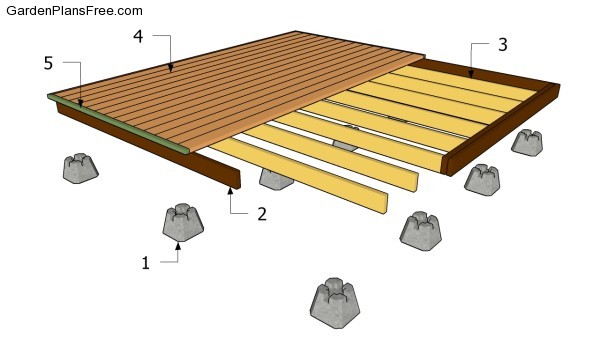
Building a garden deck
Materials
- 1 – 12 pieces of concrete blocks DECK BLOCKS
- 2 – 2 pieces of 2×8 lumber – 141″, 2 pieces – 144″ RIM JOISTS
- 3 – 2 pieces of 2×8 lumber – 141″, 8 pieces – 138″ JOISTS
- 4 – 25 pieces of 1×6 lumber – 144″ BOARDS
- 5 – 4 pieces of 2×2 lumber – 147″ TRIMS
- 12 concrete blocks
- 14 pieces of 2×8 lumber – 12 ft
- 25 pieces of 1×6 lumber – 12 ft
- 4 pieces of 2×2 lumber – 14 ft
- 3 1/2″ screws
- 1 5/8″ screws
- wood stain
- joist hanger
- 1 1/2″ structural screws
Tools
- Hammer, Tape measure, Carpentry square
- Miter saw, Drill machinery, Screwdriver, Sander, Router
- Safety Gloves, Safety Glasses, Respiratory Mask
Time
- One day
Deck Plans Free
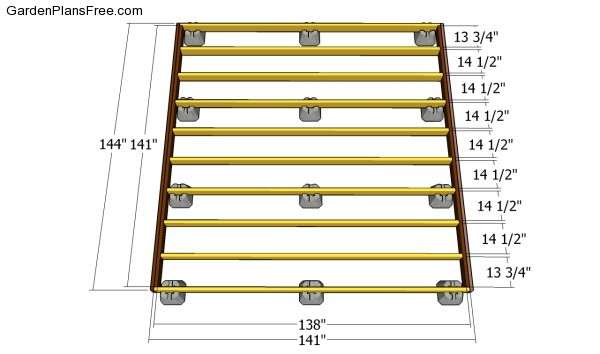
Building the deck frame
The first step of the project is to build the joists and to assemble the frame of the ground level deck. As you can easily notice in the image, we recommend you to lay the frame of the deck on concrete blocks. Make sure you lay the deck in a professional level, otherwise it will not support the weight properly. Place the deck blocks on compacted graved before assembling the frame.
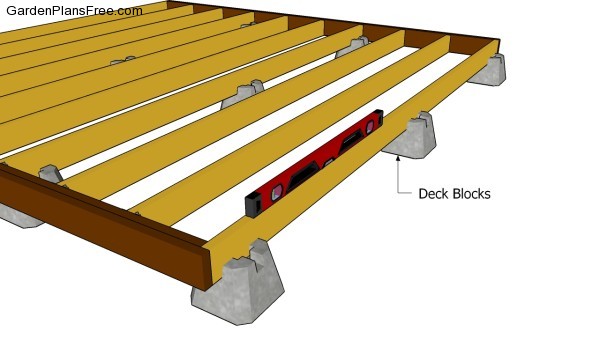
Installing the joists into the blocks
As you can see in the free plans, we recommend you to place a spirit level on the joists, in order to check if they are horizontal. Moreover, make sure the corners are right-angled, by using a carpentry square.
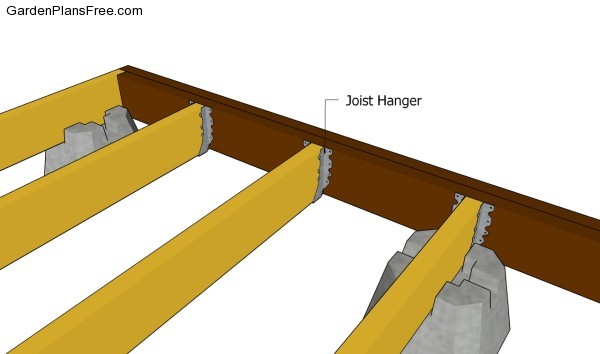
Securing the joists to the perimeter beams
After assembling the perimeter joists, you have to attach the rest of the components. Cut the 2×8 beams at the right size, fit them between the frame and lock them into place with metal hangers. Place the joists equally spaced and lock them to the rim joists with galvanized screws. Work with attention, as the frame is the essential component of your garden deck.
Installing the decking boards
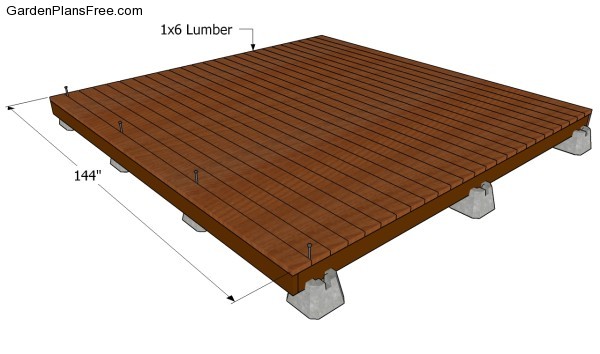
The next step of the project is to attach the decking boards. As you can see in the image, you have to lay the 2×4 boards to the framing and lock them into place with 2 1/2″ galvanized screws. Place nails between the slats, in order to get consistent gaps between them (the gaps will enhance the water drainage). Cut the excess with a circular saw and smooth the edges with a sandblock.
Attaching the trims
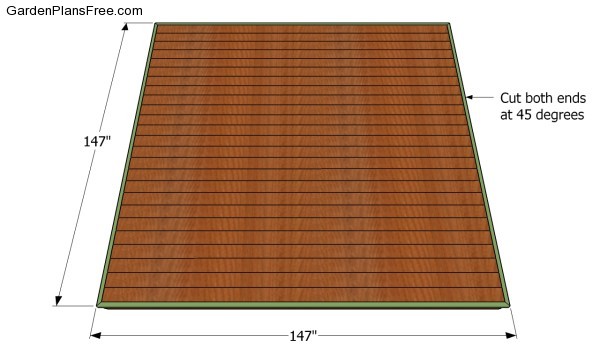
If you want to enhance the appearance of the small deck, we recommend you to attach 2×2 trims on all sides of the construction. Cut both ends of the trims at 45 degrees and lock them to the slats with finishing nails. Add waterproof glue to the joints, in order to reinforce the bond. Round the exposed edges with a router and a 3/4″ bit.
Deck plans free
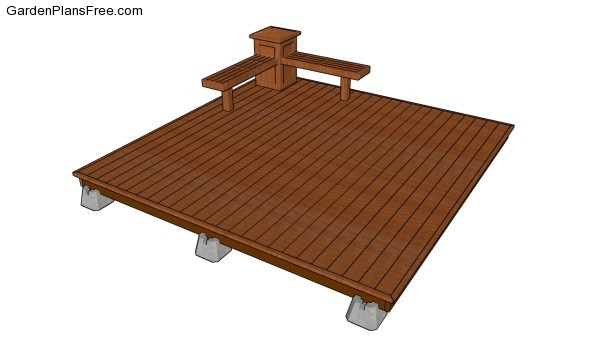
Lastly, we recommend you to get the final touches done. Therefore, fill the holes with putty and sand the surface thoroughly, after it gets dry. Check if the components are locked together properly, before attaching the deck bench or a table with several chairs.
PRO TIP: Applying a few coats of paint or stain will not only enhance the look of the small deck, but it will also protect the wooden components from water damage.
This diy project was about deck plans free. If you have enjoyed the free project, we recommend you to share it with your friends, by using the social media widgets. LIKE us on facebook in order to be the first that gets our latest projects.


18 comments
In the materials list for the garden deck ground level you have listed the joists at 2×8 joists 80 inches. These are to short
I have updated the list.
Don’t the top 2×4’s need to be 144″?
Yes, that’s correct
Is this structure sound enough to install a roof on it?
It depends on the roof.
One of the easiests and clear plans for a beginner like me to understand. I do kot wish to bring in the blocks or dig and do a floating or standing deck only. Since it will serve to put my husband’s bbq esquipment we are not planning for years and years of wear but something to gift him even for a while. My question is how high is this deck with the blocks and do you need a step for yours? I am wondering if I need a step even at the height without the blocks. Thank you
If you lay the blocks on the ground you will probably need a step. However, the good news is that you can dig holes before laying the blocks, so the deck will be truly ground level!
do you have to use 2 x 8 for floor joists like to use 2 x 6 first time
I’m going to try this! I’m wondering about leveling off the footers. I’m planning on putting the footers right on the grass/ground (no digging). It seems that the frame is deck is free standing and could be lifted off the footers at any time if you need to adjust the height of the footers.
Also, will the rim joists stay in the footers? It seems like the fit will be sloppy. Could you add grout/shims to give a tighter fit or will the steel angle hangers be sufficient? thanks.
I don’t recommend you to place the footers directly on grass, as you will have problems in time. Put some gravel under the footers and compact it thoroughly. It would be a good idea to level all the footers before building the frame, because it will get heavy. Use a 2×8 as a straight edge and a level. I don’t think you will need to put shims between the joists and the footers.
Thanks for the feedback!
You would need more like 39 2x4s for the decking to cover 12′
How would i do this if im trying to build a 11×16 deck?
How big is the deck in this example?
Hi Thomas, I will use this plan as it is exactly how I was thinking to build our garden deck.
How much compacted gravel do you recommend to put under the footings? I was thinking of 6″ since we are in Ontario (Toronto area. Thanks for the great site.
I’m seriously interested in building this deck (you did a great job in designing it).
My question:
Will this deck support a hot tub?
Thanks.
Mark
MUY INTERESAN PUEDEN PASAR UN EMAIL