This detailed garden project is about free 2×4 adirondack bench plans. Since I already made plans for a simple adirondack chair, I have to come up with a design for the matching bench. This wooden bench is built on a sturdy frame and it features an elegant design. Even if you are new to woodworking, you can pull this project off and build yourself a very nice relaxation area in your backyard. See all furniture plans HERE.
You need to know that all my plans come with a complete Cut and Shopping lists, so you waste no time and go right ahead and build the garden bench. In addition, my 3D diagrams and step by step instructions will make the assembly of the patio bench easy.
We strongly recommend you to take a look over the rest of our plans, as there are may projects that could suit your needs and budget. Moreover, plan every aspect of the project to your needs before starting the actual construction. In this manner you can prevent mistakes and keep all the costs under control. Sand the edges of the slats with a sand-block in order to enhance the look of the chair.
Free Plans for a 2×4 Adirondack Bench
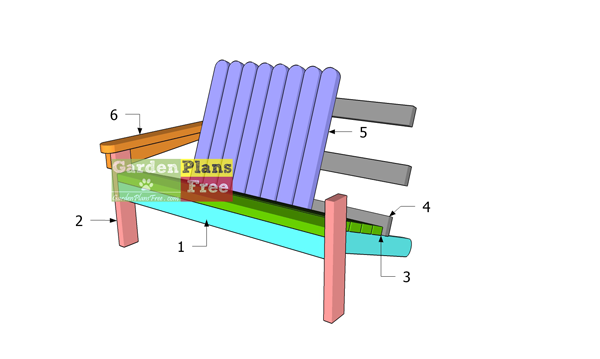
Building-an-adirondack-bench-from-2x4s
Building-a-2×4-adirondack-chair
Materials
- 1 – 3 pieces of 2×4 lumber – 32″, 1 piece – 48″ SEAT FRAME
- 2 – 2 pieces of 2×4 lumber – 19 1/2″ LEGS
- 3 – 5 pieces of 2×4 lumber – 48″ SEAT
- 4 – 2 pieces of 2×4 lumber – 48″, 1 piece – 51″ BACKREST CLEATS
- 5 – 12 pieces of 2×4 lumber – 27″ BACKREST
- 6 – 2 pieces of 2×4 lumber – 25 3/4″, 2 pieces – 27″ ARMRESTS
- 12 pieces of 2×4 lumber – 8 ft
- 200 pieces of 2 1/2″ screws
- 10 pieces of 5 1/2″ screws
- wood glue, stain/paint
Tools
- Hammer, Tape measure, Carpentry square
- Miter saw, Drill machinery, Screwdriver, Sander, Router
- Safety Gloves, Safety Glasses, Respiratory Mask
Time
- One day
Adirondack Bench – Free DIY Plans
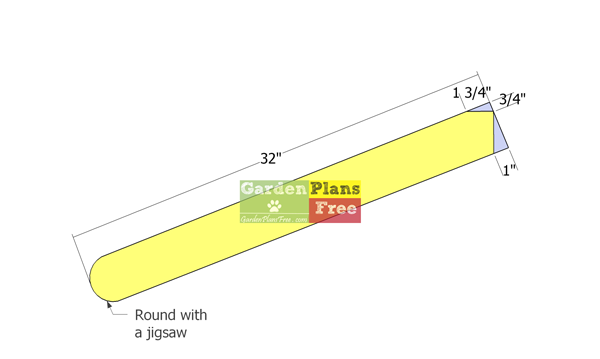
Legs-for-the-adirondack-chair
The first step of the outdoor woodworking project is to build the back legs for the bench . As you can see in the image, we recommend you to build the components from 2×4 lumber, making sure you follow the pattern shown in the plans.
Use a saw to make the straight cuts and a jigsaw to make the curved cuts. Smooth the edges with sandpaper to even out the surface.
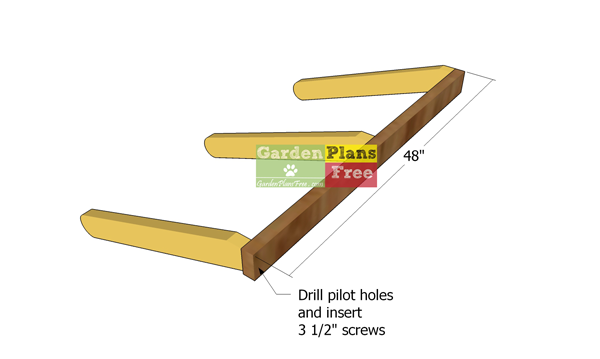
Assembling-the-seat-frame-for-the-bench
Also, attach the 2×4 apron to the three legs. Align the edges flush and make sure the corners are square. Drill pilot holes through the apron and insert 2 1/2″ screws into the legs.
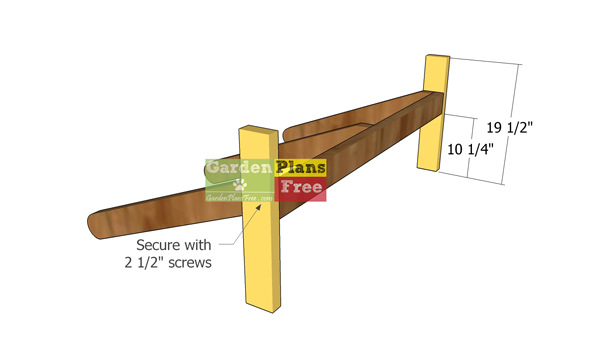
Attaching-the-front-legs
The next step of the project is to attach the front legs to the frame, as well as the frame of the chair. Use a spirit level to plumb the front legs and cleave no gaps between the components.
Clamp the legs to the seat frame. Drill pilot holes through the legs and insert 2 1/2″ screws into the frame.
Building the seat of the bench
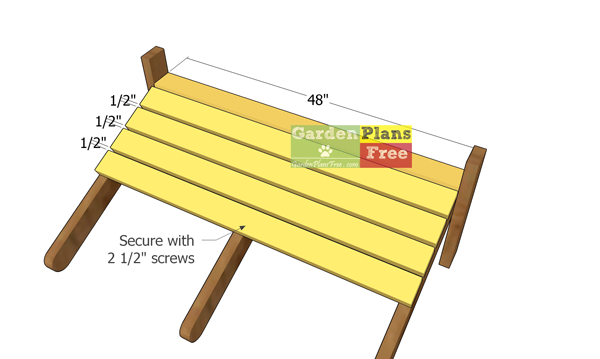
Fitting-the-seat-slats
Next, attach the 24″ slats to the seat of the adirondack chair. Place a piece of 1/2″ plywood between the slats to create even gaps. Drill pilot holes and insert 2 1/2″ screws to lock the slats to the seat frame. Use at least 2 screws for each joint.
Building the backrest
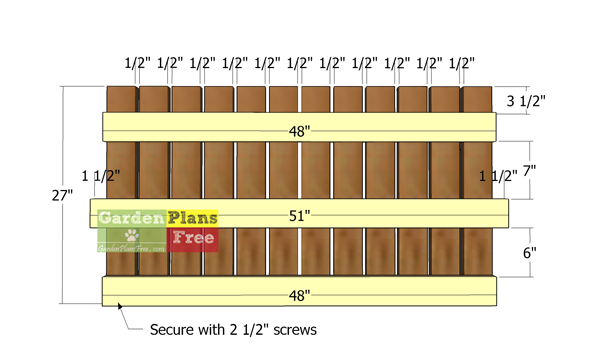
Assembling-the-backrest-for-the-bench
Next, assemble the backrest for the adirondack bench. Use 2×4 lumber for the horizontal supports and for the vertical slats.
Lay everything on a level surface and align the edges flush. Fit 1/2″ plywood between the slats to create even gaps. Lay the supports into the place, as shown in the diagram. Drill pilot holes and insert two 2 1/2″ screws for each joint.
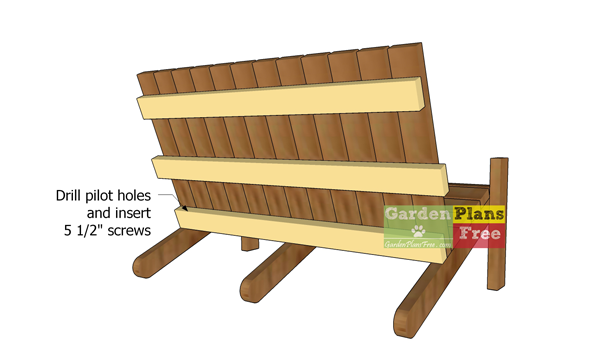
Attaching-the-backrest-to-the-adirondack-bench
Furthermore, fit the backrest to the frame of the adirondack bench. Align the edges flush, drill pilot holes and insert 5 1/2″ screws to lock the backrest to the back legs.
Building the armrests
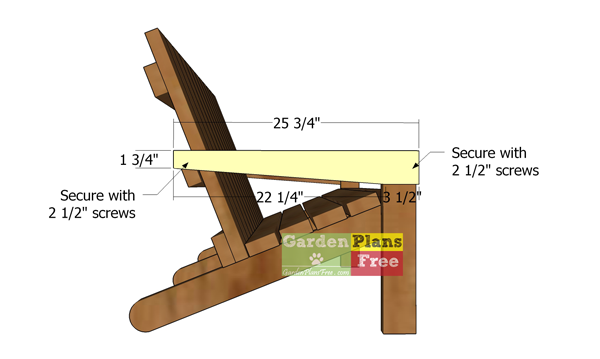
Fitting-the-armrest-supports
Build the side supports for the bench using 2x4s. Mark the cut edges on the slats and get the job done with a saw. Attach the supports to the frame of the bench. Drill pilot holes and insert 2 1/2″ screws to lock the supports to the backrest and to the front legs.
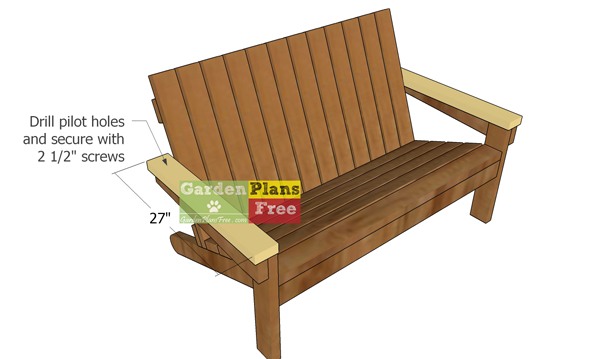
Fitting-the-armrests-to-the-bench
Next, attach the armrests to the bench. Align the edges, drill pilot holes and insert 2 1/2″ screws to lock them into place tightly.
Finishing touches for the patio bench
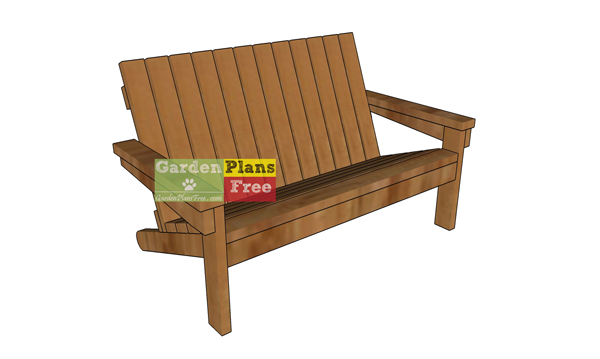
How-to-build-an-adirondack-bench-from-2x4s
Lastly, take care of the finishing touches. Fill the holes with wood putty and smooth the surface with 120-220 grit sandpaper. You can use a router and a bit to round over the exposed edges. Apply stain or paint to protect the wood from the elements.
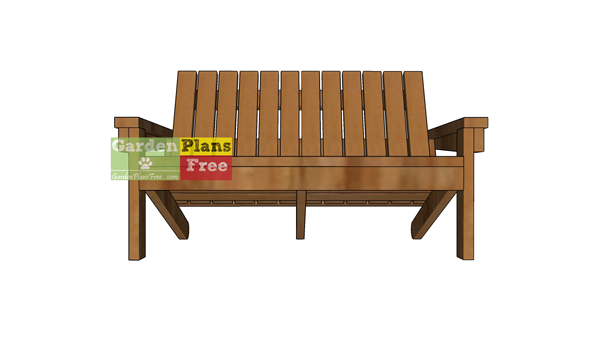
DIY-Adirondack-bench-plans
You can find free plans for the matching adirondack chair, on my blog, as well. Building 2 chairs and this bench will make you a really nice set of the patio. This is a super comfy bench because the backrest has an angle to it.
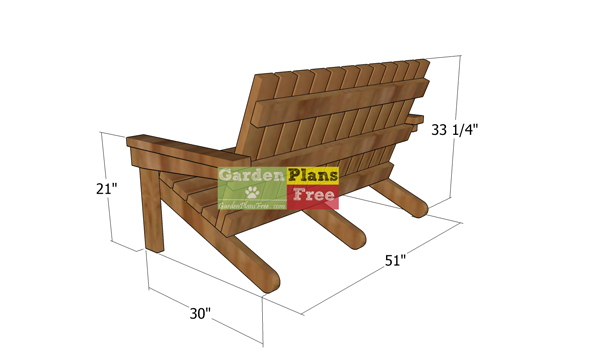
Adirondack-Bench—back-view-with-dimensions
PRO TIP: This outdoor chair makes for the perfect addition to your patio. This is a comfy wooden chair with a modern design that is ideal for persons of all weights and heights. If you love this design I recommend you to take a look over the rest of my furniture plans.
This diy project was about adirondack bench plans made from 2x4s. If you have enjoyed the free project, we recommend you to share it with your friends, by using the social media widgets. You can also take a look over this tutorial on how to build an adirondack chair.

