This step by step project is about bird feeder plans free. If you want to attract singing birds to your garden you should consider building a simple feeder and hang it to a tree or attach it to a post, about 6′ above the ground. There are many plans and designs you could choose from, so make sure you pay attention to all the alternatives before starting the actual construction project.
From our experience, we recommend you to build the components form weather-resistant lumber, such as cedar, pine or redwood. Work with attention and with great care and plan everything form the very beginning, if you want to prevent costly mistakes. Always align the components at both ends and drill pilot holes, to avoid splitting the wood. Add waterproof glue, in order to enhance the bond of the joints.
Free bird feeder woodworking plans
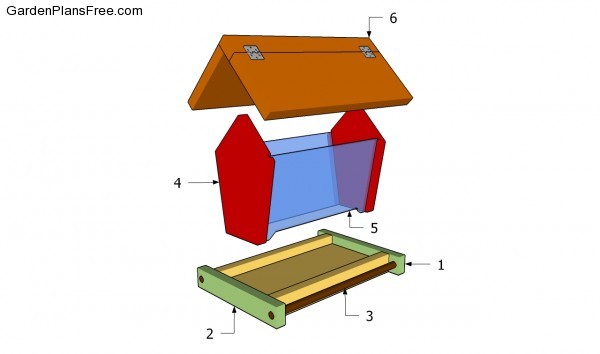
Building a bird feeder
Materials
- 1 – 1 piece of 1×6 lumber – 12” BASE
- 2 – 2 pieces of 1×2 lumber – 12” long, 2 pieces – 9″ long TRIMS
- 3 – 2 pieces of 1/4″ dowels – 13 1/2″ long DOWELS
- 4 – 2 pieces of 1×6 lumber – 8 1/2″ long END FACES
- 5 – 2 pieces of 1/4 plexiglass – 6×11” long WALLS
- 6 – 2 pieces of 1×6 lumber – 14″ long, 1 piece of 1×2 – 14″ long ROOF [
Tools
- Hammer, Tape measure, Carpentry square
- Miter saw, Drill machinery, Screwdriver, Sander, Router
- Safety Gloves, Safety Glasses, Respiratory Mask
Time
- One day
Bird Feeder Plans Free
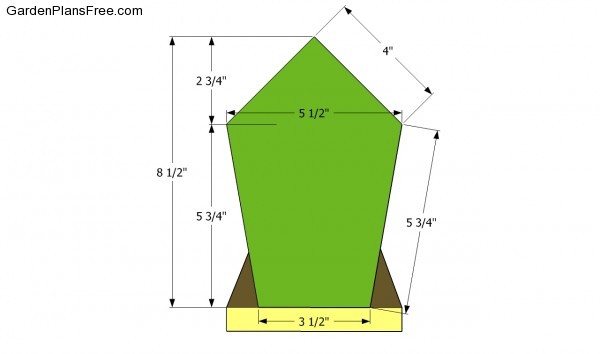
Building the ends of the feeder
The first step of the woodworking project is to build the ends of the bird feeder. As you can easily notice in the image, you need to use 1×6 lumber and a good circular saw with a sharp blade. After you adjust the components at the right size, we recommend you to smooth the edges with medium-grit sandpaper. Don’t forget that you also need to carve 1/4″ deep channels along the interior faces of the components, as to slide the plexiglass walls.
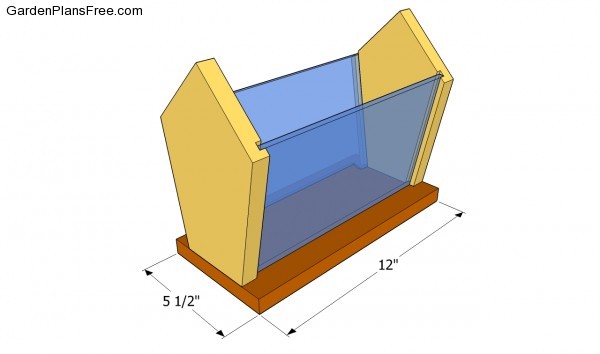
Attaching the base of the bird feeder
Cut a small piece of 1×6 lumber and attach the gable ends into place. Center the components into place and drill pilot hole trough the base, before inserting the finishing nails. Check if the exterior edges of the faces are flush with the base, before inserting the 1 1/4″ finishing nails.
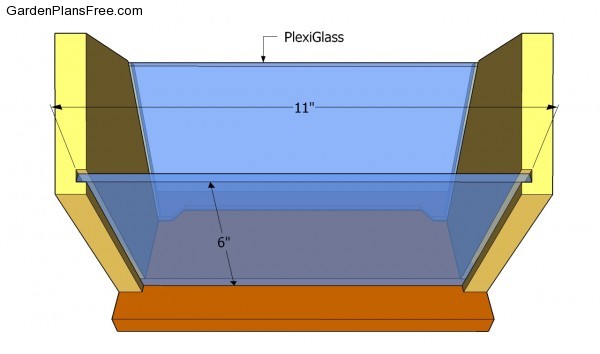
Installing the plexiglass walls
Continue the woodworking project by sliding the plexiglass pieces along the sides of the bird feeder. As you can easily notice in the plans, you need to cut out a small piece of the pexiglass. The gap placed at the bottom of the walls will allow the seeds to get trough and feed the birds.
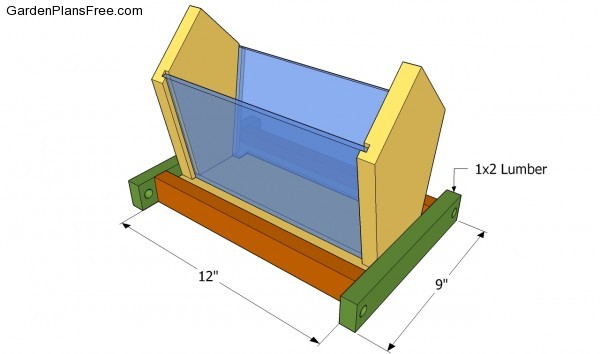
Building the trims
The next step of the project is to attach the bottom trims to the base of the bird feeder. Cut the components from 1×2 lumber and lock them to the base with finishing nails. Add glue to enhance the bond of the joints. Drill small holes trough the ends trims, as you need to create supports for the birds, out of wooden dowels.
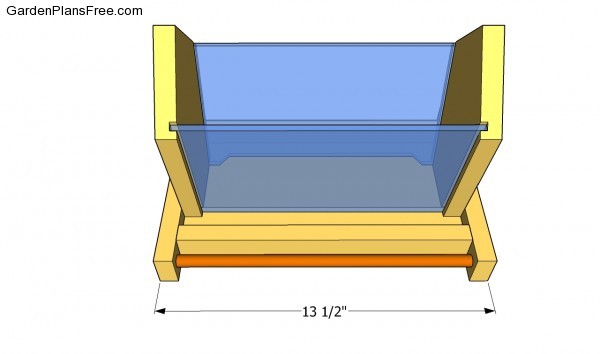
Installing the dowels
Insert the dowels inside the trims and lock them into place with waterproof glue and finishing nails. Make sure the ends of the dowels are flush with the surface of the birdhouse and smooth the surface with medium-grit sandpaper. Work with attention and with great care, if you want to prevent costly mistakes.
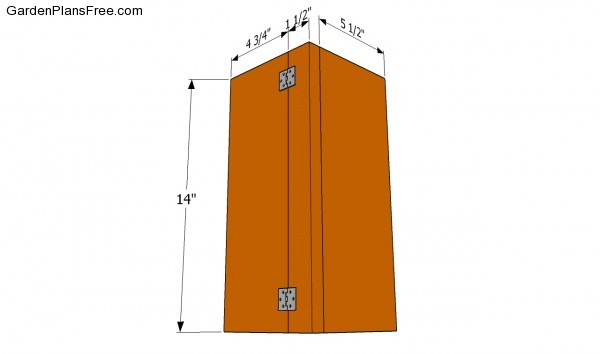
Installing the roof
Installing the roof of the bird feeder is not difficult, especially if the right plans and techniques are used. As you can notice in the image, you need fit a full 2×6 board on one side of the birdhouse, while on the opposite side you need to install two components. Use metal hinges to secure the lid into place. You can lift the lid anytime you want to clean the inside of the birdhouse or to fill it with seeds.
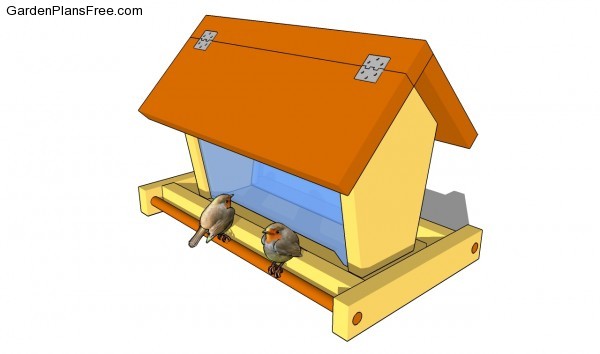
Bird feeder plan frees
Last but not least, you should take care of the finishing touches. Therefore, we recommend you to check if the components are locked into place properly and if the frame is rigid. Make sure there are no protruding screws or sharp edges. Moreover, the components should be installed properly, making sure there are no gaps between the slats.
PRO TIP: Fill the holes with a good wood filler and smooth the surface with 120-grit sandpaper. Apply several coats of exterior paint over the components, in order to protect them from decay (choose mild colors like white, blue or green).
This diy project was about bird feeder plans free. If you have enjoyed the free project, we recommend you to share it with your friends, by using the social media widgets.

1 comment
hi feeder looks very good. i will try my luck with this one. not many people put up plans when they posting feeders are not cheap thx. i only have a skill saw a jig saw and a mitre saw not compound thx