Building a swing bench is a great project, if you are looking to create a simple relaxation corner in your garden or porch. Therefore, after building the A-frame swing you have to continue the project and make a simple bench. There are many designs and sizes you could choose from, so you should study several alternatives before taking a decision. These plans have and average level of difficulty, so any person with basic woodworking skills can get the job done.
After choosing professional bench swing plans, you should buy quality materials. Therefore, choose weather-resistant lumber that has a beautiful natural finish, such as pine, redwood or pine. Always align the components before locking them into place with galvanized screws. In addition, round the edges of the components with a router, in order to get a nice appearance.
Building a bench swing
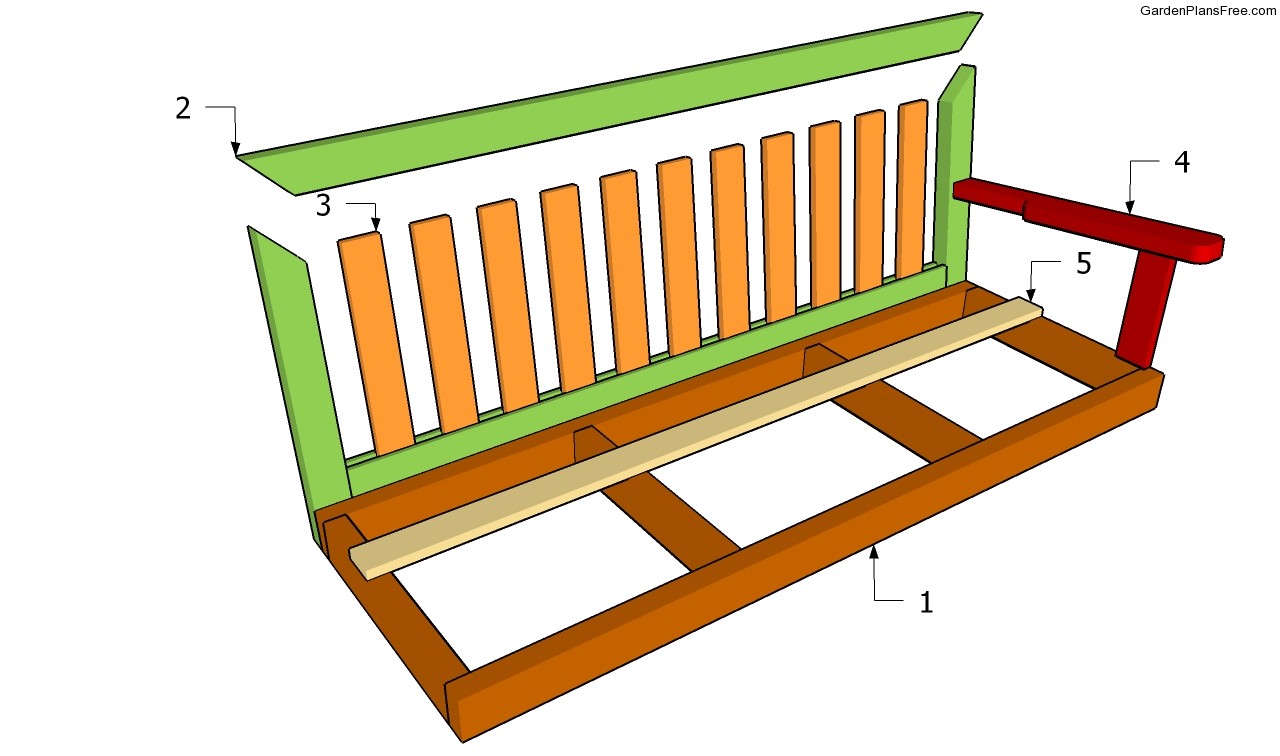
Building a swing bench
Materials
- 1 – 2 pieces of 2×4 lumber – 60″ long, 4 pieces of 2×4 lumber – 17″ long FRAME
- 2 – 2 piece of 2×3 – 21 1/2″, 1 piece of 2×3 – 60″, 1 piece of 2×6 – 55″ BACK SUPPORT
- 3 – 11 pieces of 1×4 lumber – 15 1/2″ long SLATS
- 4 – 2 piece of 1×4 – 13 1/2”, 2 pieces of 2×3 – 23 1/2”’ long ARMRESTS
- 5 – 7 pieces of 1×4 lumber – 60″ long SLATS
Related
- PART 1: Garden Swing Plans
- PART 2: Bench Swing Plans
Tools
- Hammer, Tape measure, Carpentry Square
- Miter saw, Drill machinery, Screwdriver, Sander
- Safety Gloves, Safety Glasses, Respiratory Mask
Time
- One Day
Bench Swing Plans
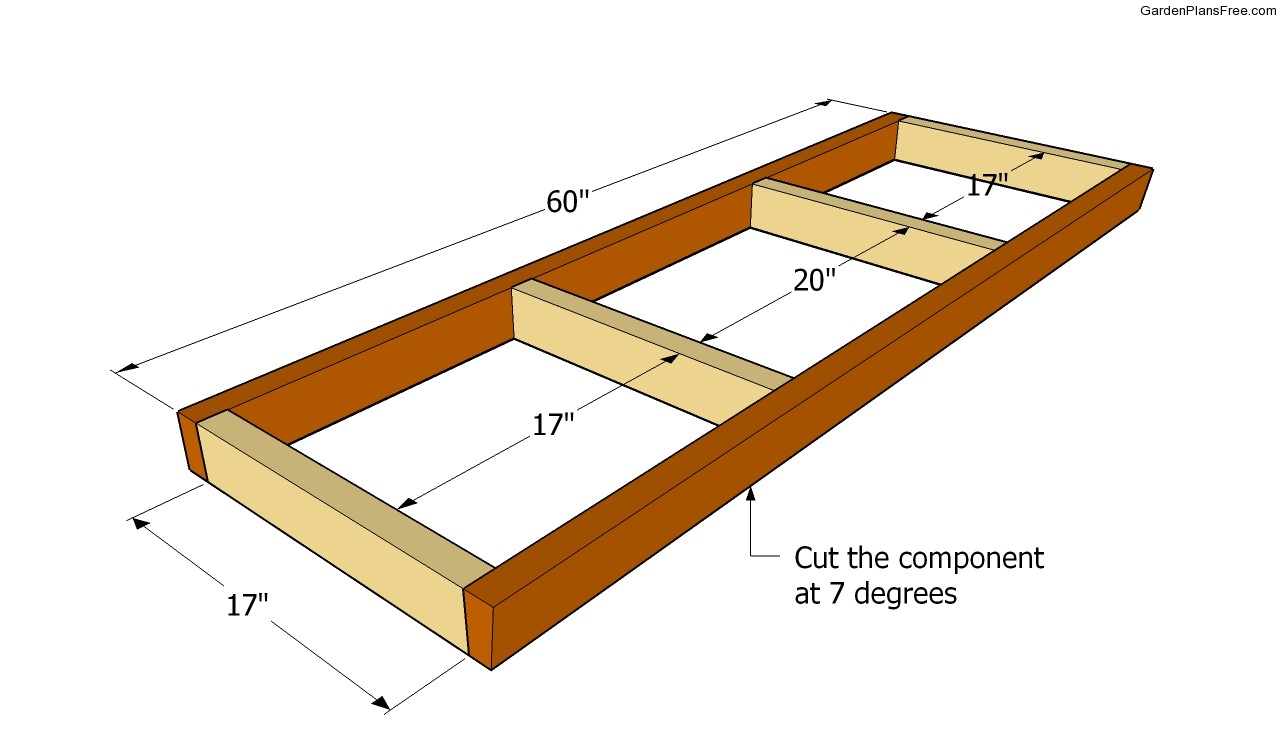
Building the frame
The first step of the project is to build the seat frame, using the above plans. In order to build a rigid and durable structure, you need to use 2×4 boards. After cutting them at the sight size, you should drill pilot holes and fit the components into place with 3″ galvanized screws.
PRO TIP: Don’t forget to cut the back components at about 7º. In this manner, you can attach the back support and secure it to the frame with several screws. You could adjust the angle of the back rest according to your needs and subsequently the angle of the cut.
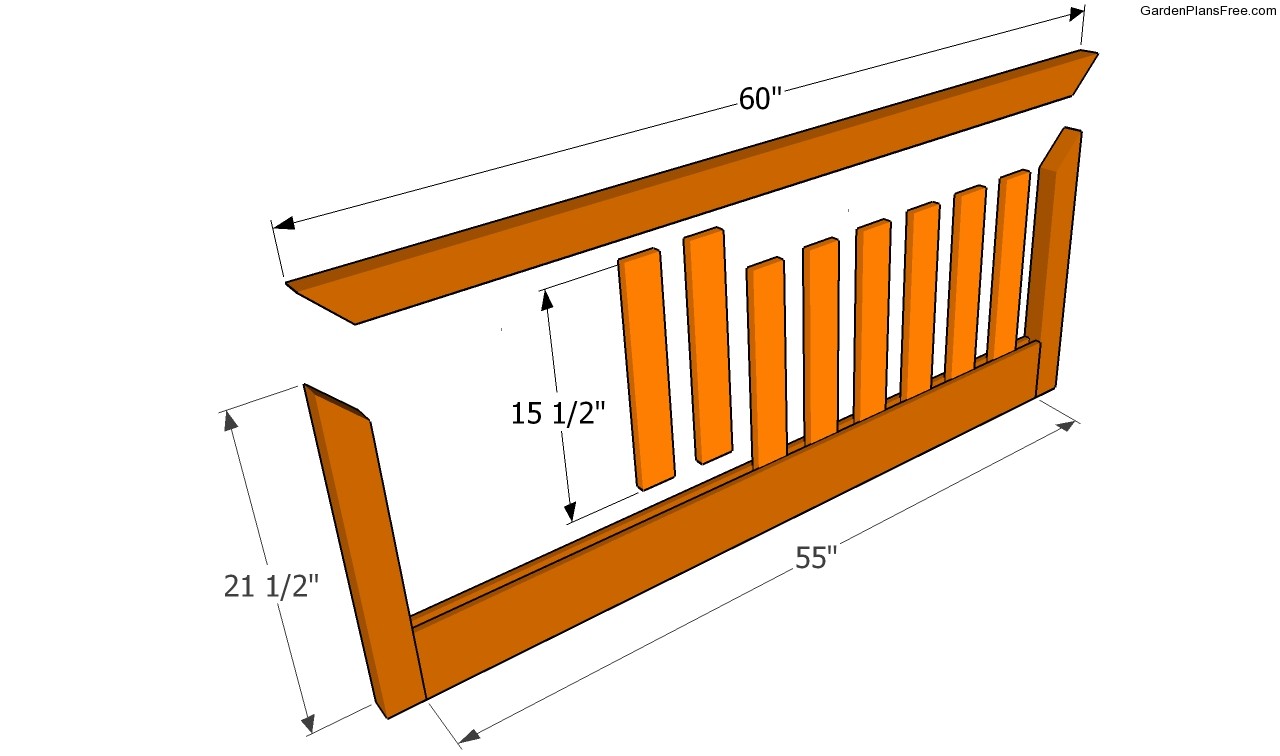
Building the back support
Continue the project by building the back support. As you can easily notice in the image, you just need to use 2×4 lumber (side and top component), 2×6 lumber (bottom component) and 1×4 lumber (slats). In order to create durable and rigid joints between the components of the frame, you should cut the ends at 45°.
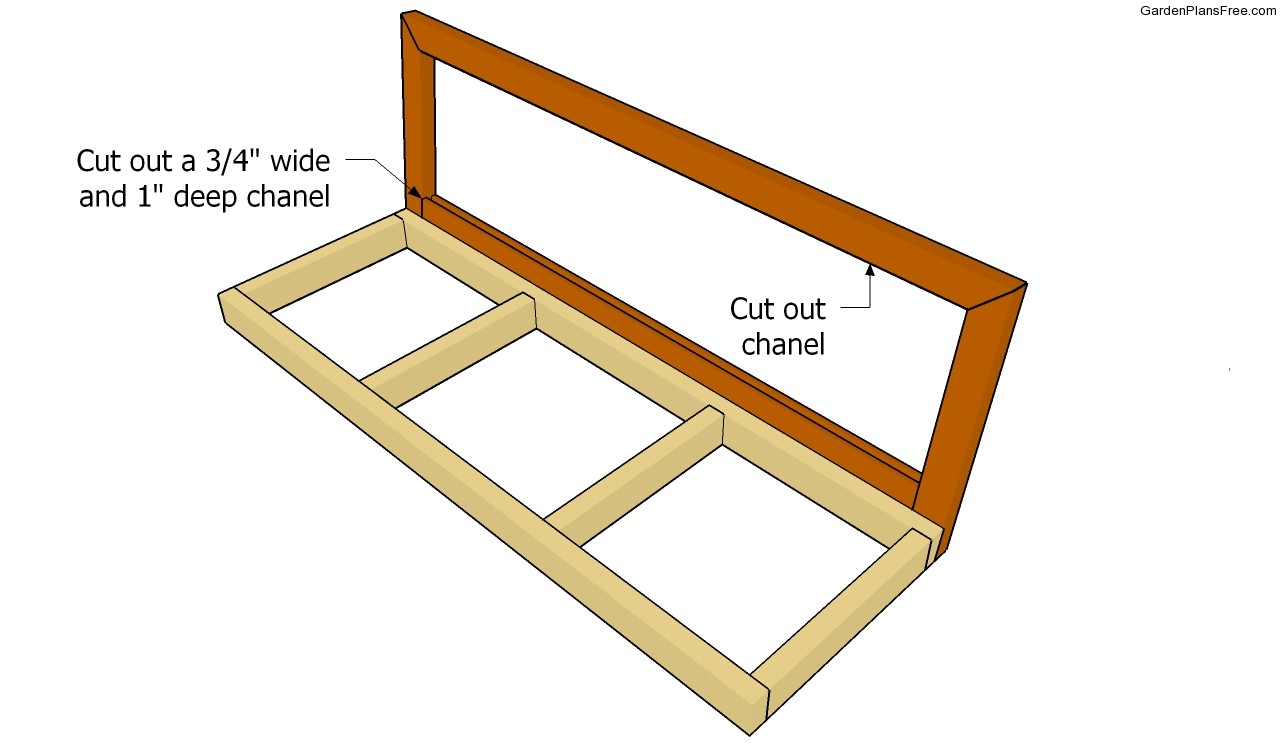
Building the back support frame
In addition, you could fit the slats inside the frame by drilling pocket holes and inserting 1 1/4″ screws or by using a smart solution. Therefore, you could use a router and make 1″ deep and 3/4″ wide channels on the middle of the bottom and top components. Fit the slats inside the channel and lock them into place with 1 1/4″ screws driven trough the back of the back support.
Installing the armrest supports
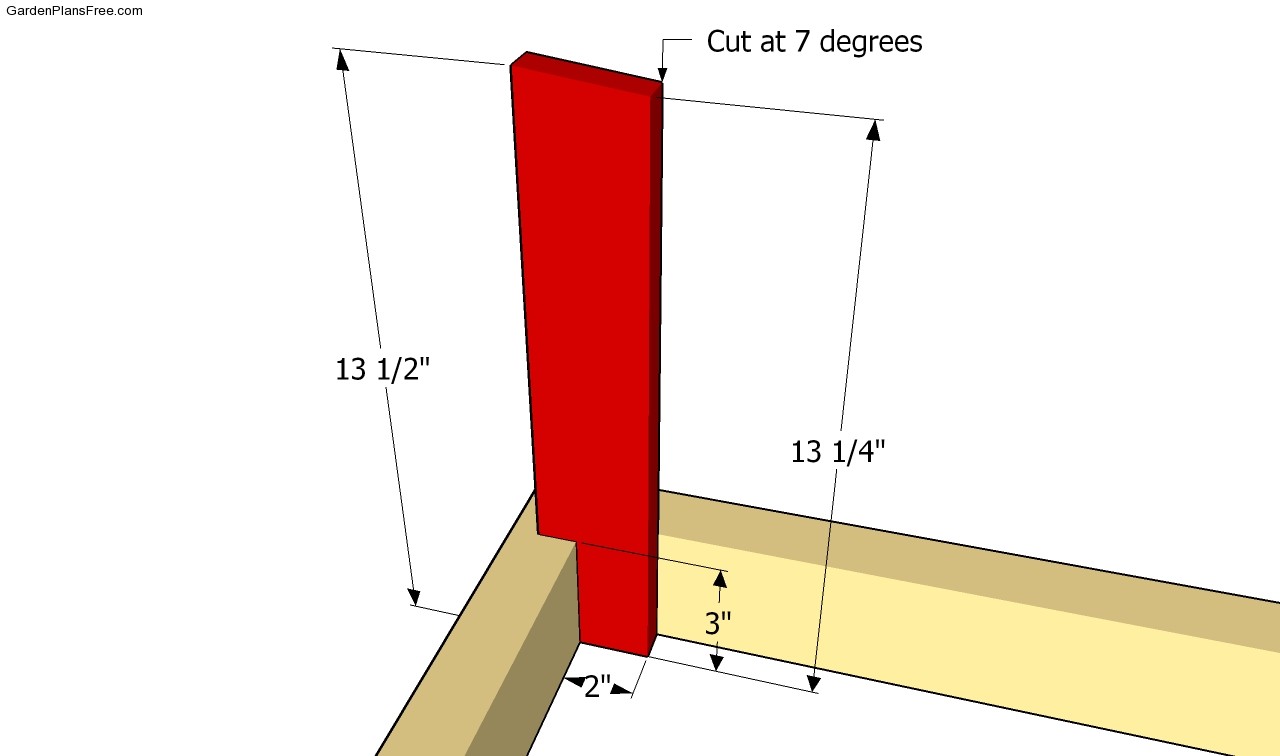
Continue the woodworking project by fitting the armrest supports to the frame of the swing bench. As you can see in the image, you should cut a small notch at the bottom of the component. In addition, cut the top of the supports at about 7-10º, using a circular saw with a sharp blade.
Fitting the slats
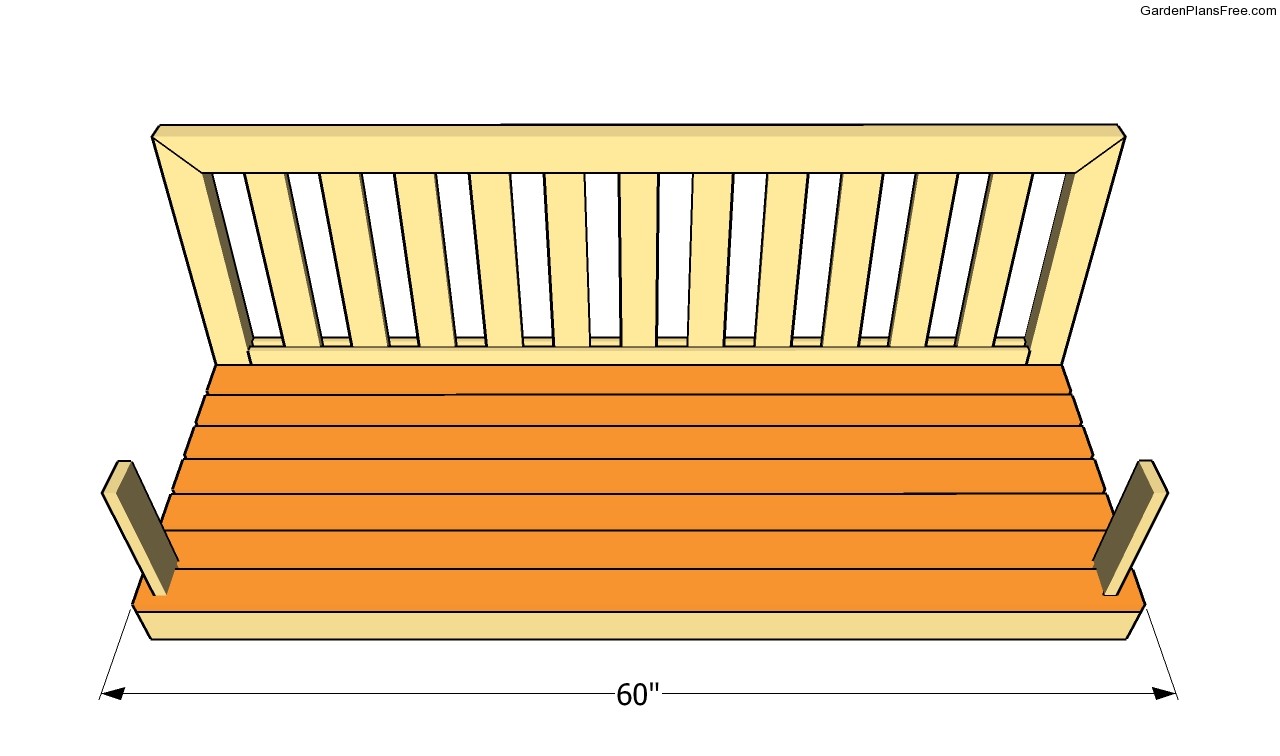
The next step of the project is to install the seat slats. In order to get the job done as a professional, you should notch the 1×4 slats as to fit perfectly around the armrest supports. After aligning the slats at both ends, drill pilot holes and drive 2 1/2″ screws into the frame, as to lock them into place properly.
PRO TIP: Round the exposed edges of the slats and place them equally spaced, if you want to get a neat appearance.

Fitting the armrests
One of the last steps of the woodworking project is to build the armrests and to fit them into place. As you can easily notice in the image, you should round the corners of the armrests, as to add character to your swing bench. Secure the wood pieces to the supports and to the backrest with 1 1/4″ screws and wood glue. Don’t forget to countersink the head of the screws.
Garden swing plans
Last but not least, there are several aspects you should take into account. Therefore, you should fill the holes with wood filler and smooth the wooden surface after it dries out. In addition, check all the screws are inserted properly and round the exposed edges with a router and a 1/4 – 3/4″ bit.
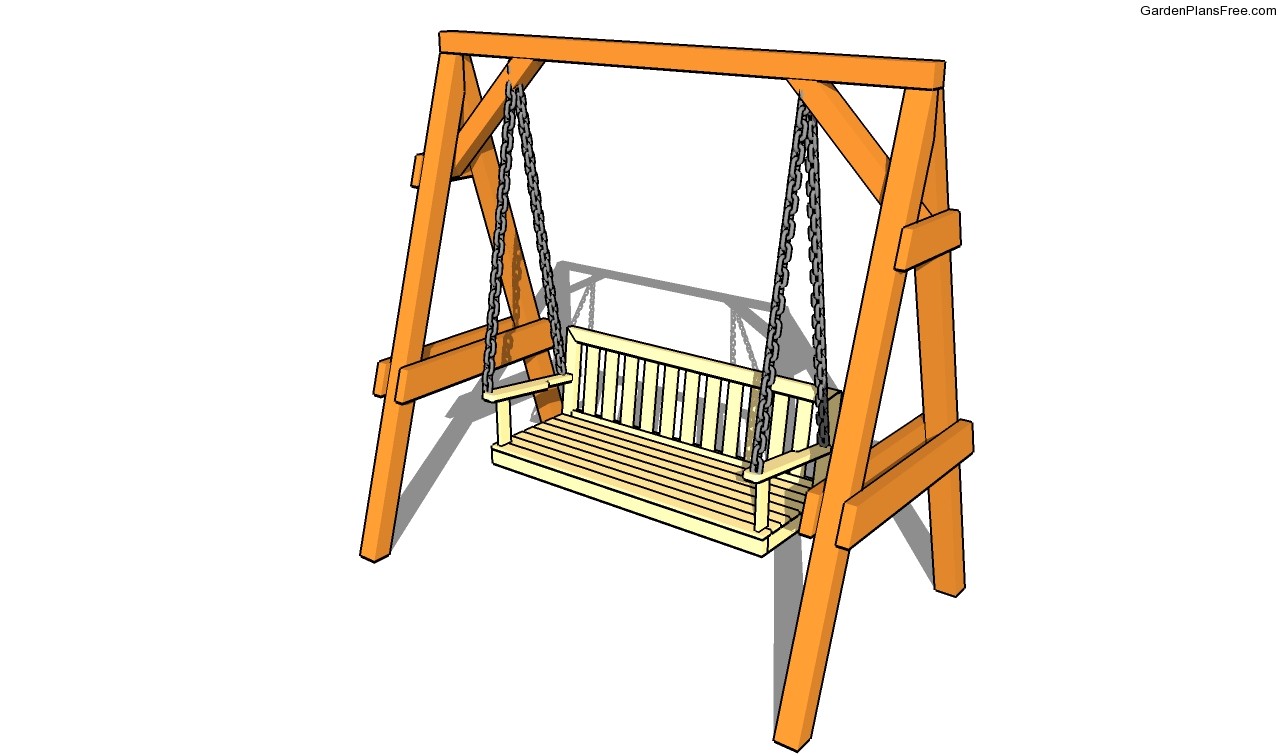
PRO TIP: Apply several coats of paint over the components, in order to protect them from decay. Secure the swing bench to the A-frame with chain or rope, after making sure it is perfectly level.
This diy project was about bench swing plans. If you have enjoyed the free project, we recommend you to share it with your friends, by using the social media widgets.
<<<< PREVIOUS | NEXT >>>>

4 comments
How do I get a copy of these plans to build a swing for my garden?
Please the FAQs: https://gardenplansfree.com/faqs/
hey there, can you please elaborate on the instruction to cut the frame at 7 degrees? to what end? thanks
To one end of the 17″ components, so you get a lean or the backrest.