Step by step woodworking project about potting bench plans with sink. Building a sturdy potting bench with a sink is a must have project for any amateur gardener, as it will make your work a lot easier and save you precious time. There are certain designs that you could choose from, so we strongly recommend you to check out the rest of the similar projects. In addition, you could also build a greenhouse or a cold frame.
There are several things that you should take into account when building the garden bench. As you will see in the project, any person with basic carpentry skills can get the job done, but you need to use quality materials (redwood, cedar or pine) and professional tools. Always align the components at both ends and drill pilot holes before inserting the galvanized screws, in order to prevent the wood from splitting. Add waterproof glue to the joints, in order to get a rigid structure.
Building a potting bench

Building a potting bench
Materials
- 1 – 2 pieces of 2×4 lumber – 35” long, 2 pieces – 50” long, 2 pieces – 32″ LEGS
- 2 – 4 piece of 2×4 lumber – 48″ long, 6 pieces – 22” FRAMES
- 3 – 1 piece of 3/4″ plywood – 25 x 48” long TABLETOP
- 4 – 1 piece of bar sink SINK
- 5 – 1 piece of 2×6 lumber – 48″ long, 1 piece of 1×6 – 48″, 2 pieces – 5 1/2″ TOP SHELF
- 6 – 6 pieces of 2×4 lumber – 48″ long DECKING
- 7 – 15 sq ft of pegboard panels PEGBOARD
- 8 – 6 pieces of 2×2 lumber – 22″ long, 12 pieces of 1×6 lumber – 21 3/4″ long SHELVES
- 10 pieces of 2×4 lumber – 8 ft
- 1 piece of 3/4″ plywood – 4’x4′
- 1 piece of 2×6 lumber – 8 ft
- 2 pieces of 2×2 lumber – 8 ft
- 4 pieces of 1×6 lumber – 8 ft
- 15 sq ft of pegboard panels
- 1 sink
- 100 pieces 1 5/8″ screws
- 50 pieces of 2 1/2″ screws
- 50 pieces of 3 1/2″ screws
- wood glue, stain/paint
Tools
- Hammer, Tape measure, Carpentry square
- Miter saw, Drill machinery, Screwdriver, Sander, Router
- Safety Gloves, Safety Glasses, Respiratory Mask
Time
- One day
Potting bench plans with sink

Building the frame
The first step of the woodworking project is to build the frames of the potting bench. As you can easily notice in the plans, we recommend you to drill pilot holes trough the rim components and to insert 3 1/2″ galvanized screws into the perpendicular elements. Check if the corners are right-angled, by using a carpentry square.

Building the frame of the potting bench
Build the legs from 2×4 lumber and attach them to the frames as in the building plans. It is essential to plumb the legs and to check if the frames are perfectly horizontal, before inserting the galvanized screws. Countersink the head of the 2 1/2″ screws, if you want to get a professional result.

Fitting the bottom slats
The next step of the woodworking project is to attach the 2×4 slats to the bottom frame. As you can see in the image, you need to cut small notches at both ends of the slats, as to fit around the legs. Place the slats equally spaced, leaving about 1/2″ between them. Drill pilot holes and insert 2 1/2″ screws to secure them into place tightly.
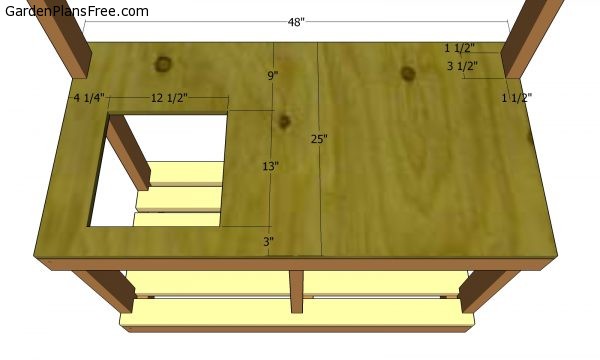
Tabletop
Continue the woodworking project by attaching the tabletop. In order to get the job done in a professional manner, we recommend you to use 3/4″ plywood or MDF. In this manner, it will be a lot easier to cut out a hole into the tabletop, as to fit a bar sink. Make sure you take accurate measurements before cutting out the hole, otherwise the sink might not fit into place easily.
Drill pilot holes and insert 1 5/8″ screws to lock the tabletop into place.
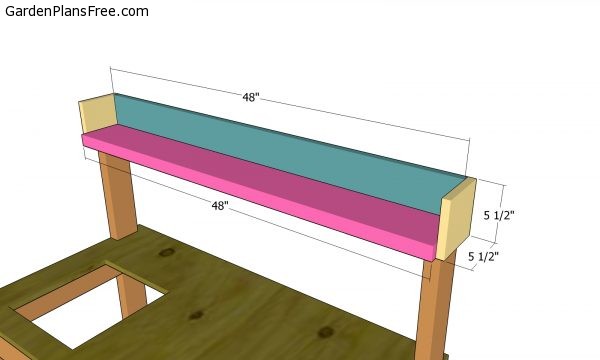
Top shelf
Building the top shelf is a straight-forward process and it will increase the storage capacity of the potting bench. As you can see in the image, you need to build the bottom component from 2×6 lumber, while the back and the sides should be made out of 1×6 lumber. Use finishing nails and waterproof glue to lock the components into place tightly.
Secure the 2×6 board to the back legs with 2 1/2″ screws. Attach the side slats to the board with 1 5/8″ screws.
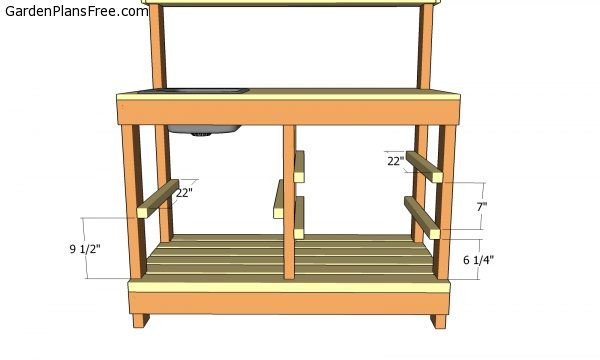
Fitting the shelf supports
Fit the 2×2 cleats to the frame of the potting bench with 2 1/2″ screws, after drilling the pilot holes. Use a spirit level to check if the cleats are horizontal.

Attaching the shelves
Adding simple shelves to the potting bench is the next step of the project. Therefore, we recommend you to use 1×6 slats when building the shelves. Drill pilot holes and insert 1 5/8″ screws to secure the boards to the cleats. Adjust the distance between the shelves as to fit your needs.
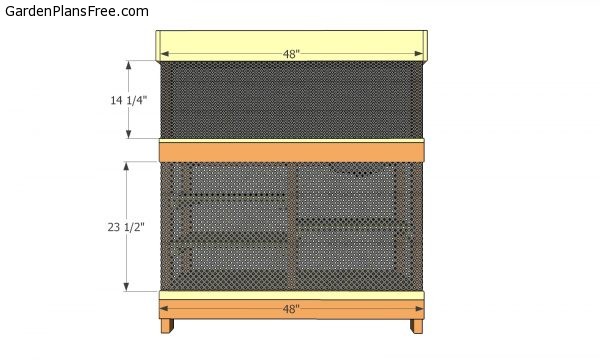
Pegboards
Cut and attach the pegboards to the back of the potting bench. That will help you to hang tools to the bench with ease.

Fitting the sink
One of the last steps of the project is to check if all the components are locked together properly and if the screws are inserted properly. You can use a small bucket under the potting bench to hold the water that goes through the sink and keep everything today.

Potting bench plans with sink
Last but not least, you should take care of the finishing touches. Therefore, fill the holes with wood filler and let it dry out for about one hours (read the manufacturer’s instructions for precise information). Sand the wooden components along the wood grain and remove the residues.
PRO TIP: Apply several coats of stain or paint to enhance the look of the potting bench and to protect it from wood decay on the long run. Use a PVC water pipe to the left side of the potting bench and enjoy the versatility of your latest garden project.

This diy project was about potting bench plans with sink. If you have enjoyed the free project, we recommend you to share it with your friends, by using the social media widgets.