If you want to learn more about a simple 4×6 deer stand plans you have to take a close look over the free plans in the article. This 6×6 deer blind is built on a sturdy frame and it features windows on all 4 sides. In addition, you have a door for access inside of the shelter. The gable roof is easy to make and it will serve you well during the rainy of snowy days. Please take a thorough look over my diagrams, cut list and instructions and tell me if you resonate with me and think it’s a solid design!
My woodworking plans come with step by step instructions and detailed diagrams. In addition, I have these plans in an easy printable format for you, so you can download them. If you want to support GardenPlansFree, buying the PDF plans will be really helpful.
If you want to get the job done in a professional manner, we recommend you to plan everything with attention, as to prevent costly mistakes and to build a professional garden project. Invest in high quality materials, such as cedar, pine or redwood, as the bench will be exposed to all kinds of weather. Apply a few coats of paint over the components, to enhance their appearance and to protect them from bad weather.
4×6 Deer Blind Plans Free – PDF Download
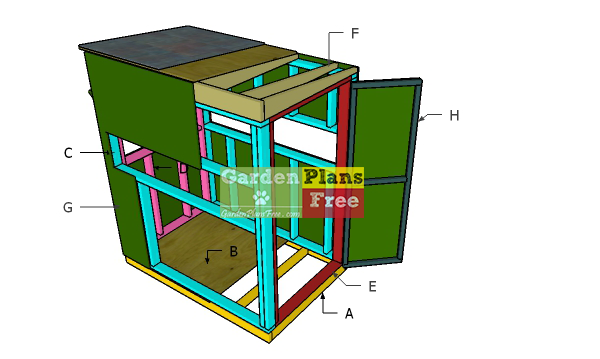
Building-a-4×6-deer-blind
Materials
- A – 2 pieces of 2×6 lumber – 72″ long, 5 pieces – 45″ long FLOOR FRAME
- B – 1 piece of 3/4″ plywood – 48″x72″ long FLOOR
- C – 2 pieces of 2×4 lumber – 72″ long, 4 pieces – 72″ long, 2 pieces – 65″ long, 4 pieces – 18 1/2″ long, 4 pieces – 36 1/2″ long 2xSIDE WALL
- D – 2 pieces of 2×4 lumber – 41″ long, 2 pieces – 72 long, 2 pieces – 38″ long, 2 pieces – 18 1/2″ long, 2 pieces – 36 1/2″ long BACK WALL
- E – 2 pieces of 2×4 lumber – 41″ long, 3 pieces – 72″ long, 2 pieces – 14″ long FRONT WALL
- F – 1 piece of 2×6 lumber – 72″ long, 6 pieces – 46 1/2″ long RAFTERS
- F – 1 piece of 1/2″ plywood – 48″x80″ long RAFTERS
- G – 3 pieces of 1/2″ plywood – 48″x80 1/2″ long, 1 piece – 24″x80 1/2″ long, 1 piece – 48″x76 1/2″ long, 1 piece – 24″x76 1/2″ long PANELS
- H – 1 piece of 1/2″ plywood – 22 1/2″x72″ long, 2 pieces of 2×2 lumber – 22 1/2″ long, 2 pieces – 69″ long, 1 piece – 19 1/2″ long DOOR
- 9 pieces of 2×6 lumber – 8 ft
- 1 piece of 3/4″ plywood – 4’x6′
- 29 pieces of 2×4 lumber – 8 ft
- 6 pieces of 1/2″ plywood – 4’x8′
- 3 pieces of 2×2 lumber – 8 ft
- 30 sq ft of asphalt shingles
- 500 1 5/8″ screws
- 100 2 1/2″ screws
- 300 3 1/2″ screws
- 25 pieces of 5 1/2″ screws
- wood glue, stain/paint
- door hardware kit
- elevated platform mounts
Tools
- Hammer, Tape measure, Carpentry square, Pocket hole jig
- Miter saw, Drill machinery, Screwdriver, Sander, Router
- Safety Gloves, Safety Glasses, Respiratory Mask
Time
- One weekend
STEP 1: Building the deer blind floor
Floor-frame—deer-blind
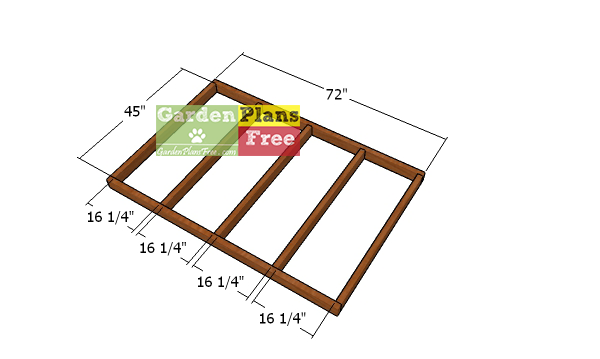
The first step of the project is to build the floor frame for the 4×6 deer stand. As you can see in the diagram, you need to cut the joists from 2×6 lumber. Lay the components on a level surface and align the edges flush.
Drill pilot holes and insert 3 1/2″ screws to assemble the frame. Make sure the corners are square. Place the joists every 16″ on center, as shown in the diagram.
Fitting-the-floor-sheet
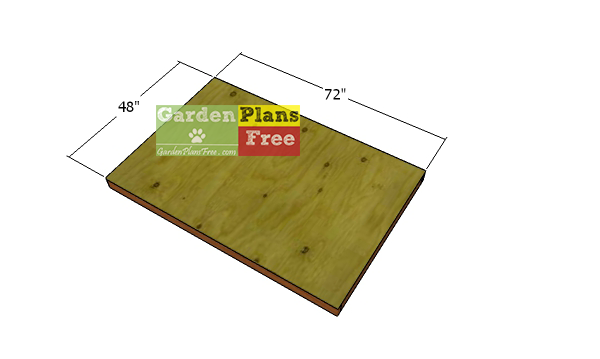
Fit the 3/4″ tongue and groove plywood sheets to the floor frame and align the edges flush. Leave no gaps between the sheets and secure them into place, every 8″ along the joists, using 1 5/8 screws. Invest in pressure treated plywood if you want your project to last longer.
STEP 2: Building the wall frames for the deer blind
Back-wall-frame—deer-stand
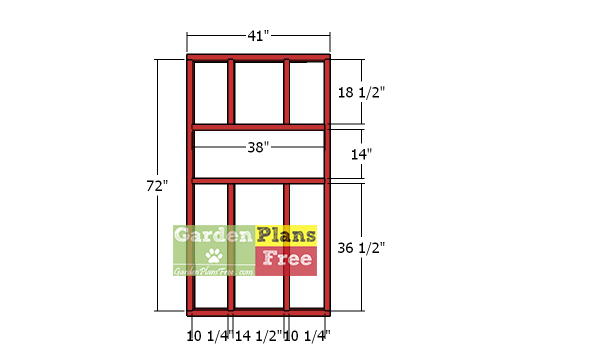
The next step of the project is to build the back wall for the hunting blind. Use 2×4 lumber for the back wall and cut the components at the right dimensions, as shown in the diagram. Drill pilot holes through the plates before inserting the screws.
Insert 3 1/2″ screws to lock the plates to the studs. Make sure the corners are square. As you can see in the plans, you need to frame a window to the wall frames so you can have a good view, and the door opening for an easy access inside.
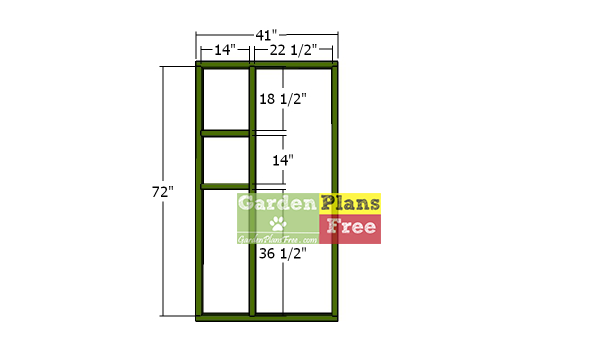
Front-wall-frame
Also, use 2×4 lumber for the front wall frame. Drill pilot holes and insert 3 1/2″ screws to assemble everything together tightly. The front wall has an opening for the door. You can adjust the size of the door to suit your needs.
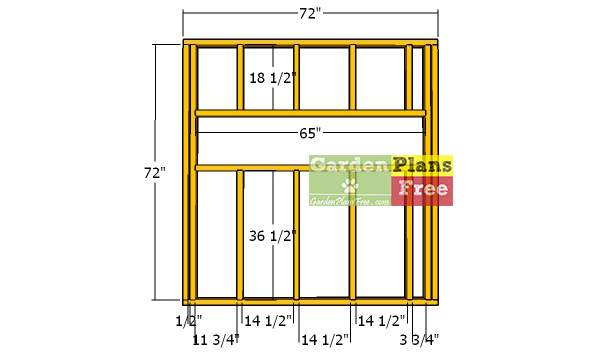
Side-wall-frame
Build the side wall frames for the deer stand, using the same techniques described above. Notice the large windows on the sides of the stand, so you have a 360 degree view on the field. You can make modifications to suit your needs. The frame has double studs at both ends of the wall. Fit 1/2″ plywood between the double studs.
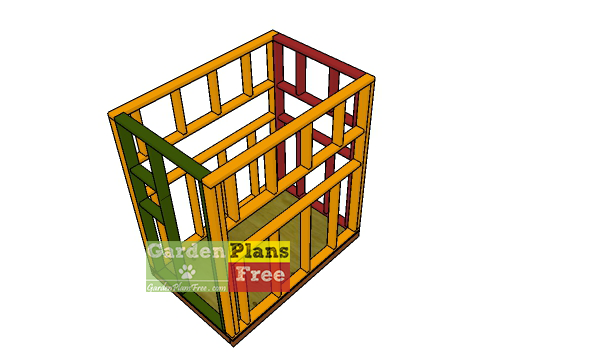
Assembling-the-frame-of-the-deer-stand
Fit the side wall frames to the floor and plumb them with a spirit level. Align the edges flush with the floor, drill pilot holes through the bottom plates and insert 3 1/2″ screws into the floor.
Next, lay the front and back wall frames into place, making sure the edges are aligned and the corners are square. Lock the adjacent walls together with 3 1/2″ screws. Make sure the corners are square.
STEP 3: Building the lean to roof
Fitting-the-ridge-beam
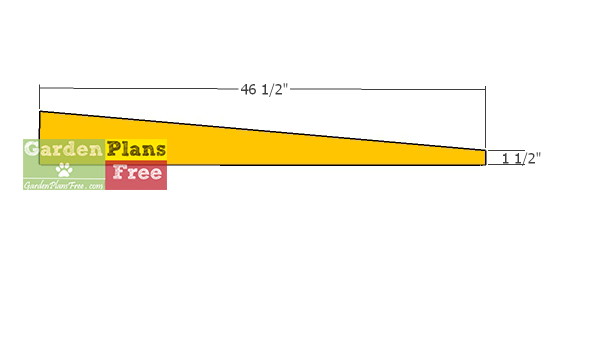
Rafters-for-4×6-deer-stand
Next, you need to build the rafters from 2×4 lumber. Mark the cut lines on the beams and then get the job done with circular saw. The cut will create a small roof pitch.
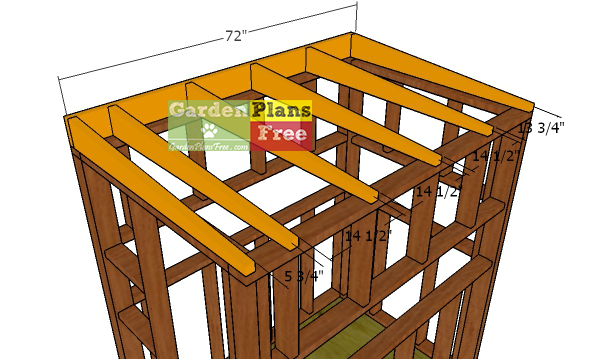
Fitting-the-rafters-to-the-deer-blind
Fit the 72″ rafter to the top of the side wall frame. Drill pocket holes and insert 2 1/2″ screws to lock them to the plate. Then install the rest of the rafters every 16″ on center. Drill pilot holes through the rim rafters and insert 3 1/2″ screws into the regular rafters. Drill pilot holes and insert 3 1/2″ screws to lock the other end to the opposite side wall.
STEP 4: Attaching the wall panels to the deer stand
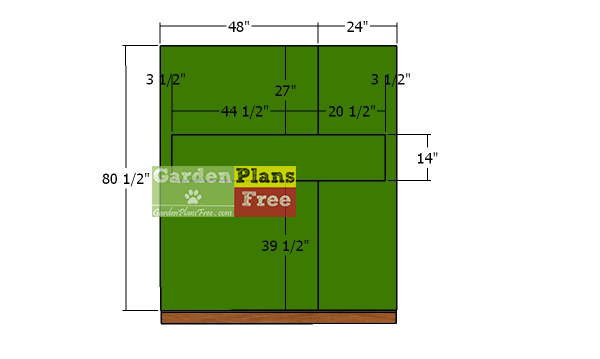
Tall-side-wall-siding
Use 1/2″ plywood for the exterior wall panels. Mark the cut lines on the panels and make the cuts with a circular saw. Align the edges with attention and use 1 5/8″ screws or 6d nails to lock the panels to the framing. Notice the blinds. You need to secure them to the wall panel with hinges.
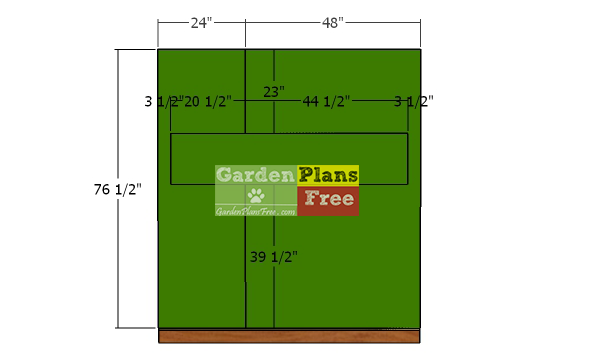
Short-side-wall-siding-sheets
Attach the 1/2″ plywood panels to the other side wall of the shooting stand.
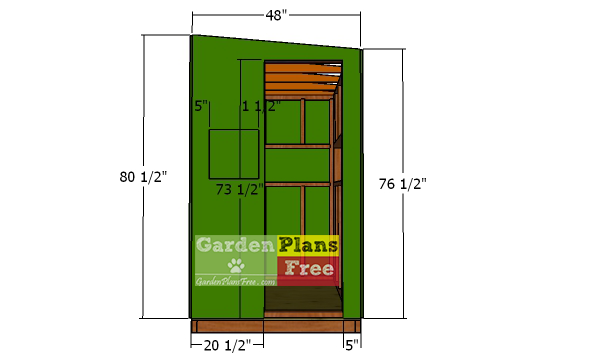
Front-wall-panels
Cut and fit the panels to the front and back of the deer stand. Notice the cuts around the door opening. That will the difference between the front and back walls.
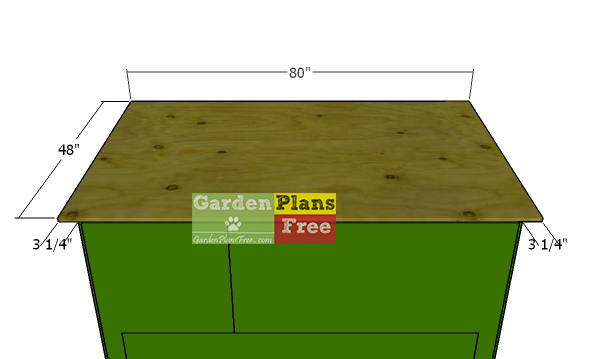
Fitting-the-roof-sheets
Since this is a budget friendly project, the roof will be made from 1/2″ plywood. Attach the plywood panel to the top of the deer stand and notice the even overhangs on the sides. Insert 1 5/8″ screws every 8″ along the rafters.
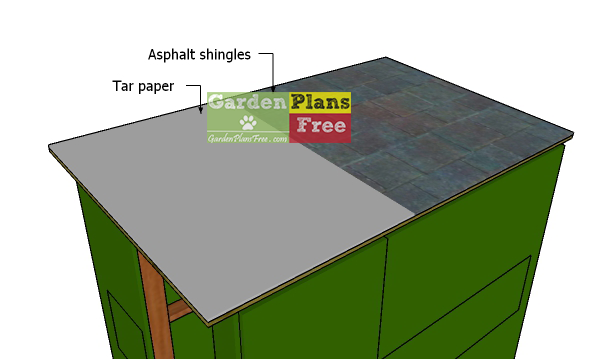
Fitting-the-roofing—deer-blind
Install the shingles to the top of the deer stand. Install the drip edges, as well. Start fitting the singles front the bottom left up to the top. Alternatively, you can replace the plywood with 1×4 purlins and the shingles with metal roof sheets.
STEP 5: Building the door for the deer stand
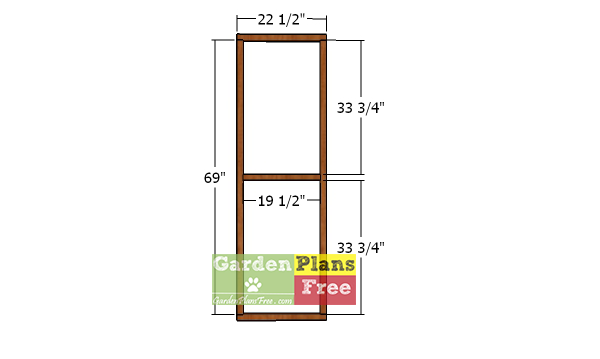
Door-frame-for-hunting-blind
Use 2×2 lumber for the door frame. Cut all the components at the dimensions shown in the diagram and lay them on a level surface. Drill pocket holes as shown in the plans and assemble the frame with 2 1/2″ screws. Align the edges flush and make sure the corners are square.
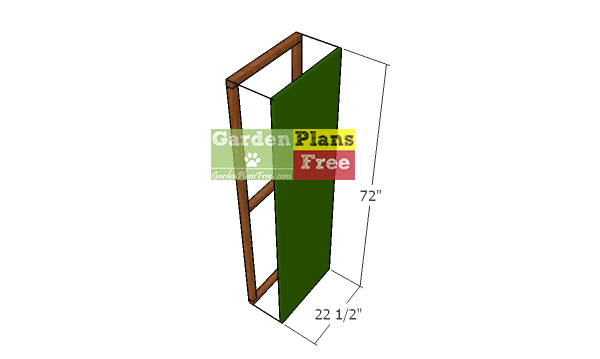
Fitting-the-door-panel-to-the-frame
Use 1/2″ plywood for the door panel. Align the edges flush, drill pilot holes and insert 1 5/8″ screws into the frame of the door.
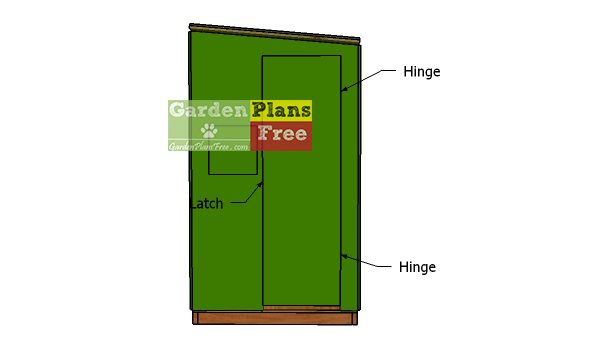
Fitting-the-door-to-the-stand
Fit the door to the opening and lock it to the front wall with hinges. Install a latch to keep the door locked while you are out.
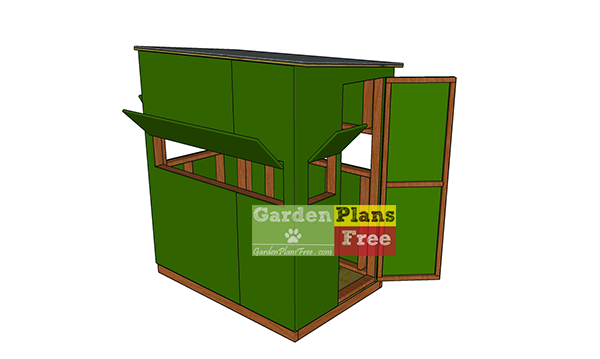
4×6-Small-Deer-stand-plans
Last but not least, you need to take care of the finishing touches. Apply a few coats of paint over the exterior of the shed. Attach the windows to the opening or use the panels that you cut out, as basic blinds. You should consider building a slightly larger 5×6 gable deer blind or an elevated 6×6 deer blind.
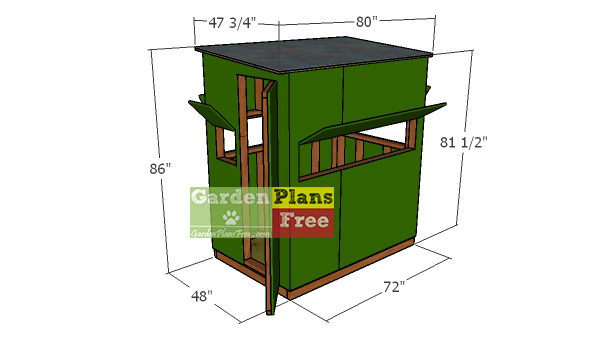
Deer-stand-plans—4×6-with-dimensions
You can see in the top diagram the overall dimensions for the deer stand. This will be helpful for you, since you know the overall dimensions beforehand. In addition, if you want more building inspiration, see a list with lots of free deer stand plans HERE.
This diy project was about 4×6 deer stand plans. If you have enjoyed the free project, I recommend you to share it with your friends, by using the social media widgets. You can always save the plans as PDF or Print them using the floating widget on the left side of the screen (working only on PC or laptop).

