Step by step diy woodworking project about pergola plans free 10×10. Building a wooden pergola for your backyard will enhance the look of the property and create a nice relaxation area. If you plan everything form the very beginning and choose proper building plans for your needs, you can get the job done by yourself and keep the costs under control. Work with attention and with great care.
There are a large variety of designs and shapes you could choose from, so we strongly recommend you to take a look on the rest of the pergola projects. In addition, you need to use quality materials that are weather-resistant. Cedar, redwood or pine are excellent choices, as they will have a beautiful natural finish and add value to your project. Always align the components at both ends and drill pilot holes before inserting the galvanized screws.
Building a simple pergola

Building a simple pergola
Materials
- 1 – 8 pieces of 4×4 lumber – 110″ long POSTS
- 2 – 4 pieces of 2×6 lumber – 144″ long SUPPORT BEAMS
- 3 – 9 pieces of 2×6 lumber – 144″ long CROSSBEAMS
- 4 – 4 piece of 2×2 lumber – 76″ long , 32 pieces – 16 1/2″ long TRELLIS
- 5 – 2 piece of 2×12 lumber – 113″ long CURVED ELEMENTS
- 8 pieces of 4×4 lumber – 10 ft
- 13 pieces of 2×6 lumber – 12 ft
- 2 piece of 2×12 lumber – 10 ft
- 10 pieces of 2×2 lumber – 8 ft
- 8 post anchors
- 200 pieces of 2 1/2″ screws, 200 pieces of 1 5/8″ screws
- 100 pieces of 4″ screws
- 8 pieces of 7″ carriage bolts
- wood glue, stain/paint (for base)
Tools
- Hammer, Tape measure, Carpentry Square
- Miter saw, Drill machinery, Screwdriver, Sander
- Safety Gloves, Safety Glasses, Respiratory Mask
Time
- One Weekend
Pergola Plans Free
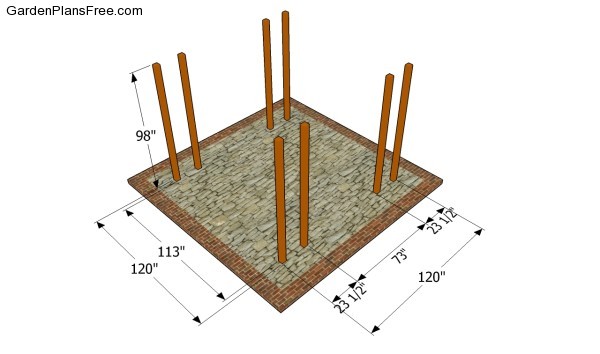
Attaching the wooden posts
The firsts tep of the woodworking project is to cut the 4×4 wooden posts at the right size. If you want to get a rigid structure, you should consider setting the posts into concrete and add at least 24″ to the wooden posts.
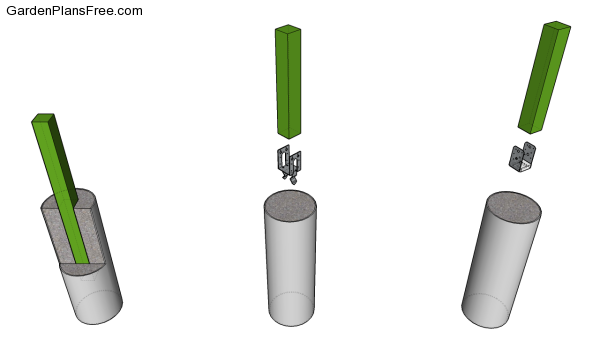
Fitting the posts into concrete
You have several options when having to install the wooden posts into place. On one hand, you could dig 2-3′ deep holes in the ground and set the posts into concrete. Otherwise, you have the option of pouring concrete footings and using metal anchors.
PRO TIP: It is essential to plumb the posts and to secure them temporarily with braces, if you want to get a professional result. Remove the braces after installing the support beams and the shade elements.
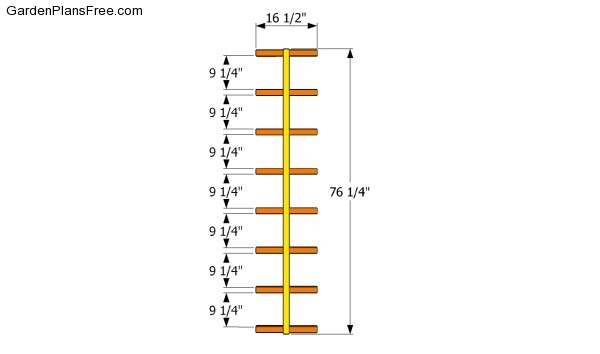
Building the lattice
If you want to add character to the construction, you should consider add 2×2 trellis between the posts, as in the plans. Attach the components into place after aligning them at both ends. In addition, drill pilot holes and lock them together with 2 1/2″ galvanized screws. Make sure the small pieces of wood are parallel and the corners are right-angled.
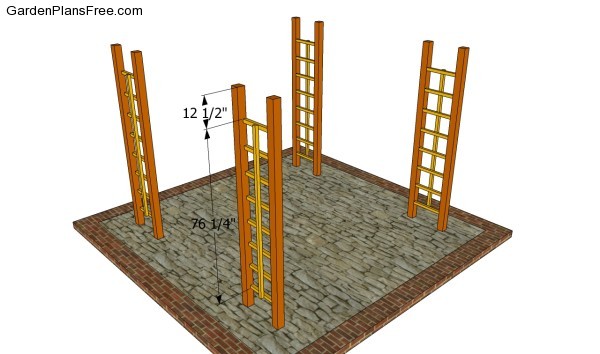
Attaching the trellis
Fit the trellis between the posts and align them at both ends, as in the image. After plumbing the trellis, we recommend you to lock them to the posts with wood screws. Countersink the head of the screws, in order to get a professional result.
Attaching the support beams
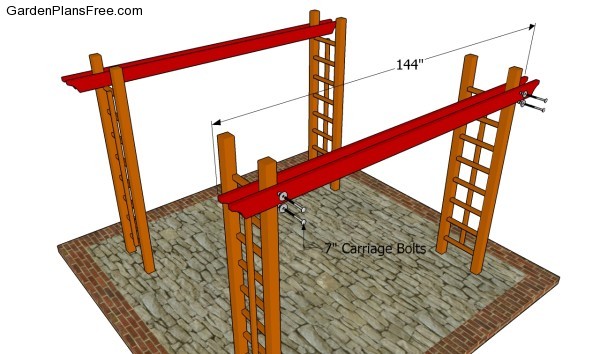
The next step of the woodworking project is to attach the 2×6 support beams to the top of the posts. In order to get a professional result, we recommend you to clamp the beams to the posts, after leveling them with a spirit level.
PRO TIP: Drill pilot holes trough the components and insert 7″ carriage bolts. If you want to add style to your project, we recommend you to cut the ends of the beams in a decorative manner.
Building the shade elements
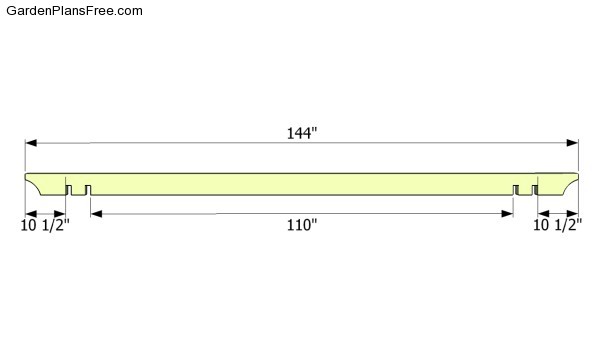
Building a the shade elements is not a difficult process, provided you use quality lumber and proper tools. As you can notice in the image, you need to make several notches inside the shade elements. Make several parallel cuts with a circular saw inside the marked area and clean the recess with a chisel. Afterwards, cut the ends of the crossbeams in a decorative manner.
Attaching the shade elements
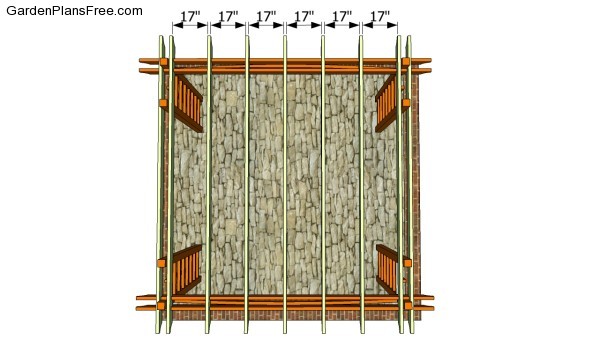
Place the shade elements on top of the support beams equally spaced. In order to get a professional result, we recommend you to drill pilot holes trough the components and to insert 4″ screws into the support beams. Align the beams a both ends and plumb them with a spirit level, if you want to get consistent results.
Attaching the curved elements
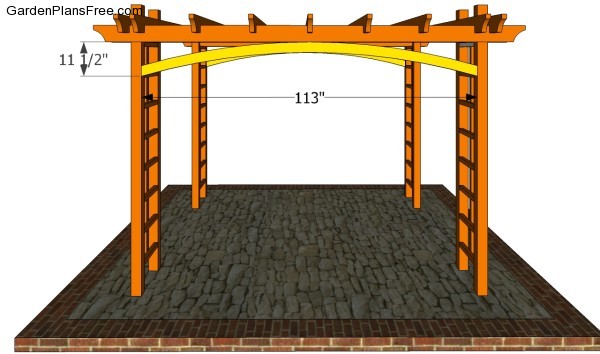
In addition, you could also build two curved components and attach them to the both sides of the pergola, between the posts. In order to get the job done quickly, we recommend you to mark the guidance line on the 2×12 beams and to make the cuts with a jigsaw.
PRO TIP: Fit the elements between the wooden posts and lock them into place with 3 1/2″ galvanized screws, after drilling pilot holes. You need to also take a look over my 12×12 pergola plans.

Pergola plans free
Last but not least, you should take care of the final touches. Fill the holes with a good wood filler and let it dry out for several hours, before smoothing the surface with medium-grit sandpaper. Add 2×4 braces to the front and back ends of the pergola, if you want to add character to the pergola.
PRO TIP: Protect the wooden components of the trellis from decay by applying several coats of paint. In addition, if you choose the right color and finish, the trellis will enhance the look of your garden.
This diy project was about pergola plans free. If you have enjoyed this free project, we recommend you to share it with your friends, by using the social media widgets. I would mean the world to me if you LIKE and SHARE my projects to your friends.

1 comment
Great plans, thank you for the guidance. This pergola was a fantastic addition to my 1933 Craftsman Bungalow.