A wooden pavilion is an ideal area for relaxations and for taking dinner with your friends. This detailed project illustrated with diagrams is about outdoor 10×18 pavilion plans free. If you aren’t new to woodworking or if you know the basic carpentry techniques, you can get the job done in several weekends while keeping the costs at a decent level. Using quality materials will pay off on the long run, as they will be weather-resistant.
Before starting the construction of the garden pavilion, you should adjust the designs and the size of the construction to suit your needs and to match the style of your property. Afterwards, buy the materials you need for job and gather all the tools required. Being organized and planning every aspect of the project from the very beginning will keep the costs at a low level and prevent mistakes.
Building a 10×18 garden pavilion

Building a garden pavilion
Materials
- 1 – 8 pieces of 4×4 96″ (above ground), 16 pieces – 21″ POSTS
- 2 – 2 pieces of 6×6 lumber – 240′, 4 pieces – 120” TOP RAILS
- 3 – 4 pieces of 6×6 lumber – 53 1/4″, 1 piece – 240″ TOP RIDGE
- 4 – 22 piece of 2×6 lumber – 97 1/4″ RAFTERS
- 5 – 48 pieces of 1×6 lumber – 240″ ROOFING
- 6 – 2 pieces of 1×6 lumber – 240″ TRIMS
- 12 pieces of 4×4 lumber – 8 ft
- 3 pieces of 6×6 lumber – 20 ft
- 6 pieces of 6×6 lumber – 10 ft
- 22 piece of 2×6 lumber – 10 ft
- 48 pieces of 1×6 lumber – 20 ft
- 2 pieces of 1×6 lumber – 20 ft
- 8 4×4 post anchors
- 20 pieces of 8″ screws
- 300 pieces of 2 1/2″ screws
- 100 pieces of 2″ nails
- 64 pieces of 4 1/2″ screws
- 44 pieces of rafter ties
- 2 boxes 1 1/2″ structural screws
- 1 box of 2 1/2″ structural screws
- 8 post to beam connectors
- wood glue, stain/paint
Tools
- Hammer, Tape measure, Carpentry square
- Miter saw, Drill machinery, Screwdriver, Sander, Router
- Safety Gloves, Safety Glasses, Respiratory Mask
Time
- One day
Outdoor Pavilion Plans

Installing the posts
First, you need to lay out the 10×18 wooden pavilion, making sure the diagonals are equal and the corners are right-angled. In order to reduce the amount of work needed and to get a professional result, we recommend you to use batter boards and string. Adjust the size of the string until you get the desired result.
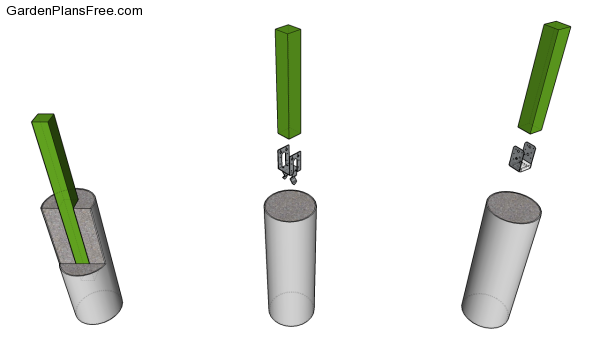
Fitting the posts into concrete
Fitting the 4×4 posts is a complex process, but with a proper planning you can get a professional result. From our experience, digging 3′ deep holes and setting the posts into concrete will provide the best support to the construction. Plumb the posts with a spirit level and secure them with braces before pouring the concrete.
For this project I assume you will just set the anchors to the concrete footings and then install the posts. Read the local building codes to determine the best depth of the footings and the size of the holes you need to dig.

Fitting the top rails
The next step of the woodworking project is to attach the top tails with 8″ screws. As you can easily see in the plans, you need to use 6×6 lumber, as this will not only enhance the look of the pavilion, but it will also add support to the construction. Cut small notches in the components, otherwise they won’t fit into place. Mark the joint, make several cuts with a circular saw and clean the recess with a chisel and sandpaper.

Fitting the braces
Even if this step is optional, we still recommend you to add braces to the frame of the outdoor pavilion. Cut both ends of the 4×4 braces at 45º and lock them into place with 4 1/2″ galvanized screws. Use a spirit level to make sure the posts are plumb after fitting each brace.

Attaching the top ridge
Continue the project by attaching the top ridge. As you can notice in the free plans, using 6×6 lumber is a good idea, as it will create a rigid structure that will support the weight of the roof in a professional manner. Secure the supports to the center of the beams using 6×6 post to beam connectors and 2 1/2″ structural screws.
Drill pilot holes trough the top rails and insert 7-8″ screws into the support. Check if the supports are plumb and if the top ridge is horizontal by using a good spirit level.

Building the rafters
Building the roof of the pavilion is not as complex as it might look at first glance, but you still need to take accurate measurements before cutting the components and fitting them into place. Use a good miter saw to cut one end of the rafters at 45 degrees. In addition, make small notches at the bottom of the rafters, to fit over the top rails properly.

Attaching the rafters
Afterwards, you need to attach the rafters into place and to space them as shown in the plans. Use rafter ties and 1 1/2″ structural screws to secure the rafters to the ridge beams and to the side top plates. Make sure you place the rafters every 24″ on center.

Attaching the slats
One of the last steps of the project is to attach the roofing to the pavilion. The easiest approach is to install 1×6 cedar slats, starting from the bottom part of the roof. As you can see in the image, you need to overlap the slats at least 1″, as to protect the structure from water damage and to drain the precipitations efficiently.
Alternatively, you can just use 1/2″ plywood and 1 5/8″ screws, every 8″ along the rafters.

Attaching the trims
If you want to enhance the look of the wooden pavilion, you need to attach 1×6 trims to both sides of the structure, as in the image. Align the trims at both ends and lock them to the ends of the rafters with 2″ finishing nails. Add waterproof glue to the joints, if necessary. Take a look over my other 16×20 gable pavilion plans.

Outdoor Pavilion Plans
Last but not least, you should take care of the finishing touches. Therefore, we recommend you to check if the components are locked into place properly and structure is rigid. Make sure there are no protruding screws or sharp edges.
PRO TIP: Fill the holes with a good wood filler and smooth the surface with medium-grit sandpaper. Apply several coats of paint or stain over the components, in order to protect them from decay. Check out the rest of the garden projects, as there are many plans that could suit your needs.

This diy project was about 10×18 gable outdoor pavilion plans. If you have enjoyed the free project, we recommend you to share it with your friends, by using the social media widgets.
3 comments
On this plan I want to go to 12foot wide and only us one post in the middle on.the sides. Plus go to 2 foot center trusses and us metal roof. Just wanted to get your ideas on that. Thanks. Doug
I would go with 6×6 lumber for the structure and posts. 24″ on center might work, but I would personally stick to 16″ on center.
Do you happen to have a plan and materials list for a 18 x 10 pavilion?
Meaning the width is 18’ and the depth is 10 feet?
I would greatly appreciate your assistance!