This projects contains detailed instructions and diagrams about 8×10 garden shelter with a gable roof plans. Building an outdoor shelter is a complex woodworking project, but it will create a neat recreating area. Before starting the actual construction of the backyard shelter, we strongly recommend you to adjust its designs and size to your needs and budget. Use cedar, pine or redwood, if you want to build a durable wooden construction.
In this project, we show you step by step instructions for building a small shelter that is ideal for placing a picnic table and therefore for taking dinner with the loved ones. As you will see below, we have designed the shelter as to require a small investment and basic skills, materials and tools. If you want to create a permanent structure, we recommend you to set the posts into concrete for at least 24″.
Building an outdoor shelter

Building a garden shelter
Materials
- 1 – 2 pieces of 2×6 lumber – 120″, 6 pieces – 93″ FRAME
- 2 – 8 pieces of 4×4 lumber – 96″ POSTS
- 3 – 18 pieces of 2×6 lumber – 120″ DECKING
- 4 – 2 piece of 4×4 lumber – 120″, 2 pieces – 96″ TOP RAILS
- 5 – 2 pieces of 4×4 lumber – 22 1/4″, 1 piece – 120″ TOP RIDGE
- 6 – 12 pieces of 2×4 lumber – 62″ RAFTERS
- 7 – 30 pieces of 1×6 lumber – 120″ ROOFING
- 20 pieces of 2×6 lumber – 10 ft
- 6 pieces of 2×6 lumber – 8 ft
- 7 pieces of 4×4 lumber – 8 ft
- 3 pieces of 4×4 lumber – 10 ft
- 6 pieces of 2×4 lumber – 12 ft
- 30 pieces of 1×6 cedar – 10 ft
- 24 pieces of rafter ties
- 1 box of 1 1/2″ structural screws
- 4 pieces of 4×4 post to beam connectors
- 16 pieces of 4″ lag screws
- 100 pieces of 3 1/2″ screws
- 250 pieces of 2 1/2″ screws
- 16 pieces of 5 1/2″ screws
Tools
- Hammer, Tape measure, Carpentry square
- Miter saw, Drill machinery, Screwdriver, Sander, Router
- Safety Gloves, Safety Glasses, Respiratory Mask
Time
- One day
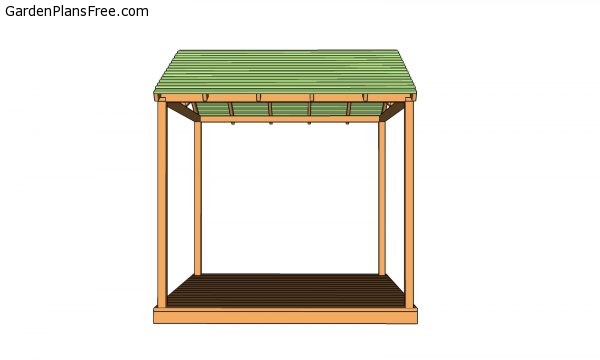
8×10 Garden Shelter Plans
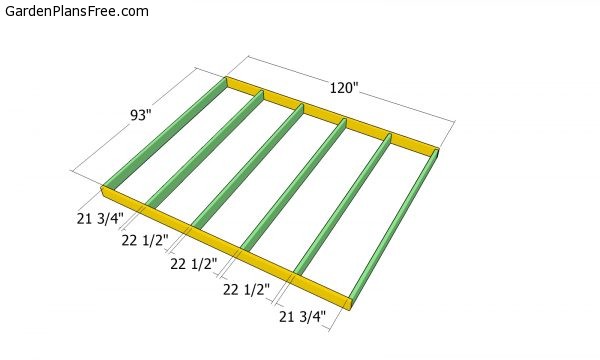
Floor frame
The first step of the outdoor project is to build the frame of the small shelter. As you can see in the plans, you need to use 2×6 boards for the frame and 4×4 lumber for the posts. Drill pilot holes trough the rim joists and insert the 3 1/2″ screws into the regular joists. Check if the corners are square and align the edges flush.
Select the area for your picnic shelter. Level the surface and remove the vegetation layer. Next, cover the ground with weed control matting and pour a 2″ thick layer of gravel. This will help protect the wooden components from the elements.
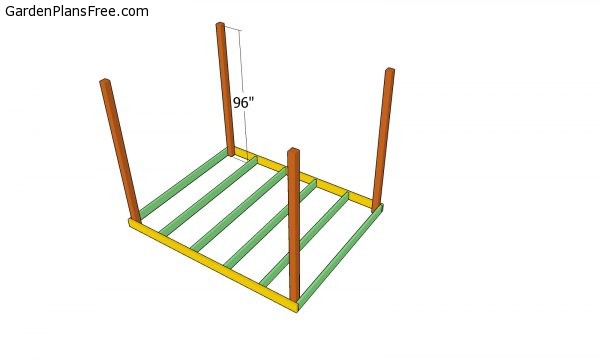
Fitting the posts
Check if the corners are right-angled and if the diagonals are equal, before continuing the project and attaching the posts.

Installing the posts
Drill pilot holes trough the frame and insert the bolts into the corner posts. Use a good spirit level to check if the posts are plumb before locking them to the posts. It is essential to pre-drill the lumber, in order to prevent the wood from splitting. Use 4″ lag screws to secure the floor frame to the posts.

Attaching the slats
Afterwards, you have to install the decking to the frame. Use 2×6 boards for the floor decking. Place a piece of 1/2″ plywood between the boards to create consistent gaps and drill pilot holes to prevent the wood from splitting. Cut small notches in the slats fitted around the posts. Insert 2 1/2″ screws to secure the boards to the joists.
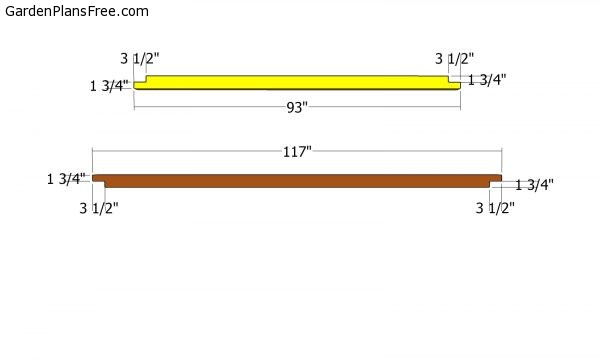
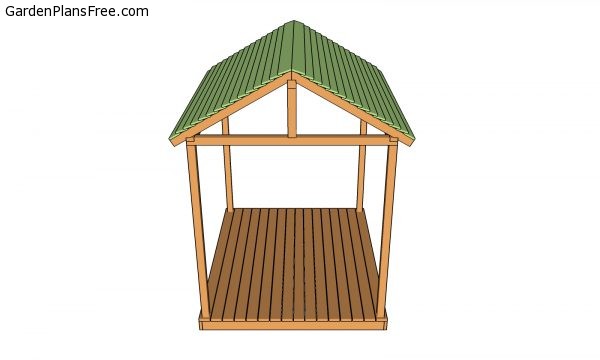
Top plates
The next step of the garden project is to fit the top rails. Therefore, you need to build the components from 4×4 lumber. Cut 3 1/2″ wide and 1 3/4″ deep notches at both ends of the rails, before locking them to the posts, as in the image. These are called half lap joints. Make parallel cuts inside the marked areas and then remove the excess material with a chisel and a hammer. Smooth the recess with sandpaper.

Fitting the top rails
Fit the plates to the top of the posts, as shown in the diagram. Make sure the corners are square. Drill pilot holes and add waterproof glue to the joints, before inserting the 5 1/2″ galvanized screws.

Installing the top ridge
Continue the project by installing the top ridge. Fit the supports to the center of the plates and lock them into place with post to beam connectors and 1 1/2″ structural screws.
It is essential to reinforce the structure with 4×4 braces, as to provide support to the garden shelter. Cut both ends of the braces at 45º and lock them to the components with 3 1/2″ screws. Check if the supports are plumb and if the top ridge is horizontal.

Building the rafters
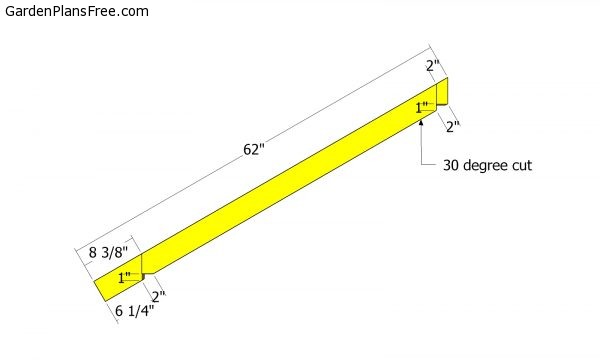
Rafters
Build the rafters form 2×4 lumber using the information shown in the diagrams. Use a good circular saw with a sharp blade to cut the ends at 30 degrees and to make the notches. It is essential to cut all the rafters ins the same manner and at the same size, otherwise they won’t fit together.

Fitting the rafters
Attach the rafters to the top rails and ridge, as in the plans. In addition, we recommend you to space the rafters as shown in the image, as to support the weight of the roof efficiently. Use rafter ties and 1 1/2″ structural screws to secure the rafters into place tightly.

Installing the roofing slats
One of the last steps of the shelter project is to attach the roofing. Although there are many options you could choose from, we recommend you to attach 1×6 slats, starting with the bottom of the roof. Make sure the slats overlap at least 1″, if you want to get a professional result. Drill pilot holes and insert 2 1/2″ screws to lock them to the rafters. Use cedar boards because they are very durable in all elements.
PRO TIP: Alternatively, you could cover the surface with 3/4″ plywood sheets and install asphalt shingles.

Garden shelter plans
Lastly, you should take care of the final touches. Therefore, check if the components are locked into place properly and if the wooden structure is rigid. Make sure there are no protruding screws or sharp edges that could injure you.
Garden shelter plans – side view
Build a 8×10 garden shelter
PRO TIP: Fill the holes with a good wood filler and smooth the surface with medium-grit sandpaper. Apply several coats of paint or stain over the components, in order to protect them from decay. Check out the rest of the project, to see more alternatives for creating a relaxation corner in your garden.

This diy project was about garden shelter plans. If you have enjoyed the free project, we recommend you to share it with your friends, by using the social media widgets.