This step by step diy woodworking project is about bench arbor plans. Building a wooden bench arbor is easy, if the right plans and materials are used. Nevertheless, the challenge of this project is choose the plans and designs that fit your needs. If you haven’t found the best fit, you should consider adjusting this project as to satisfy your tastes and to match the style of your garden.
There are several aspects that you should take into account when building a beautiful bench arbor. First of all, we recommend you to use weather-resistant lumber, such as cedar, pine or redwood. In addition, always align the components before locking them together with galvanized screws. Pre-drill the components at both ends and countersink the head of the screws, if you want to build an arbor with bench with a neat appearance.
Building a bench arbor
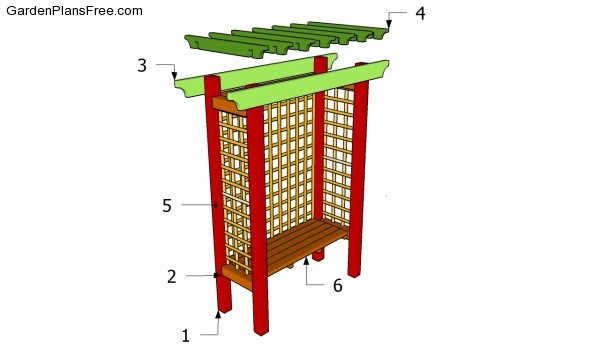
Building a bench arbor
Materials
- 1 – 4 pieces of 4×4 lumber – 86” long LEGS
- 2 – 2 piece of 2×2 lumber – 16” long, 2 peices of 4×4 lumber – 48 1/2″ long FRAME
- 3 – 2 pieces of 2×6 lumber – 75 1/2″‘ long SUPPORT BEAMS
- 4 – 7 pieces of 2×4 lumber – 36” long SHADE ELEMENTS
- 5 – 20 pieces of 1×2 lumber – 57″ long, 12 pieces – 48 1/2″ long, 24 pieces – 15″ long LATTICE
- 6 – 4 pieces of 2×2 lumber – 15″ long, 5 pieces of 1×4 lumber – 48 1/2″ long BENCH[/tab]
Tools
- Hammer, Tape measure, Carpentry square
- Miter saw, Drill machinery, Screwdriver, Sander, Router
- Safety Gloves, Safety Glasses, Respiratory Mask
Time
- One day
Bench Arbor Plans
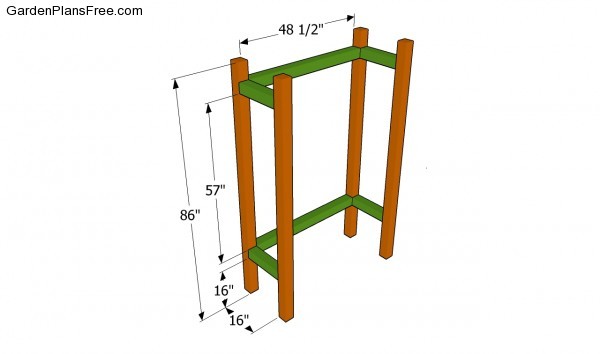
Building the frame for the arbor
The first step of the project is to build the frame of the arbor. As you can see in the image, you need to use 4×4 lumber and 6″ galvanized screws. Drill pilot holes trough the posts and insert the screws into the horizontal components. Align all the components at the both ends before inserting the screws and make sure the corner are right-angled.
PRO TIP: When building a bench arbor you need to secure the posts into place with great attention. Therefore, you could either set the posts into concrete or pour footings and use metal anchors.
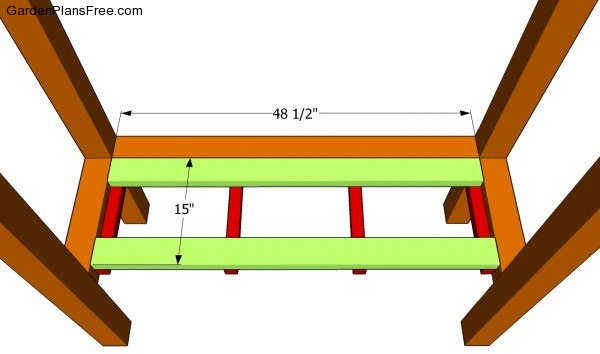
Installing the bench
Continue the woodworking project by fitting the bench seat. As you can easily notice in the free plans, you should install 2×2 cleats to the frame of the arbor. Use a spirit level to make sure the seat will be perfectly horizontal. Attach the slats to the cleats, drill pilot holes and countersink the head of the screws, before inserting the 2 1/2″ galvanized screws.
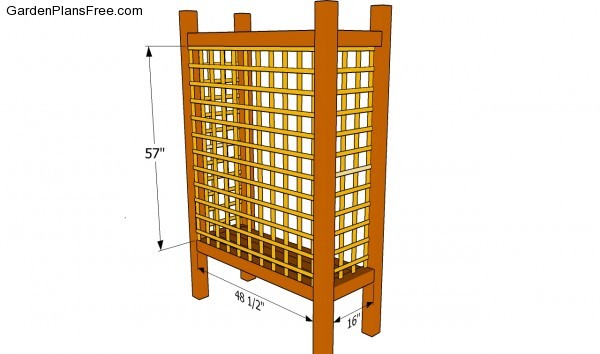
Installing the trims
If you want to add style and to enhance the look of the bench arbor, you should consider adding lattice panels to the back and sides of the constructions. Use 1×2 lumber (1/4″ thick) to build the panels and lock them to the posts with finishing nails. Align the components at both ends and plumb them with a spirit level, if you want to get a professional result.
Installing the support beams
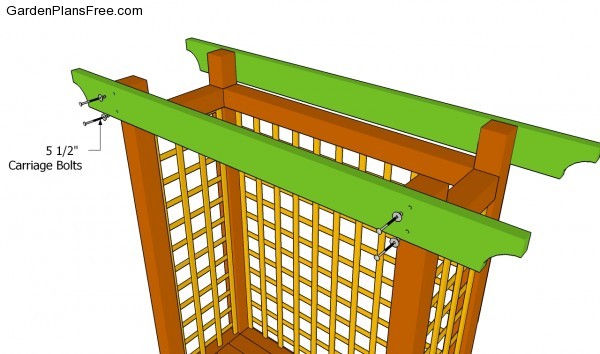
Build the support beams from 2×6 lumber before attaching them to the top of the posts. As you can see in the image, you need to drill pilot holes trough the components before securing them into place with carriage bolts. In addition, use a circular saw to enhance the ends of the support beams.
Installing the cross-braces
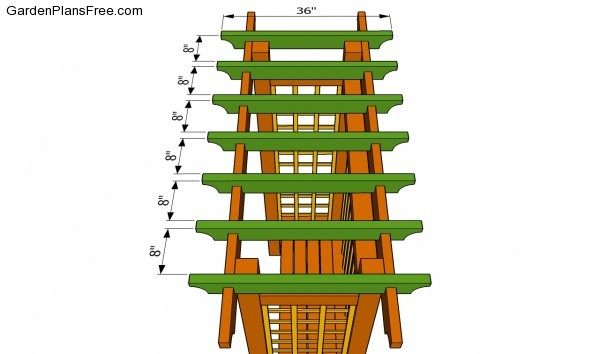
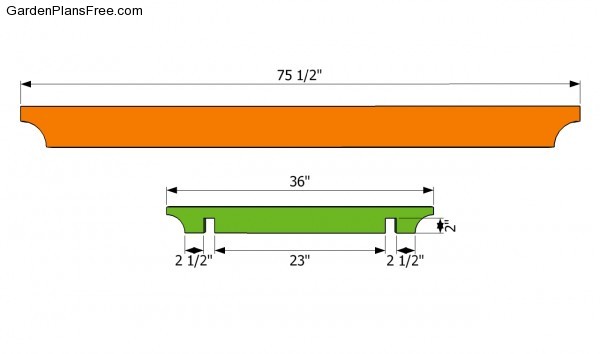
Build the shading elements from 2×4 lumber, if you want to get the job done as a professional. Cut the ends of the components in a decorative manner and cut several notches, as to fit into place easily. Drill pilot holes and secure the shade elements to the support beams with 3 1/2″ galvanized screws.
Building the shade elements
Building the components support beams and the shade elements using our free plans. Make sure you take accurate measurements and use a saw with a sharp blade, if you want to get the job done as a professional. Align all the components before locking them into place with screws. In addition, place the shade elements equally spaced, if you want to get a professional result.

Bench arbor plans
Last but not least, you should take care of the finishing touches. Check if the heads of the screws are level with the wooden surface and make the necessary adjustments if possible. Fill the holes with a good wood filler and let it dry out for several hours.
PRO TIP: Sand the wooden surfaces with 120-grit sandpaper, vacuum the residues and apply several coats of stain or paint, to protect the wooden components against wood decay.
This woodworking project was about bench arbor plans. If you have enjoyed the plans, we recommend you to share it with your friends, by using the social media widgets.
