If you want to learn more about how to build a 16×20 wooden pavilion you have to take a close look over the free plans in the article. This rectangular pavilion is easy to build if you follow my instructions. Read the local building codes so you come with the most appropriate dimensions for the components. The roof pitch is 6:12. You can change that by adjusting the height of the supports.
If you want to get the job done in a professional manner, we recommend you to plan everything with attention, as to prevent costly mistakes and to build a professional garden project. Invest in high quality materials, such as cedar, pine or redwood, as the structure will be exposed to all kinds of weather. Apply a few coats of paint over the components, to enhance their appearance and to protect them from bad weather.
16×20 Pavilion – Free DIY Plans
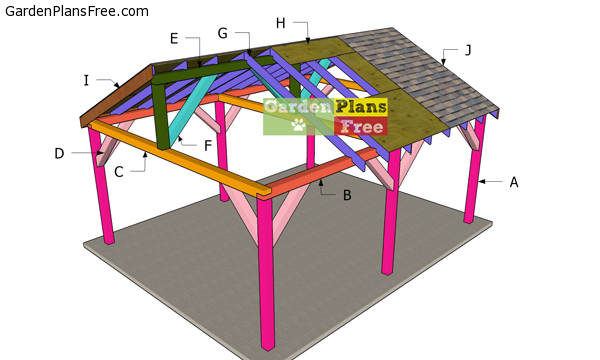
Building-a-16×20-pavilion
Materials
- A – 6 pieces of 6×6 lumber –8′ long POSTS
- B – 2 pieces of 6×6 lumber – 20′ long PLATES
- C – 3 pieces of 6×6 lumber – 16′ long PLATES
- D – 12 pieces of 6×6 lumber – 42 1/2″ long BRACES
- E – 3 pieces of 6×6 lumber – 41 1/8″ long, 1 piece – 20″ long RIDGE BEAM
- F – 4 pieces of 6×6 lumber – 58″ long BRACES
- G – 22 pieces of 2×6 lumber – 10′ long RAFTERS
- H – 8 pieces of 1/2″ plywood – 4’x8′, 4 pieces – 4’x4′, 4 pieces – 21 1/2″x8′, 2 pieces – 21 1/2″x4′ ROOF
- I – 4 pieces of 1×8 lumber – 122″ long, 4 pieces – 10′ long TRIMS
- J – 450 sq ft of tar paper and asphalt shingles ROOF
- 16 pieces of 6×6 lumber – 8 ft
- 3 pieces of 6×6 lumber – 20 ft
- 3 pieces of 6×6 lumber – 16 ft
- 22 pieces of 2×6 lumber – 10′
- 4 pieces of 1×8 lumber – 10′
- 4 pieces of 1×8 lumber – 12′
- 13 pieces of 1/2″ plywood – 4’x8′
- 450 sq ft of tar paper and asphalt shingles
- 2 1/2″ screws
- 1 5/8″ screws
- 24 pieces of 8″ screws
- 2″ nails
- 40 pieces of 5 1/2″ screws
- 44 rafter ties
- 2 boxes of 1 1/2″ structural screws
- 1 box of 2 1/2″ structural screws
- 6 pieces of post to beam connectors
- 6 post anchors
- wood glue, stain/paint
Tools
- Hammer, Tape measure, Carpentry square
- Miter saw, Drill machinery, Screwdriver, Sander, Router
- Safety Gloves, Safety Glasses, Respiratory Mask
Time
- One week
How to Build a large pavilion
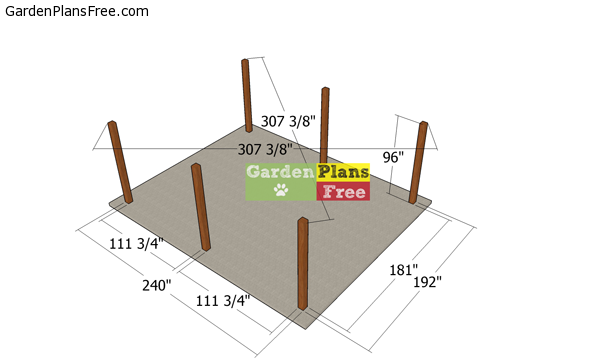
Laying-out-the-pavilion-posts
The first step of the project is to layout the posts for the pavilion using string and batter boards. Make sure the diagonals are equal and also apply the 3-4-5 rule to the each corner. Select the location for the pavilion making sure you comply with the codes. Remove the vegetation layer and then try to level it as much as possible.
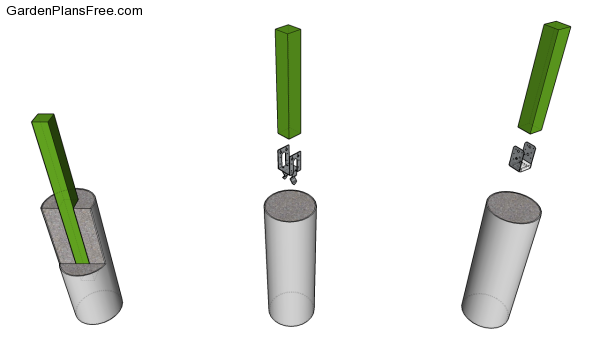
Dig holes under the front line and fit the tube forms into place. Fill them with concrete and then install the post anchors. Fit the posts to the anchors and then plumb them with a spirit level. Use temporarily braces to lock the posts into place until assembling the frame of the pavilion.
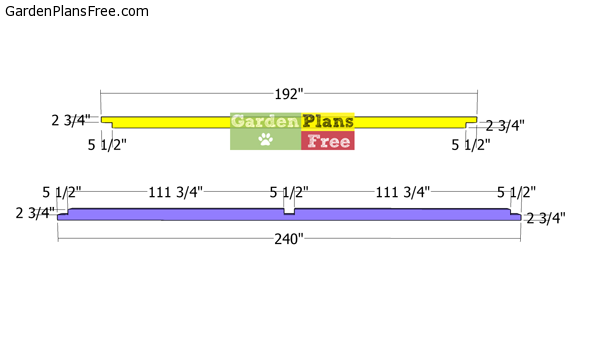
Building-the-plates
Use 6×6 lumber for the top plates, as well. Use a circular saw and set the blade at 2 3/4″. Make parallel cuts inside the marked areas and then remove the excess with a chisel. Smooth the surface with sandpaper.
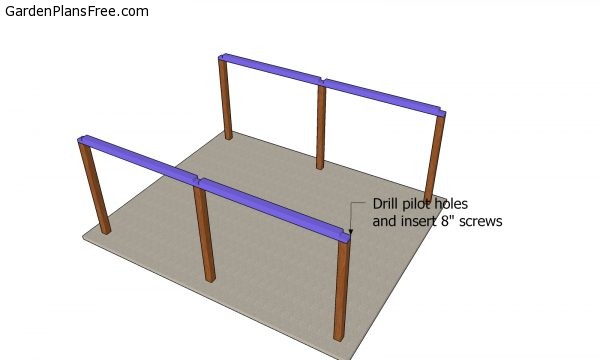
Fitting the side beams
Fit the plates to the top of the posts, as shown in the diagram. Align the edges flush and make sure the corners are square. Drill pilot holes through the top plates and insert 8″ screws into the posts.
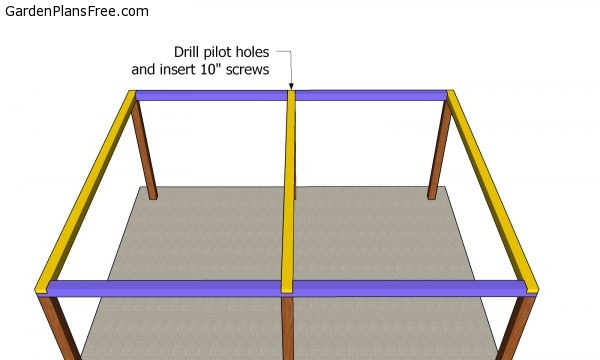
Fitting the crossbeams
Fit the crossbeams to the top of the posts. Make sure the corners are square and align the edges flush. Drill pilot holes and insert 10″ screws to lock the beams into place tightly.
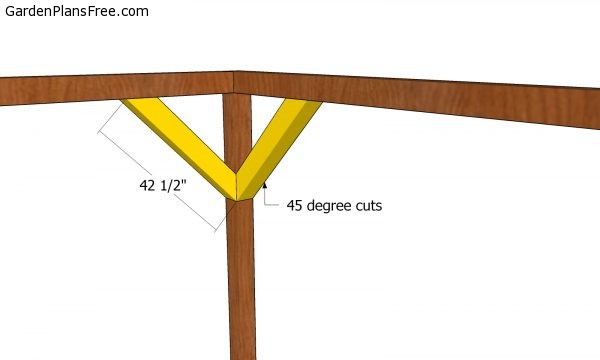
Braces for the large pavilion
Use 6×6 lumber for the braces. Make 45 degree cuts to both ends of the braces. Fit the braces to the frame of the pavilion. Plumb the posts and make sure the plates are horizontal. Drill pilot holes through the braces and insert 3 1/2″ screws to lock them into place. Use 2 screws for each joint.
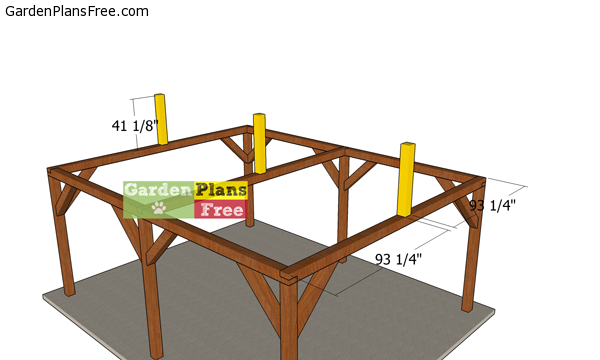
Fitting-the-ridge-beam-supports
Use 6×6 lumber for the ridge beam supports. Cut the supports to 41 1/8″ and then center them to the top of the cross beams. Use post to beam connectors to secure the supports into place. Use 2 1/2″ screws to lock the connectors into place. Plumb the posts with a spirit level before inserting it into place.
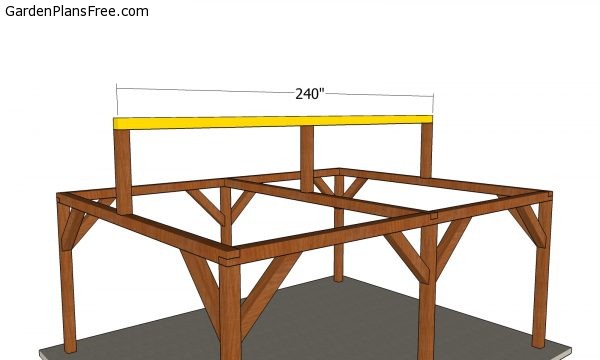
Fitting the ridge beam
Fit the 6×6 beam to the top of the supports. Check if the corners are square and align the edges. Use post to beam connectors to lock it into place.
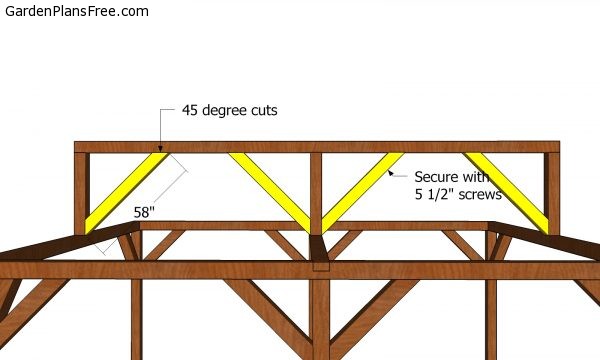
Ridge beam braces
Cut the braces for the ridge beam. Make 45 degrees cuts to both ends. Drill pilot holes and insert 3 1/2″ screws to lock the braces into place.
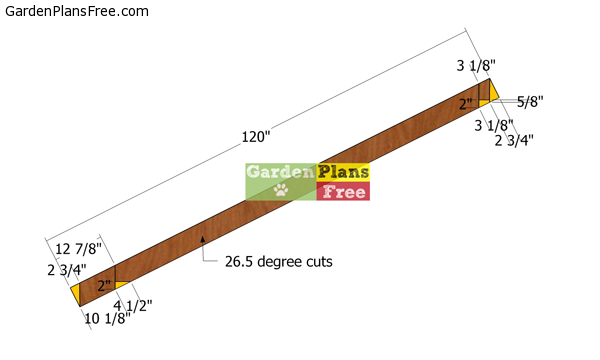
Rafters—16×20-gable-pavilion
Use 2×6 lumber for the rafters. Mark the cut lines to the beams and then get the job done with a circular saw. Smooth the edges with attention and pay attention to the birdsmouth cuts.
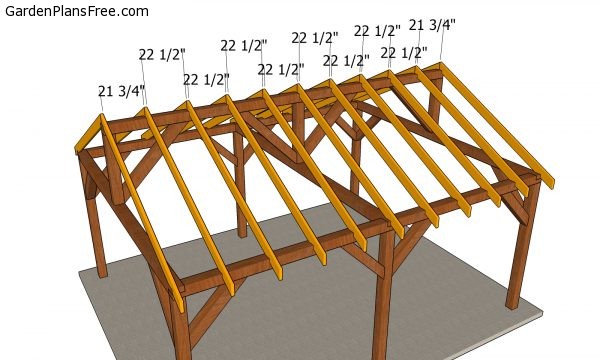
Fitting the rafters
Fit the rafters to the top of the pavilion and place the rafters every 24″ on center. Use rafter ties and 1 1/2″ structural screws to lock the rafters into place tightly.
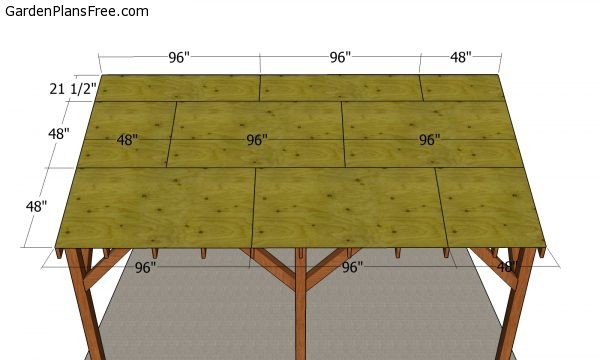
Fitting the roof sheets
Lay the 1/2″ plywood sheets to the top of the pavilion. Align the edges flush and leave no gaps between the sheets. Insert 1 5/8″ screws every 8″ along the rafters.
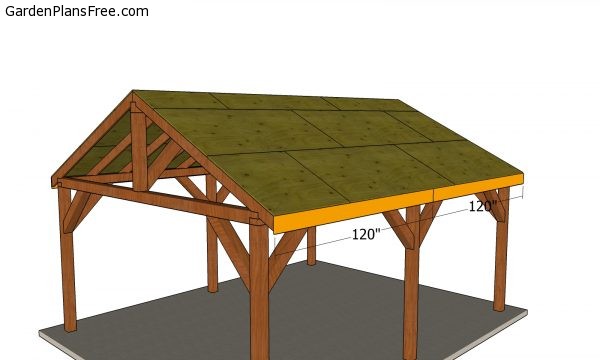
Side roof trims
Use 1×8 lumber for the side roof trims. Align the edges flush and insert 2″ nails to secure the trims into place tightly.
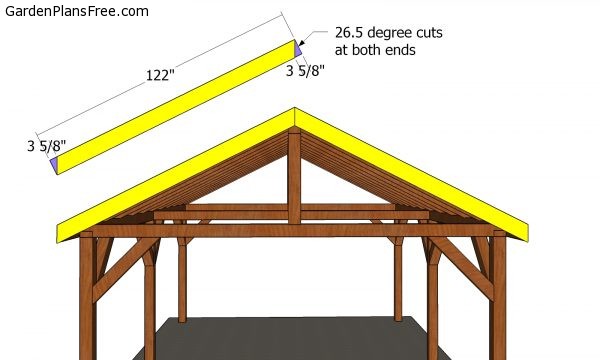
Front and back roof trims
Cut the trims for the front and back of the roof using 1x8s. Make the angle cuts and fit the trims into place with 2″ nails.
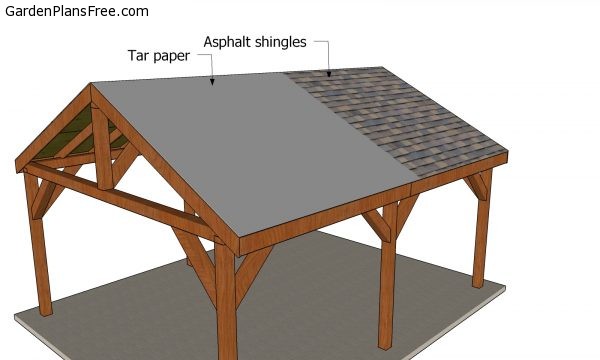
Fitting the roofing to the pavilion
In order to waterproof the pavilion, you have to cover the roofing sheets with felt. Make sure the strips of roofing felt overlap at least 2-3″ and staple them to the plywood sheets every 8″. Continue the project by installing the asphalt shingles. Place the starting course at the bottom of the roof, before fitting the rest of the shingles.
PRO TIP: Always read the manufacturer’s instructions, before installing the shingles. They provide essential information about the installation of the shingles.
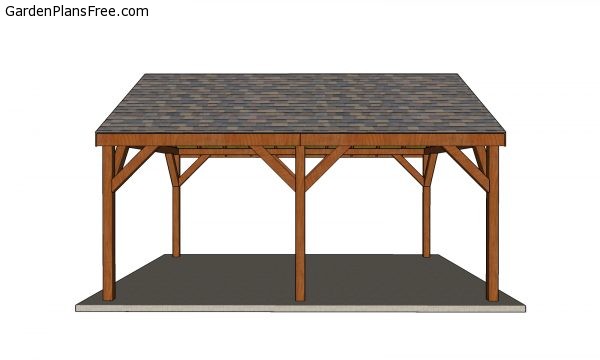
16×20 Pavilion Plans – side view
Next, make sure everything is assembled together tightly. Fill the holes with wood putty and smooth the surface with 120-220 grit sandpaper. Apply a few coats of paint or stain to enhance the look of the pavilion and to prevent the wood from decay. I also have free plans for building a 20×30 pavilion.
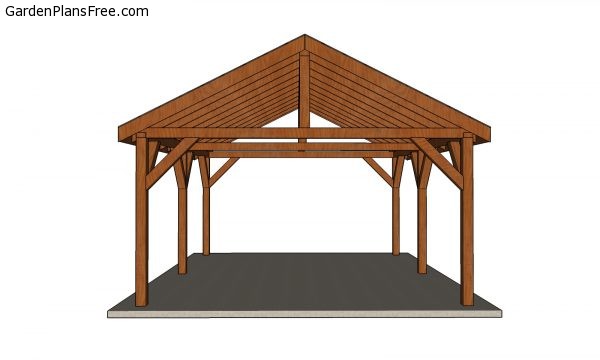
16×20 Pavilion Plans – front view
This large pavilion is easy to make and it will shelter a nice relaxation are for you and the loved ones. The structure of the pavilion is sturdy.
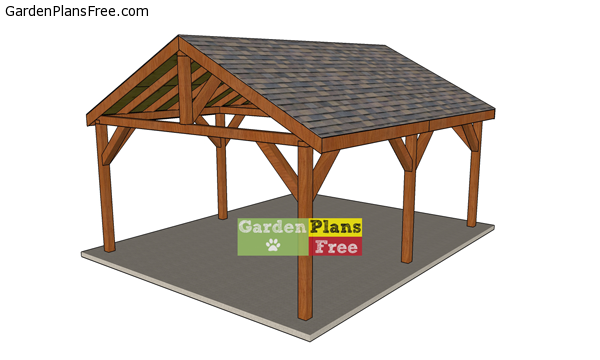
16×20-pavilion-plans
This pavilion has a base of 16’x20′ and it features a roof with a 6:12 pitch. This roof features overhangs on both sides of the pavilion.
PRO TIP: Apply several coats of paint or stain over the components, in order to protect them from decay. Check out the rest of the project to learn more about building garden projects.


47 comments
Hello ,my name is Mihai Silviu and i live in Europe, i would like to build a gazebo myself according to your plans, do you think you can give me the plans in centimeters, of coese i pay . Thank you very much.
Unfortunately, I only design in imperial measurements, since lumber sizes are different.
If I reduce this to a 16×16, do I need any of the center posts or can I just use 4 like you have on the outside of the 16×20?
ok multumesc frumos
Hey, I am wanting to make a pool enclosure. I was thinking about building a pavilion like the one you have designed here but having polycarbonate as a roof and using cloth as a screen on the side to stop mosquitoes or just screening it in with framed walls.
My pool is 16×32. I was curious if I built two of the 16×20 would that be a good idea? I was looking at your larger plans, and I couldn’t do a post in the middle of it obviously.
Love all your plans and designs. Makes me want to learn sketchup. TY.
Yes, you can do that
Could 6 x 6 x 10s be used in place of the 6 x 6 x 20s?
Yes, but make sure the joints are on the middle posts.
Can the posts be installed with anchors on 4” slab?
No, you need foottings.
If you are doing a 4 in slab, can you just dig deeper holes where the post will stand, and pour concrete into those holes and pour the rest of the slab at the same time? If you can, how deep should those holes be. Thanks
Also eliminate the 16’ support in center, 2×10 all across the top for 20’?
No
Can use a 2×8 ridge board and eliminate the center support ?
No
If I had to go 18’ instead of 16’, can I still use some plan? 20×18.
Can I get a 20×18 plan from you? How much cost?
I don’t do custom plans. Sorry
can I build this on top of a deck
What type of snow rating will these plans support? My are needs 90-150 psi rating? Thank you in advance.
How can I get these plans
See the GET PDF PLANS at the bottom of the article
Thank you!
for 16×20 plans. it will be on stamped concrete 32mpa. (strong sidewalk grade) 10-12 inches thick where posts are. Sufficient base? I plan on using 8×8 for the 4 corner posts and top plates thanks
How much snow can the 16×20 roof handle? Can I get an engendered copy?
I was considering cost and availability to do this and wanted to do the 14 x 18 size. I was wondering if I can use 6×6 for all base legs and 4X4 for the rest of the support beams above that and use 2×6 for roof trusses. Would that be sufficient?
No.
Thomas, are you still here?
Do you have plans for the 16×20 but roof rotated, so that the front is the 20’ side?
I could use those plans also.
Can I make this 16×16? Do I need the middle posts on the side?
Can I put this on a slab if I use 8 x 8 beams for support
On the check list, you have it label A to J then theirs a thin line. Below that line theirs another list of material. If I am to purchased the materials needed for 16×20 pavilion which list do I used.
Second list is the Shopping List. First list is the Cut List.
Can I build this on a 6 in concrete slab with 2300 psi strength
Or I need to make the footing? How deep should the footing be and how much of the 6×6 post go in the concrete
Do you have these plans but with a long gable roof (the roof just rotated) could it be the same pitch or would that have to change?
Can I move the middle post approximately 2′ in either direction?
Do anyone have a picture of their final product they could send me?
what is the pitch of the roof?
hoe to adjust support to make it a 4:12 pitch? thanks
Can I build this on an 8-10” concrete slab using a 6×6 post base?
No, this project needs post footings or a continuous foundation under the posts.
Thanks for your reply, does this mean that a portion of the 6×6 post must go under the ground, if so how much it should be under the ground level?
Regards
J
No. It means you pour concrete footings and use post anchors. The footings need to be above the ground level. You determine the height of the footings above ground according to the thickness of the slab you will pour after completing the project
Hey Thomas I really like your plans for the 16×20 pavilion with the gable roof. If I substitute the roof with a sheet metal roof, would it change the plans in a drastic way? If so, how would I change up the roof regarding the wood? Thank you.
What size footings do you recommend? Thx.