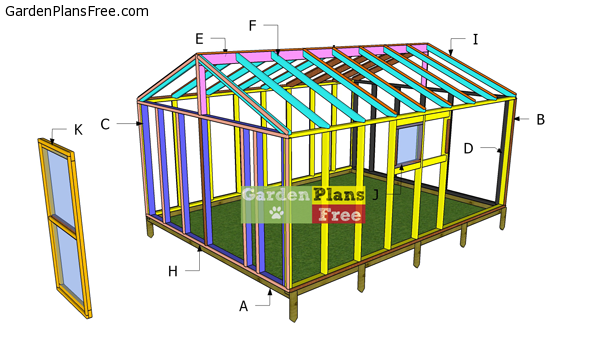
If you want to learn more about how to build a 12×16 greenhouse with a gable roof, we recommend you to pay attention to the instructions described in the article. Work with attention and plan every aspect of the project from the very beginning, in order to prevent costly mistakes and to save time. This greenhouse features a roof pitch of 5:12, a front door and 2 side vents to let the hot air out of the greenhouse in the hot summer days.
It is essential to select the right small greenhouse plans from the very beginning, as the construction should fit within your budget and to match the style of your garden. Invest in weather-resistant lumber, as the components will be exposed to moisture. Take accurate measurements before making the cuts and drill pilot holes before inserting the screws, to prevent the wood from splitting.
12×16 Gable Greenhouse – Free DIY Plans
Building-a-12×16-greenhouse
Materials
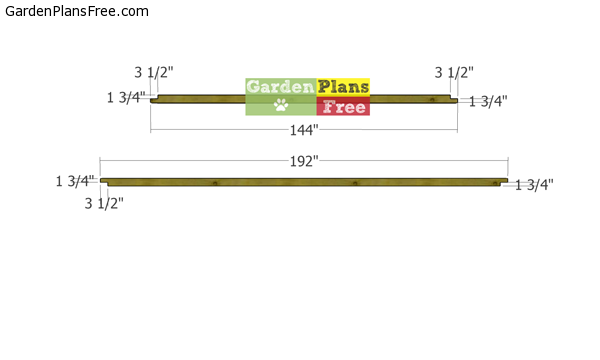
- A – 2 pieces of 4×4 lumber – 12′, 2 pieces – 16′, 1o pieces of 2×4 lumber – 16″ BASE
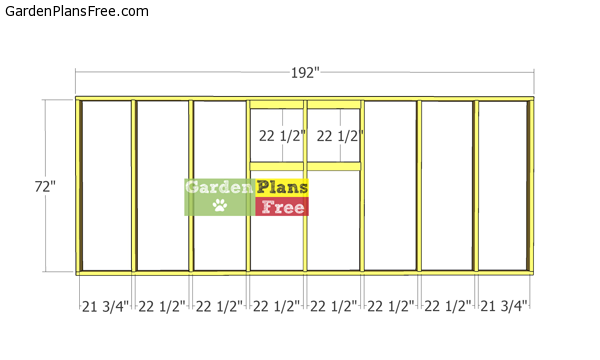
- B – 2 pieces of 2×4 lumber – 16 ft, 9 pieces – 72″ long, 4 pieces – 22 1/2″ long FRAME
- B – 2 pieces of 2×4 lumber – 16 ft, 9 pieces – 72″ long FRAME
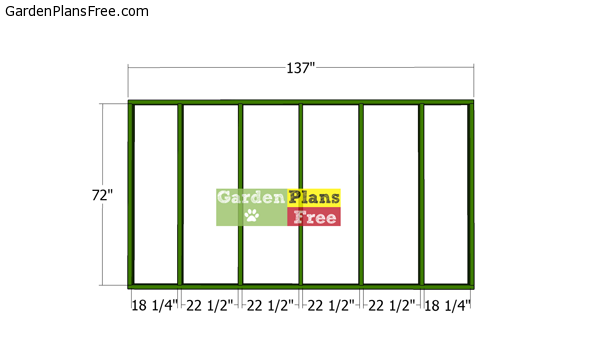
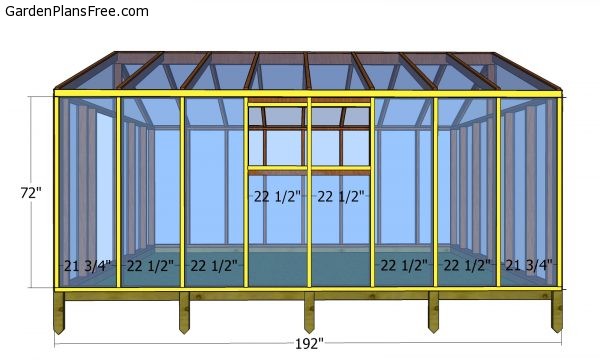
- C – 2 pieces of 2×4 lumber – 137″ long, 7 pieces – 72″ long FRONT WALL
- D – 2 pieces of 2×4 lumber – 137″ long, 7 pieces – 72″ long BACK WALL
- E – 2 pieces of 2×4 lumber – 25 5/8″, 1 piece of 2×6 lumber – 192″ long RIDGE BEAM
- F – 19 pieces of 2×4 lumber – 77 3/4″ long RAFTERS
- H – 32 pieces of 1×2 lumber – 72″ long, 4 pieces – 22 1/2″ long, 2 pieces – 31″ long, 4 pieces – 76 1/2″ long, 2 pieces of 1×4 lumber – 192″ long TRIMS
- I – 1 piece of 1×2 lumber – 16 ft, 18 pieces – 77″ long ROOF TRIMS
- J – 4 pieces of 2×2 lumber – 22 1/2″ long, 4 pieces – 19 1/2″ long, 4 pieces of 1×2 lumber – 19 1/2″ long, 4 pieces – 22 1/2″ long VENTS
- I – 2 piece of 2×4 lumber – 65″ long, 2 pieces – 36″ long, 1 piece – 29″ long, 2 pieces of 1×2 lumber – 36″ long, 2 pieces – 69″ long, 1 piece – 33″ long DOOR
- 2 pieces of PT 4×4 lumber – 16 ft
- 2 pieces of PT 4×4 lumber – 12 ft
- 20 pieces of 2×4 lumber – 8 ft
- 4 pieces of 2×4 lumber – 16 ft
- 1 piece of 2×6 lumber – 16 ft
- 23 pieces of 2×4 lumber – 12 ft
- 18 pieces of 2×4 lumber – 8 ft
- 2 pieces of 2×2 lumber – 8 ft
- 3 pieces of 1×2 lumber – 16 ft
- 2 pieces of 1×4 lumber – 16 ft
- 23 pieces of 1×2 lumber – 12 ft
- 18 pieces of 1×2 lumber – 8 ft
- 500 pieces of 3 1/2″ screws
- 100 pieces of 2 1/2″ screws
- 500 pieces of 1 5/8″ screws
- 7 pieces of hinges
- latch
- wood stain
- greenhouse film
Tools
- Hammer, Tape measure, Carpentry square
- Miter saw, Drill machinery, Screwdriver, Sander, Router
- Safety Gloves, Safety Glasses, Respiratory Mask
Time
- One weekend
Building a garden greenhouse
Skids
The fist step of the project is to build the base for the greenhouse. Therefore, use 4×4 pressure treated lumber, since the beams will be exposed to moisture. Set the miter saw at 1 3/4″ and then make parallel cuts inside the marked areas. Remove the excess materials with a hammer and smooth the half butt joint with a chisel.
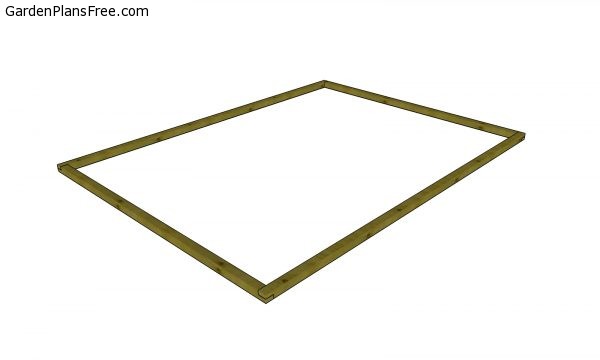
Assembling the base
Select the location for the greenhouse and then level the surface thoroughly. Align the edges flush and check if the corners are square. Drill pilot holes and insert 3 1/2″ screws to assemble the base tightly.
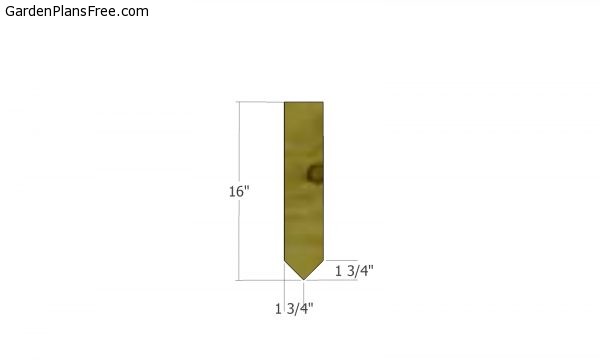
Stakes
Use 2×4 pressure treated lumber for the stakes. Use a circular saw to make the pointed end of the stakes.
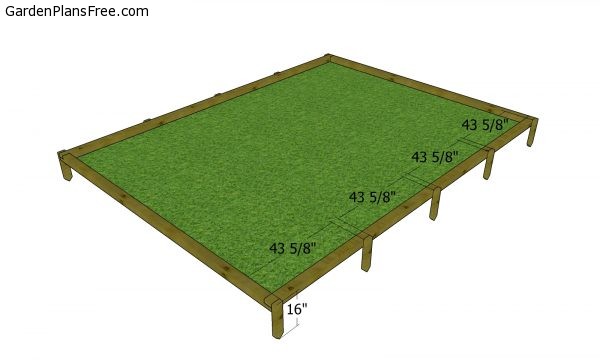
Fitting the stakes
Fit the stakes along the base skids, as shown in the diagram. Use a hammer to set the stakes into the ground. Drill pilot holes and insert 3 1/2″ screws through the stakes into the frame. You need to set the stakes so you can anchor the greenhouse into the ground.
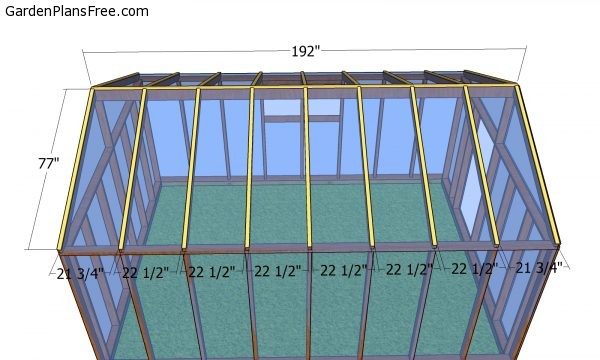
Side-walls
Use 2×4 lumber for the side wall frames. Cut all the components at the dimensions shown in the diagram. Drill pilot holes through the plates and insert 3 1/2″ screws into the studs. Place the studs every 24″ on center and check if the corners are square. Fit the 2×4 blockings, so you can frame the side vents. Drill pocket holes at both ends of the blockings and then insert 2 1/2″ screws to lock them to the studs.
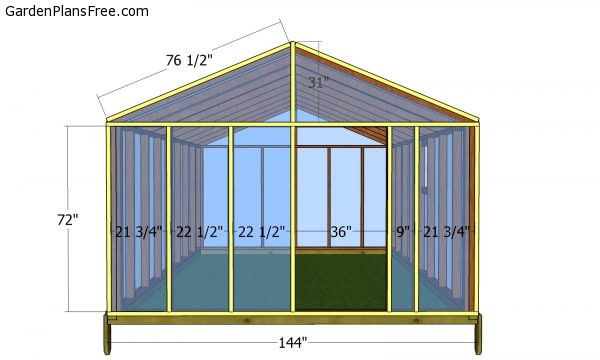
Back-wall-frame
Next, you need to build the back wall frame for the 12×16 greenhouse. Cut the components from 2×4 lumber and then lay them on a level surface. Drill pilot holes through the plates and insert 3 1/2″ screws into the studs. Place the studs every 24″ on center.

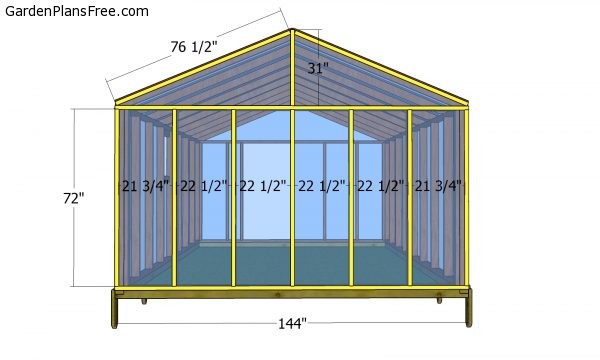
Front wall frame
Build the front wall for the greenhouse, as shown in the diagram. Use the same techniques described above. As you can see in the diagram, we let a 36″ opening to the wall, so you can install a door and have an easy access inside.
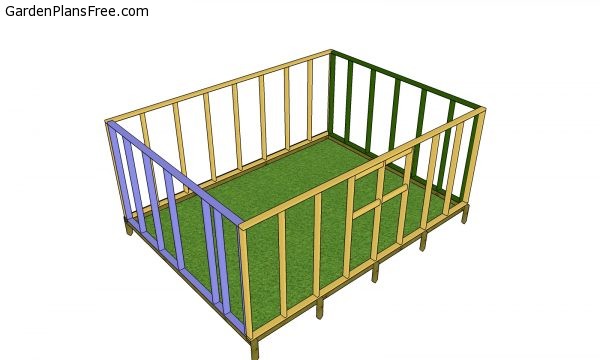
Assembling the frame of the greenhouse
Fit the wall frames to the base of the greenhouse. Align the edges flush and then insert 3 1/2″ screws to secure the walls frames into place. Lock the adjacent wall frames together using 3 1/2″ screws, after drilling pilot holes.
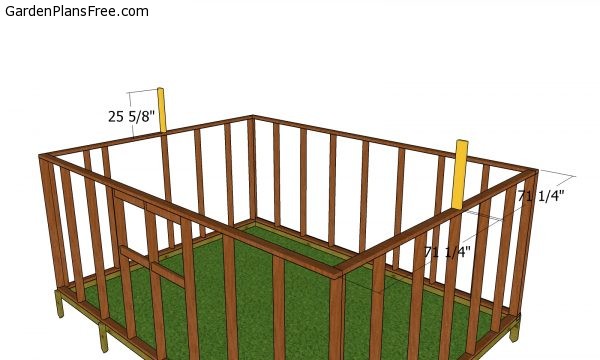
Supports for the ridge beam
Use 2×4 lumber for the ridge beam supports. Drill pocket holes at both ends of the supports and insert 2 1/2″ screws to secure them into place. Center the supports to the plates. Plumb the supports with a spirit level.
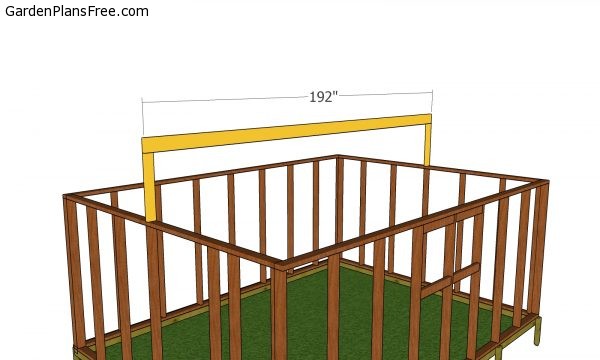
Fitting the ridge beam
Fit the 2×6 ridge beam to the top of the greenhouse. Align the edges and insert 2 1/2″ screws.
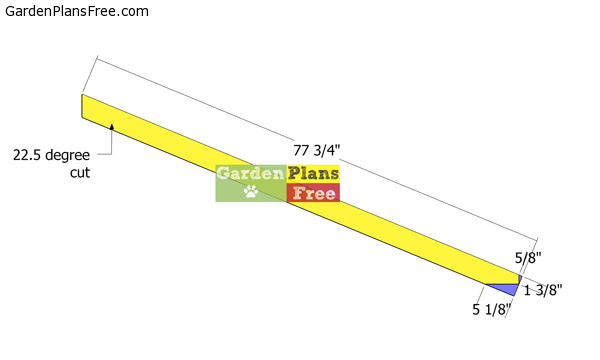
Rafters
Use 2×4 lumber for the rafters. Use a miter saw to make the angle cut. Make the cuts at the opposite end with a circular saw, after marking the cut lines on the beams.

Fitting-the-rafters-to-the-greenhouse
Fit the rafters to the top of the greenhouse. Place the rafters every 24″ on center. Drill pilot holes and insert 3 1/2″ screws to secure the rafters into place.
Side wall trims
Cover the greenhouse with film and stretch it as firmly as possible. Use 1×2 slats and 1 5/8″ screws to secure the slats along the framing.
Top roof trims
Fit the 1×2 trims to the top of the greenhouse, as shown in the diagram.
Front and back wall trims
Fit the 1×2 slats to the back of the greenhouse, as well. Secure the slats to the frame of the greenhouse with 1 5/8″ screws, as well.
Front wall trims
Attach the 1×2 slats to the front of the greenhouse.
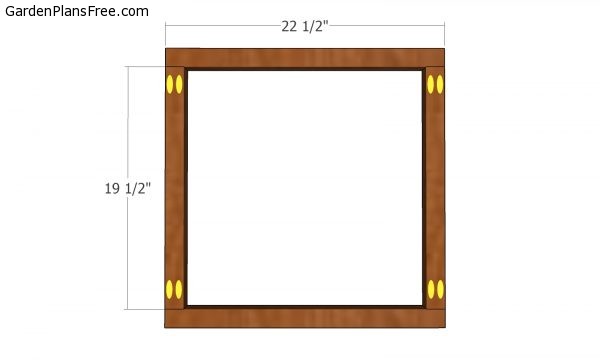
Window frame
Use 2×2 lumber for the window frame. Drill pocket holes and insert 2 1/2″ screws to assemble everything together tightly. Align the edges and make sure the corners are square.
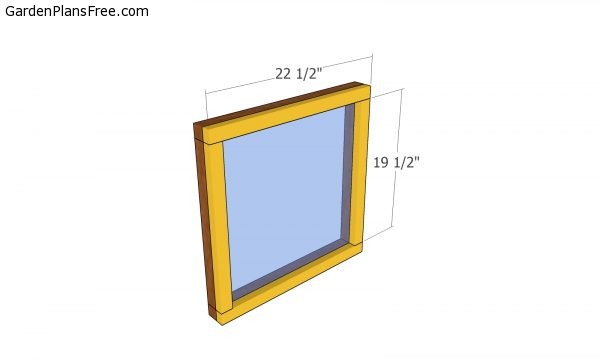
Window trims
Cover the vents with film and then attach the 1×2 trims, making sure the edges are flush.
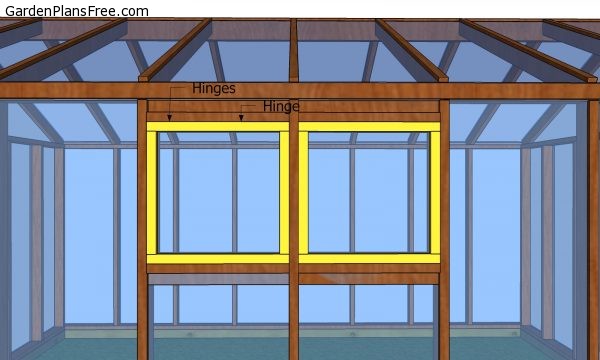
Fitting the side windows
Fit the vents to the side openings. Install the hinges to secure the vents into place. You can also install automatic vent openers, so you can ventilate the greenhouse with easy, irrespective of the weather.
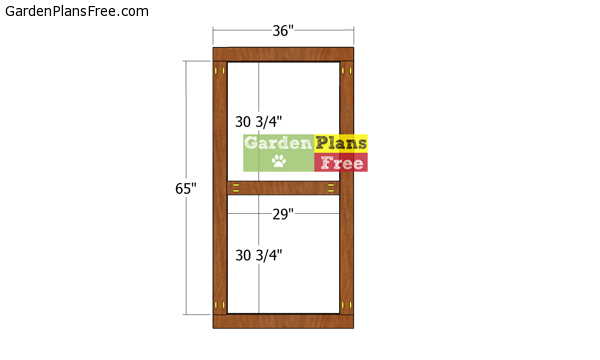
Door-frame
We will build the frame for the front door from 2×4 lumber. Drill pocket holes at both ends of the vertical and middle components. Insert 2 1/2″ screws to lock everything together tightly.
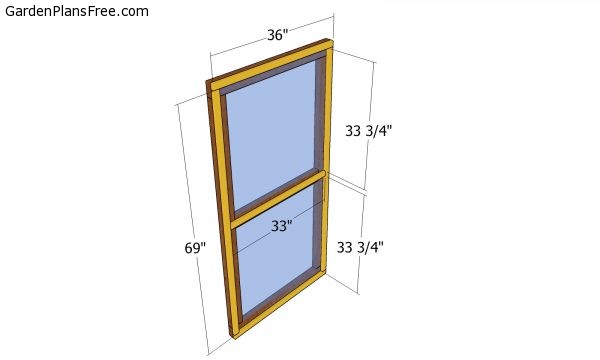
Door trims
Cover the door with film and then attach the 1×2 trims, using 1 5/8″ screws.
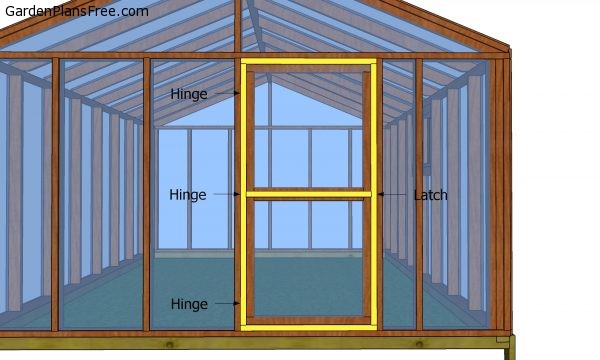
Fitting the door to the greenhouse
Fit the door to the front of the greenhouse. Use hinges to lock it into place. Install a latch, as well.

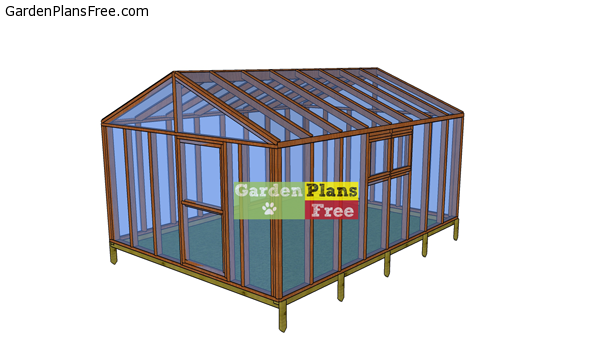
12×16 greenhouse plans – side view
Now that the greenhouse is assembled, all you are left to do is start growing vegetables for your and the loved ones. You can build greenhouse tables inside, if you want to make the most of the space.
How-to-build-a-greenhouse
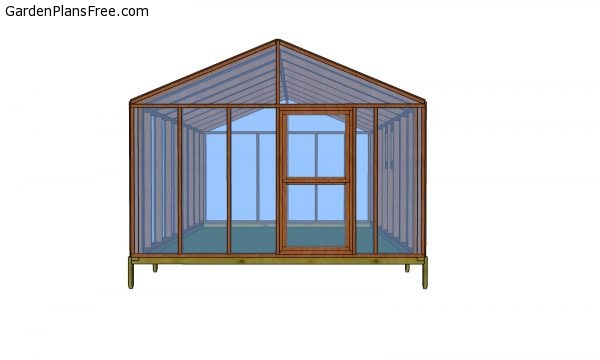
Front view – 12×16 greenhouse
Last but not least, you should cover the rest of the structure with foil and secure it into place tightly. Make sure there are no gaps or holes, as to keep the warmth inside and the protect the plants from bad weather. Open the lids whenever is necessary, in order to ventilate the interior of the greenhouse.
PRO TIP: Fill the holes with a good wood filler and smooth the surface with 120-grit sandpaper. Apply several coats of paint or stain over the components, in order to protect them from decay.

This diy project was about 12×16 garden greenhouse plans. If you have enjoyed the free project, we recommend you to share it with your friends, by using the social media widgets. LIKE us on Facebook if you want to be the first that gets our latest projects.