If you want to learn more about how to build an outdoor table, we recommend you to pay attention to the instructions described in the article. Select the right outdoor table plans for your needs. Work with attention and plan every aspect of the construction from the very beginning, in order to keep the costs under control and to save time. Cedar, pine or redwood would provide a decent compromise between looks and durability.
Use a circular saw to adjust the size of the components, after marking accurate cut lines. Smooth the cut edges with a piece of sandpaper and remove the residues before fitting them into place. Drill pocket holes before inserting the screws, in order to prevent the wood from splitting and to create a rigid structure. Check if the corners are right-angled after fitting each component, as they usually move from position easily.
Outdoor Table Plans

Building the outdoor table
Materials
- A – 4 pieces of 4×4 lumber – 30″ LEGS
- B – 2 pieces of 1×4 lumber – 26 1/2″, 2 pieces – 51 3/4″ long FRAME
- C – 2 pieces of 1×4 lumber – 54 1/2″ FRAME
- D – 2 pieces of 1×6 lumber – 37 1/2″, 3 pieces – 51 3/4″ TABLETOP
- E – 22 pieces of 1×4 lumber – 10 1/2″ TABLETOP
- 1 piece of 4×4 lumber – 10 ft
- 2 pieces of 1×4 lumber – 10 ft
- 2 pieces of 1×5 lumber – 10 ft
- 4 pieces of 1×6 lumber – 8 ft
- 200 pieces of 1 1/4″ screws
- wood stain
- wood glue
Tools
- Hammer, Tape measure, Carpentry square
- Miter saw, Drill machinery, Screwdriver, Sander, Router
- Safety Gloves, Safety Glasses, Respiratory Mask
Time
- One day
Building a table

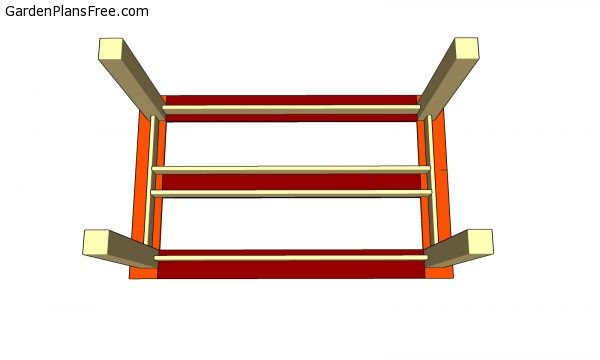
Building the frame of the table
The first step of the woodworking project is to build the frame of the table. As you can easily notice in the plans, we recommend you to build the legs for the table out of 4×4 lumber and the frame out of 1×4 lumber.

Fitting the frame of the table
Drill pocket holes at both ends of the components before attaching them to the legs with galvanized screws. Add waterproof glue to the joints and make sure the corners are right-angled. Work with attention and align the components with great care before inserting the 1 1/4″ galvanized screws.

Attaching the frame of the tabletop
Fitting the tabletop
Cut the 1×6 lumber at the right size using an appropriate saw. Drill pocket holes at both ends of the long components and secure them to the perpendicular components. Leave no gaps between the components if you want to get a professional result. Drill pocket holes through the frame of the table and insert 1 1/4″ screws into the tabletop.

Attaching the tabletop
The next step of the project is to fill the gaps in the tabletop by fitting the 1×5 lumber. Drill pocket holes at both ends of the slats, place them equally-spaced and secure them to the frame with 1 1/4″ screws. I recommend you to assemble the tabletop before attaching it to the frame table.

Outdoor table plans
Last but not least, you should take care of the finishing touches. Make sure there are no gaps between the components.
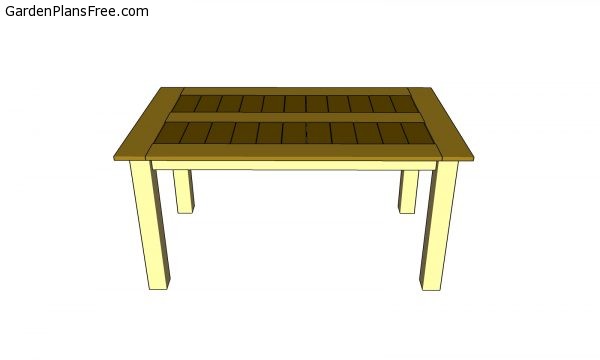
Outdoor Table – side view
PRO TIP: Fill the holes with a good wood filler and smooth the surface with 120-grit sandpaper. Apply several coats of paint or stain over the components, in order to protect them from decay. Since you are here, you should also check out free plans for a 6 ft patio table, as well.

This diy project was about outdoor table plans. If you have enjoyed the free project, we recommend you to share it with your friends, by using the social media widgets. LIKE us on Facebook if you want to be the first that gets our latest projects.