If you want to learn more about how to build a double chair bench, you have to take a close look over the free plans in the article. Therefore, this project will show you, step by step, how to build a bench with table using common materials, mainly 2x4s. This project is relatively cheap and it can be done by anyone that know the basic woodworking skills. If you have a large deck, patio or porch, this bench will be the best addition ever.
My plans come with a complete Cut and Shopping lists, so you waste no time and go right ahead and buy the materials, then build the bench. In addition, I hope the 3D diagrams will guide you step by step on how to assemble the bench.
If you want to get the job done in a professional manner, we recommend you to plan everything with attention, as to prevent costly mistakes and to build a professional garden bench. Invest in high quality materials, such as cedar, pine or redwood, as the bench will be exposed to all kinds of weather. Apply a few coats of paint over the components, to enhance their appearance and to protect them from bad weather. See all furniture plans HERE.
Double Chair Bench Plans
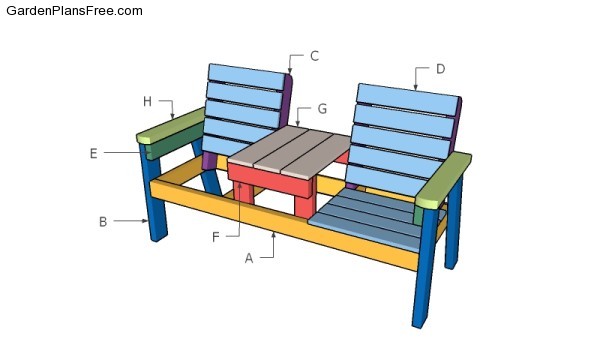
Building a double chair bench with table
Materials
- A – 2 pieces of 2×4 lumber – 58″ long, 4 pieces – 18″ long SEAT FRAME
- B – 2 pieces of 2×4 lumber – 23″ long, 2 pieces – 24 3/4″ long LEGS
- C – 4 pieces of 2×4 lumber – 24″ long BACKREST SUPPORTS
- D – 10 pieces of 1×4 lumber – 19″ long, 8 pieces of 1×4 lumber – 20 1/2″ long BACKREST & SEATS
- E – 2 pieces of 2×4 lumber – 21 3/4″ long SUPPORTS
- F – 2 pieces of 2×4 lumber – 17″ long, 2 pieces – 12″ long TABLE FRAME
- G – 3 pieces of 1×6 lumber – 21 3/4″ long TABLE
- H – 2 pieces of 2×4 lumber – 22 1/4″ long ARMRESTS
- 6 pieces of 2×4 lumber – 8′
- 1 piece of 1×6 lumber – 8′
- 4 pieces of 1×4 lumber – 8′
- 200 pieces of 2 1/2″ screws
- 100 pieces of 1 1/4″ screws
- wood glue, stain/paint
Tools
- Hammer, Tape measure, Carpentry square
- Miter saw, Drill machinery, Screwdriver, Sander, Router
- Safety Gloves, Safety Glasses, Respiratory Mask
Time
- One day
Made from this plan
How to build a double chair bench with table

Building the seat frame
The first step of the outdoor bench project is to build the seat frame. Cut one end of the side supports at 75 degrees (set the miter at 15 degrees).
Also, attach the front and back slats to the perpendicular supports. Drill pilot holes and insert 2 1/2″ screws to assemble everything together tightly. Make sure the corners are square and leave no gaps between the components.
Building the legs
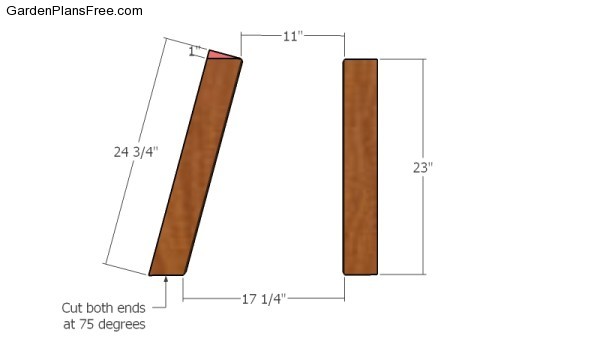
Furthermore, build the legs from 2×4 lumber. Cut both ends of the back legs at 75 degrees (set the miter at 15 degrees). Smooth the cut edges with sandpaper.
Attaching the legs
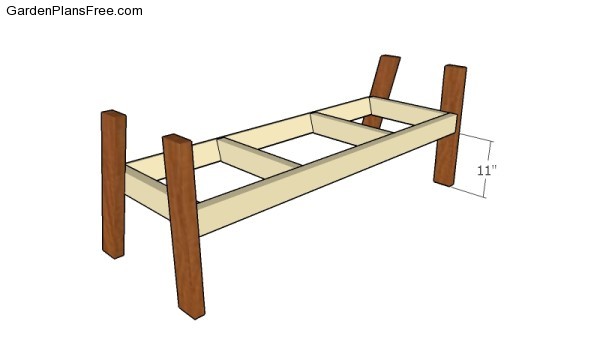
In aditions, attach the legs to the seat frame, as shown in the free double chair bench plans. Align the edges with attention, drill pilot holes through the frame and insert 2 1/2″ screws into the legs.
However, use a spirit level to make sure the legs are plumb. In addition, check the corners for squareness.
Fitting the side top supports
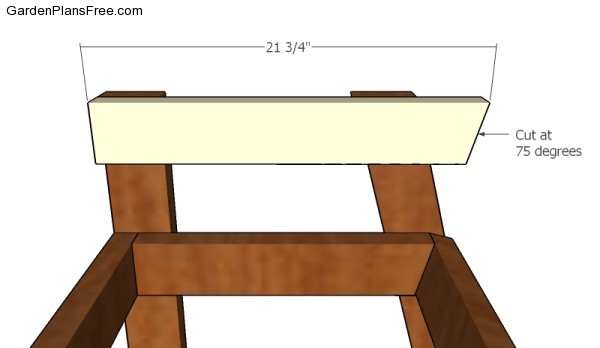
Attach the 2×4 supports to the top of the legs. Align the edges with attention, drill pilot holes and secure the supports to the legs with 2 1/2″ screws. Set the miter at 15 degrees for cutting the support.
Building the backrest
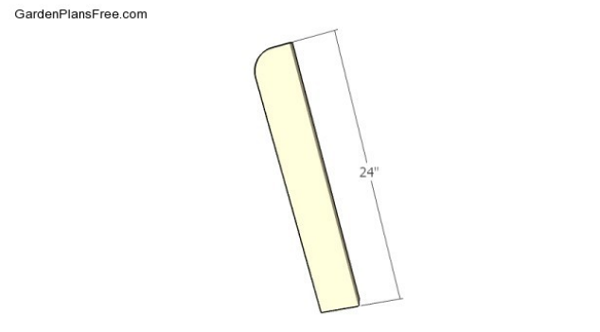
Backrest-supports
The next step of the double chair bench is to use 2×4 lumber for the backrest supports. Round the exposed corner of the supports, as shown in the image.
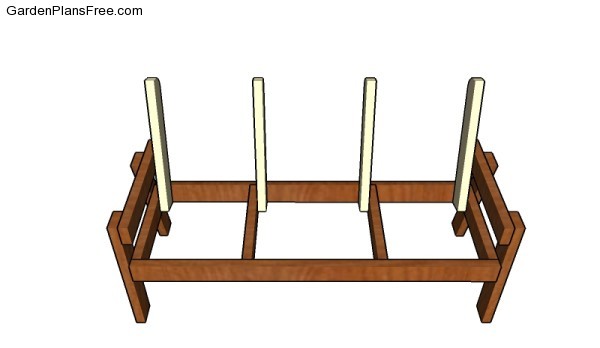
Backrest supports
Go ahead by fitting the supports to the seat frame, as shown in the plans. Drill pilot holes through the backrest supports and insert 2 1/2″ screws into the seat frame.

Continue the garden bench project by building the armrests from 2×4 lumber. Round one end of the armrests with a jigsaw. Smooth the edges with sandpaper and secure them into place with 2 1/2″ screws.
Attaching the seat slats
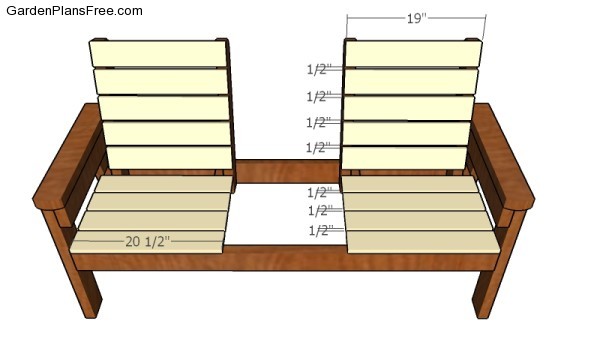
Fitting the seat and backrest slats
Similarly, use 1×4 lumber for the seat and for the backrest of the chairs. Place a piece of 1/2″ plywood between the slats for a professional result and for even gaps.
Drill pilot holes through the slats and insert 1 1 /4″ screws into the frame. Countersink the head of the screws, so that they will be at the same surface with the slats.
Building the bench table
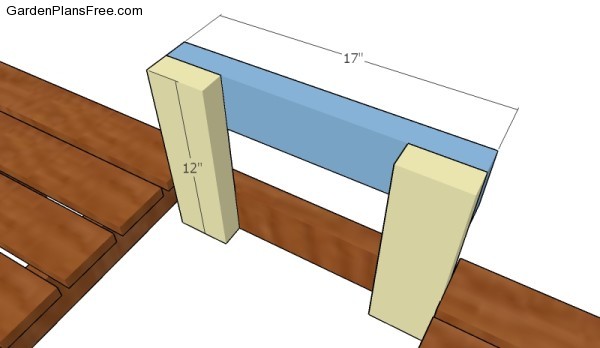
Front table supports
Additionally, use 2×4 lumber for the front table supports. Drill pilot holes and insert 2 1/2″ screws into the front support. In addition, fit the to support to the vertical components. Make sure the corners are square before inserting the screws.
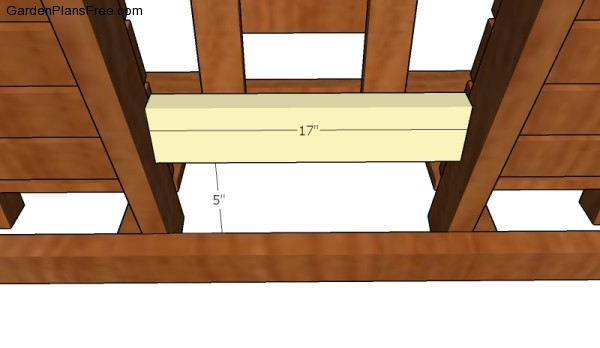
Back table support
Next, fit the table support to the back of the bench. Drill pocket holes at both ends and secure them to the frame with 2 1/2″ screws.
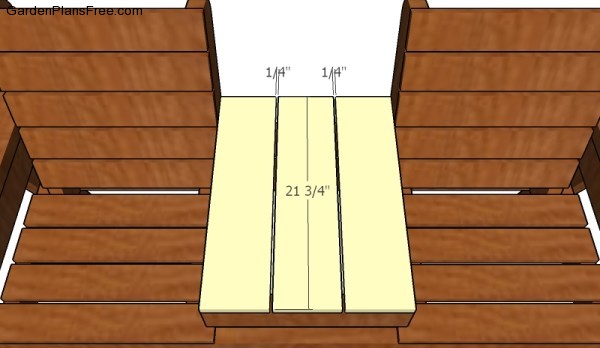
Fitting the table slats
Also, attach the 1×6 slats to the supports, as shown in the plans. Place a piece of 1/4″ plywood between the slats to create even gaps. Drill pilot holes before inserting the 1 1/4″ screws into the slats.
Finishing touches for bench

How to build a double chair bench with table
Now that you have assembled the double chair bench with table, you need to take care of the finishing touches. Fill the holes and dents with putty and let it dry out for several hours. Smooth the surface with sandpaper and remove the residues with a damp cloth.
If you are a skilled woodworker, you can even modify the plans so that you can fit a cooler to the bench. It will be an awesome project for the summer. If you want to build complementing chairs, take a look over my patio chair plans.
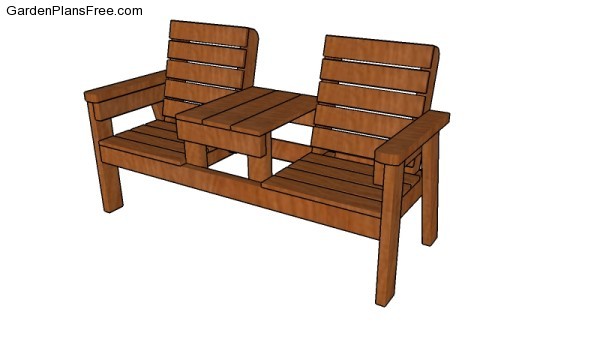
Double Chair Bench Plans
We recommend you to check if the components are locked into place properly and structure is rigid enough for your garden. Make sure there are no protruding screws or sharp edges.
PRO TIP: Apply several coats of paint or stain over the components, in order to protect them from decay. Check out the rest of the project to learn more about building garden projects.
Building a double chair bench explained!
This diy project was about free double chair bench plans. If you have enjoyed the free project, we recommend you to share it with your friends, by using the social media widgets. If you want a bigger bench, you should take a look over these large double chair bench plans.


10 comments
working on fixed income and love to build things
Awesome. Looking forward to seeing your projects.
Thanks for the bench plans. Mine turned out great!
That is awesome! Congrats. I would love to see and feature your project. You can send a few pics here: http://gardenplansfree.com/contact/
I would really like to make this, but I don’t know how I would go about the conversion to metric. Obviously I have to round it but I don’t know if I have to round everything the same way or just to what is closest?
I’ve build with metric before, and I can tell you it’s not that complicated. It doesn’t have to be perfect. Just adjust the numbers to male them work for the materials you have. Pay attention to seat height and angles. You can adjust the rest. Also remember the actual sizes for lumber, fox ex. 2x4s are actually 1 1/2″ x 3 1/2″
Could you give me the “real” sizes of the rest aswell, I’m sure the conversion will be easier if I know those! Thanks in advance!
1×6 is 3/4″x5 1/2″ and 1×4 is 3/4″x3 1/2″
Hi, i´m very interested in building this but I life in the metric world and also the lumber I can obtain is cut in swedish dimensions for example 2×4 is 45×95 mm. Is there some simple way to adjust the plan?
Unfortunately, I cannot help you with that.