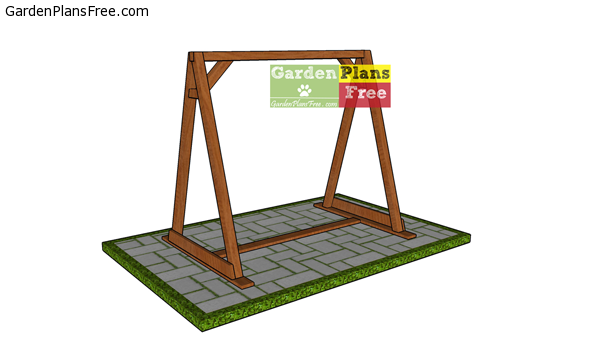
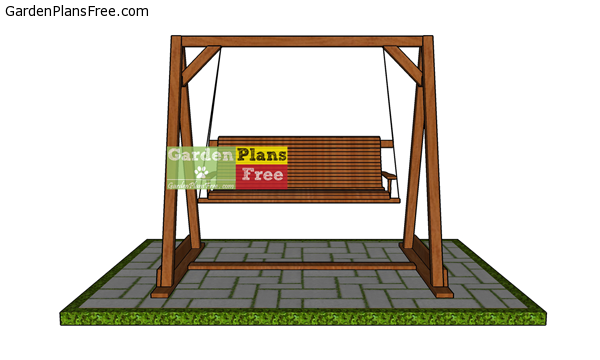
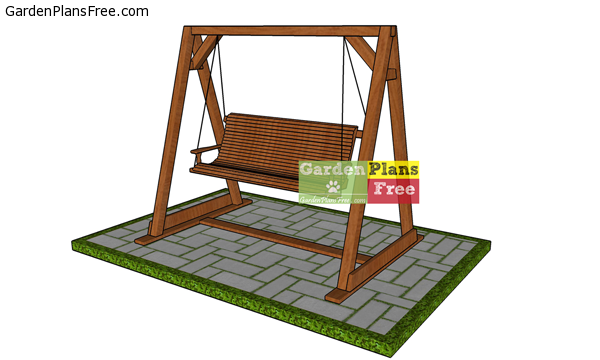
If you want to learn more about how to build an A-frame swing stand you have to take a close look over the free plans in the article. This is a basic stand made out of wood that makes for the perfect choice if you want to spend time on your porch, deck or patio. The stand is 8 ft wide, so it makes for a great project for almost any swing bench. I recommend you to use at least pressure treated lumber, as some components will be exposed to moisture. More furniture projects HERE.
If you want to get the job done in a professional manner, we recommend you to plan everything with attention, as to prevent costly mistakes and to build a professional garden bench. Invest in high quality materials, such as cedar, pine or redwood, as the bench will be exposed to all kinds of weather. Apply a few coats of paint over the components, to enhance their appearance and to protect them from bad weather.
A-frame Porch Swing Stand – Free DIY Plans
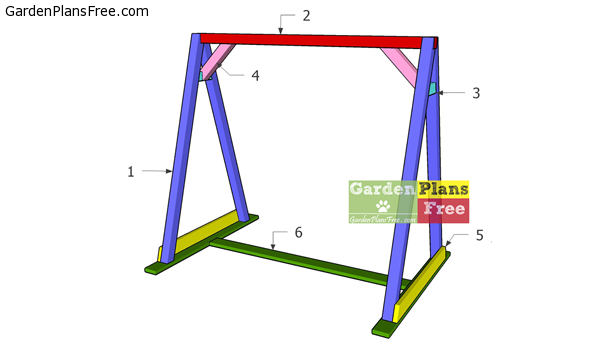
Building-an-A-frame-swing
Materials
- 1 – 4 pieces of 4×4 lumber – 90 1/2″ long POSTS
- 2 – 1 piece of 4×4 lumber – 96″ long TOP BEAM
- 3 – 2 pieces of 4×4 lumber – 8 3/4″ long BRACES
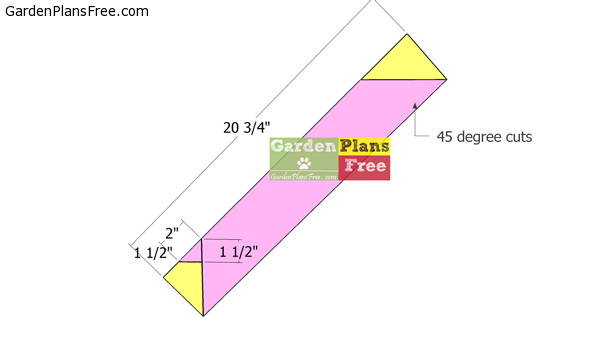
- 4 – 2 pieces of 4×4 lumber – 20 3/4″ long BRACES
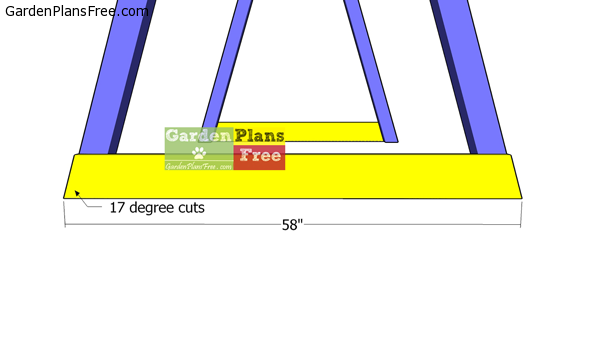
- 5 – 2 pieces of 2×6 lumber – 58″ long BASE BRACES
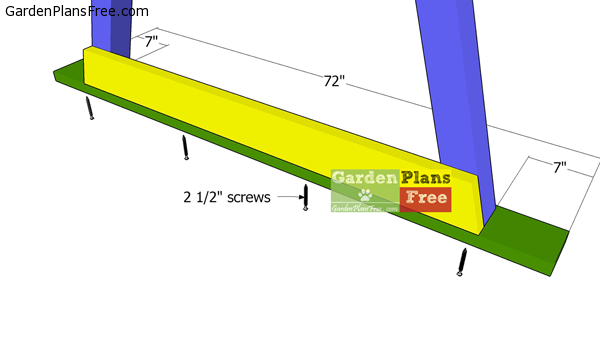
- 6 – 2 pieces of 2×6 lumber – 72″ long SKIDS
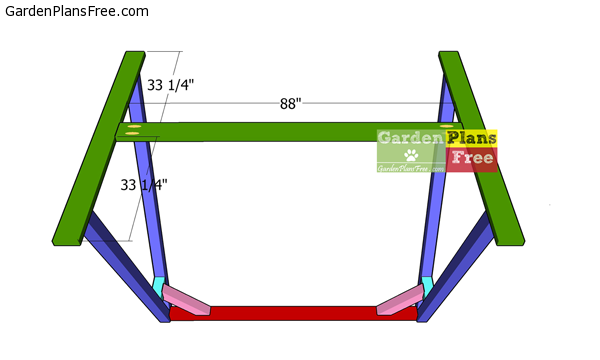
- 6 – 1 piece of 2×6 lumber – 88″ long STRETCHER
- 5 pieces of 4×4 lumber – 8′
- 1 piece of 4×4 lumber – 6′
- 1 piece of 2×6 lumber – 8′
- 1 piece of 2×6 lumber – 10′
- 1 piece of 2×6 lumber – 12′
- 30 pieces of 2 1/2″ screws
- 10 pieces of 3 1/2″ screws
- 20 pieces of 5 1/2″ screws
- swing hangers
- wood glue, stain/paint
Tools
- Hammer, Tape measure, Carpentry square
- Miter saw, Drill machinery, Screwdriver, Sander, Router
- Safety Gloves, Safety Glasses, Respiratory Mask
Time
- One day
Cut Diagram
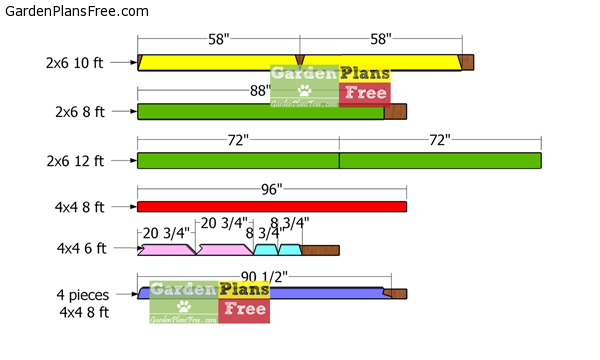
Cut-list—a-frame-swing
STEP 1: Building A-frame swing stand

Posts-for-A-frame-swing
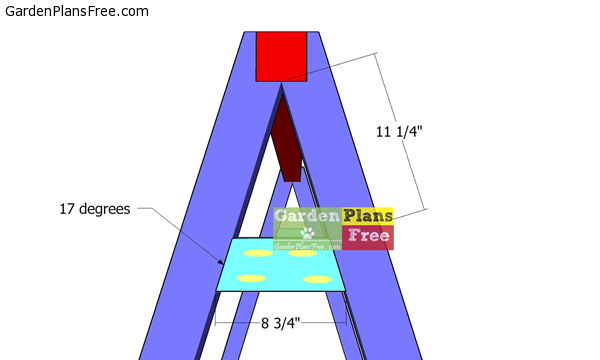
First of all, we need to make the posts for the A-frame swing stand. Therefore, use a miter saw to make the 17 degree angle cut to one end of the posts.
Top-cuts-to-posts
Mark the cut lines to the opposite end of the posts and get the job done with a circular saw. Smooth the edges with sandpaper.

Fitting-the-top-beam
Next, we need to assemble the frame of the swing stand by attaching the top beam. Drill pilot holes through the posts and insert 5 1/2″ screws into the beam. Use at least 2 screws for each joint. Make sure you leave no gaps between the components and check if the corners are square.
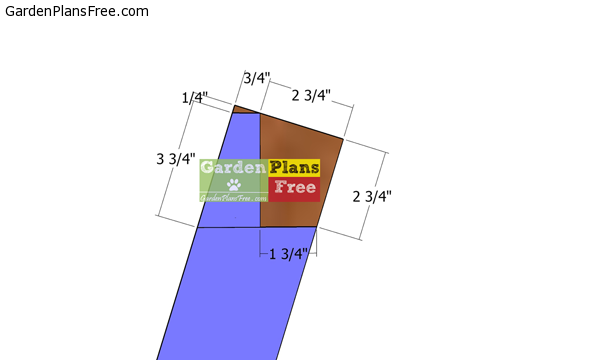
Top-side-braces
Use 4×4 lumber for the side braces. Make 17 degree cuts to both ends of the braces and then drill pocket holes, as shown in the diagram. Align everything with attention and insert 3 1/2″ screws to lock them into place tightly. Make sure you leave no gaps between the components.
STEP 2: Attaching the braces
Diagonal-braces
We will also use 4×4 lumber for the diagonal braces. These braces are needed to prevent the lateral movements. Mark the cut lines to the beams and get the job done with a circular saw.

Fitting-the-diagonal-braces
Plumb the side frames for the swing stand. In addition make sure the corners are square. Fit the braces to the frame of the stand, drill pilot holes through the braces and insert 5 1/2″ screws into the framing.
Base-braces—swing-stand
Fit the 2×6 braces to the base of the A-frames. Make 17 degree cuts to both ends of the braces and then clamp them to the base of the posts. Drill pilot holes and insert 3 1/2″ screws to lock them into place.
Fitting-the-base-slats
Fit the 2×6 skids to the base of the A-frames, as shown in the diagram. Drill pilot holes through the skids and insert 2 1/2″ screws into the braces and legs. Before inserting the screws make sure the skids are centered into place. Leave no gaps between the components.
Stretcher
Use 2×6 lumber for the stretcher. Drill pocket holes at both ends before centering it to the skids. Leave no gaps between the components and make sure the corners are square. Insert 2 1/2″ screws to set the stretcher into place tightly.
8-ft-swing-stand-plans
Last but not least, you need to take care of the finishing touches. Therefore, doublecheck all the joints and fill the holes with wood putty. Smooth the surface with 120-220 grit sandpaper, before applying stain or paint.
How-to-build-an-A-frame-swing
If you want a permanent solution for the swing bench, that also has minimalist design, I have free plans for a 2 post stand.
A-frame-swing-stand-plans
You should take a look over my other tutorial on how to build the swing bench HERE.

This diy project was about basic swing stand plans. If you have enjoyed the free project, we recommend you to share it with your friends, by using the social media widgets.
4 comments
Hi – I love this site. I’m interested in printing/downloading the pattern for the garden swing seat but I don’t seem to be able to do this. I can’t do a woodwork project with the instructions on my laptop- that’s just not feasible. Can you help?
Hi, you have a GET PDF PLANS button at the end of the article.
Ok the site says free. Then there’s a $2+ charge to get the directions? NOT FREE! I don’t mine the $2 bucks BUT it’s either FREE or it’s not! Also, as the previous person stated, your site it’s very clear on how to get the directions. If I hadn’t see the previous comment, I wouldn’t know how to get the directions…..and I’ve been looking for quite awhile. AND….how about saying the directions will be sent to your email? I thought they would show up on the screen after payment was made.
All plans are FREE ONLINE. There is no mention about free download or free print on my blog. Therefore, don’t accuse me of something you wish it was. Secondly, it is common sense the PDF is delivered to your email, that’s why your email is asked when making the purchase. Cheers.