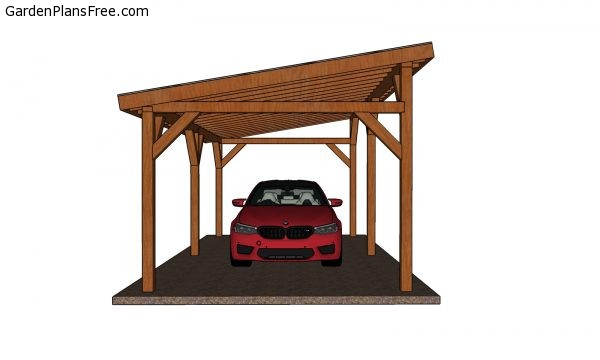
If you want to learn more about how to build a single car carport you have to take a close look over the free plans in the article. I have designed this carport with a low slope, so you can protect your car from the elements. This carport will save you money and time. Read the local building codes so you come with the most appropriate dimensions for the components. The roof pitch is 2:12 and the roof has a lean to shape. The roof structure is made from 2x6s and 1/2″ plywood. The rafters are placed every 16″ on center. You can change that by adjusting the height of the supports. See all my plans and projects HERE.
If you want to get the job done in a professional manner, we recommend you to plan everything with attention, as to prevent costly mistakes and to build a professional garden project. Invest in high quality materials, such as cedar, pine or redwood, as the structure will be exposed to all kinds of weather. Apply a few coats of paint over the components, to enhance their appearance and to protect them from bad weather.
12×24 Lean to Carport – Free DIY Plans
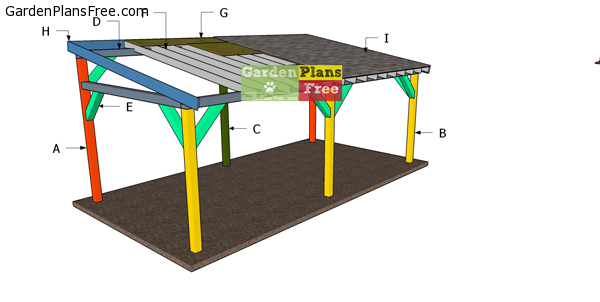
Building-a-lean-to-carport
Materials
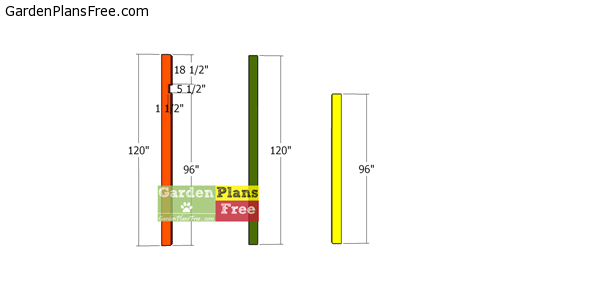
- A – Posts – 6×6 lumber 12′ long 2 pieces
- B – Posts – 6×6 lumber 8′ long 3 pieces
- C – Posts – 6×6 lumber 12′ long 1 piece
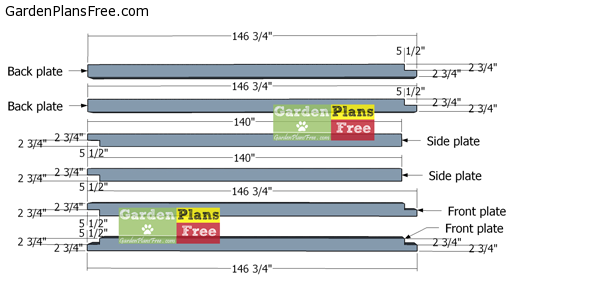
- D – Plates – 6×6 lumber 140″ long 2 pieces
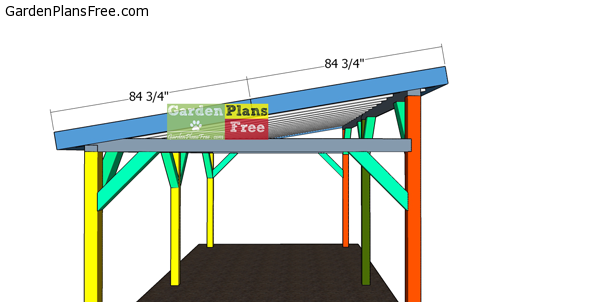
- D – Plates – 6×6 lumber 146 3/4″ long 4 pieces
- E – Braces – 6×6 lumber 36″ long 12 pieces
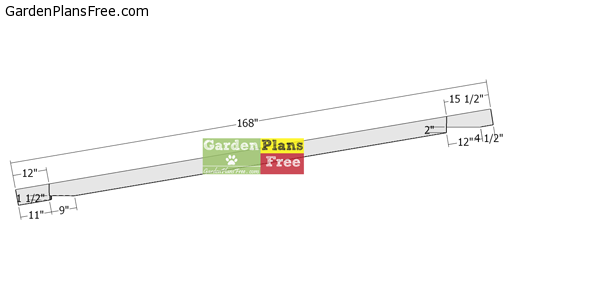
- F – Rafters – 2×6 lumber 168″ long 19 pieces
- G – Roof sheets – 1/2″ plywood 4’x8′ long 8 pieces
- G – Roof sheets – 1/2″ plywood 4’x4′ long 2 pieces
- G – Roof sheets – 1/2″ plywood 2’x8′ long 2 pieces
- G – Roof sheets – 1/2″ plywood 2’x4′ long 2 pieces
- H – Trims – 1×8 lumber 12′ long 4 pieces
- H – Trims – 1×8 lumber 84 3/4′ long 4 pieces
- I – Asphalt Shingles & Tar Paper 350 sq ft
- 10 pieces of 1/2″ plywood 4’x8′
- 1 piece of 1/2″ plywood 4’x4′
- 3 pieces of 6×6 lumber 10 ft
- 3 pieces of 6×6 lumber 8 ft
- 5 pieces of 6×6 lumber 12 ft
- 4 pieces of 6×6 lumber 14 ft
- 4 pieces of 1×8 lumber 8 ft
- 4 pieces of 1×8 lumber 12 ft
- 19 pieces of 2×6 lumber 14 ft
- 350 sq ft of tar paper and asphalt shingles
- 4 tube forms – 16″ diameter
- 500 pieces of 1 5/8″ screws
- 16 pieces of 8″ screws
- 100 pieces of 2″ nails
- 50 pieces of 7 1/2″ screws
- 50 pieces of 4 1/2″ screws
- 38 rafter ties
- 2 boxes of 1 1/2″ structural screws
- 2 pieces of post to beam connectors
- 500 pieces of roof nails
- 80 ft Roof flashing
- 6 post anchors
- wood glue, stain/paint
Tools
- Hammer, Tape measure, Carpentry square
- Miter saw, Drill machinery, Screwdriver, Sander, Router
- Safety Gloves, Safety Glasses, Respiratory Mask
Time
- One week
Step 1: Building the frame of the Carport
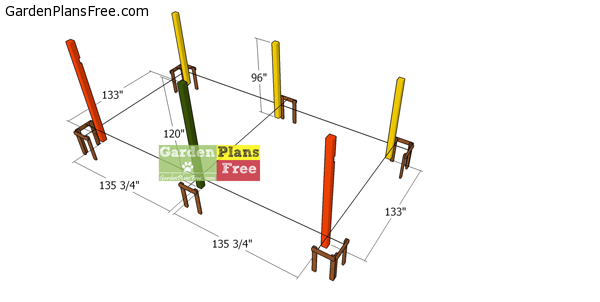
Laying-out-the-posts—single-carport
Lay out the carport in a professional manner. Build batter boards and use string to layout everything in a professional manner. Apply the 3-4-5 rule to every corner and make sure the diagonal are equal, otherwise the corners won’t be square.
Building-the-posts—carport
Select the location for the carport with attention, making sure it complies with the local codes. Get a building permit if needed. Level the surface with attention, removing the vegetation layer.
Cut the posts for the carport from 6×6 lumber. Make a cutout in the orange posts. Make parallel cuts and remove the excess with a chisel.
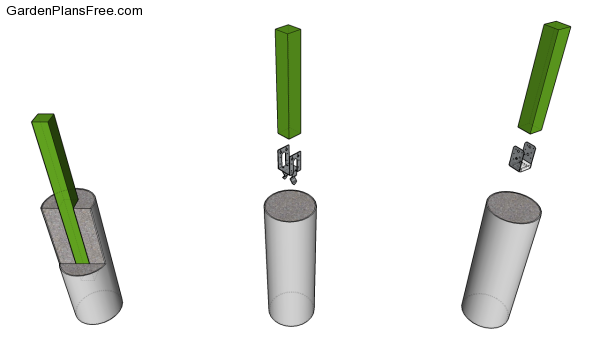
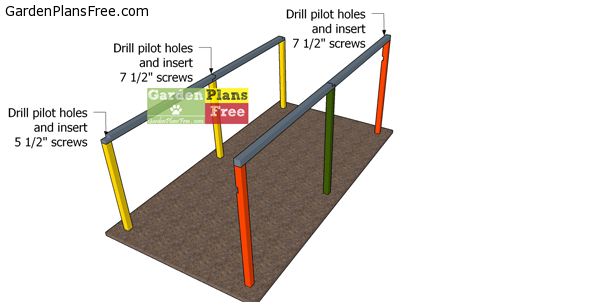
Dig holes under the front line and fit the tube forms into place. Fill them with concrete and then install the post anchors. Fit the posts to the anchors and then plumb them with a spirit level. Use temporarily braces to lock the posts into place until assembling the frame of the pavilion.
Plates
Build the top plates for the carport from 6×6 lumber. Make the notches to the plates with a circular saw. Make parallel cuts inside the marked areas and remove the excess material with a chisel. Smooth the surface with sandpaper.
Front-and-back-plates
Fit the 6×6 plates to the sides of the carport. Align the edges with attention and make sure the corners are square. Drill pilot holes through the plates and insert 7 1/2″ screws into the top of the posts. Plumb the posts with a spirit level and check of the corners are square.
Fitting-the-plates—one-car-carport
Fit the plates to the front and back of the carport. Use a spirit level to make sure the plates are perfectly horizontal, before locking them into place with screws. Drill pilot holes and insert 7 1/2″ screws to lock them into place tightly.
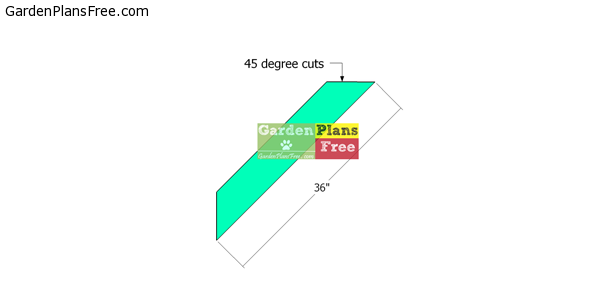
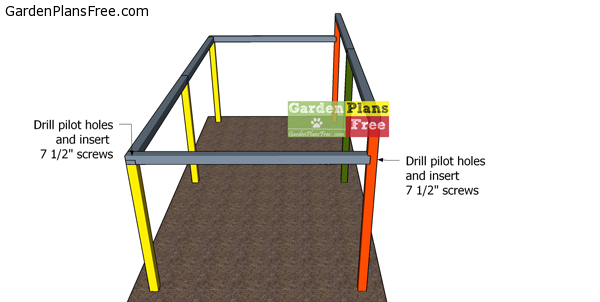
Building-the-braces
Use 6×6 lumber for the braces. Use a miter saw to make 45 degree cuts to both ends of the braces.

Fitting-the-braces
Plumb the posts with a spirit level and then attach the braces into place tightly. Drill pilot holes through the braces and insert 4 1/2″ screws, to lock them into place tightly.
Step 2: Building the roof of the Carport
Rafters-for-carport
Build the rafters for the single car carport. Therefore, you should use 2×6 lumber. Mark the cut lines on the beams and then get the job done with a saw. Smooth the edges with sandpaper for a professional result.
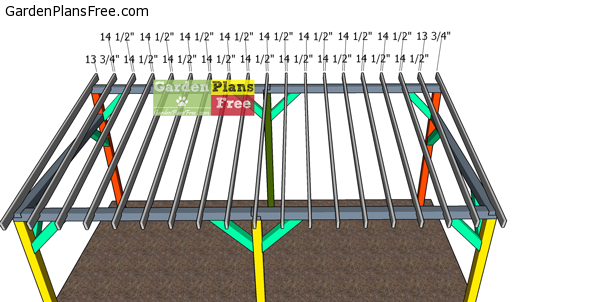
Fitting-the-rafters
Fit the rafters to the top of the single car carport, making sure you place them every 16″ on center. Use a spirit level to plumb the trusses and lock them to the support beams with rafter ties.
Fitting-the-roof-sheets
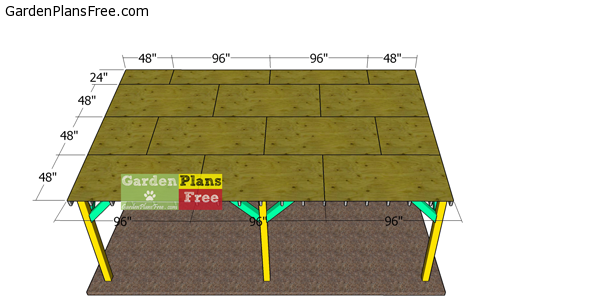
Attach 1/2″ plywood sheets to the top of the carport. Start with the bottom left section of the carport and go up to the top. Leave no gaps between the sheets and secure them into place with 1 5/8″ screws or nails. Ideally, you should use tongue and groove roof sheets.
Front-and-back-roof-trims
Fit 1×8 trims to the carport, so you cover the ends of the rafters. Use 2″ brad nails to secure the trims into place. Align the edges with attention for a professional result.
Side-roof-trims—-carport
Fit the rest of the 1×8 trims to the roof of the carport. Align the edges flush and leave no gaps between the trims. Insert 2″ nails, every 8″.
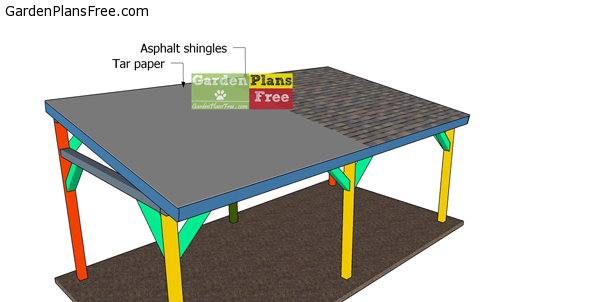
Fitting-the-roofing
Install the roofing felt, starting from the bottom left of the roof. Secure the paper to the roofing, using a stapler. Make sure the tar paper overlaps at least 2”.
Don’t forget to cover the top ridge with a 14” strip of paper. Start the first course of shingles with a full tab, the second with 2 1/2 tabs, the third with 2 tabs, the forth with 1 1/2 tabs, the fifth with 1 tab, the sixth with half tab and the seventh with a 3 tabs.
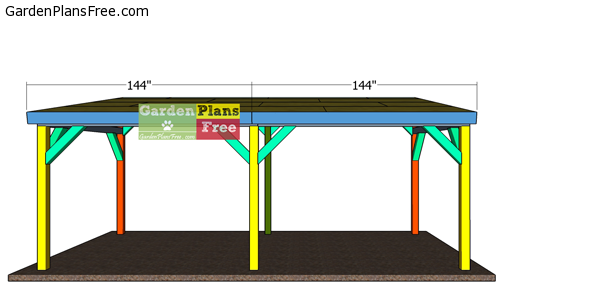
12×24 Carport – front view
Next, make sure everything is assembled together tightly. Fill the holes with wood putty and smooth the surface with 120-220 grit sandpaper. Apply a few coats of paint or stain to enhance the look of the pavilion and to prevent the wood from decay. Since you are here, why not check my 12×16 pavilion plans, as well.

12×24 Carport – free diy plans
Last but not least, fill the holes with wood putty and let it dry out for a few hours. Sand the whole surface with sandpaper and then apply a few coats of paint or stain to enhance the look of the carport and to protect the components from decay.
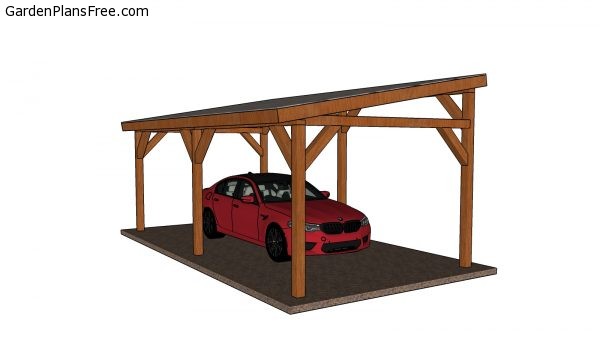
How to build one car carport
This is a sturdy carport with a lean to roof that can shelter one car. The generous dimensions make this carport ideal for a family car. You can build this carport with minimal tools and basic woodworking techniques. You can make adjustments to the carport to enhance the look of the project and make it suit your needs.
PRO TIP: Apply several coats of paint or stain over the components, in order to protect them from decay. Check out the rest of the project to learn more about building garden projects. I also have free plans for a 2 car carport, so you should consider checking them out, as well.

9 comments
How much would you charge to give us plans for a 10 or 12×30 lean to carport? Also we want to install a metal roof. Thank you
Me too! That’s what we want also!! Thanks!!!
Can you do a plan for a 34×28 34 feet goes along the house and comes out 28 feet I need snow load at 50 lbs per square foot and how much
No
Hi
Can I modify this to have 11’6″ from ground to lowest part of roof (that cross bar), and to be 10×20? That’s the size i need for truck camper storage. Is that engineered to withstand particular wind speed?
Many thanks,
Bill Slaughter
Tacoma WA
Good looking plans, but how do I print or download them? Says content is protected, Thanks
There is a GET PDF PLANS button at the end of the article. The PDF file is not free.
Do these plans have an engineering stamp?
No.