This step by step diy woodworking project is about deck bench plans free. If you want to enhance the look of your backyard deck, we strongly suggest you to consider building a bench with a classic design. Make sure you adjust the size and the style of the deck bench to your needs before starting the actual constructions project, otherwise it might not suit your needs as you imagine.
On the other hand, we strongly recommend you to invest in high quality materials, as the bench will be exposed to moisture and sunlight. Choose weather-resistant lumber and make sure the components are perfectly straight and in a good condition. Work with attention and always plan everything from the very beginning, in order to prevent potential issues and to fit within the budget.
Free Deck Bench Plans
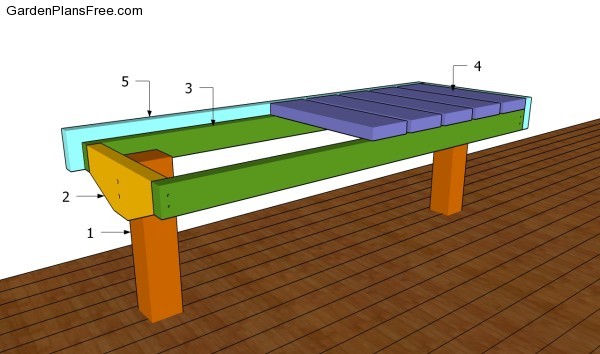
Building a deck bench
Materials
- 1 – 2 pieces of 4×4 lumber – 25″ POSTS
- 2 – 2 pieces of 2×6 lumber – 16” SUPPORTS
- 3 – 2 piece of 2×3 lumber – 55 1/2″ FRAME
- 4 – 9 pieces of 2×6 lumber – 19″ SLATS
- 5 – 2 pieces of 2×6 lumber – 19″, 2 pieces – 58 1/2″ TRIMS
- 1 piece of 4×4 lumber – 6 ft
- 3 pieces of 2×6 lumber – 8 ft
- 1 piece of 2×6 lumber – 10 ft
- 1 piece of 2×3 lumber – 10 ft
- 2 1/2″ screws
- wood glue, stain/paint
Tools
- Hammer, Tape measure, Carpentry square
- Miter saw, Drill machinery, Screwdriver, Sander, Router
- Safety Gloves, Safety Glasses, Respiratory Mask
Time
- One day
Building a deck bench
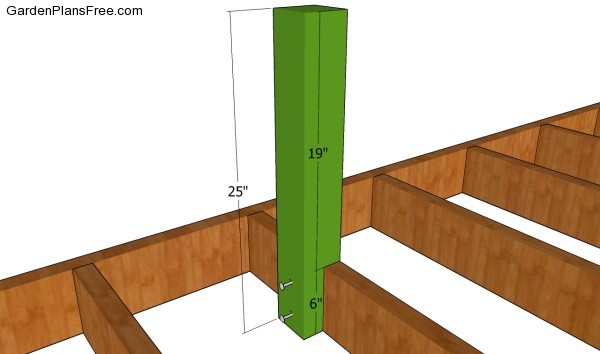
Installing the posts
The first step of the woodworking project is to attach the posts to the deck framing. As you can easily notice in the image, we recommend you to cut out a small notch inside the posts by using a circular saw.
PRO TIP: Make parallel cuts with a circular saw and clean the recess with sandpaper.Drill pilot holes, plumb the posts with a spirit level and lock them into place with carriage bolts.
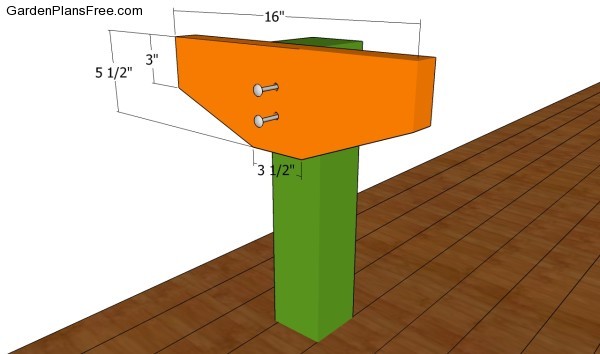
Fitting the support slats
The next step of the project is to cut the supports out of 2×6 lumber. Mark the cut lines on the 2×6 slats and get the job done with a saw. Smooth the cut edges with sandpaper, drill pilot holes and lock the supports to the posts with carriage bolts or with screws.
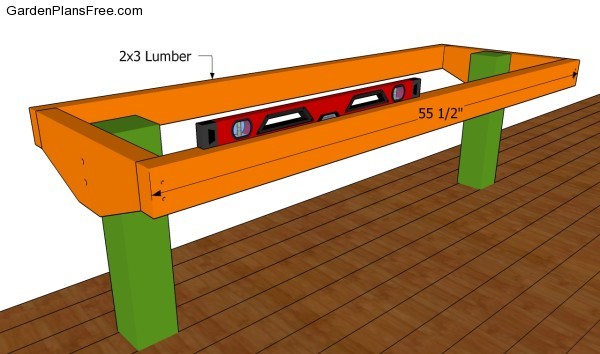
Building the frame of the bench
Continue the project by attaching 2×3 slats to the front and to the back of the deck bench, as shown in the free plans. Check if the slats are perfectly horizontal before locking them to the supports with galvanized screws. Add waterproof glue to the joints, if you want to create rigid joints.
Attaching the slats
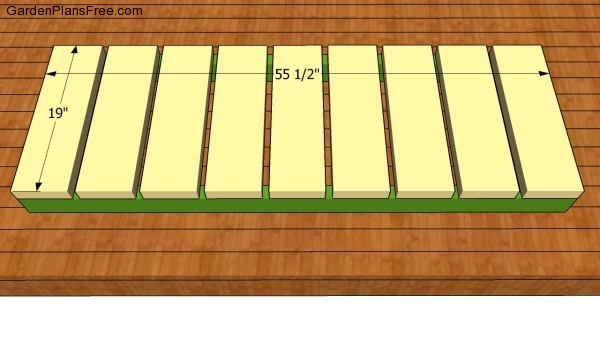
The next step of the backyard project is to attach the slats to the deck bench. As you can see in the image, you should cut the 2×6 slats at the right dimension and lock them to the supports, at both ends, by using galvanized screws. Place the slats equally spaced, by placing a wood block between them. In this manner it will be a lot easier to get consistent gaps between the slats.
Attaching the trims
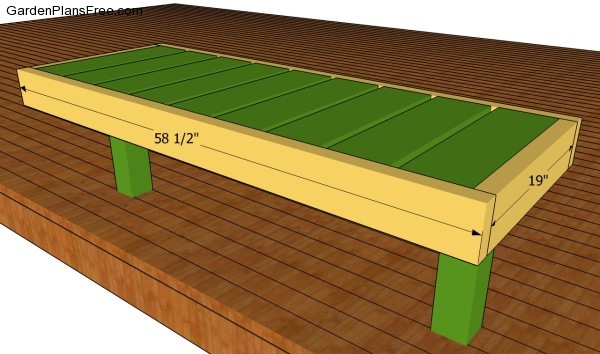
If you want to enhance the look of the deck bench, we suggest you attach trims to the exterior of the slats. As you can easily notice in the image, you should attach the trims to the bench after making sure the components are perfectly aligned. Use waterproof glue and finishing nails to get the job done. If you want to add character to the deck bench, you could cut the ends of the trims at 45 degrees and get neat joints.
Deck bench plans free
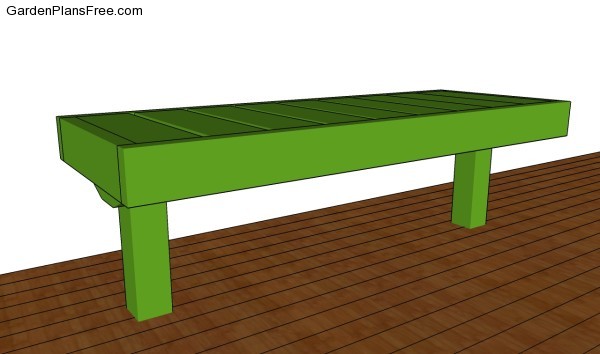
Last but not least, you should take care of the finishing touches. Therefore, we recommend you to check if the components are locked into place properly and if the frame is rigid. Make sure there are no protruding screws or sharp edges.
PRO TIP: Fill the holes with a good wood filler and smooth the surface with 120-grit sandpaper. Apply several coats of paint or stain over the components, in order to protect them from decay. Make sure the design of the deck seat matches the style of the rest of your garden.
This diy project was about deck bench plans free. If you have enjoyed the free project, we recommend you to share it with your friends, by using the social media widgets.
