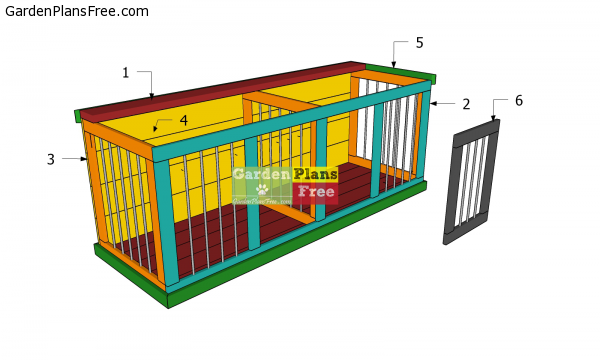
If you want to learn more about a double large dog kennel you have to take a close look over the free plans in the article. This project requires common lumber that you can find in any DIY store and rebars. This kennel is easy to build and it will also be a central piece of your living room. You can use this wooden crate as a TV stand, for example. This kennel is designed for a large dog, as it has the following total interior dimensions: 26″x80″x29″ (lxLxh). See more dog projects HERE.
In addition, you need to know that I’ve got you covered with a full and complete cut / shopping list, so you waste no time and go right ahead and build the kennel. The 3 D diagrams will guide you through all the steps, so you build a nice project, even as a beginner to woodworking.
If you want to get the job done in a professional manner, we recommend you to plan everything with attention, as to prevent costly mistakes and to build a professional garden project. Invest in high quality materials, such as cedar, pine or redwood, as the bench will be exposed to all kinds of weather. Apply a few coats of paint over the components, to enhance their appearance and to protect them from bad weather.
Double Large Dog Kennel – Free DIY Plans
Building-a-dog-kennel
Materials
- 1 – 10 pieces of 2×6 lumber – 81 1/2″ long FLOOR AND TOP
- 2 – 5 pieces of 1×3 lumber – 24″ long, 2 pieces – 81 1/2″ long FRONT WALL
- 3 – 2 pieces of 1×3 lumber – 24″ long, 2 pieces – 26″ long 2xSIDE WALL
- 4 – 4 pieces of 1×8 lumber – 81 1/2″ long BACK WALL
- 5 – 4 pieces of 1×3 lumber – 29″ long, 4 pieces – 83″ long TRIMS
- 6 – 4 pieces of 1×3 lumber – 17″ long, 4 pieces – 18 3/4″ long DOOR
- 14 pieces of 1×3 lumber – 8 ft
- 10 pieces of 2×6 lumber – 8 ft
- 4 pieces of 1×8 lumber – 8 ft
- 3 pieces of 3/8″ rebar – 20 ft
- 150 1 1/4″ pocket hole screws
- 100 1 5/8″ screws
- 100 2 1/2″ screws
- 150 2″ finish nails
- wood glue, stain/paint
- 4 hinges
- 2 door handle
Tools
- Hammer, Tape measure, Carpentry square, Pocket hole jig
- Miter saw, Drill machinery, Screwdriver, Sander, Router
- Safety Gloves, Safety Glasses, Respiratory Mask
Time
- One weekend
Cut Layout Diagram
STEP 1: Building the dog kennel frame
Top—assembly
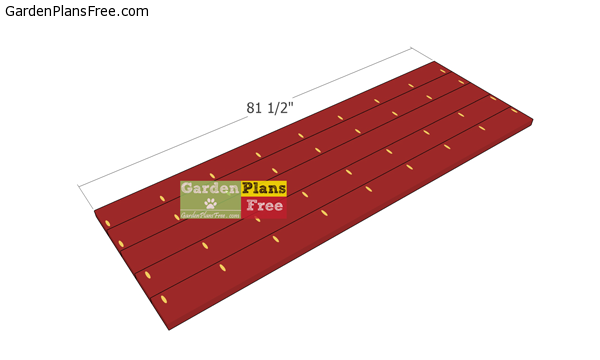
The first step of the project is to build the floor and the top for the double dog kennel. Cut the components from 2×6 lumber at 81 1/2″. Use a level surface and drill pocket holes, as shown in the diagram. Align the edges flush and add glue to the joints. Clamp them together leaving no gaps between the boards and insert 2 1/2″ screws through the pocket holes.
Using 2x6s makes the structure heavy but also very sturdy and durable. You can also join the boards with wood biscuits.
Assembling-the-side-panels
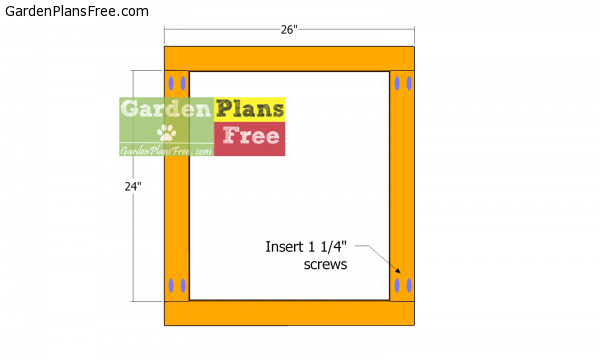
Next, we will build the side panels for the dog kennel. Therefore, we need 1x3s for the frames. Cut the components as shown in the diagram and drill pocket holes at both ends of the vertical components.
Side-panels—assembly
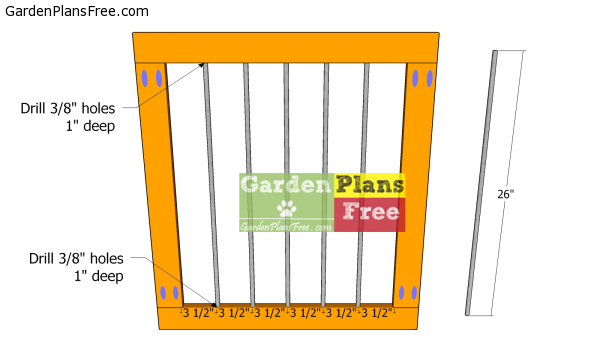
We also need 3/8″ rebars cut at 26″, that go inside the frames. Use a 3/8″ drill bit and make 1″ deep holes, every 3 1/2″ along the bottom and top slats. REMEMBER that you have to install the top slat to the frame, AFTER installing the rebars.
Furthermore, align the edges flush and insert 1 1/4″ screws through the pocket holes, to assemble the frames together tightly. Make sure the corners are square.
Assembling-the-back-panel
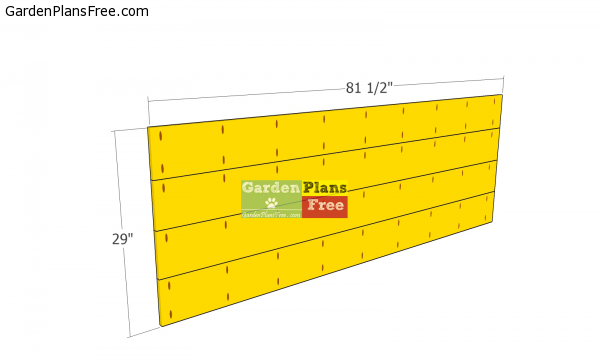
We need 1×8 boards cut at 81 1/2″ for the back wall. Drill pocket holes along the boards, as shown in the diagram. Align the edges flush, add glue to the joints and insert 1 1/4″ screws to assemble everything together tightly.
STEP 2: Assembling the dog kennel
Assembling-the-dog-kennel
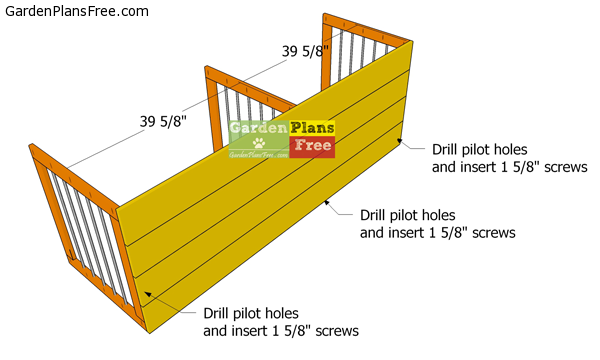
Also, attach the sides to the back panel. Make sure the edges are flush and check if the corners are square. Drill pilot holes through the back panel and insert 1 5/8″ screws into the side frames (insert one screws through each board, at both ends).
Fitting-the-floor
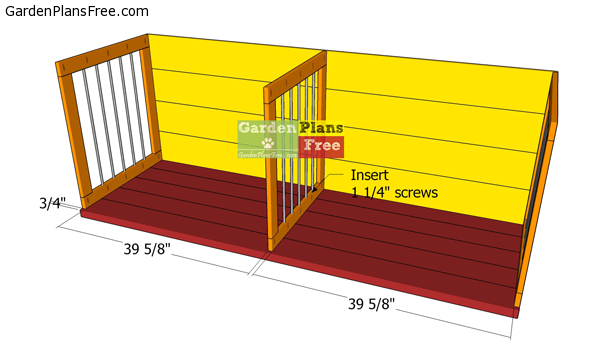
As you see in the diagram, you need to drill pocket holes along the base and top slats of the side frames. We need the pocket holes so we can attach the side frames to the floor and tabletop. After drilling pilot holes set the frame of the kennel over the bottom, align the edges and insert 1 1/4″ screws to lock them together tightly.
Assembling-front-frame
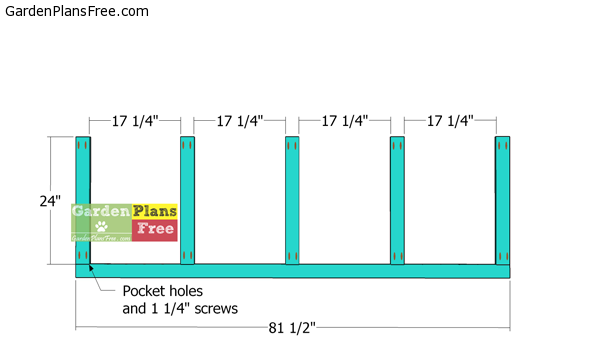
Next, we need to cut the components for the front wall. Cut the components from 1×3 lumber as shown in the diagram and drill pocket holes at both ends of the vertical slats. Do not attach the top slat into place until you fit the rebars.
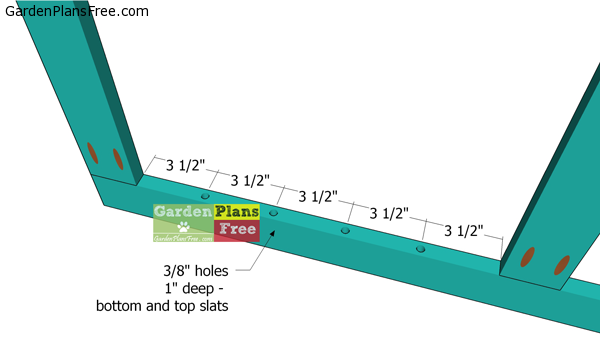
Holes
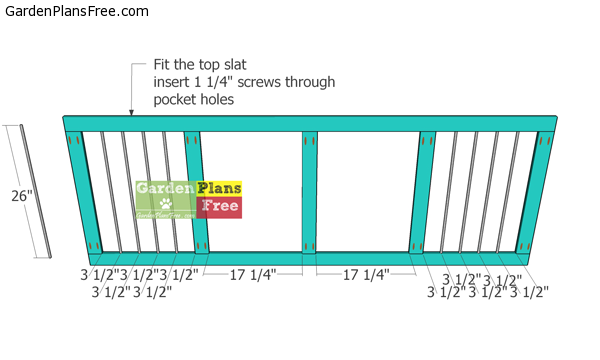
Assembling-the-front-wall-panel
Basically, cut 4 pieces of 3/8″ rebars at 26″. Use a drill and a 3/8″ bit to make 1″ deep cuts into the bottom and top slats, every 3 1/2″, as shown in the diagram. Fit the rebars into place and then attach the top slat. Assemble everything with 1 1/4″ screws.
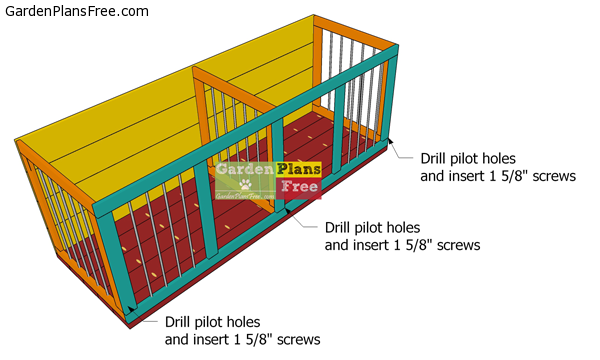
Fitting-the-front-wall-frame
Also, attach the front wall frame to the kennel, as shown in the diagram. Align the edges flush, drill pilot holes and insert 1 5/8″ screws into the side frames. Use 4 screws for each side.
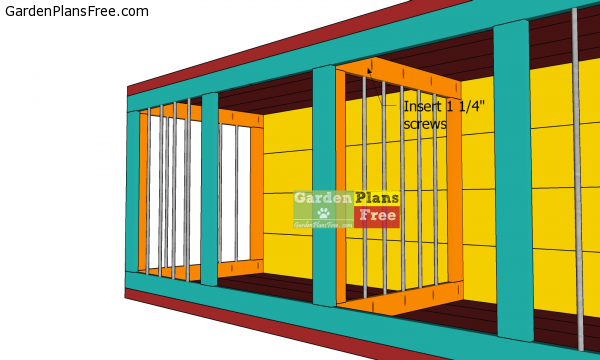
Attaching-the-tabletop
Next, we will attach the tabletop to the large dog kennel. Align the edges flush and insert 1 1/4″ screws to lock it into place.
STEP 3: Building the door
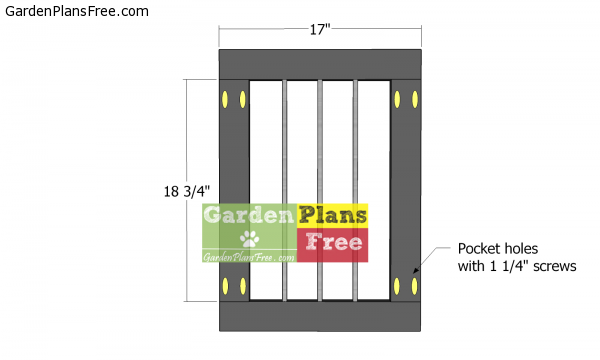
Door-frame
Building the door is a straight forward process. Just cut the components from 1×3 lumber, as shown in the diagram.
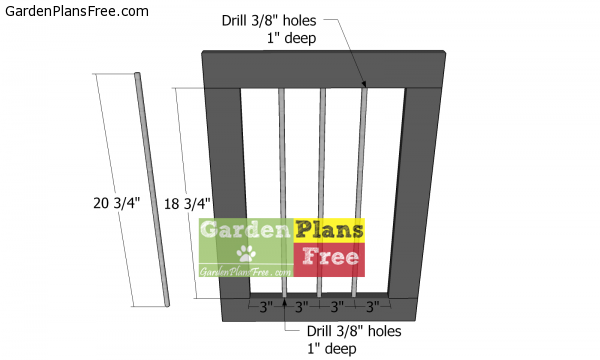
Assembling-the-door
Drill 1″ deep holes with a 3/8″ bit, every 3″ along the bottom and top slats. Make sure you fit the rebars inside the door frame, before the final assembly with 1 1/4″ screws through the pocket holes.
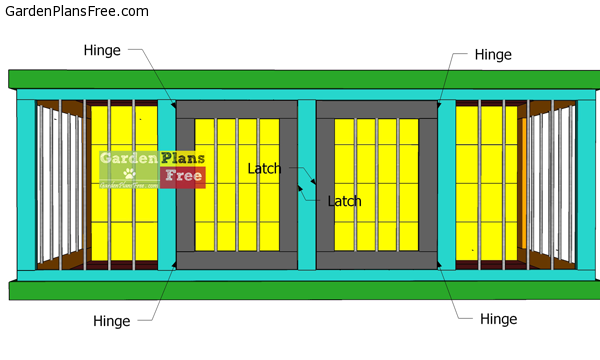
Fitting-the-doors
Furthermore, fit the door to the opening, making sure you have equal gaps on both sides (1/8″). Use the hinges to secure the door to the front wall and a latch so you can keep the kennel locked.
STEP 4: Finishing touches
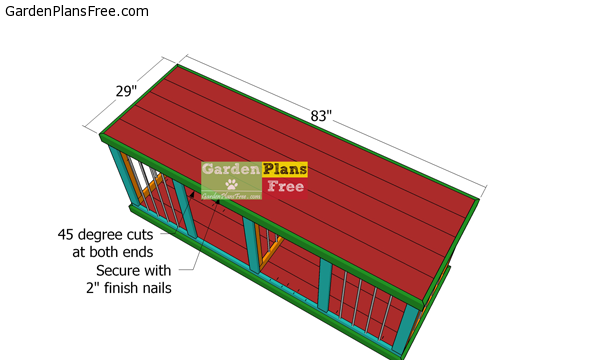
Fitting-the-top-trims
In order to make the wooden kennel look nicer, I recommend you to attach 1×3 decorative trims around the top and bottom. Use a miter saw to make 45 degree cuts to both ends of the kennel.
Align the edges flush and use 2″ finish nails to secure the trims into place. Repeat the process for the bottom of the kennel.
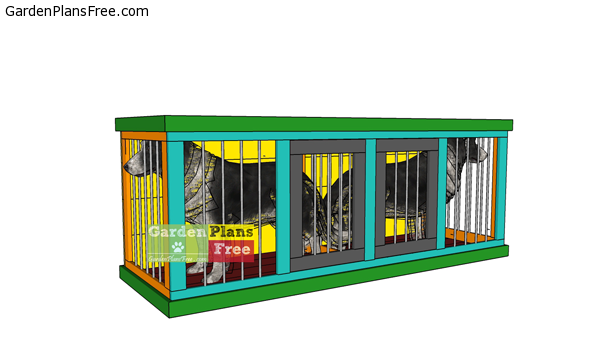
How-to-build-a-dog-kennel-for-2-large-dogs
Now that the dog crate is assembled, you have to double check all the joints. Make sure there are no gaps between the components and fill all the pocket holes with plugs or wood putty. For the sake of your pet, smooth the sharp edges and leave no protruding screws.
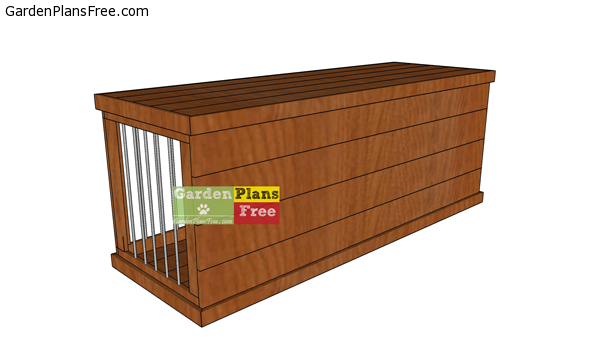
Large-kennel-for-two-dogs-plans
Remember that you can play with the dimensions of this crate project and follow the same techniques shown above. You should also take a look over this single dog kennel plan, if you need something for just one dog.
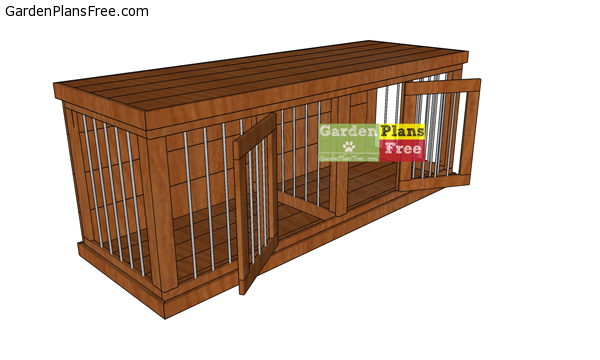
Build-a-double-kennel-from-wood
Last but not least, you need to care of the finishing touches. Smooth the surface with 120-220 grit sandpaper. Apply a few coats of stain / paint to enhance the look of the kennel and to protect the wood.
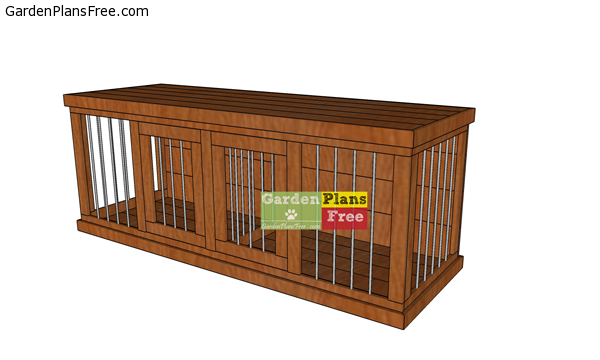
Double-large-dog-kennel-plans
In addition, if you want more building inspiration, see a list with all my diy plans HERE.
This diy project was about double large dog kennel plans. If you have enjoyed the free project, I recommend you to share it with your friends, by using the social media widgets. You can always save the plans as PDF or Print them using the floating widget on the left side of the screen (working only on PC or laptop).

