Step by step by step woodworking project about firewood shed plans free. Building a wood shed requires average skills and a low budget, so any person can get the job done. Nevertheless, we recommend you to choose a proper location and to check if you need a building permit. There are situations in which you have to comply with several legal requirements, so make sure you read the building codes.
There are a few things that you should know about building a firewood shed. Therefore, you should choose the most appropriate shape and designs for your needs and adjust its size to support enough firewood. Moreover, we recommend you to invest in quality lumber, such as pressure-treated lumber or cedar, if you want to build a durable shed and use it for many years in a row.
Building a firewood shed

Building a firewood shed
Materials
- 1 – 4 pieces of 2×4 lumber – 48 1/2”, 2 pieces – 53″, 2 pieces – 54 1/4″ POSTS
- 2 – 7 pieces of 2×4 lumber – 18”, 2 pieces – 90″ FRAME
- 3 – 5 pieces of 2×4 lumber – 90″ DECKING
- 4 – 16 piece of 1×4 lumber – 24 3/4″, 8 pieces – 93″ SLATS
- 5 – 2 pieces of 2×4 lumber – 96″, 5 pieces of 2×4 lumber – 25 3/4″ RAFTERS
- 6 – 1 piece of 3/4″ plywood – 96×27 3/4″ ROOFING
- 7 – 25 sq ft of roofing felt ROOFING FELT
- 8 – 25 sq ft of asphalt shingles SHINGLES
- 9 – 2 pieces of 1×4 lumber – 96″, 2 pieces – 30 1/2″ TRIMS
- 18 pieces of 2×4 lumber – 8′
- 17 pieces of 1×4 lumber – 8′
- 1 piece of 3/4″ plywood – 4’x8
- 200 pieces of 2 1/2″ screws
- 25 sq ft of tar paper, 25 ft of asphalt shingles
- 100 pieces of 1 5/8″ screws
Tools
- Hammer, Tape measure, Carpentry square
- Miter saw, Drill machinery, Screwdriver, Sander, Router
- Safety Gloves, Safety Glasses, Respiratory Mask
Time
- One day
Made from this plan
Firewood Shed Plans Free

Attaching the floor frame
The first step of the project is to build the floor frame. As you can see in the image, you need to assemble the frame from 2×4 lumber and 3 1/2″ galvanized screws. Use a carpentry square to check if the corners are right-angled.

Attaching the posts
The next step of the project is to attach the 2×4 posts to the exterior of the frame. As you can notice in the image, you need to leave a clearance space of several inches form the ground to the floor frame.
TOP TIP: Check if the floor is horizontal by using a spirit level before drilling pilot holes trough the posts and inserting the screws into the frame.In addition make sure the posts are plumb, otherwise the shed won’t have a professional appearance.

Attaching the decking
Attach 2×4 slats to the floor frame, making sure you place them equally spaced. Drill pilot holes trough the slats, countersink their head and insert the 3 1/2″ galvanized screws into the frame. Alternatively, you could fit 2×6 slats to the frame.

Attaching the rafters
Next, you should cut the rafters at the right size and angle (at least 15º) and fit them into place, as seen in the plans. First, you should attach the rim rafters to the posts and then the common rafters. Leave about 24″ OC between the rafters, if you want to support the weight of the roof properly.
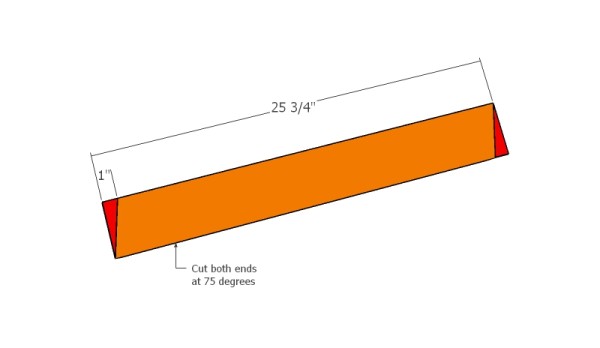
Build the rafters from 2×4 lumber, using the information from the diagram.

Attaching the roofing sheets
Use a small piece of 3/4″ plywood to cover the roof structure. Fit the plywood to the rafters and secure it into place by inserting 1 5/8″ screws every 6″ along the rafters.

Installing the roofing
Cover the plywood sheet with roofing felt, making sure the strips overlap at least 2″. Next, attach the asphalt shingles into place, starting with the bottom left of the roof. Work with attention and with great care, if you want to prevent costly mistakes.

Attaching the slats
Attach 1×4 slats to the sides and to the back of the firewood shed. Leave about 1-2″ between the slats and lock them to the posts with 1 5/8″ screws, if you want to add rigidity to the wooden structure.

Attaching the trims
Add 1×4 trims to the roof, if you want to enhance the look of the construction. You should decide from the very beginning if you install the trims, as the asphalt shingles have to overhang about 1-2″ on all sides of the shed.
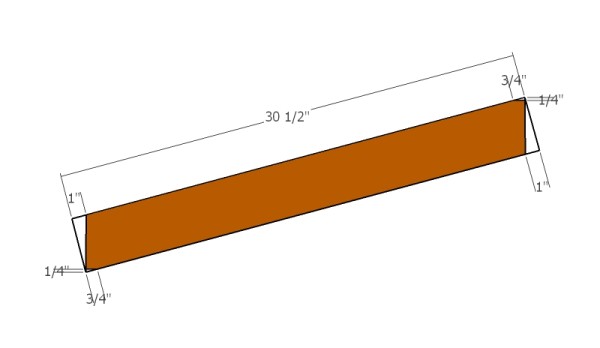
Trims
Build the side trims from 1×4 lumber.

Firewood Shed Plans Free
Last but not least, you should take care of the finishing touches. Therefore, we recommend you to check if the components are locked into place properly and structure is rigid enough to support the firewood. Make sure there are no protruding screws or sharp edges.
PRO TIP: Fill the holes with a good wood filler and smooth the surface with medium-grit sandpaper. Apply several coats of paint or stain over the components, in order to protect them from decay.

This diy project was about firewood shed plans free. If you have enjoyed the free project, we recommend you to share it with your friends, by using the social media widgets.