This detailed woodworking project is about attached carport plans free. If you want to build a carport attached to an existing building, then pay attention to the plans and instructions shown in this article. Make sure you plan every aspect of the project from the very beginning, paying attention to the designs, size and the materials you are going to use for your wooden carport.
Read the local codes before starting the project and make sure you do the necessary modifications to comply with your specific requirements. The good part of my plans is that they come with 3D diagrams and complete cut / shopping lists.
If you have a small backyard or you just want to keep the total expenditures of the project under control, we strongly recommend you to consider building an attached carport. Moreover, you should study the local building codes carefully, as there are many legal regulations you have to take into account. Invest in high quality materials, as the components will be exposed to moisture.
Attached carport plans
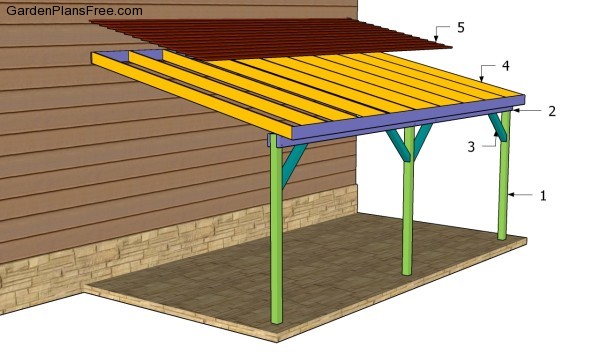
Building an attached carport
Materials
- 1 – 3 pieces of 4×4 lumber – 84” POSTS
- 2 – 3 pieces of 2×6 lumber – 216″, 1 piece of 1×8 lumber – 216″ BEAMS
- 3 – 4 pieces of 4×4 lumber – 34″ BRACES
- 4 – 10 pieces of 2×6 lumber – 131 1/4″ RAFTERS
- 5 – 24 pieces of 1×8 lumber – 216″ SLATS
- 1 piece of 4×4 lumber – 12 ft
- 3 pieces of 4×4 lumber – 8 ft
- 3 pieces of 2×6 lumber – 18 ft
- 10 pieces of 2×6 lumber – 12 ft
- 25 pieces of 1×8 lumber – 18 ft
- 3 pieces of 4×4 post anchors
- 1 box of 1 1/2″ structural screws
- 10 pieces of rafter ties
- 10 pieces of rafter hangers
- 16 pieces of 3 1/2″ screws
- 250 pieces of 1 5/8″ screws
- 5″ lag screw
- 6 pieces of 7″ carriage bolts
- wood stain
Tools
- Hammer, Tape measure, Carpentry square
- Miter saw, Drill machinery, Screwdriver, Sander, Router
- Safety Gloves, Safety Glasses, Respiratory Mask
Time
- One week
Building an attached carport – laying out the posts
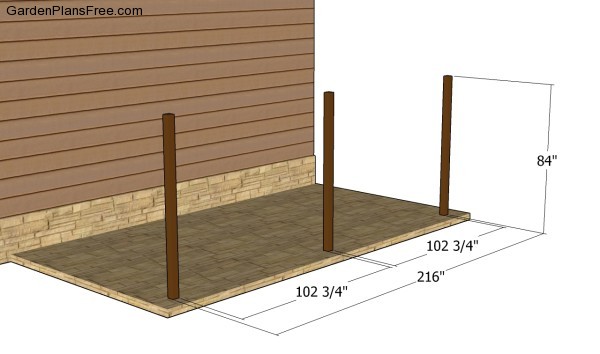
Installing the posts
The first step of the woodworking project is to set the posts into place. Therefore, dig 3′ deep holes in the ground and set the posts into concrete after making sure they are perfectly plumb. Use a tape measurement to place the posts equally spaced.
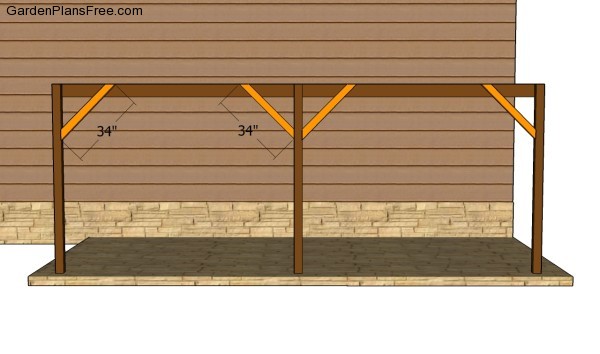
Installing the braces
The next step is to attach the support beams to the top of the posts. As you can easily notice in the image, you have to fit 4×4 braces, in order to enhance the rigidity of the structure. Clamp the beams to the top of the posts, drill pilot holes and insert 7″ carriage bolts to lock everything together tightly.
PRO TIP: Place a spirit level on top of the beams to make sure they are perfectly horizontal. Cut both ends of the braces at 45 degrees with a circular saw if you want to get a professional result. Use 3 1/2″ screws to lock the braces to the posts.
Securing the ledger board
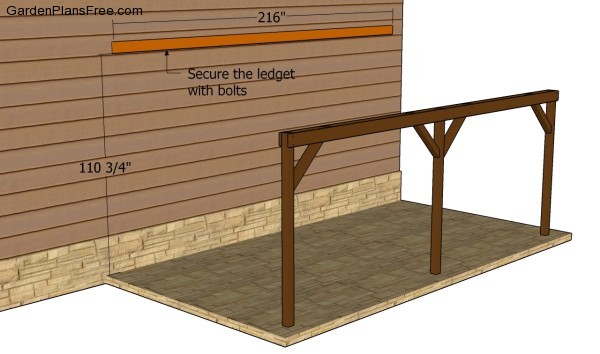
Fitting the ledger
Next, you have to attach the 2×6 ledger to the wall of the construction. In order to lock the ledger tightly into place, we recommend you to drill pilot holes and to insert the 5″ bolts into the wall. Make sure you fit a PVC flashing, in order to protect the ledger from water damage. Make sure the beam is horizontal before driving the bolts into the wall.
Building the lean to roof
Building the rafters
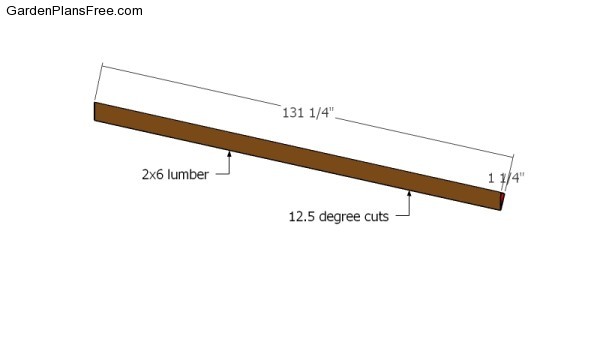
One of the last steps of the project is to build the 2×6 rafters, by following the information shown in the plans. Cut both ends of the rafters at 77.5 degrees and lock them to the support beams and to the ledger as shown in the plans. Lock the rafters into place by using metal hardware and galvanized screws, after aligning them at both ends.

Installing the rafters
As you can see in the image, it is essential to place the rafters equally spaced. In this manner, you will not only get a symmetrical appearance, but the rafters will also support the weight efficiently.
Attaching the roofing boards
Installing the roofing
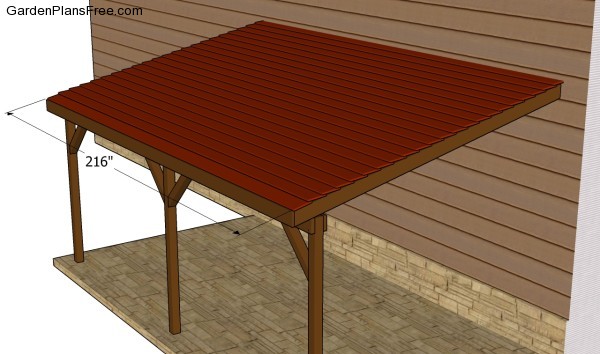
One of the last steps of the project is to attach the roofing components into place. Therefore, you can choose from several options, such as: weather-resistant slats, corrugated metal sheets, asphalt shingles and so on.
PRO TIP: If you want to build an attached carport with a rustic appearance, we recommend you to use 1×8 slats with 1 5/8″ screws. Use finishing nails to lock the slats into place and make sure the boards overlap at least 1″.
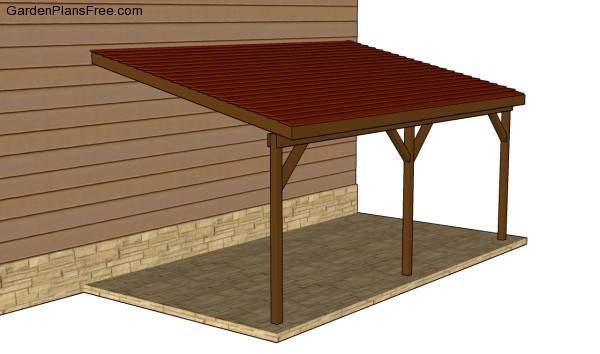
Attached carport plans free
Last but not least, you should take care of the finishing touches. Therefore, we recommend you to check if the components are locked into place properly and if the frame is rigid. Make sure there are no protruding screws or sharp edges.
PRO TIP: Fill the holes with a good wood filler and smooth the surface with 120-grit sandpaper. Apply several coats of paint or stain over the components, in order to protect them from decay.
This diy project was about attached carport plans free. If you have enjoyed the free project, we recommend you to share it with your friends, by using the social media widgets.


36 comments
are there plans available for a single carport with 6 ft storage on the side?
No. I have no plans with side storage.
I cant print this plan?? It just says protected
Yes, the pdf for printing is not free, it says in the blog FAQs: https://gardenplansfree.com/faqs/
Thank you! Just what I was looking for!
Plans for a 26 x 12 lean to car port attatched to existing garage with siding on side and back?
I don’t have plans for that yet.
Are the rafters 2 x 6 x 12′ (before cutting)? Just trying to figure out how wide the carport is to see if it will fit in the space I have.
Yes, the carport is 10′ wide.
Do you have plans for double wide carport for 2 cars
I don’t have plans for that.
Does a car 6 wide fir well?
Yes.
I have vinyl siding on my garage that I will be attaching the lean to carport on to.
Can I apply the 2×6 ledger on to the vinyl or do i need to cut out the vinyl and if so how would I seal it?
Your best bet would be to take it off and add the ledger. You can seal it with metal flashing that goes under the siding and then over the ledger.
do u have plans for a 12 wide but same length
Not yet, but I will add this to the list.
Hi Thomas. Suggestion and question: While you include the fasteners (screws, ties) needed for this project, I can’t find where you mention which fasteners are used for each step. My 4×4 posts are sunk, and I’ve prepared my 45-degree braces, but I’m not sure how to connect them. Do I just screw them to the posts and support beams?
Yes.
Looking for this exact carport for my moms mobile home, except I need it 25×12 , do you have any plans for these dimensions?
What is the distance of the 4×4 posts from the structure?
Thank you for help. Do you have plans for a porch roof attached to fascia? I have 5 4×4 post base support braces, 1st brace is 8´ from second, 2nd brace is 104 1/8” from 3rd brace, 3rd brace is 104 3/8” from fourth brace, 4th brace is 8´1/2”. Concrete ground to top of fascia is 98 1/2”, width of concrete is 36.5 ‘. Distance from post brace is 10’.
Hope this helps and you can help. Thank you
Hi! And first thank you for all this info! Would you have plans for: Attached 16’ wide by 22’ or 24’ long carport? Metal corrugated roof.
Thank you, John
Why does your material list specify 3 2x6x18s, but I see 4 in your drawings?
The roof trims is 1×8
Do you have plans to build this using metal studs?
Unfortunately, I have no plans for a metal frame carport
The first step is to install posts. How far away from structure are they. This measurment is key as all other dimensions are tied into that first step.
like the simplicity of the plans like to have the plans
how do you attach the rafters to the ledger?
Nice design, do you share the plans outside of this post?
Do you have plans for a 16 x 24 attached car port?
Good afternoon. I am planning to build a 12×48 carport with polycarbonate sheet roof. I currently have the slab already there. What size of beams would you use? Spacing between post? What type of anchor would be good to use to secure post? Do you have any plans that could help me ? Thank you
Nice Design. I ill be attaching my ledger to a brick home. Would size or type of anchor bolt would i need to drive this into brick
Garaj
Hola, necesito ayuda kiero aser un tejado de 28×14, necesito planos alguien me puede ayudar