If you want to learn more about 12×12 gable shed plans you have to take a close look over the free plans in the article. Since all my recent shed plans have been received so good, I thought this 12×12 shed with a gable roof will be useful for many of you. This storage shed features double doors on the front and a side door with a window on one side. Remember to read the local codes before starting the project and to comply with the local regulations. The codes differ from one area to another, so it is safer to read them thoroughly.
If you want to get the job done in a professional manner, we recommend you to plan everything with attention, as to prevent costly mistakes and to build a professional garden project. Invest in high quality materials, such as cedar, pine or redwood, as the bench will be exposed to all kinds of weather. Apply a few coats of paint over the components, to enhance their appearance and to protect them from bad weather.
12×12 Gable shed – Video
12×12 Shed Plans – Gable Shed – Free PDF Download
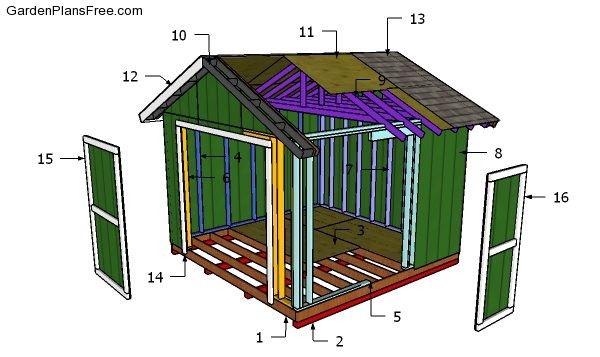
Building a 12×12 shed
Materials
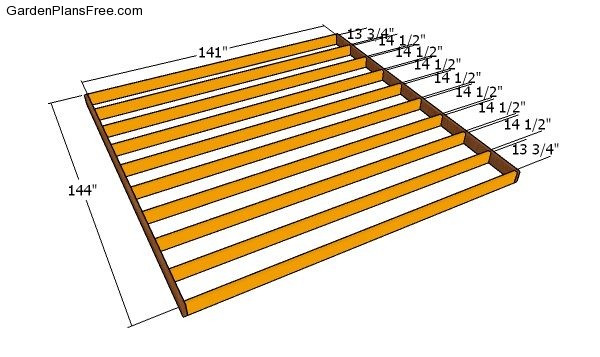
- 1 – 2 pieces of 2×6 lumber – 144″ long, 10 pieces – 141″ long FLOOR FRAME
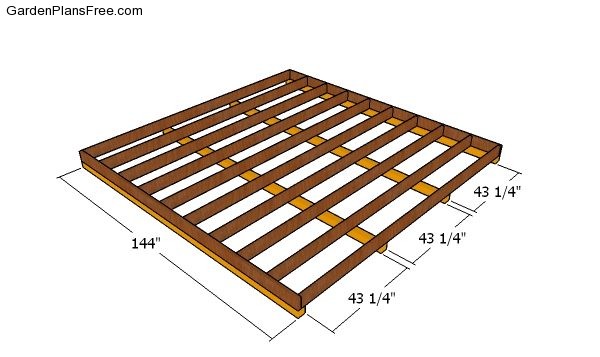
- 2 – 4 pieces of 4×4 lumber – 144″ long SKIDS
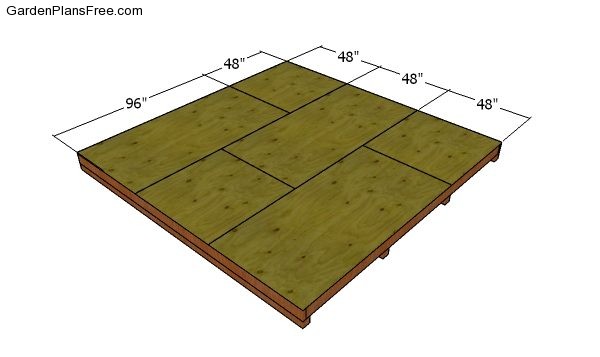
- 3 – 3 pieces of 3/4″ plywood – 48″x96″ long, 3 pieces – 48″x48″ long FLOOR
- 4 – 2 pieces of 2×4 lumber – 144″ long, 1 piece – 137″ long, 9 pieces – 90″ long SIDE WALL
- 5 – 2 pieces of 2×4 lumber – 56″ long, 1 piece – 144″ long, 1 piece – 137″ long, 11 pieces – 90″ long, 2 pieces – 78 1/2″ long, 3 pieces – 6″ long, 3 pieces – 35 1/2″ long, 2 pieces – 30″ long, 3 pieces – 17 1/2″ long, 4 pieces – 27″ long, 2 pieces of 2×6 lumber – 35″ long SIDE WALL
- 6 – 2 pieces of 2×4 lumber – 20 1/2″ long, 1 piece – 144″ long, 1 piece – 137″ long, 2 pieces – 84 1/2″ long, 2 pieces of 2×6 lumber – 99″ long FRONT WALL
- 7 – 2 pieces of 2×4 lumber – 137″ long, 1 piece – 144″ long, 10 pieces – 90″ long BACK WALL
- 8 – 6 pieces of T1-11 siding – 48″x96″ long, 4 pieces – 48″x94 1/2″ long, 4 pieces – 28″x48″ long, 2 pieces – 39 1/4″x48″ long SIDING
- 9 – 2 pieces of 2×4 lumber – 96″ long, 1 piece – 144″ long, 1 piece – 30 1/2″ long 10xTRUSS
- 9 – 14 pieces of 2×4 lumber – 22 1/2″ long, 4 pieces – 21 3/4″ long BLOCKINGS
- 10 – 4 pieces of 2×4 lumber – 96″ long, 5 pieces – 6 1/4″ long 2xOVERHANGS
- 11 – 4 pieces of 3/4″ plywood – 10″x96″ long, 4 pieces – 48″x96″ long, 4 pieces – 48″x48″ long ROOF
- 12 – 4 pieces of 1×6 lumber – 96 1/4″ long, 2 pieces – 165 1/2″ long TRIMS
- 13 – 250 sq of tar paper, 250 sq ft of asphalt shingles ROOFING
- 14 – 2 pieces of 2×4 lumber – 87 1/2″ long, 2 pieces – 81 1/2″ long, 1 piece – 103, 1 piece – 39″ long JAMBS
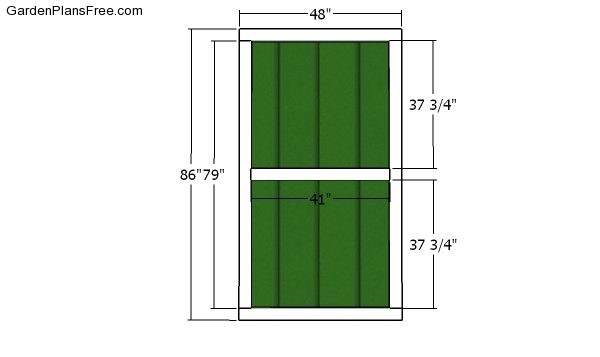
- 15 – 2 pieces of T1-11 siding – 48″x86″ long, 2 pieces of 2×4 lumber – 48″ long, 2 pieces – 79″ long, 1 piece – 41″ long 2xDOOR
- 16 – 1 piece of T1-11 siding – 32″x80″ long, 2 pieces of 2×4 lumber – 32″ long, 2 pieces – 73″ long, 1 piece – 25″ long DOOR
- 4 pieces of 4×4 lumber – 12′
- 12 pieces of 2×6 lumber – 12′
- 12 pieces of 3/4″ plywood – 4’x8′
- 10 pieces of 2×4 lumber – 12′
- 2 pieces of 2×6 lumber – 10′
- 92 pieces of 2×4 lumber – 8′
- 17 pieces of T1-11 siding – 4’x8′
- 10 pieces of 2×4 lumber – 12′
- 1 piece of 2×4 lumber – 10′
- 4 pieces of 1×6 lumber – 10′
- 2 pieces of 1×6 lumber – 16′
- 1 piece of 1/2″ plywood – 4’x8′
- 250 sq ft of tar paper, 250 sq ft of asphalt shingles
- 1 5/8″ screws
- 2 1/2″ screws
- 3 1/2″ screws
- wood glue, stain/paint
- rafter ties
- door hardware kit
- broom holder
Tools
- Hammer, Tape measure, Carpentry square
- Miter saw, Drill machinery, Screwdriver, Sander, Router
- Safety Gloves, Safety Glasses, Respiratory Mask
Time
- One weekend
STEP 1: Building the shed floor
Floor frame
The first step of the project is to build the floor frame for the 12×12 garden shed. As you can see in the diagram, you need to cut the joists from 2×6 lumber. Lay the components on a level surface and align the edges flush. Drill pilot holes and insert 3 1/2″ screws to assemble the frame. Make sure the corners are square. Place the joists every 16″ on center.
Fitting the skids
Select the location for large storage shed and remove the vegetation layer. Spread a 2-3″ layer of gravel under the shed floor, so you can protect the floor from moisture. Next, lay the 4×4 skids under the floor frame and lock them together with rafter ties. The skids will lift the floor frame from the ground to protect the components from moisture. Use pressure treated lumber for the floor frame, as the boards will be exposed to moisture.
Floor sheets
Fit the 3/4″ tongue and groove plywood sheets to the floor frame and align the edges flush. Leave no gaps between the sheets and secure them into place, every 8″ along the joists, using 1 5/8 screws. Invest in pressure treated plywood and you will thank me in 10 years.
STEP 2: Building the shed frame
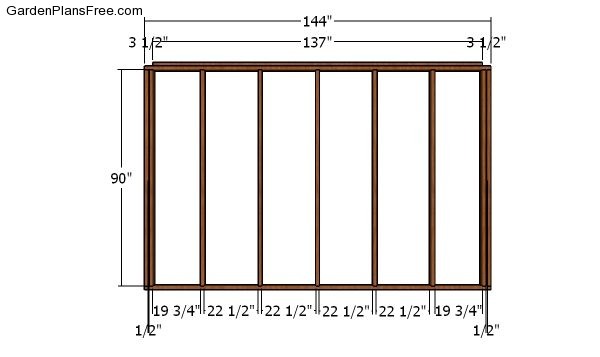
Side wall frame – 12×12 Shed Plans
The next step of the project is to build the side wall frames. Cut the components at the right dimensions and drill pilot holes through the plates. Insert 3 1/2″ screws to lock the plates to the studs. Make sure the corners are square. Place the studs every 24″ on center. You can place them every 16″ on center, as well.
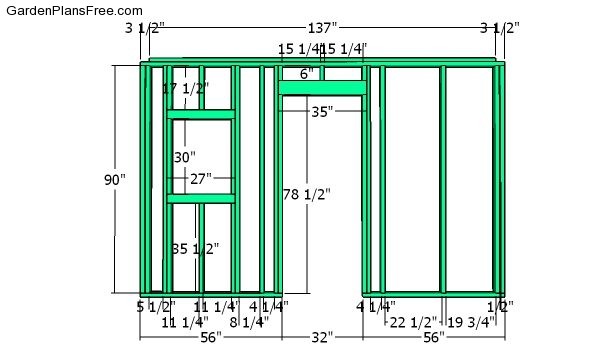
Side door with window frame
Add a window opening and a door opening to the opposite side wall frame. As you can see in the diagram, you need to use double 2×4 headers and jack studs. Adjust the size of the opening to suit your needs.
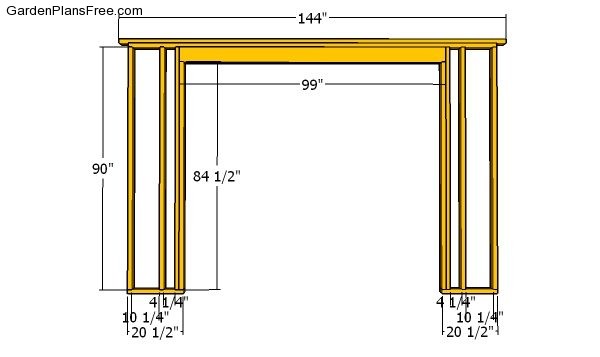
Front wall frame
Use 2×4 lumber for the front wall frame. Use 2×6 lumber for the double header. You can adjust the size of the door opening to suit your needs. Notice the double studs placed at both ends of the walls and the jack studs that support the double header.
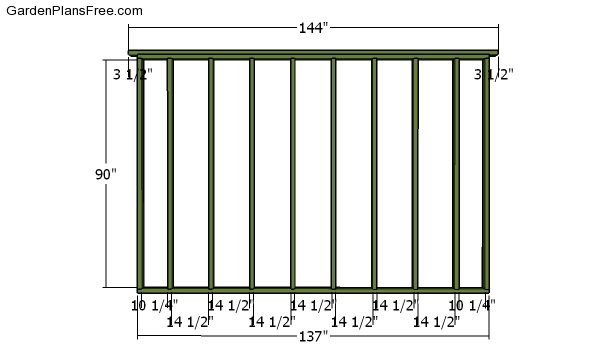
Back wall frame
Build the back wall for the lean to shed, using the same techniques described above.
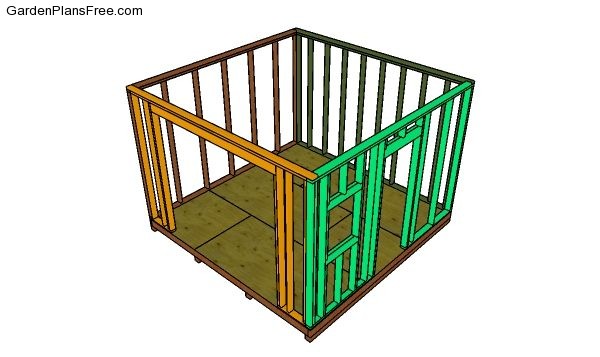
Assembling the shed frame
Fit the wall frames to the floor of the 12×12 garden shed and plumb them with a spirit level. Drill pilot holes through the bottom plates and insert 3 1/2″ screws into the floor. Lock the adjacent walls together with 3 1/2″ screws. Make sure the corners are square.
STEP 2: Attaching the siding sheets
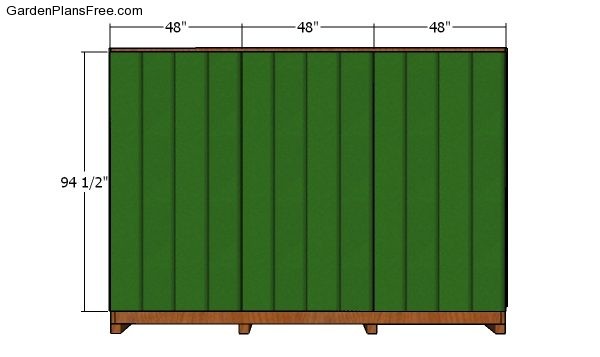
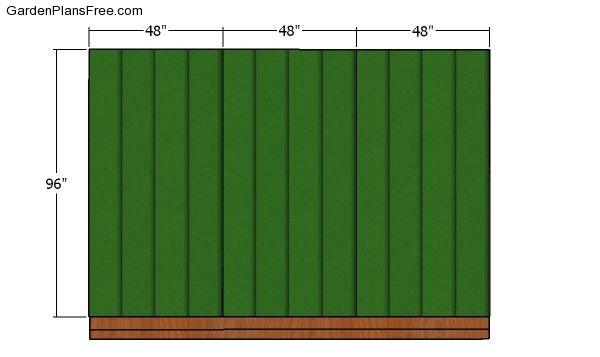
Back wall siding panels
Attach the T1-11 siding sheets to the back wall of the shed. Offset the sheets 1 1/2″ from the top edge. Leave no gaps between the them. Use 6d nails to secure the sheets to the framing, every 8″.
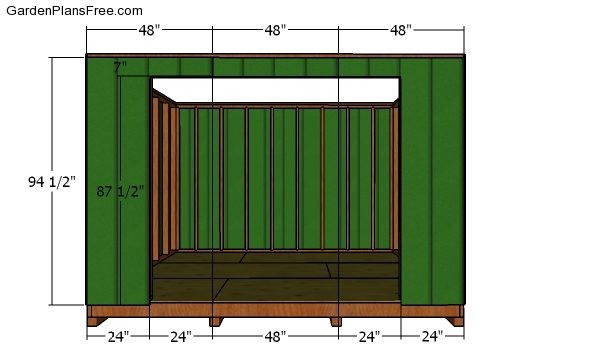
Front wall panels
Cut out the pieces that go over the double door opening. Use a saw to make the cuts accurately. Align the edges as shown in the diagram and use 6d nails to lock the panels into place tightly.
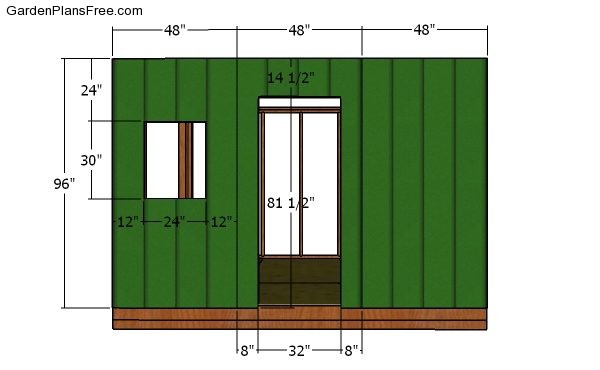
Side wall with window siding panels
Attach the T1-11 siding sheets to the side wall. Use a saw to cut out the window and door openings. Leave no gaps between the sheets and use 6d nails, every 8″ along the framing.
Side wall siding panels
Attach the T1-11 siding sheets to the opposite side wall.
STEP 3: Building the gable shed roof
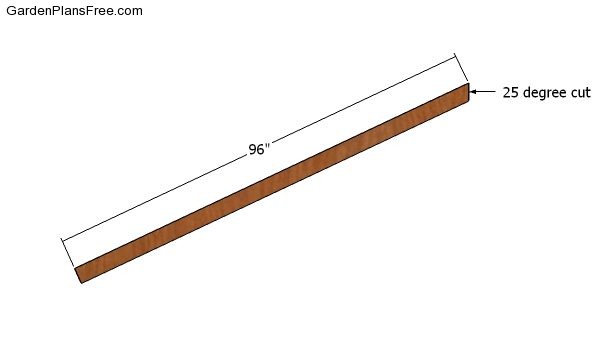
Building the rafters
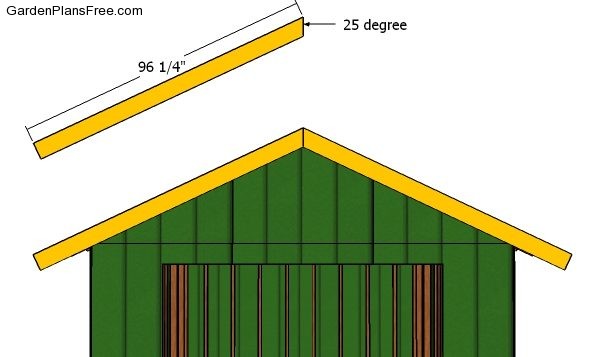
Next, you need to build the rafters from 2×4 lumber. Mark the cut lines on the beams and then get the job done with circular saw. Make the 25 degree angle cut to one end of the rafter.
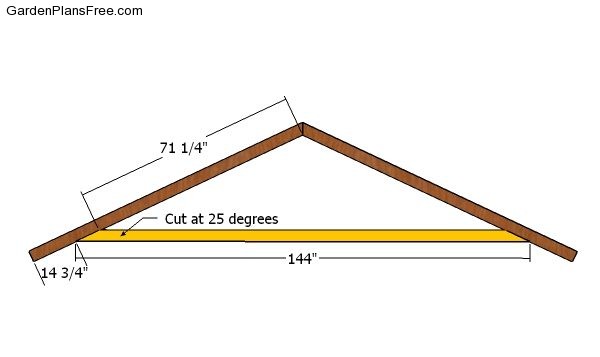
Bottom rafter
Use 2×4 lumber for the bottom rafters. Lay all the rafters on a level surface and leave no gaps between the components.
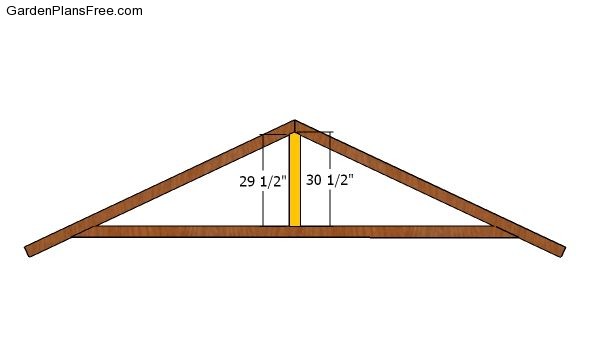
Truss king stud
Cut the kind stud and fit it to the truss, as shown in the free plans.
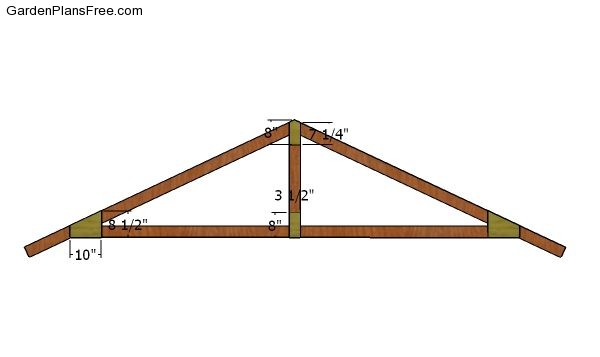
Gussets
Use 1/2″ plywood for the gussets and lock them to the rafters with 1 5/8″ screws.

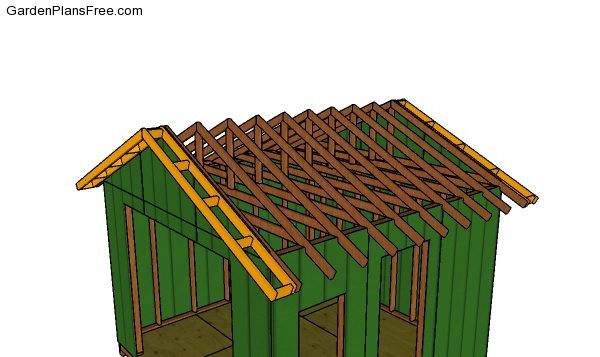
Fitting the trusses
Fit the trusses to the top of the shed, every 16″ on center. Fit 2×4 blockings between the trusses, as shown in the image. Drill pocket holes at both ends of the blockings and secure them into place with 2 1/2″ screws.
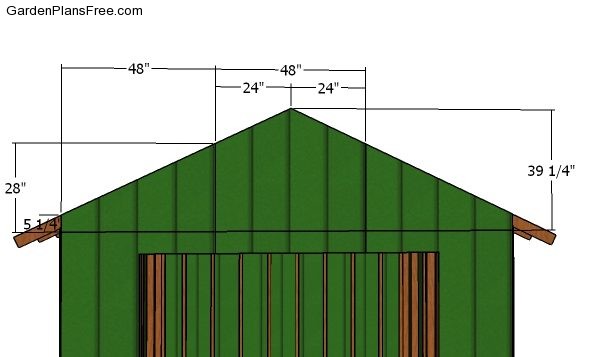
Gable end panels
Cut to size and attach the siding panels to the gable ends, as shown in the plans. Use 6d nails.
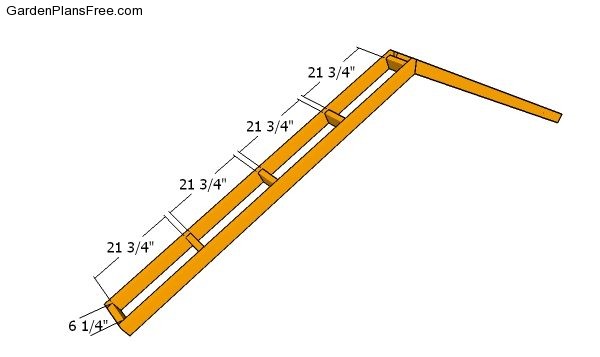
Overhangs – 12×12 Shed Plans
Assemble the front and back overhangs using the information from the diagram. Drill pilot holes through the rafters and insert 3 1/2″ screws into the blockings.
Fitting the overhangs
Fit the overhangs to the front and back of the shed. Align the edges with attention and insert 3 1/2″ screws to lock the overhangs to the frame of the shed.

Roof sheets
Attach the 3/4″ plywood sheets to the roof of the shed. Start laying the sheets from the bottom up. Leave no gaps between the sheets and insert 1 5/8″ screws, every 8″ along the rafters.
Front and back roof trims
Use 1×6 lumber for the front and back roof trims. Use a miter saw to make the angle cuts at both ends of the trims and then secure them into place with 2 1/2″ screws.
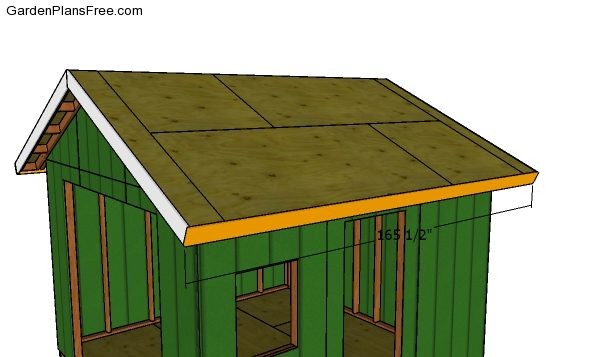
Fitting the side roof trims
Fit the 1×6 trims to the sides of the shed. Align the edges with attention and insert 2 1/2″ screws to lock them into place.
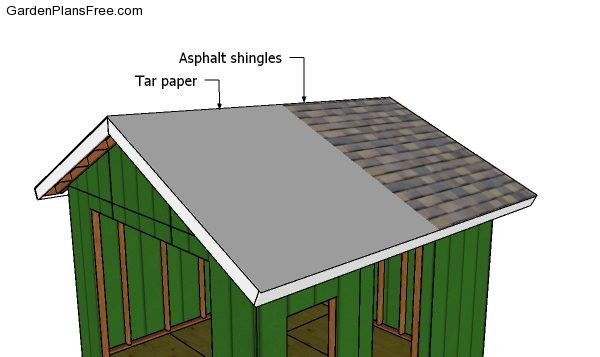
Fitting the roofing
In order to waterproof the shed, you have to cover the roofing sheets with felt. Make sure the strips of roofing felt overlap at least 2-3″ and staple them to the plywood sheets every 8″. Continue the project by installing the asphalt shingles. Place the starting course at the bottom of the roof, before fitting the rest of the shingles.
PRO TIP: Always read the manufacturer’s instructions, before installing the shingles. They provide essential information about the installation of the shingles.
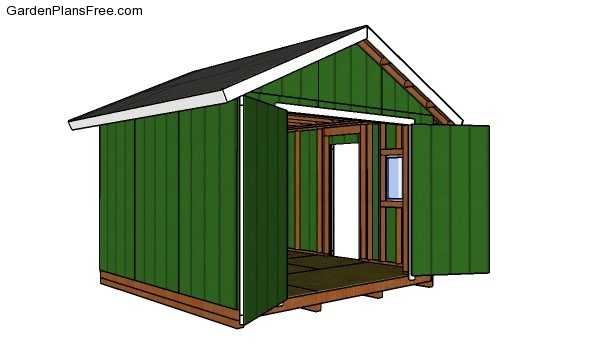
STEP 4: Building the shed doors

Side door jambs
Fit the 2×4 jambs around the side opening. Align the edges with attention and insert 3 1/2″ screws to secure them into place tightly.
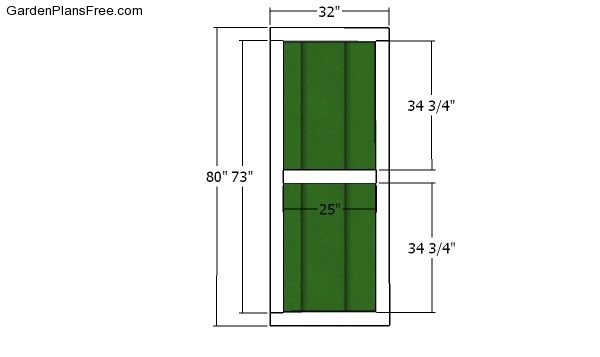
Side door
Next, you need to build the door for the lean to storage shed. Use 2×4 lumber for the frame and T1-11 siding sheets for the panels (the piece that you cut out when attaching the front wall panels). After you cut the panels you need to lay them on a level surface. Lay the trims over the panels and then insert a few 1 5/8″ screws to lock them into place. Turn the door upside down and insert more 1 5/8″ screws through the panels into the trims.
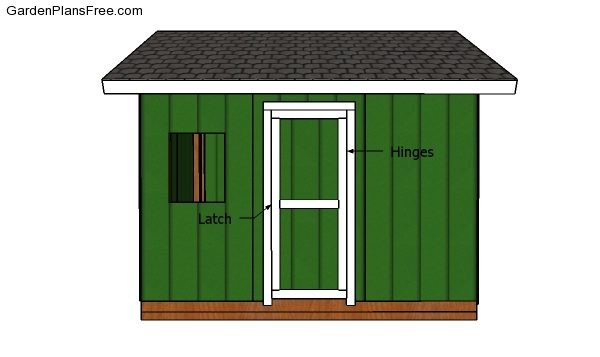
Fitting the side door
Fit the door to the opening and then lock them to the jambs with hinges. Install a latch to keep the door closed and your possessions safe.
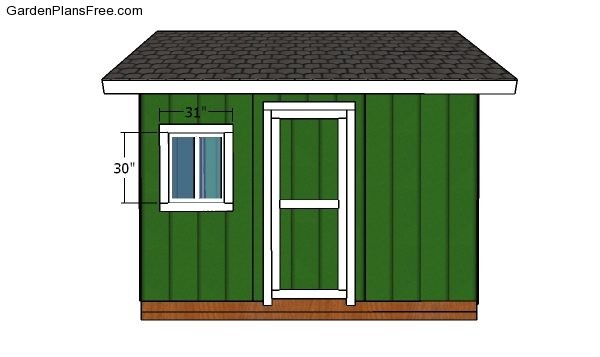
Window trims
Last but not least, you need to take care of the finishing touches. Apply a few coats of paint over the exterior of the shed. A little paint will get you far in terms of appearance, and it is a relatively small investment. Install the window to the opening and then attach the 1×4 trims around it.

Double doors jambs
Fit the 2×4 door jambs around the front opening.
Double doors
Build the double doors using the same techniques described above.
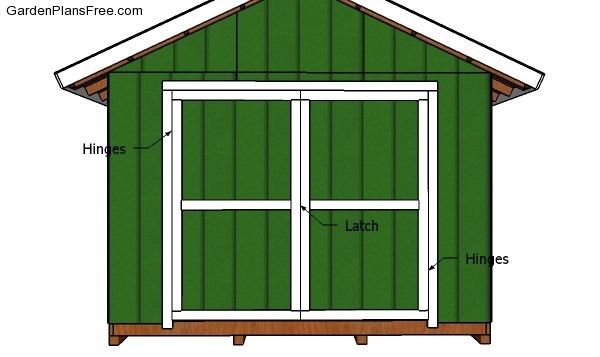
Fitting the double doors – 12×12 Shed Plans
Fit the doors to the front of the shed and lock them to the jambs with hinges.
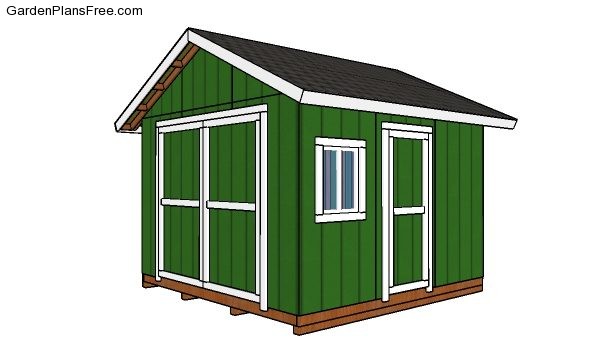
12×12 Shed Plans
You can add decorative trims to the shed to make it pop. In addition, add a vent to make sure the air circulates properly inside the shed.
12×12 Gable Shed Plans
You can see all my storage plans HERE. See 10×12 lean to shed plans and 12×16 storage shed plans.

This diy project was about 12×12 garden shed plans. If you have enjoyed the free project, I recommend you to share it with your friends, by using the social media widgets. You can always save the plans as PDF or Print them using the floating widget on the left side of the screen (working only on PC or laptop).