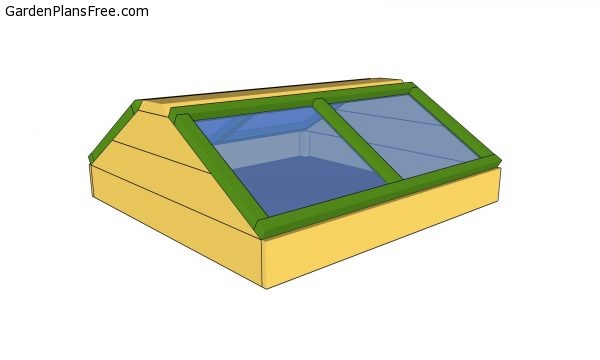
Building a wooden cold frame is not difficult, if the right woodworking plans and materials are used. Moreover, even a basic cold frame made of old windows is helpful, as it can protect the plants form bad weather and keep them in a good condition. This is a double cold frame, because it features a gable top with windows on both sides. Nevertheless, it should all start with choosing proper cold frame plans, especially if you don’t have a large expertise in the field and if you want to prevent costly mistakes.
These plans are designed as to make use of your backyard space efficiently. As you will see in the project, you should assemble the components tightly and attach the lids to the frame with hinges, if you want to get the job done as a professional. Always pre-drill the lumber before inserting the galvanized screws and fill the holes with wood putty, before sanding teh surface with medium-grit sandpaper.
RELATED PLANS:
Building a cold frame

Building a cold frame plans
Materials
- 1 – 4 pieces of 1×6 lumber – 45” long, 2 pieces – 26 1/2″ long SIDE WALLS
- 2 – 2 pieces of 1×6 lumber – 48” long FRONT AND BACK WALLS
- 3 – 6 pieces of 2×4 lumber – 5 1/2″ long, 4 pieces of 1×4 lumber – 13″ long POSTS
- 4 – 1 piece of 2×8 – 48″ long TOP SUPPORTS
- 5 – 6 pieces of 2×2 – 18 1/2” long, 4 pieces of 2×2 – 48″ long LIDS
- 4 pieces of 1×6 lumber – 8 ft
- 1 piece of 2×4 lumber – 3 ft
- 1 piece of 1×4 lumber – 6 ft
- 1 piece of 2×2 lumber – 10 ft
- 3 pieces of 2×2 lumber – 8 ft
- 1 piece of 2×8 lumber – 4 ft
- 50 pieces of 2 1/2″ screws
- 20 pieces of 1 5/8″ screws
- 50 pieces of 1 1/4″ screws
- wood glue, stain/paint
- 2 pieces of polycarbonate sheets – 2’x4′
- 4 hinges
Tools
- Hammer, Tape measure, Carpentry square
- Miter saw, Drill machinery, Screwdriver, Sander, Router
- Safety Gloves, Safety Glasses, Respiratory Mask
Time
- One day
Cold Frame Plans

Fitting the posts
The first step of the project is to build the frame of the mini-greenhouse. As you can see in the image, you need to use 1×6 boards and 2×4 corner posts. Cut the components at the right size using a circular saw and lock them together tightly with galvanized screws. Always align the components at both ends before driving the 2 1/2″ screws into the posts.

Side wall plans
The side walls should be cut as in the image, if you want to create a proper environment for the plants. Cut the ends of the slats at about 30º (set the miter saw at 60 degrees), using a circular saw with a sharp blade. If you want to get the job done as a professional, we recommend you to use tongue and groove boards.
PRO TIP: In addition, pre-drill the components before inserting the screws, to prevent the wood from splitting. Align the components at both ends, if you want to get a professional result.
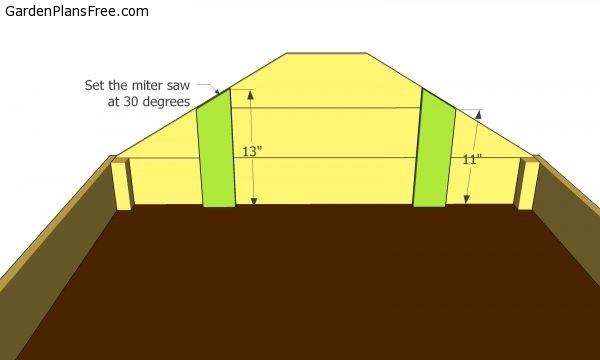
End supports
Use 1×4 lumber for the end panel supports. Make a 30 degree cut to the top and then attach them to the end panels. Drill pilot holes and insert 1 1/4″ screws to lock them into place tightly.

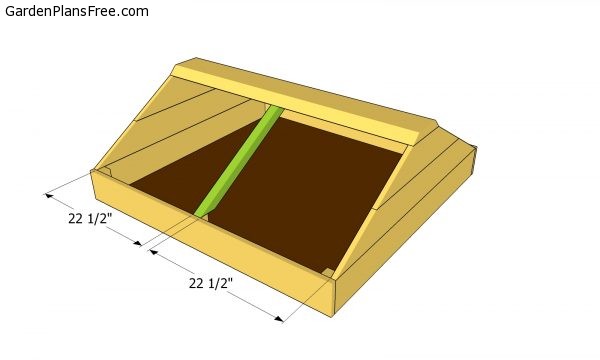
Installing the support
In order to reinforce the structure properly and to create a support for the lids of the cold frame, you should place a 2×8 piece of lumber, as in the image. In addition, you should cut both sides of the support at 45º, using a table saw (bevel cuts). Place the support on top of the cold frame and lock it into place with 2 1/2″ galvanized screws.
Fitting the supports
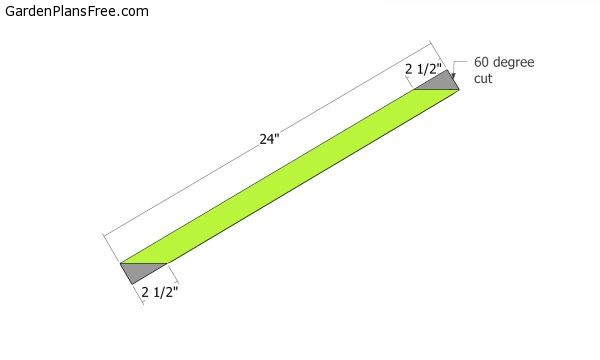
Supports
Continue the woodworking project by reinforcing the structure of the cold frame with several 2×2 braces. Cut both ends of the braces at 30º (set the miter at 60 degrees), if you want to get the job done in a professional manner. Lock the braces into place with 2 1/2″ galvanized screws.
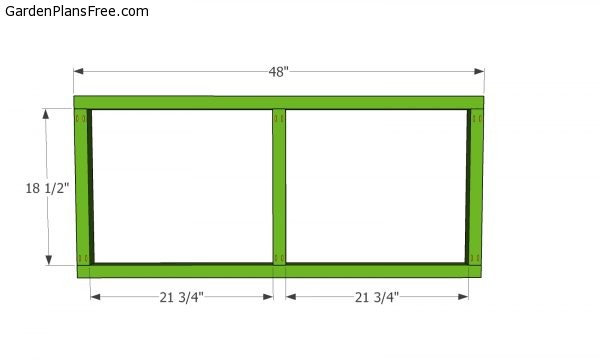
Window frame
Use 2×2 lumber to build the frame of the lids. Drill pocket holes at both ends of the 18 1/2″ supports and insert 2 1/2″ screws into the top and bottom components. Afterwards, attach the polycarbonate panels to the window frames with screws.

Installing the lids
PRO TIP: Lock the lids to the top with metal hinges, as in the image. Align all the components at both ends thoroughly, making sure there are no gaps between them.

Cold frame plans
Last but not least, you should take care of the finishing touches. Therefore, we recommend you to check if the components are locked into place properly and if the lids open properly. Make sure there are no protruding screws or sharp edges. Moreover, the components should be installed properly, making sure the are no gaps between the slats.
How to build a cold frame
PRO TIP: Fill the holes with a good wood filler and smooth the surface with medium-grit sandpaper. Apply several coats of paint or stain over the components, in order to protect them from decay. This is a simple cold frame that is easily customizable and offers plenty of light for your plants to grow healthy.

This diy project was about cold frame plans. If you have enjoyed the free project, we recommend you to share it with your friends, by using the social media widgets.