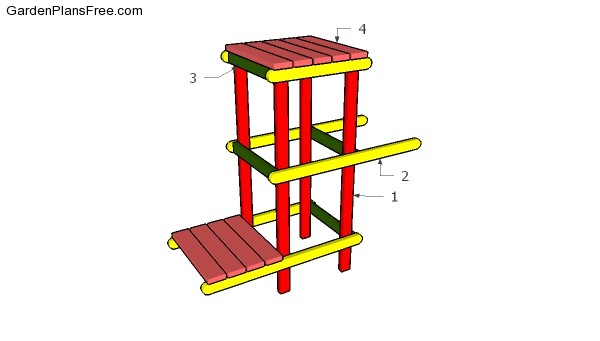
If you want to learn more about how to build a plant stand you have to take a close look over the free plans in the article. This 3 tier plant stand is easy to build and it features a beautiful design. If you want a versatile plant stand that can be used both indoor and outdoor. You only need 1x2s and 1x3s to build this plant stand, so the cost of the materials will be low. More furniture plans HERE.
If you want to get the job done in a professional manner, we recommend you to plan everything with attention, as to prevent costly mistakes and to build a professional garden bench. Invest in high quality materials, such as cedar, pine or redwood, as the structure will be exposed to all kinds of weather. Apply a few coats of paint over the components, to enhance their appearance and to protect them from bad weather.
Plant Stand – Free DIY Plans
Building a plant stand
Materials
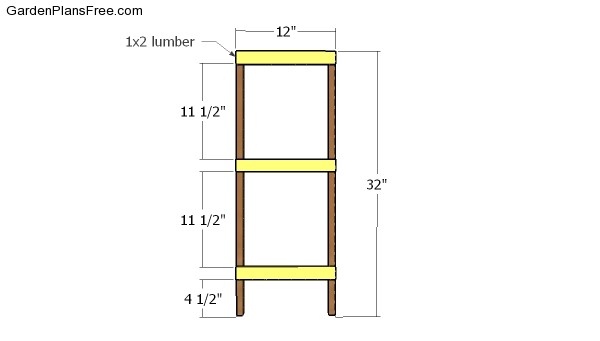
- 1 – 4 pieces of 1×2 lumber – 32″ long LEGS
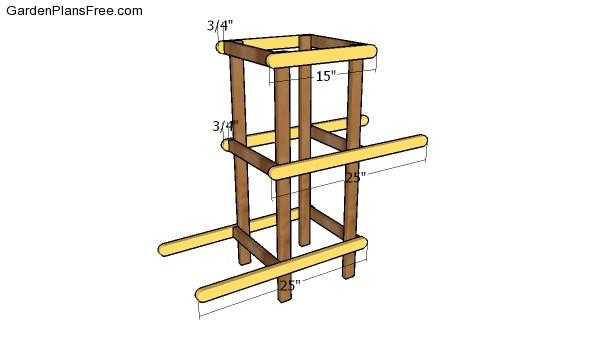
- 2 – 2 pieces of 1×2 lumber – 15″ long, 4 pieces – 25″ long SUPPORTS
- 3 – 6 pieces of 1×2 lumber – 12″ long SUPPORTS
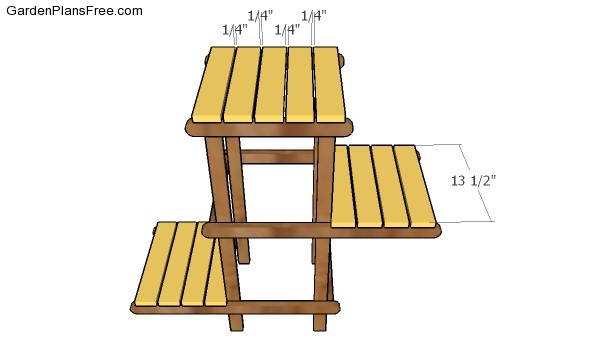
- 4 – 13 pieces of 1×3 lumber – 13 1/2″ long SHELVES
- 4 pieces of 1×2 lumber – 8′
- 2 pieces of 1×3 lumber – 8′
- 75 pieces of 1 5/8″ screws
- wood glue, stain/paint
Tools
- Hammer, Tape measure, Carpentry square
- Miter saw, Drill machinery, Screwdriver, Sander, Router
- Safety Gloves, Safety Glasses, Respiratory Mask
Time
- One day
STEP 1:
Building the sides
The first step of the project is to build the frame for the plant stand. Lay the 1×2 components on a level surface. Align the edges, make sure the corners are square, drill pilot holes and insert 1 5/8″ screws to lock everything with attention.
STEP 2:
Fitting the side supports
Next, attach the shelves supports to the sides of the plant stand, as shown in the diagram. Use a spirit level to plumb the legs and to check if the supports are perfectly horizontal.
STEP 3:
Fitting the shelf slats
Attach the 1×3 boards to the supports. Place 1/4″ plywood pieces between the slats to create even gaps. Drill pilot holes after aligning the boards at both ends, and insert 1 5/8″ screws to lock them into place tightly.
STEP 4:

Plant Stand Plans
Check out my leopold plant stand plans HERE.
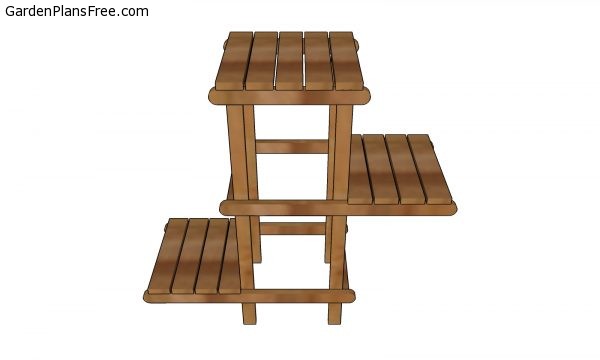
3 tier plant stand – diy plans
I recommend you to check if the components are locked into place properly and structure is rigid enough. Make sure there are no protruding screws or sharp edges. Fill the holes with wood putty and then smooth the surface with sandpaper. Install the chain, the eye hooks and the hangers.
PRO TIP: Apply several coats of paint or stain over the components, in order to protect them from decay. Check out the rest of the project to learn more about building garden projects.
